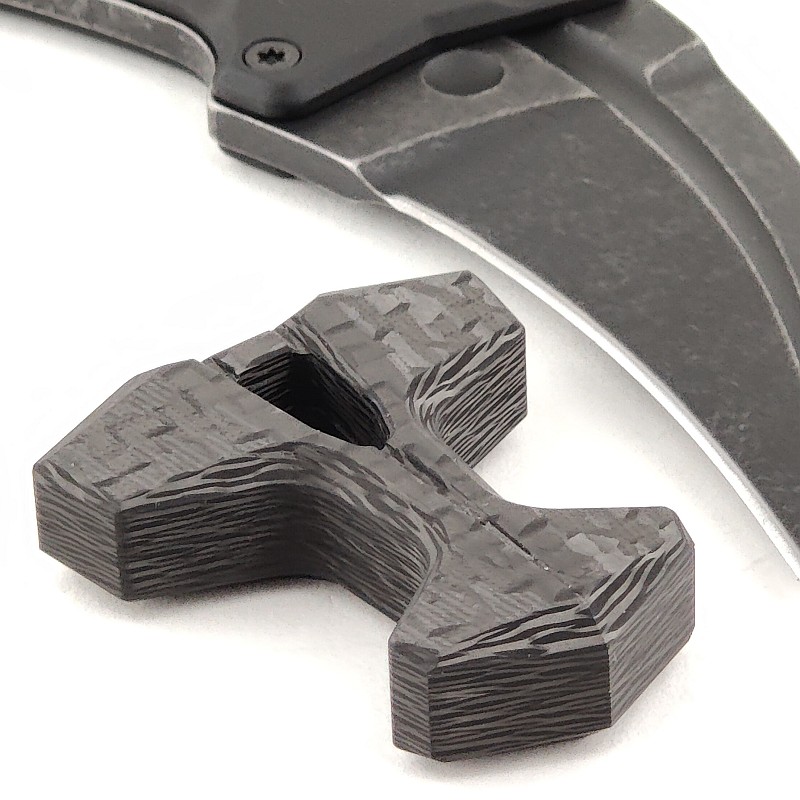
When it comes to EDC pocket jewellery, nothing beats a hand-made custom piece, and I’ve had my eye on the Mjolnir from Ostap Hel Knives for some time. Yes, Mjolnir is Thor’s hammer, and being capable of a knockout blow is very appropriate association, but of course the shape of Ostap’s Mjolnir is also like the old Norse symbols.
Join me in this review of the Mjolnir III from Ostap Hel Knives, the featured version is in carbon fibre.
Video Overview
This video is a detailed look at the Mjolnir III, and hopefully you can get a good feel for the quality of finish.
What it is like to use?
Without saying exactly how you might use the Mjolnir III (due to some more negative connotations), it is both EDC pocket jewellery and a self-defence aid.
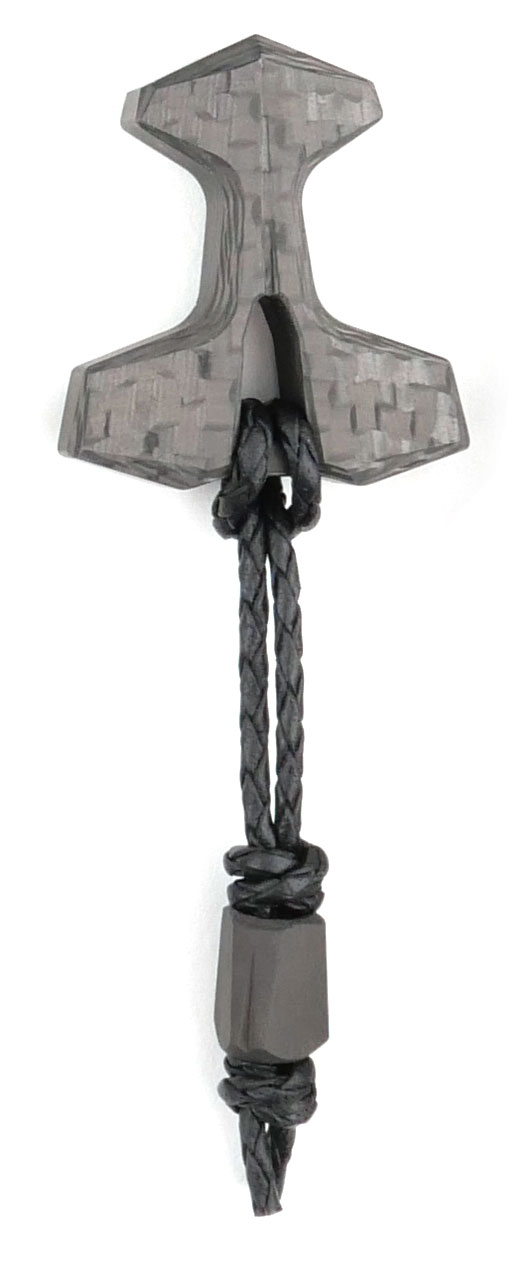
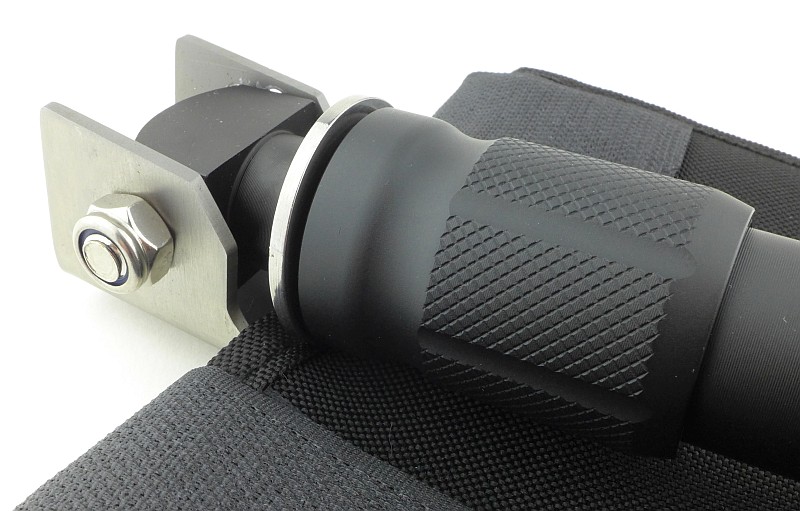
The intended configuration for carrying the Mjolnir III is on its own with a lanyard, added for ease of getting it into your hand when needed. Shown here, it has the matching lanyard from Ostap Hel Knives which has a CF bead on the cord. With the CF version being so light, it has minimal pocket presence so can also feel a little difficult to home in on. So…
…picking up on the fact it has felt a little ‘detached’ from easily finding the CF Mjolnir III in my pocket, I wanted to try something a bit different and out there, and fit it as a lanyard stopper on another EDC item. In this case a slip-joint knife which already had a longish lanyard on it.
In this way, the knife provides the weight for easily finding it, and the Mjolnir III makes a fantastic ‘puller’ for getting the knife to hand, but also for then ease of getting the Mjolnir III into your hand.
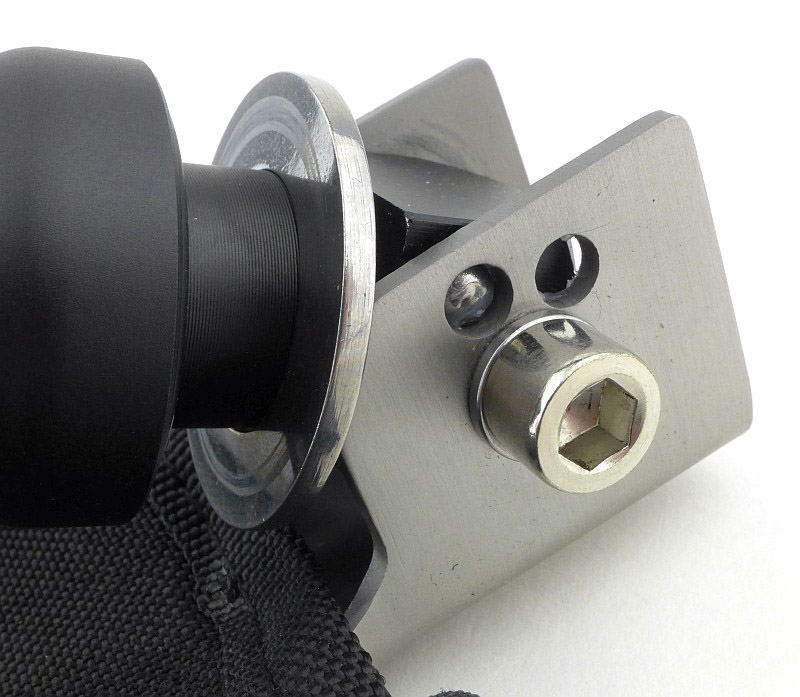
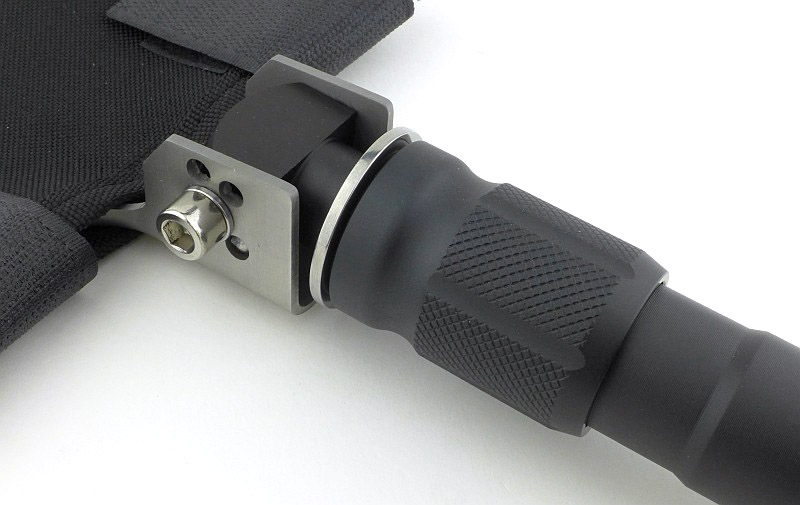
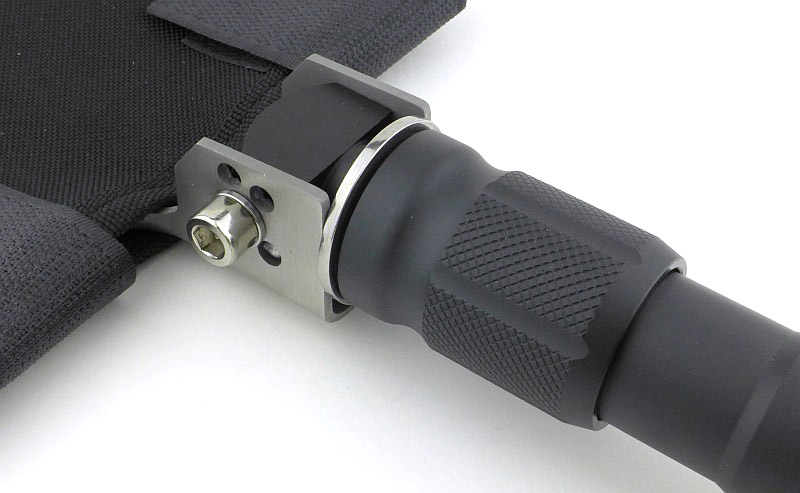
Reversing the sense that the Mjolnir III is the lanyard stopper round to the knife being the lanyard stopper, and you can either allow the knife to hang out to the side, or take it into you palm while gripping the Mjolnir III between your fingers.
You can experiment with the lanyard length to see how it might work for you if you try this approach. Here the loose ends of the paracord are not yet woven into the lanyard to more easily allow adjustments before making the final configuration.
It has worked for me, it might work for you; try it before completely dismissing the idea.
Regardless of how you choose to carry it, the Mjolnir III is a pleasure to handle and carry. Despite there being no moving parts, it can be a worry-stone or fidget toy, as well as having an actual serious purpose – definitely worth the investment in a quality piece.
Review Summary
The views expressed in this summary table are from the point of view of the reviewer’s personal use. I am not a member of the armed forces and cannot comment on its use beyond that covered in the review.
Something that might be a ‘pro’ for one user can be a ‘con’ for another, so the comments are categorised based on my requirements. You should consider all points and if they could be beneficial to you.
I’m trying something slightly different and starting with what doesn’t work so well, so I can finish on a more positive note.
_______________________________________________
What doesn’t work so well for me
_______________________________________________
What is not to like?
_______________________________________________
Things I like
_______________________________________________
Beautifully crafted.
Choice of materials.
Easy to carry.
Might make all the difference in a tight situation.
Low profile.
Thor’s hammer in your pocket.
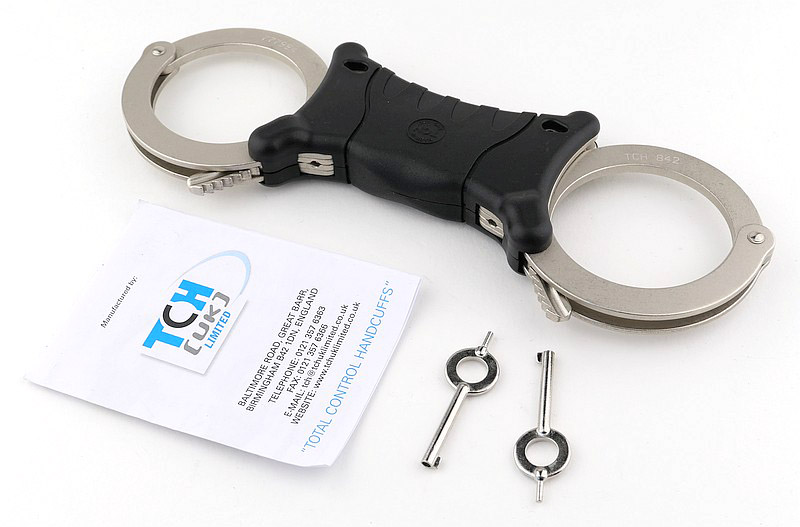
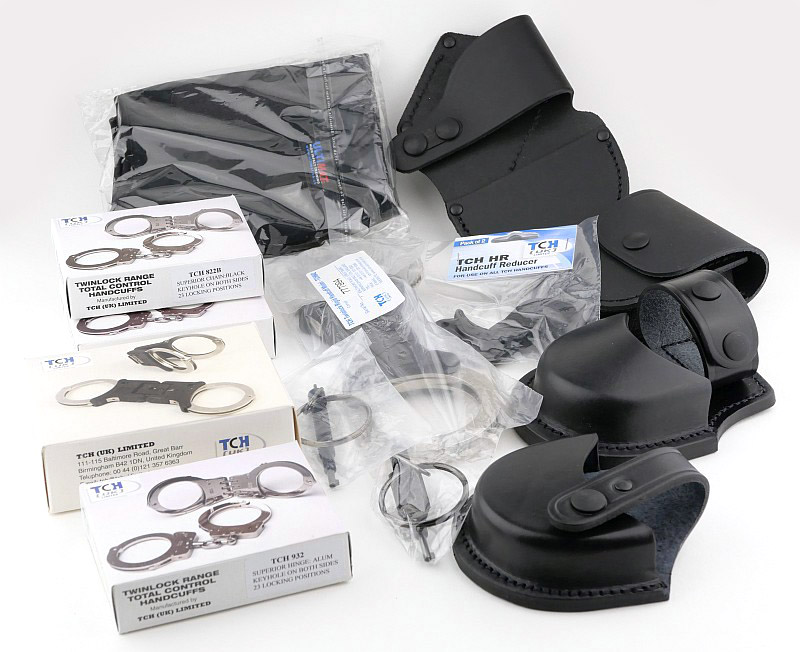
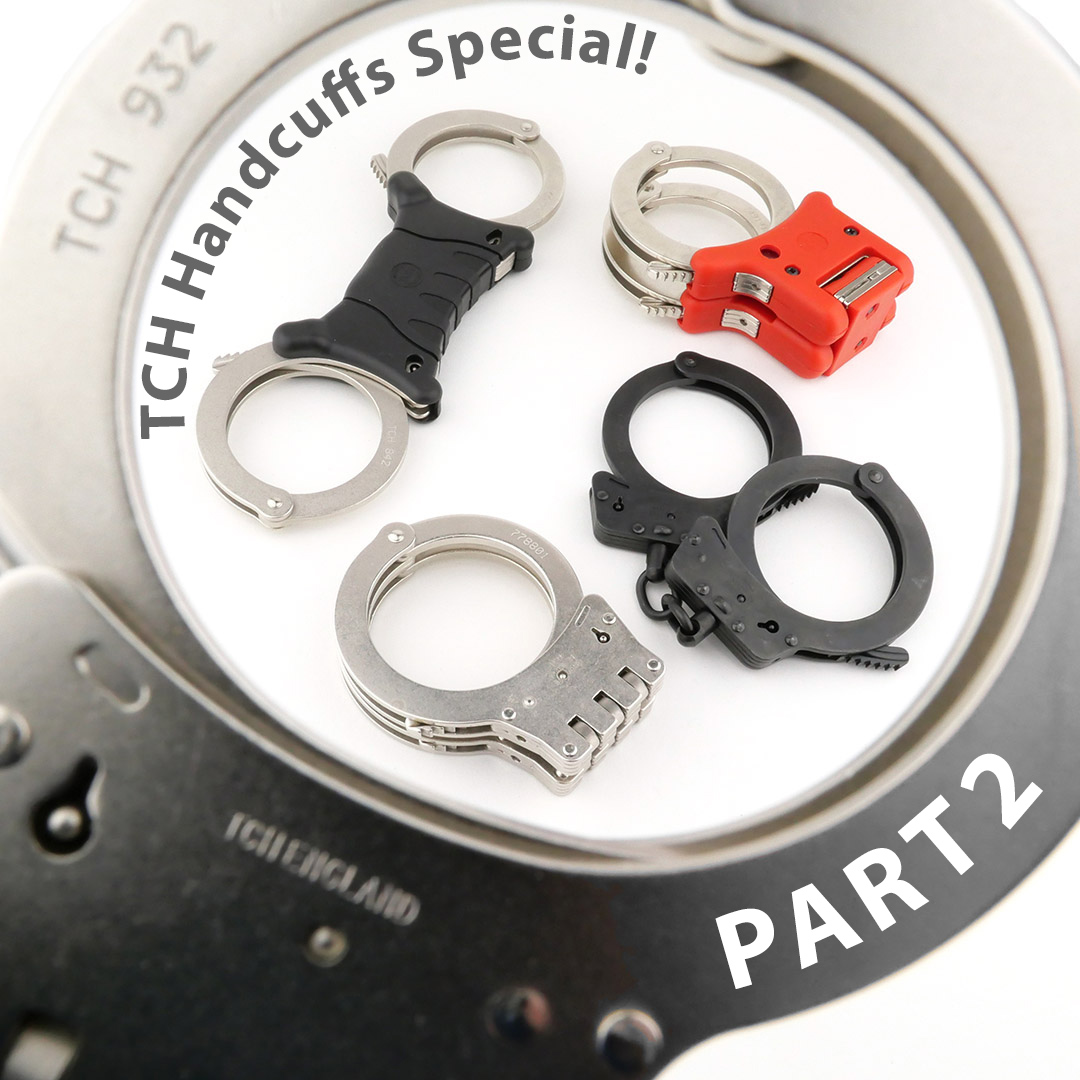
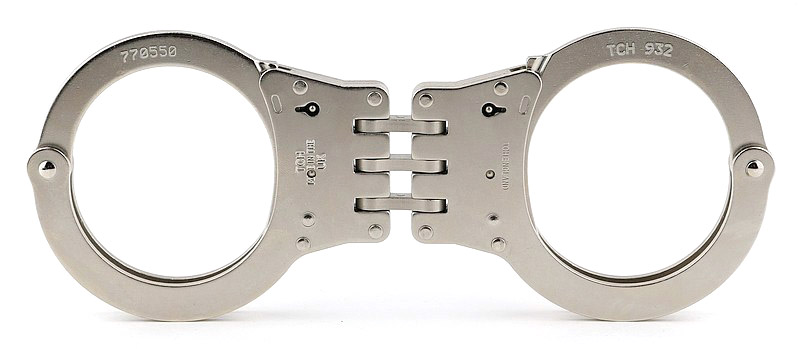
This is Part 3 of a TCH (Total Control Handcuffs) Handcuffs Special three part review series featuring the TCH Twinlock cuffs. In Part 3 we will be looking at the 842 Rigid Twinlock cuffs with RCP5 Handcuff Pouch, NCG Neoprene Cuff Guard, plus an overview of handcuffing techniques. As a bonus, Part 3 also includes Tactical Reviews’ interpretation of the TOOOL universal handcuff key and ‘alternative’ prepping uses for handcuffs. TCH Handcuffs Twinlock Special – Part 1 covered the 932 and 822 Twinlock cuffs, SK5 and SK6 keys, plus the 9201 belt pouch. TCH Handcuffs Twinlock Special – Part 2 included the 852 Folding Rigid Twinlock, 832 Superior Hinge Twinlock, TCH HR Handcuff Reducer plus the 9200 and 9215 Handcuff Pouches.
Join me here for Part 3 of the TCH Handcuffs Special review as we continue our look over these excellent cuffs and the Twinlock dual keyway design.
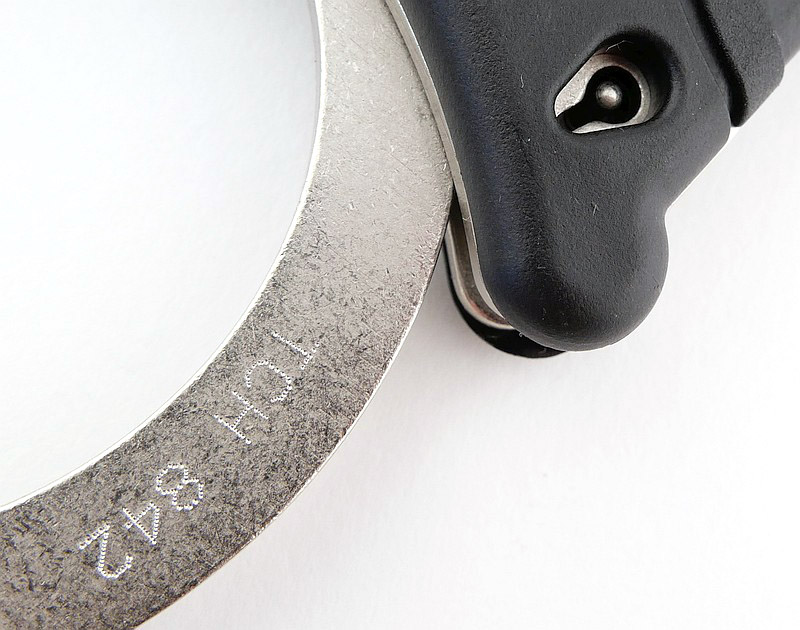
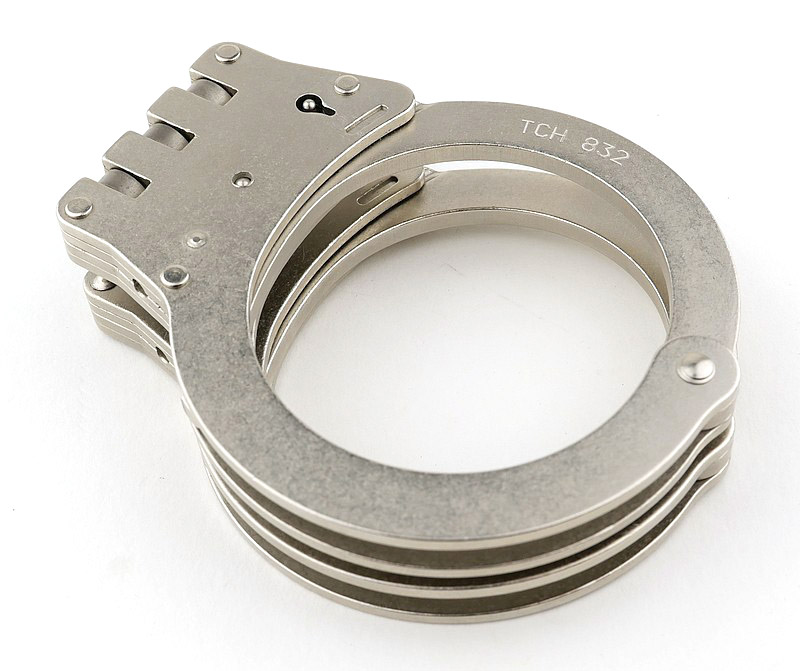
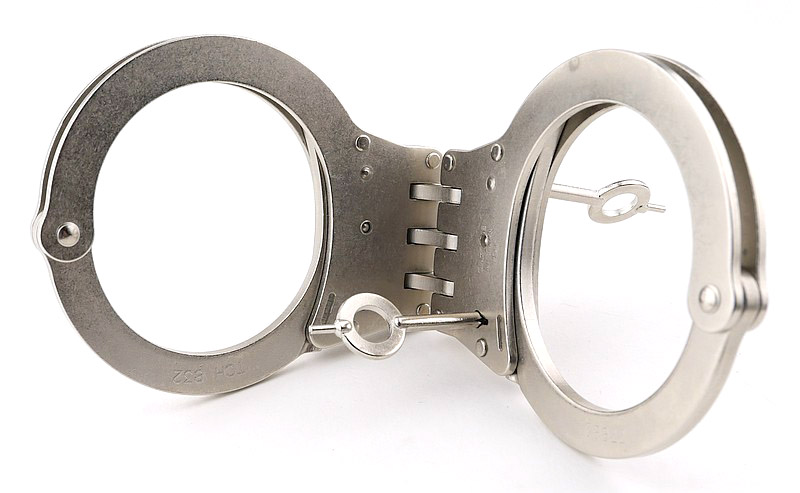
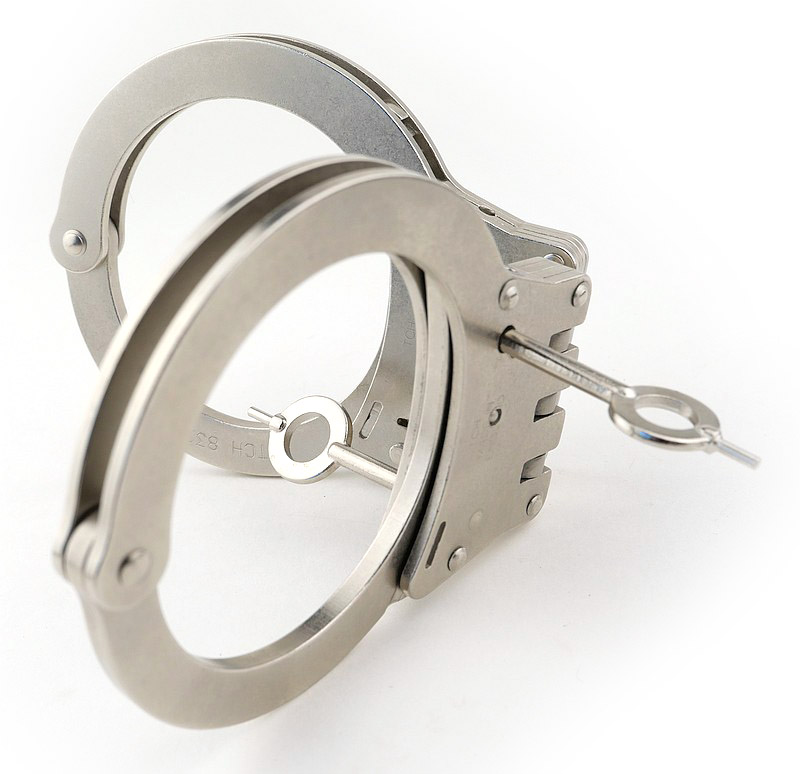
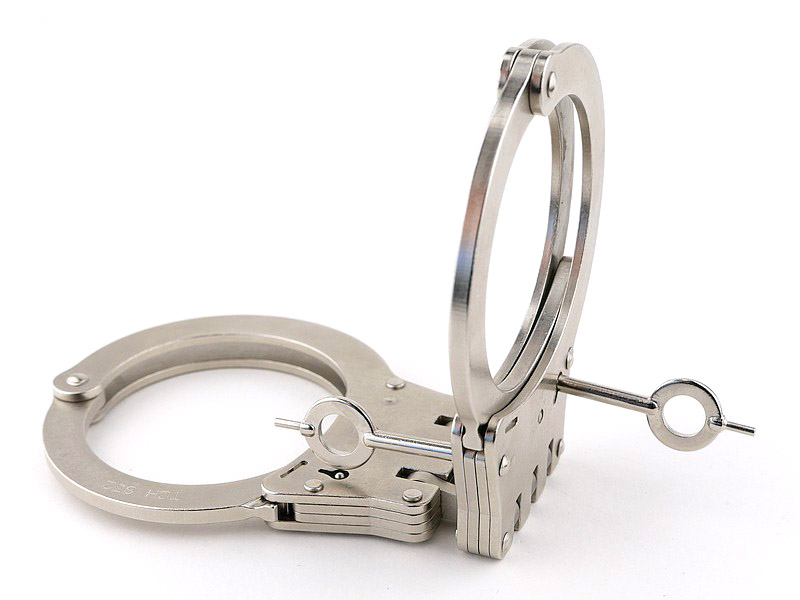
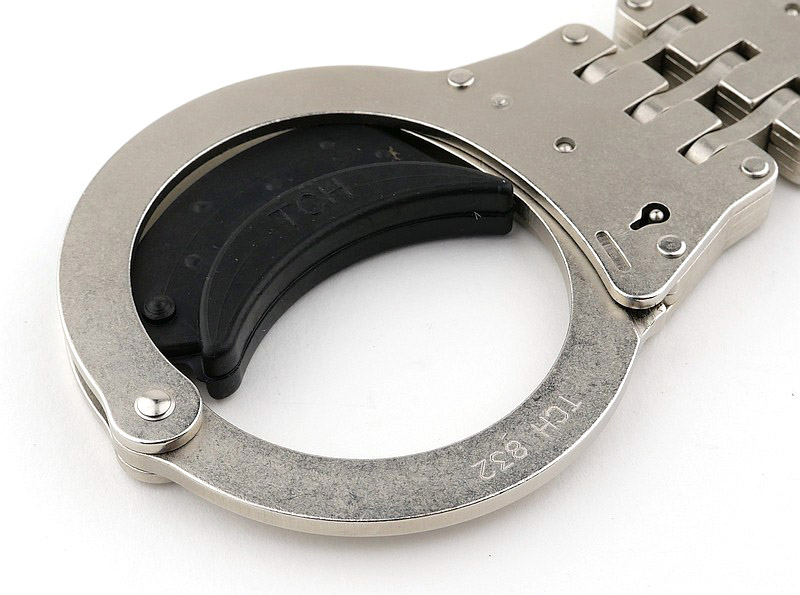
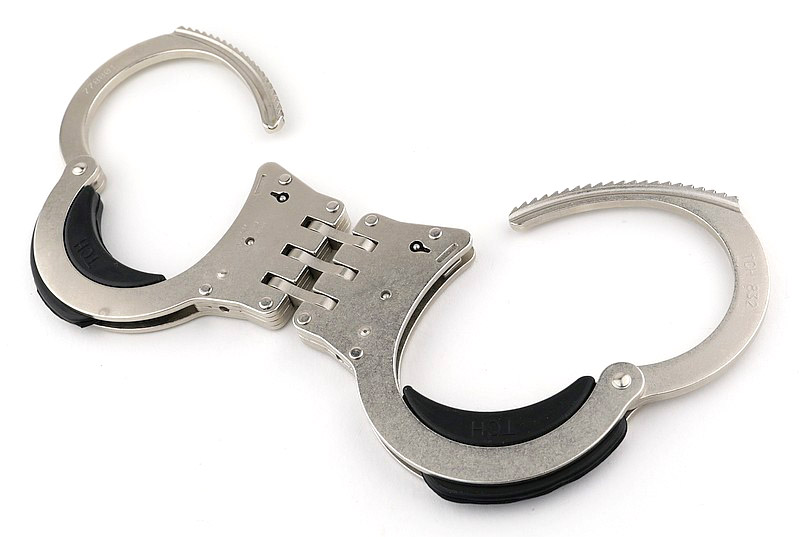
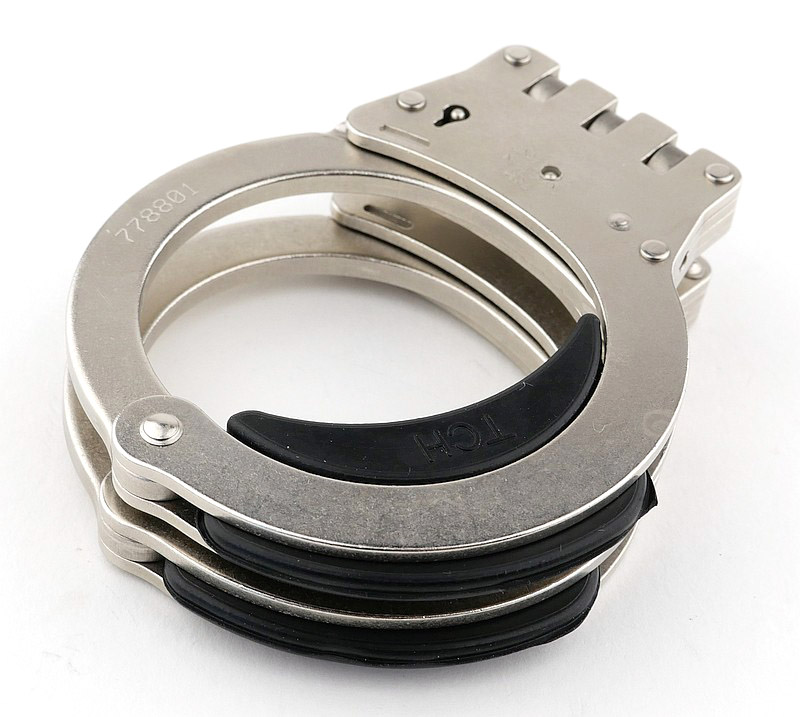
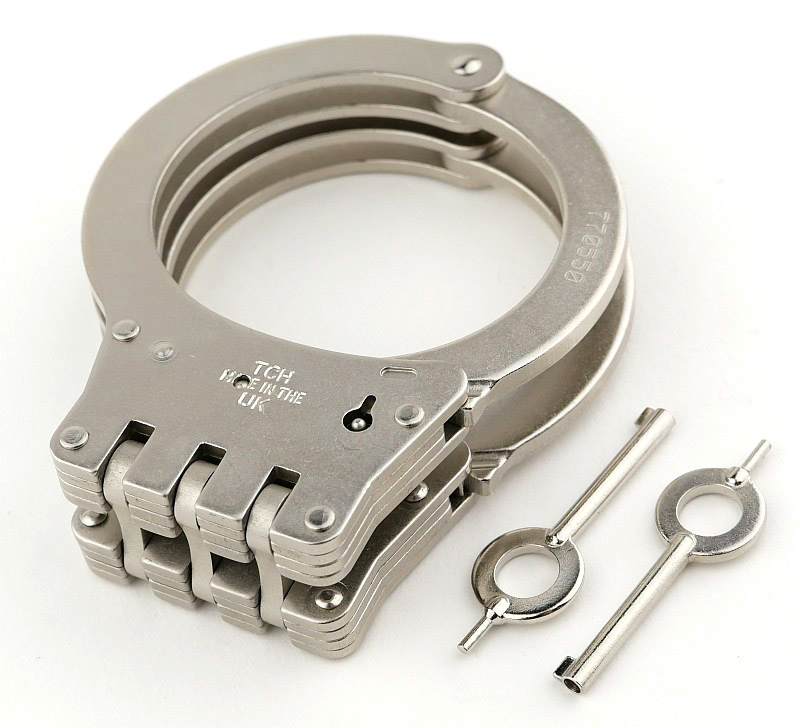
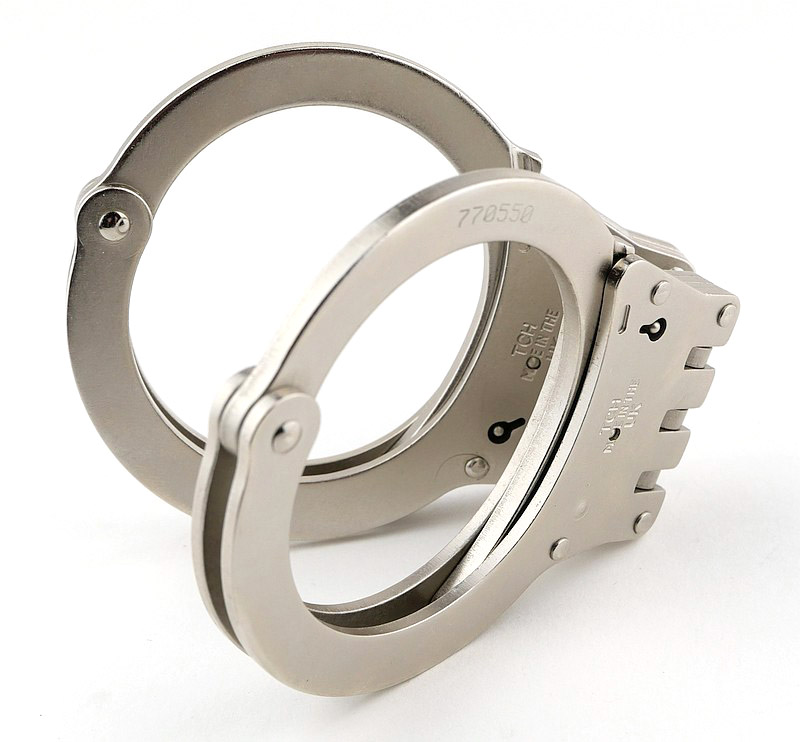
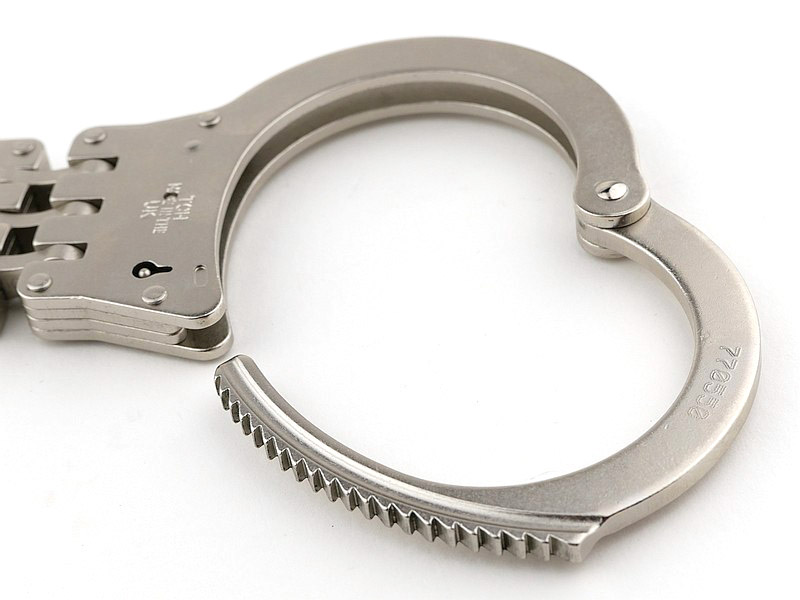
First look round the model 842 Rigid Twinlock cuffs:
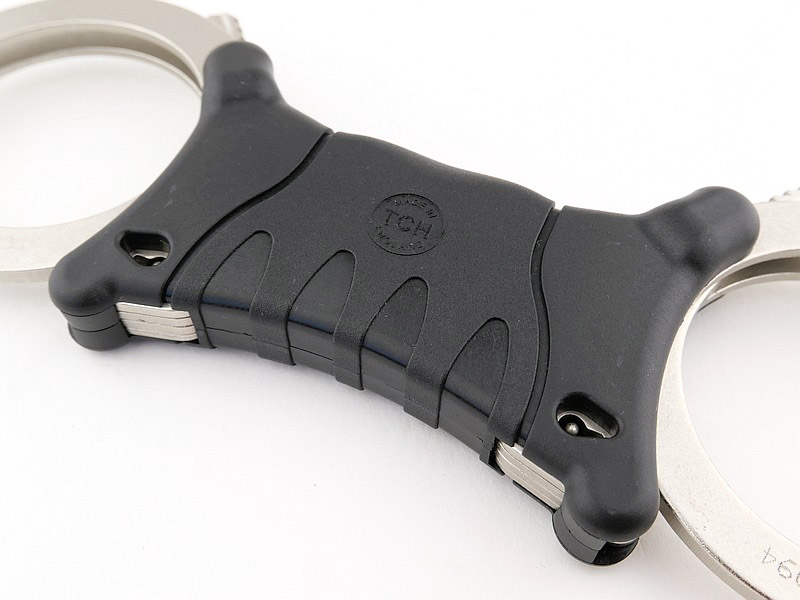
These 842 cuffs are currently the go-to standard issue for the UK Police force, although not all issue cuffs will be the Twinlock option, but more likely the single lock version.
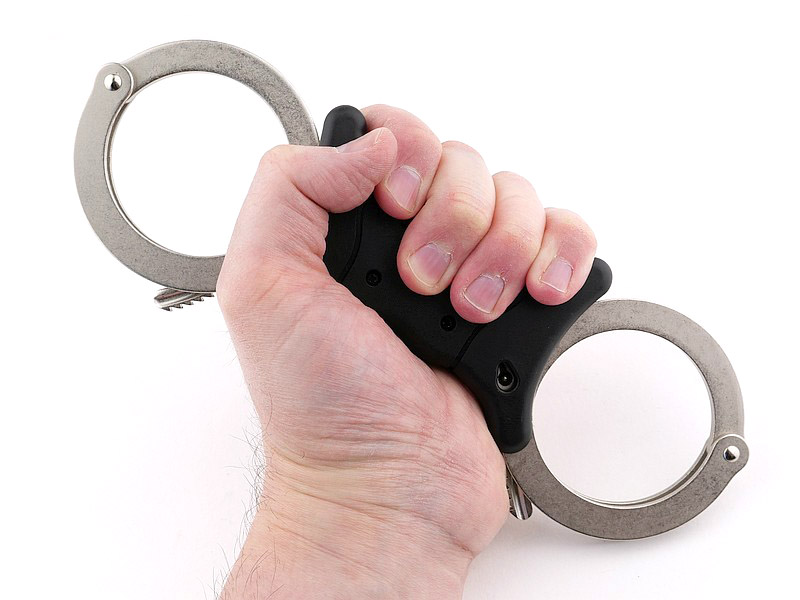
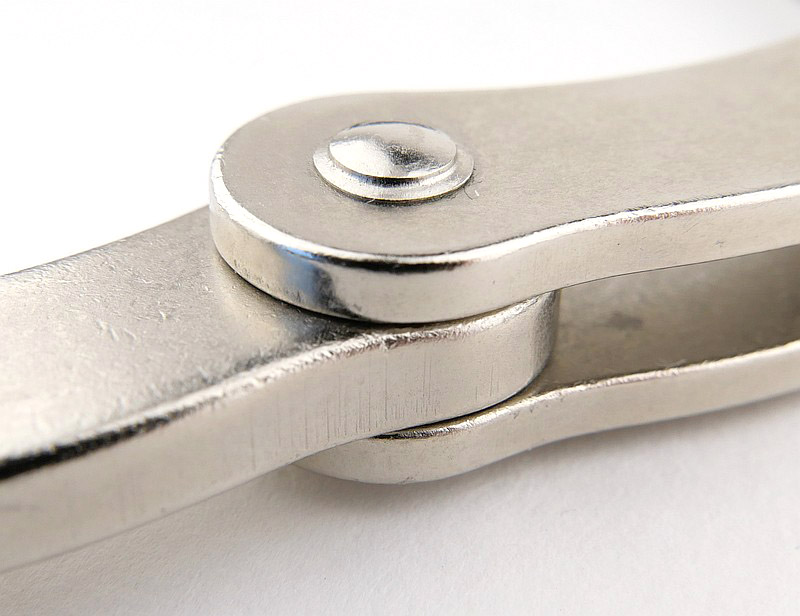
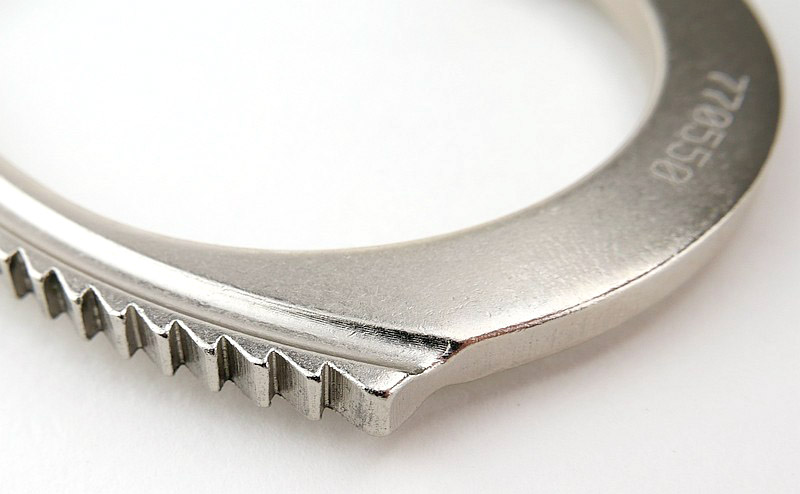
Rigid cuffs and their handling makes speedcuffing the norm, at least for the first wrist. From the first photo in this gallery the rotating arm of the cuffs are ‘back loaded’ ready for rapid cuffing.
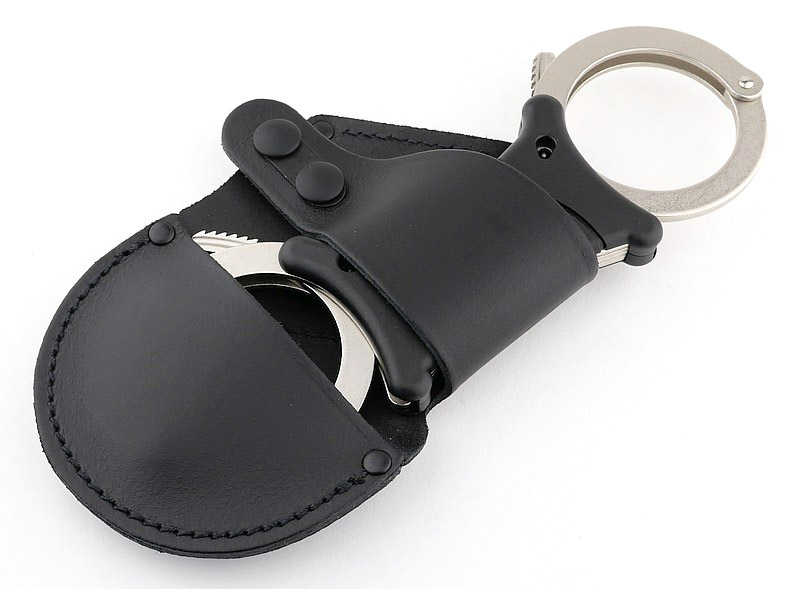
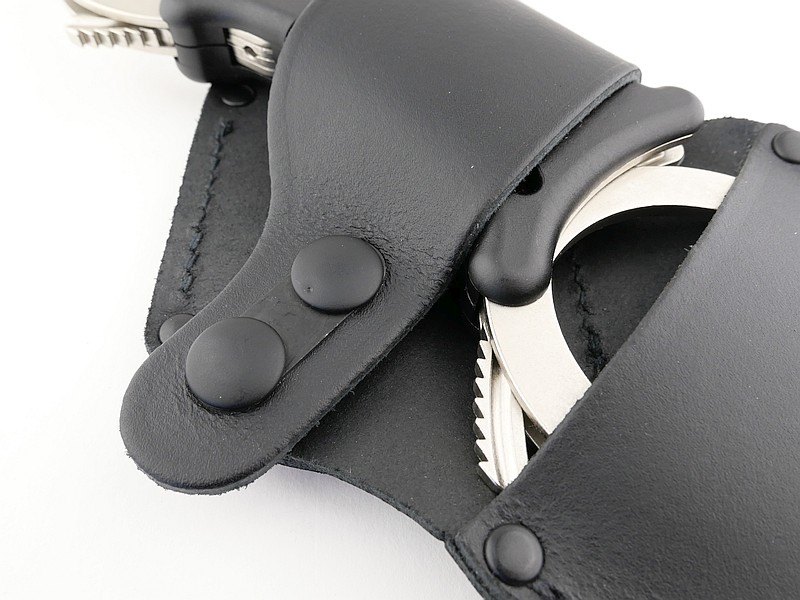
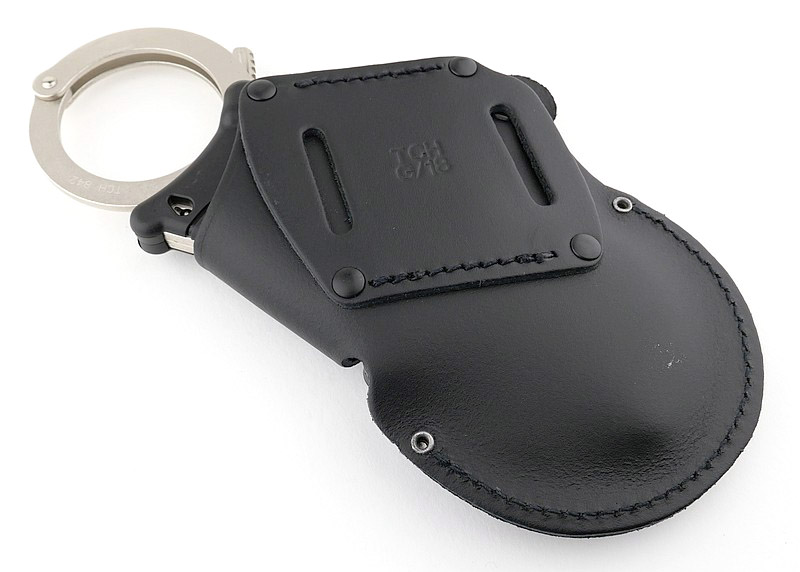
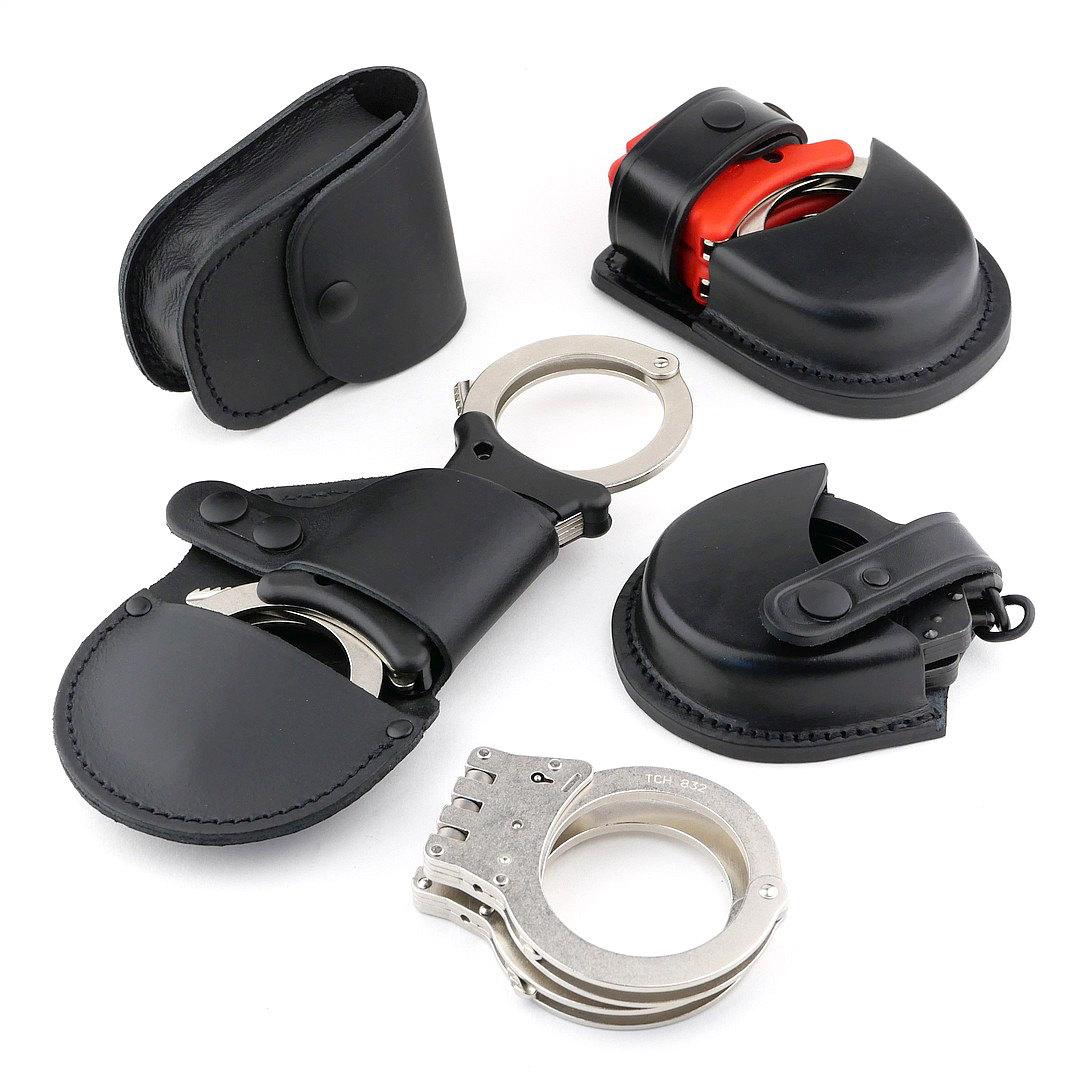
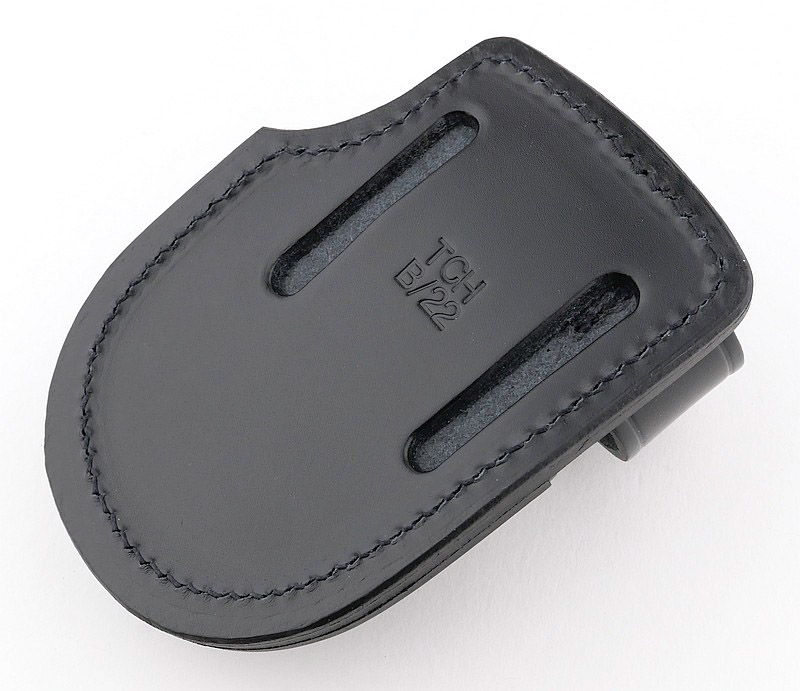
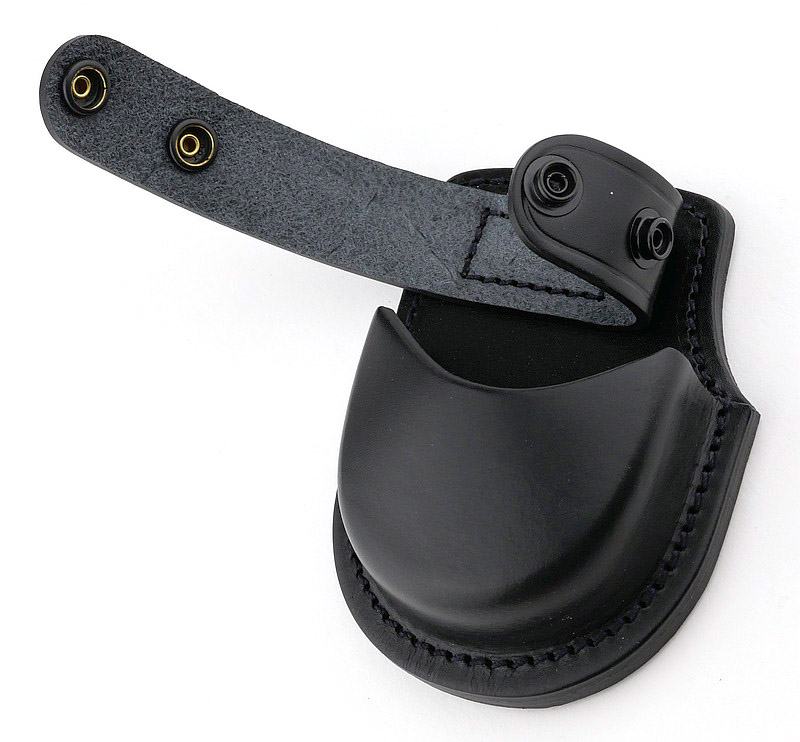
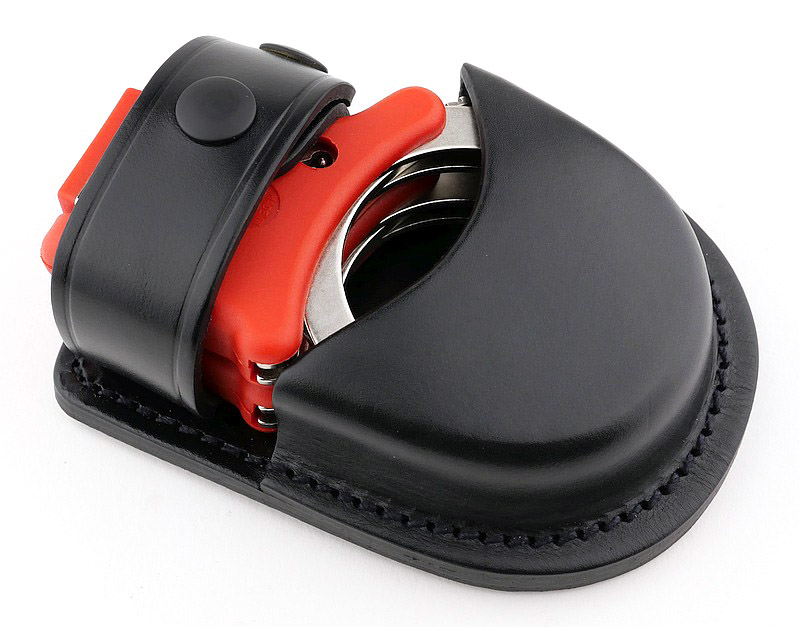
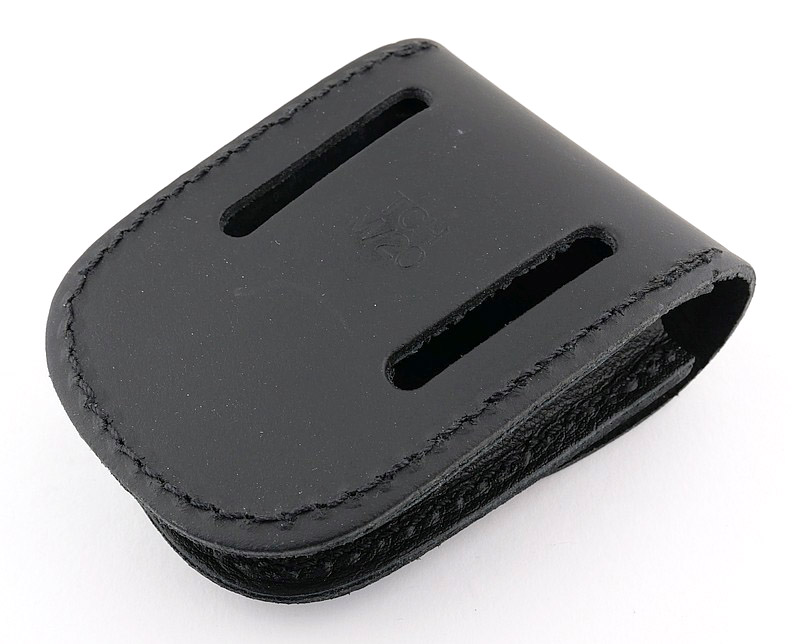
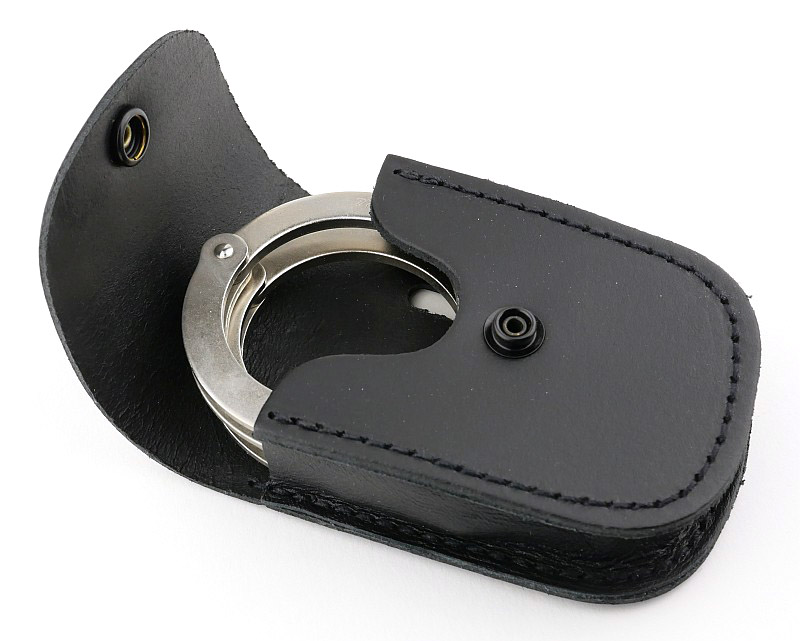
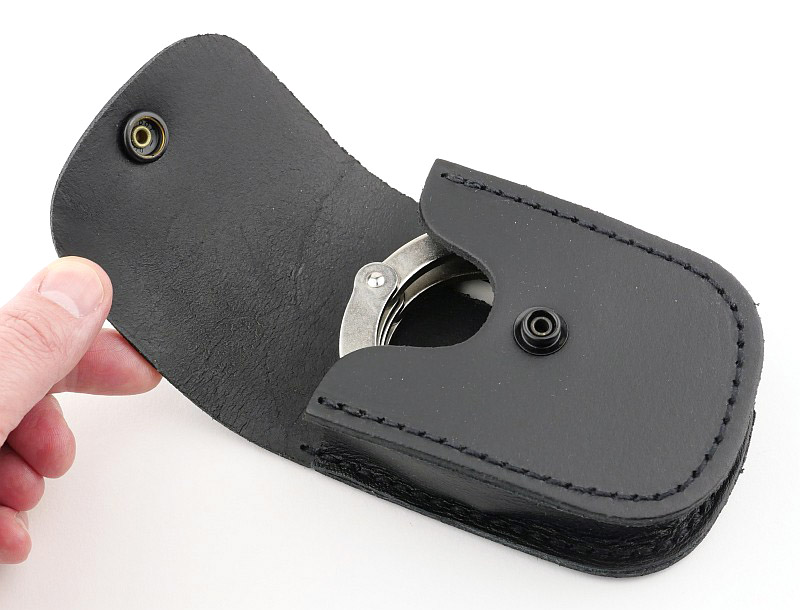
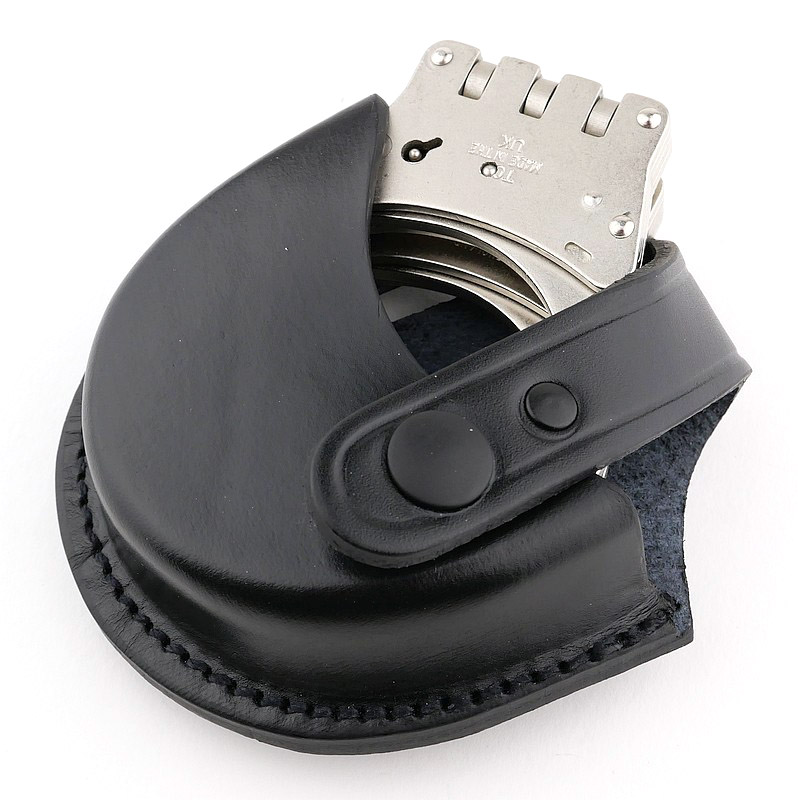
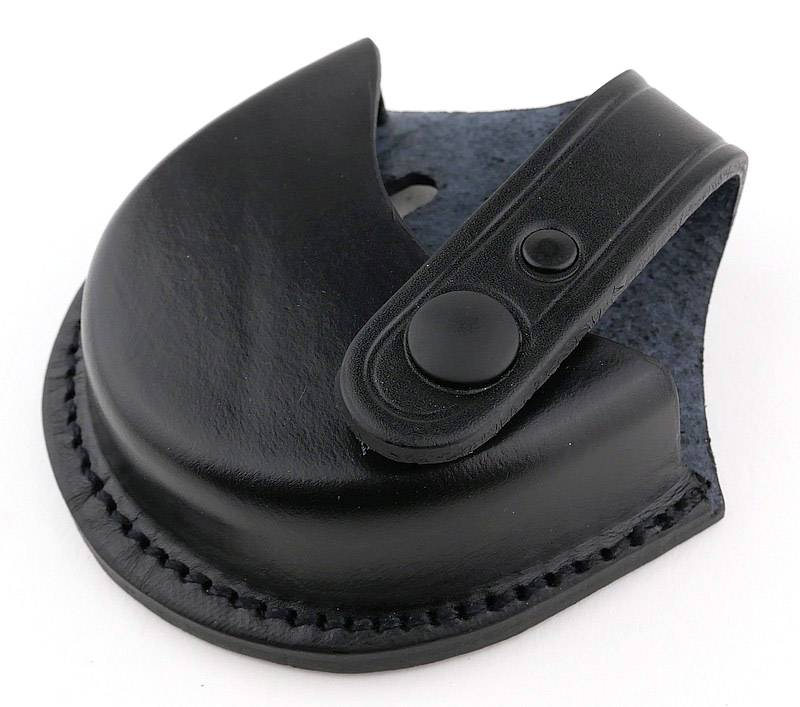
The RCP5 Handcuff Pouch:
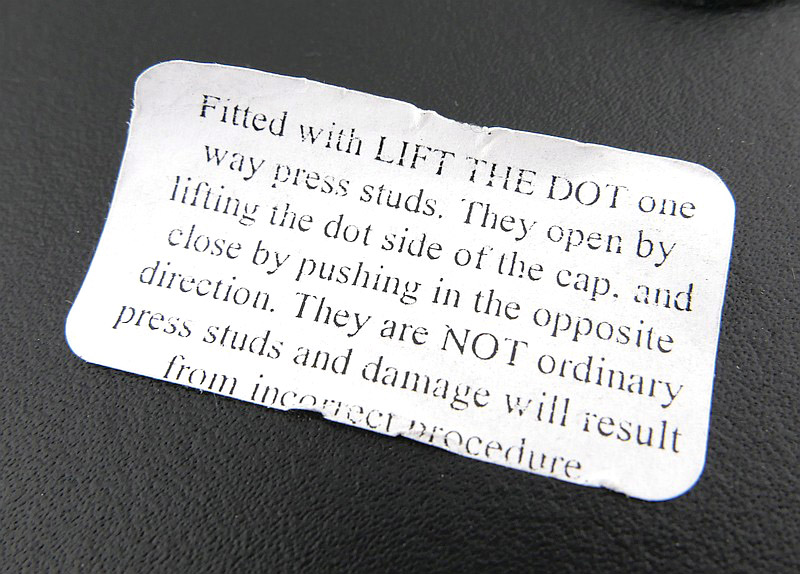
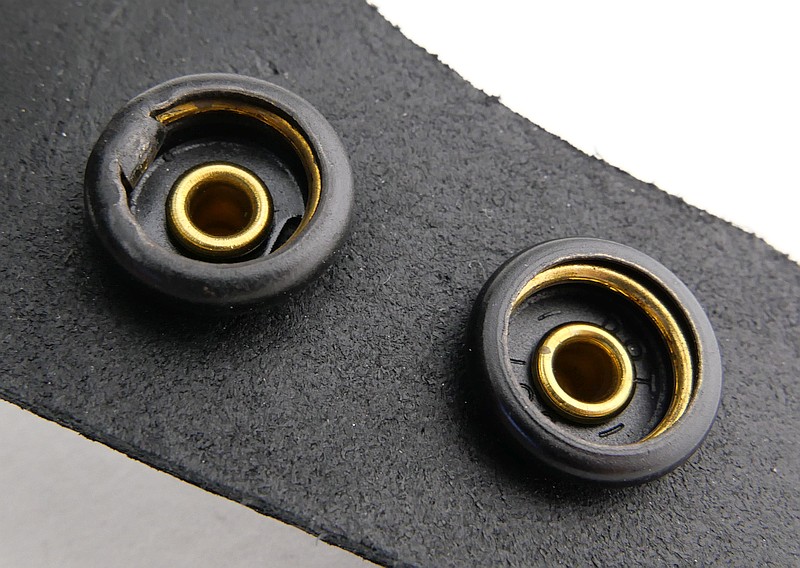
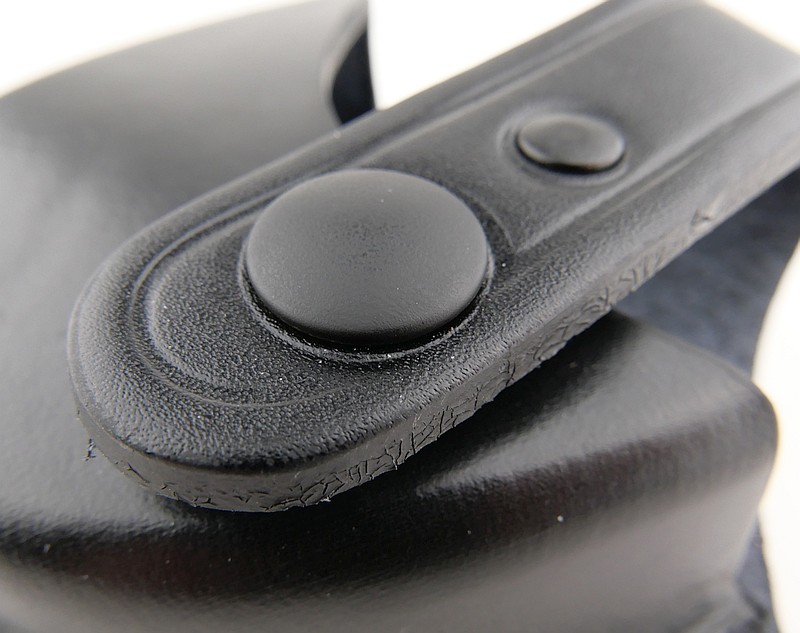
Being fully rigid, the 842s need a different approach for belt carry to all other folding cuffs. The RCP5 pouch has to hold these cuffs differently to any of the folding versions, and because of this the retaining strap has to use the military style press stud with a ‘dot’ that only opens from one side. The RCP5 comes with a warning label to inform you how to use this type of press-stud if you haven’t come across them before. The press-stud directly next to the cuffs is fitted so that the side against the cuffs cannot be pulled open from the cuff side, instead it can only be lifted open from the side away from the cuffs. Like this any pressure on the cuffs while carrying them can’t cause the retaining strap to open unintentionally.
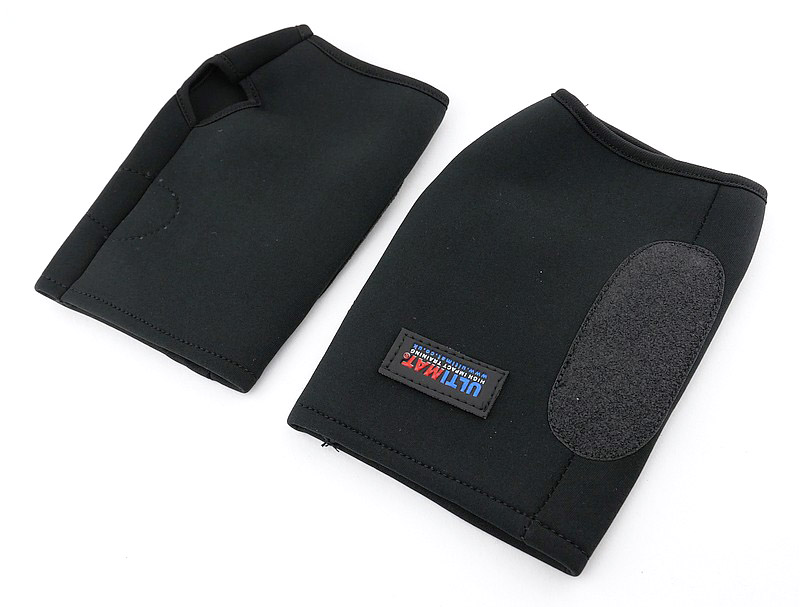
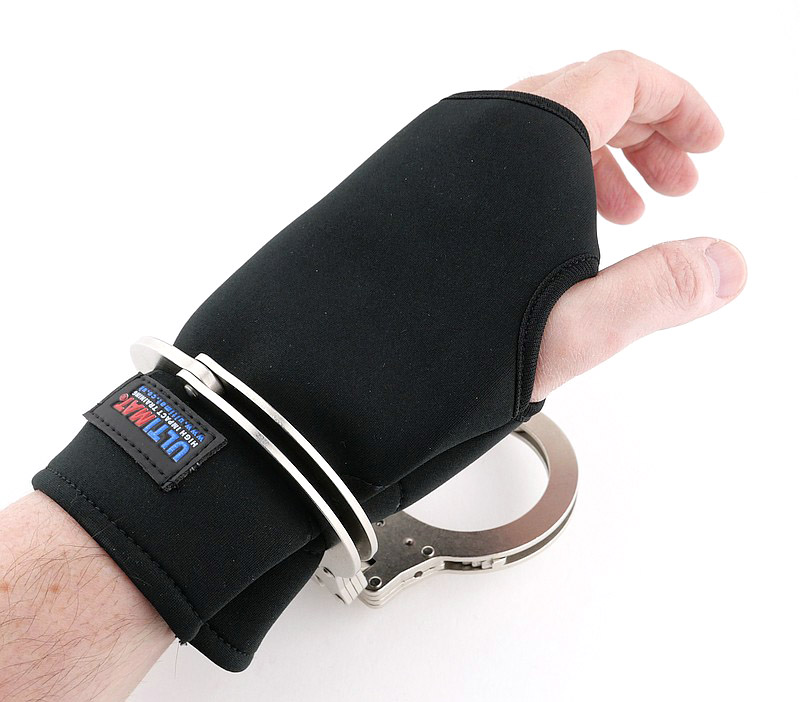
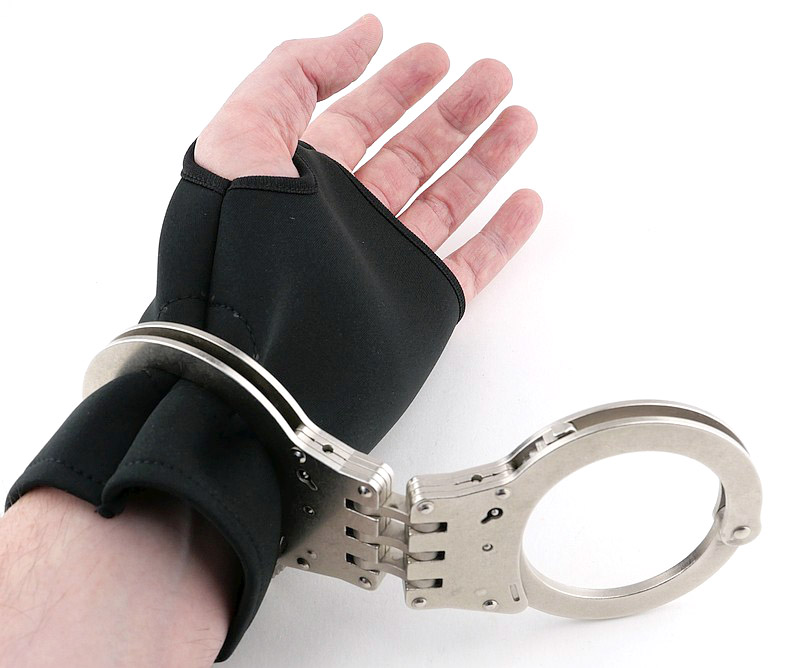
NCG Neoprene Cuff Guard:
Provided for comfort during training only, this is not for use when restraining a suspect. During training all personnel will be cuffed and un-cuffed repeatedly, not always gently, and the NCG means the trainees need not suffer too much with speedcuffing and reverse stack practice.
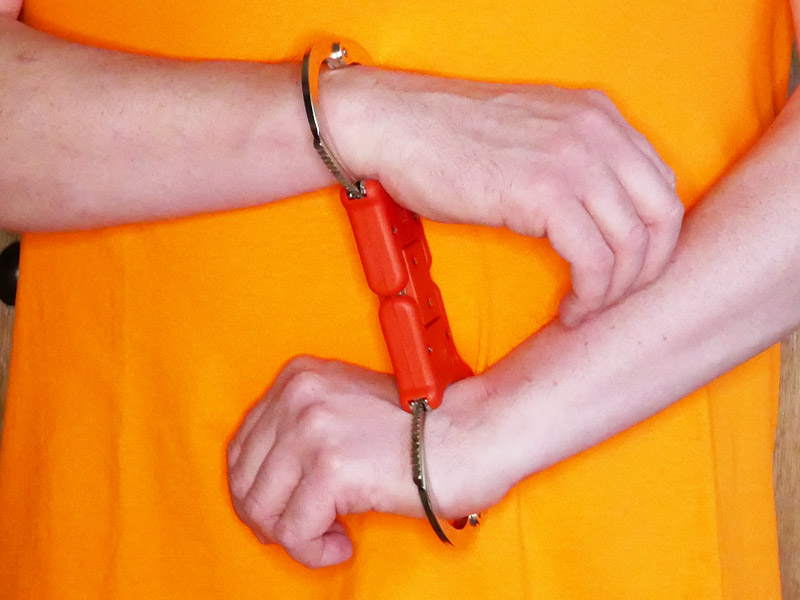
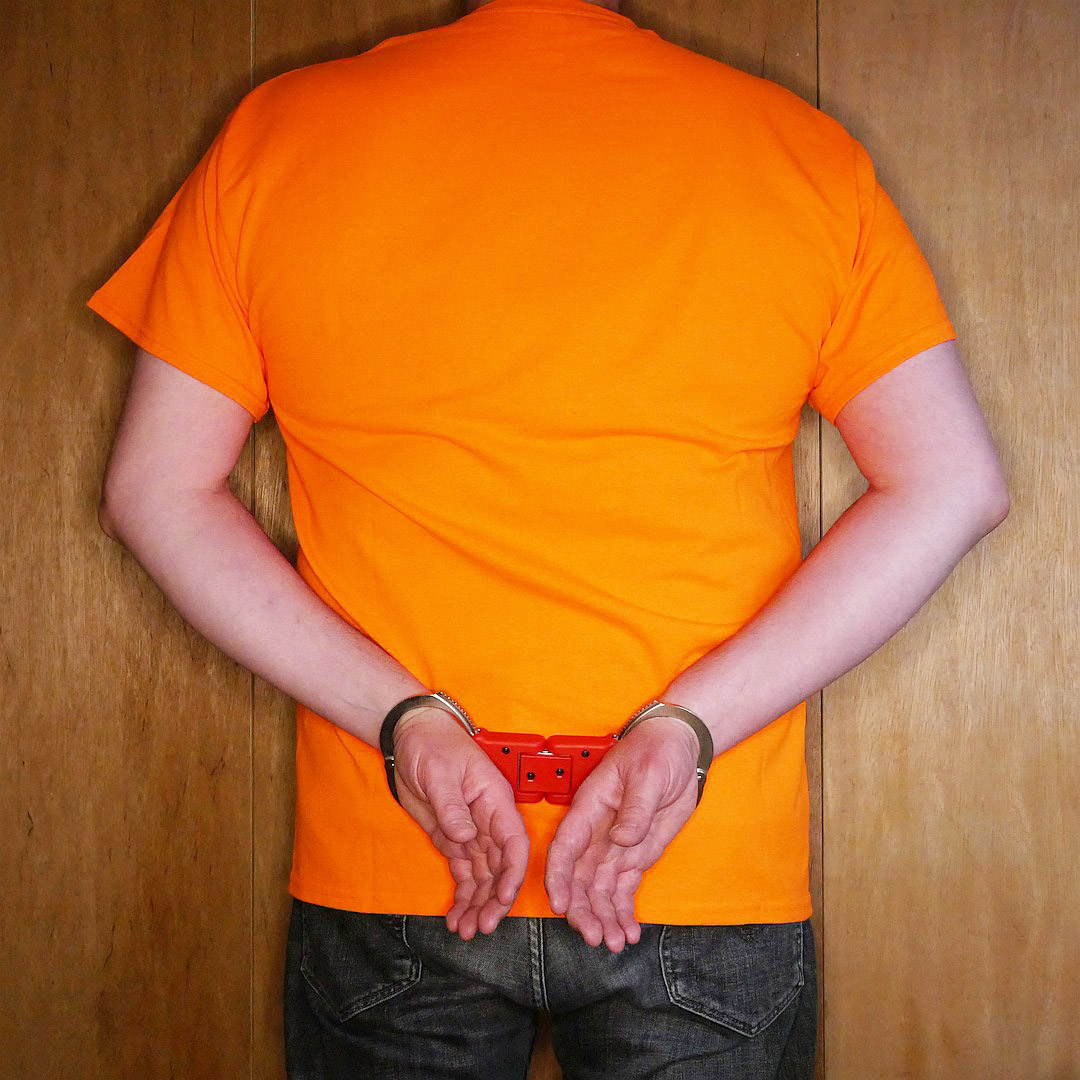
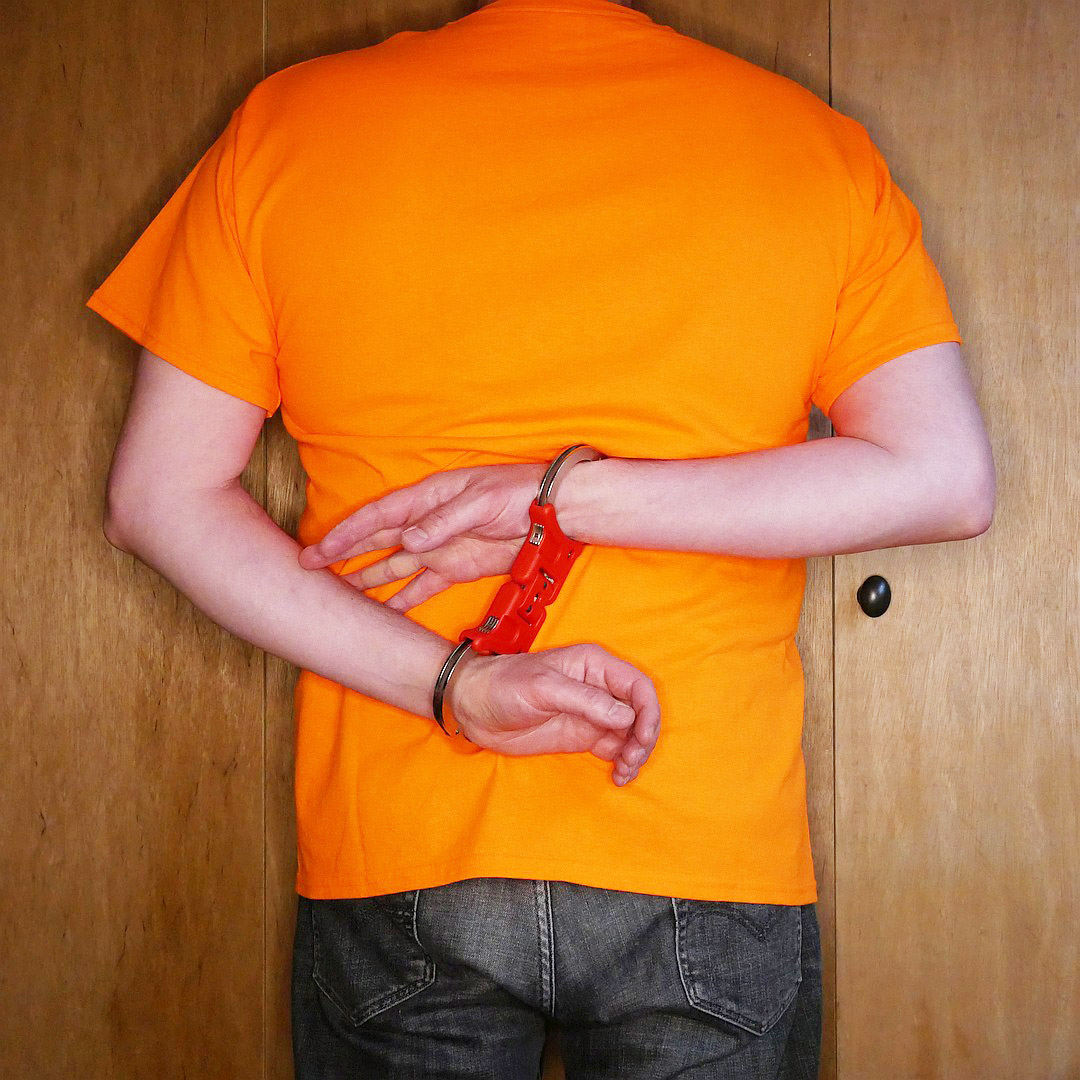
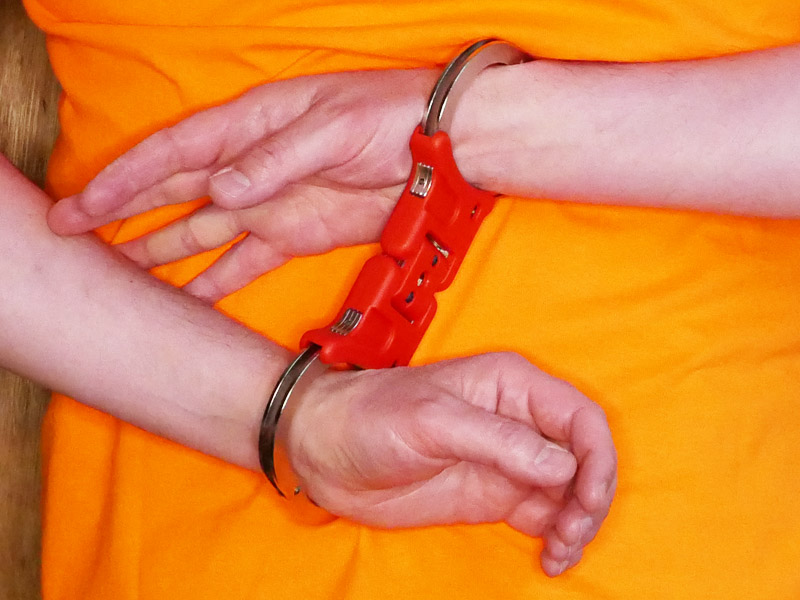
Standard cuffing techniques:
Here we have a demonstration of the main cuffing methods using traditional chain cuffs and rigid cuffs with two TCH models. All methods are shown full body and zoomed in on the hands.
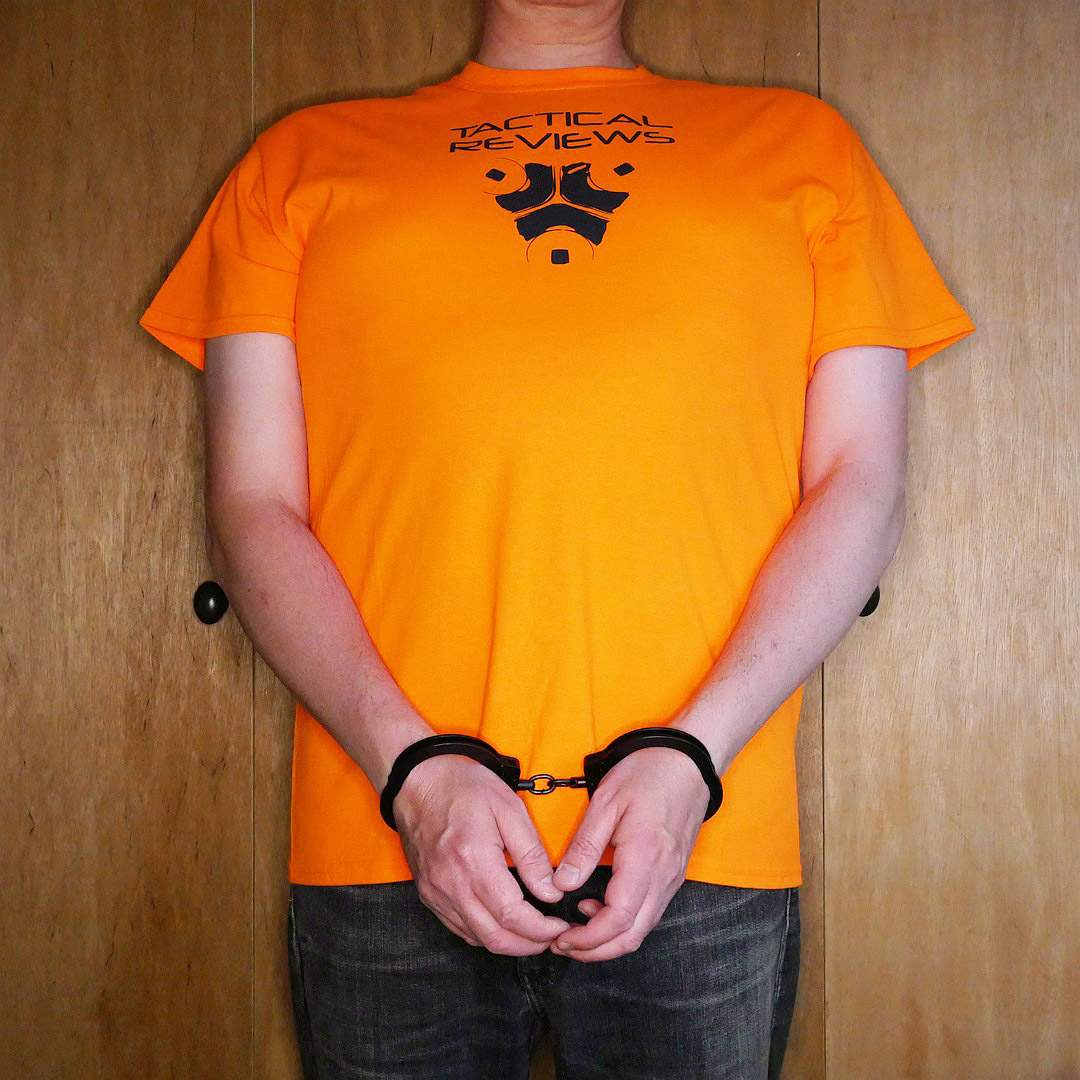
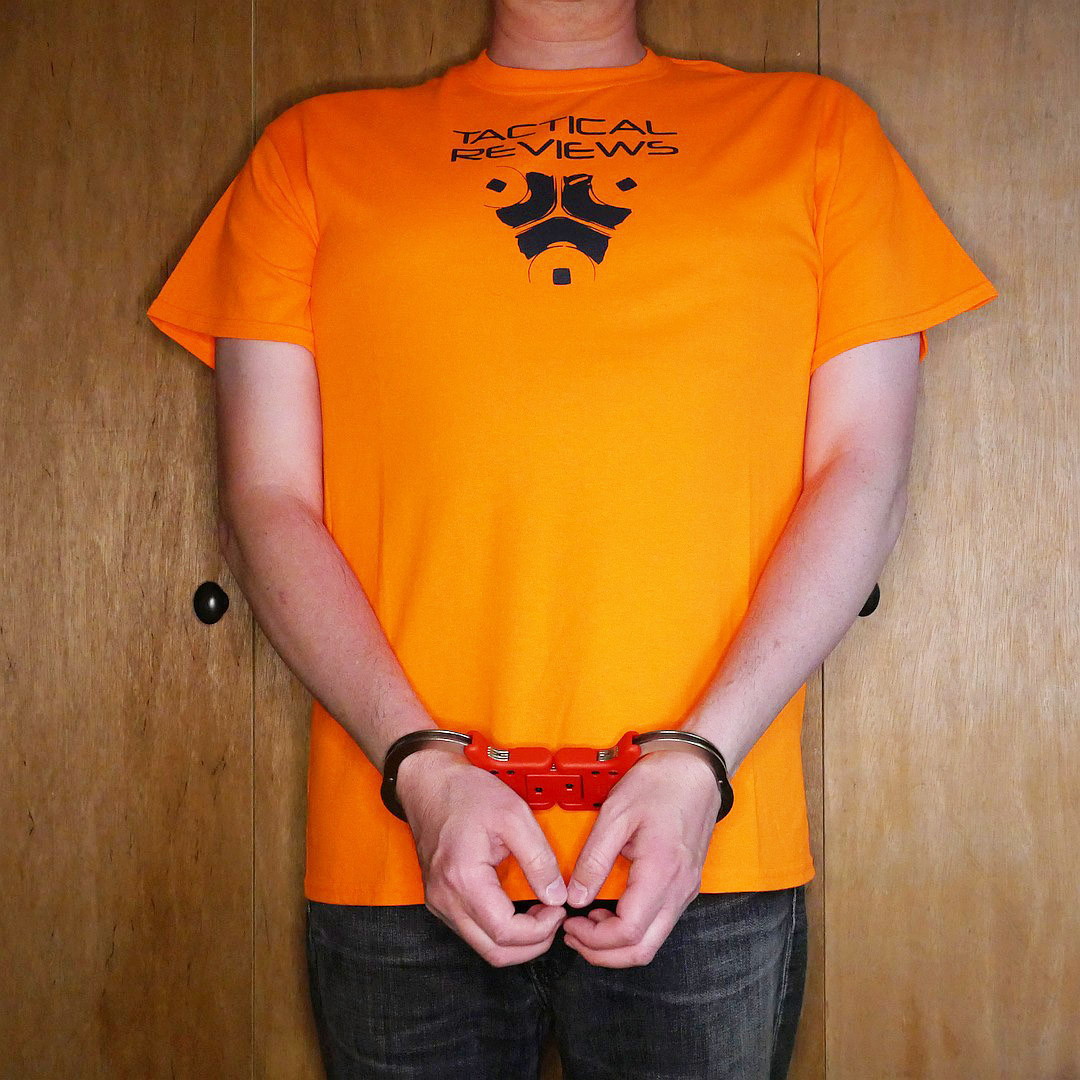
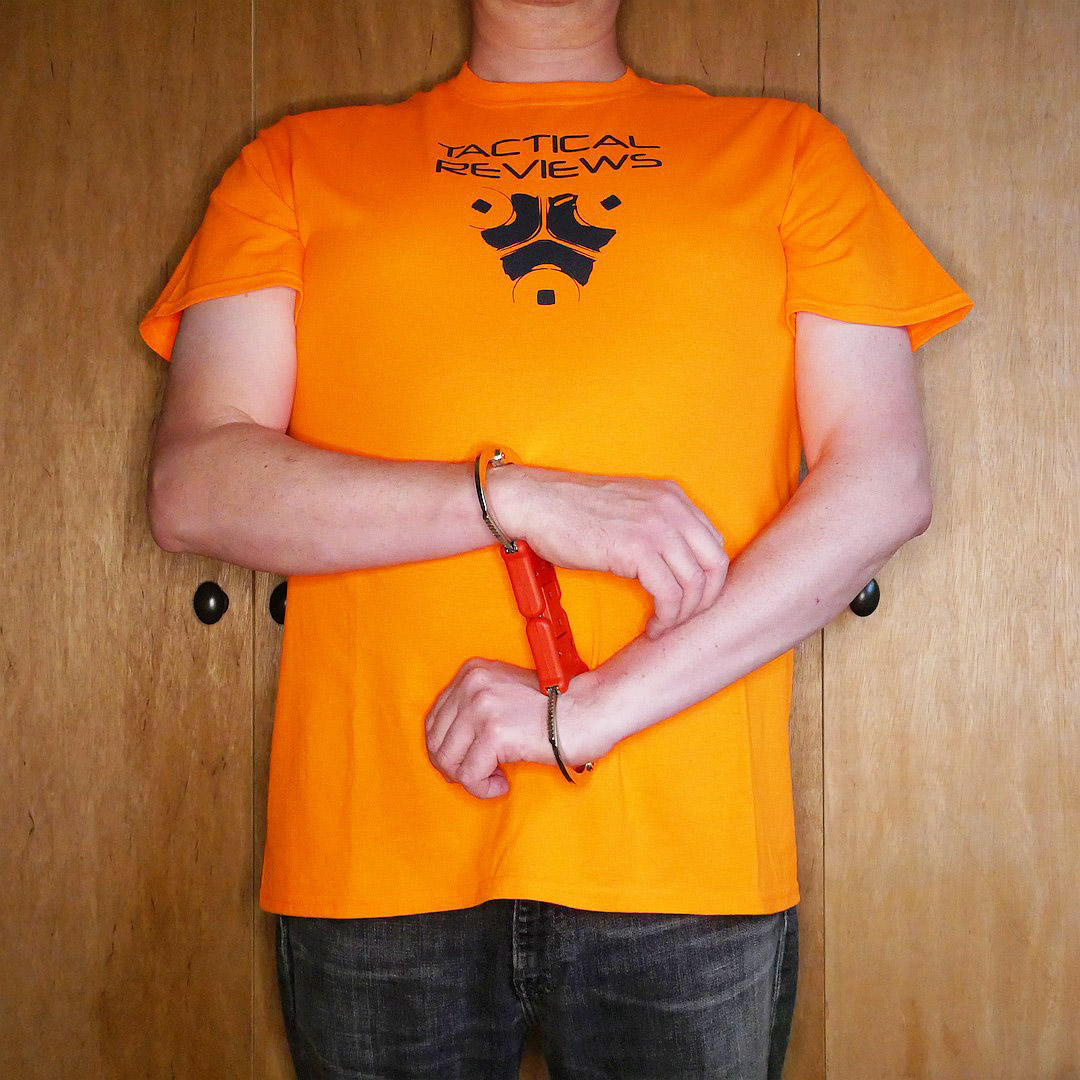
With chain models like the 822 you can only use ‘palm to palm’ (to the front), or ‘back to back’ (behind the back).
A fixed or hinge model now allows for the ‘stack’ where the hands face different directions through the cuffs.
So with the folding fixed 852 model here, we have ‘palm to palm’ (to the front), then ‘front stack’. Now moving to ‘back to back’ (behind the back), and then the ‘rear stack’. Rear stack is the most uncomfortable for the restrained person and should only be used if absolutely necessary.
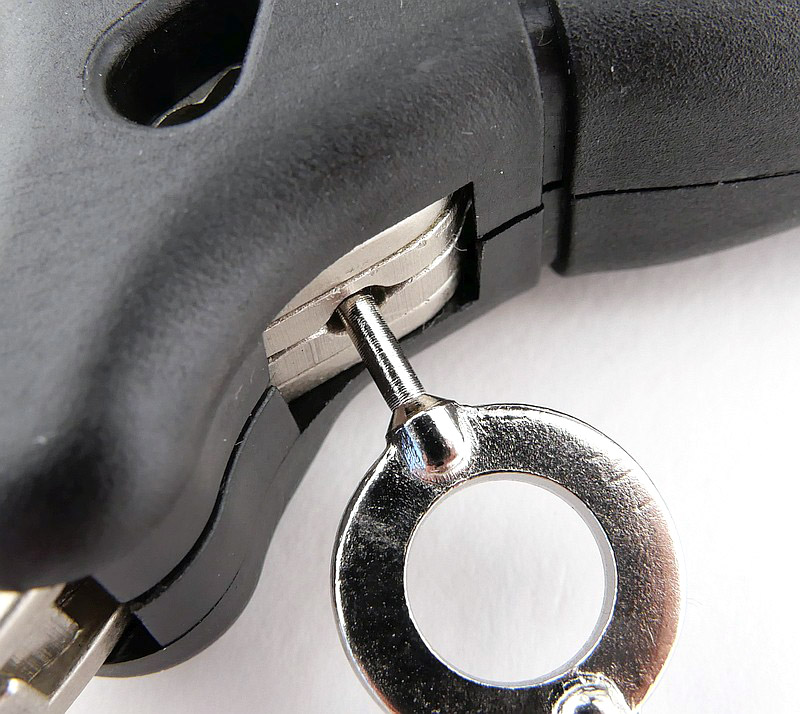
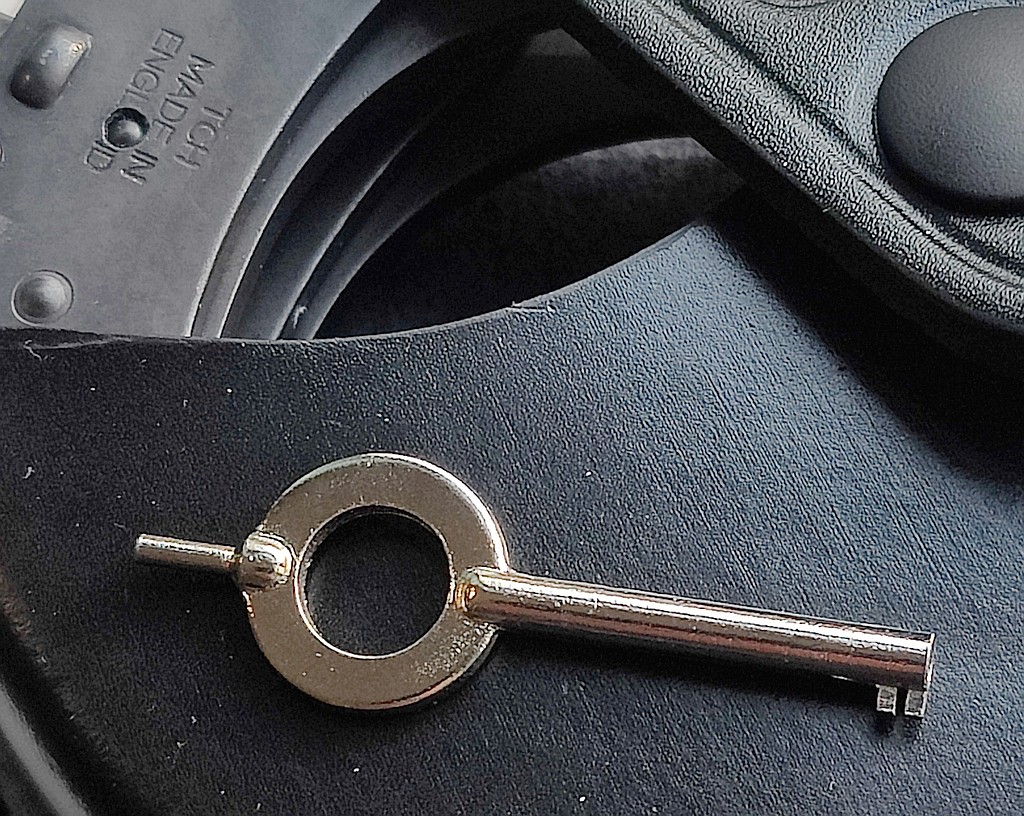
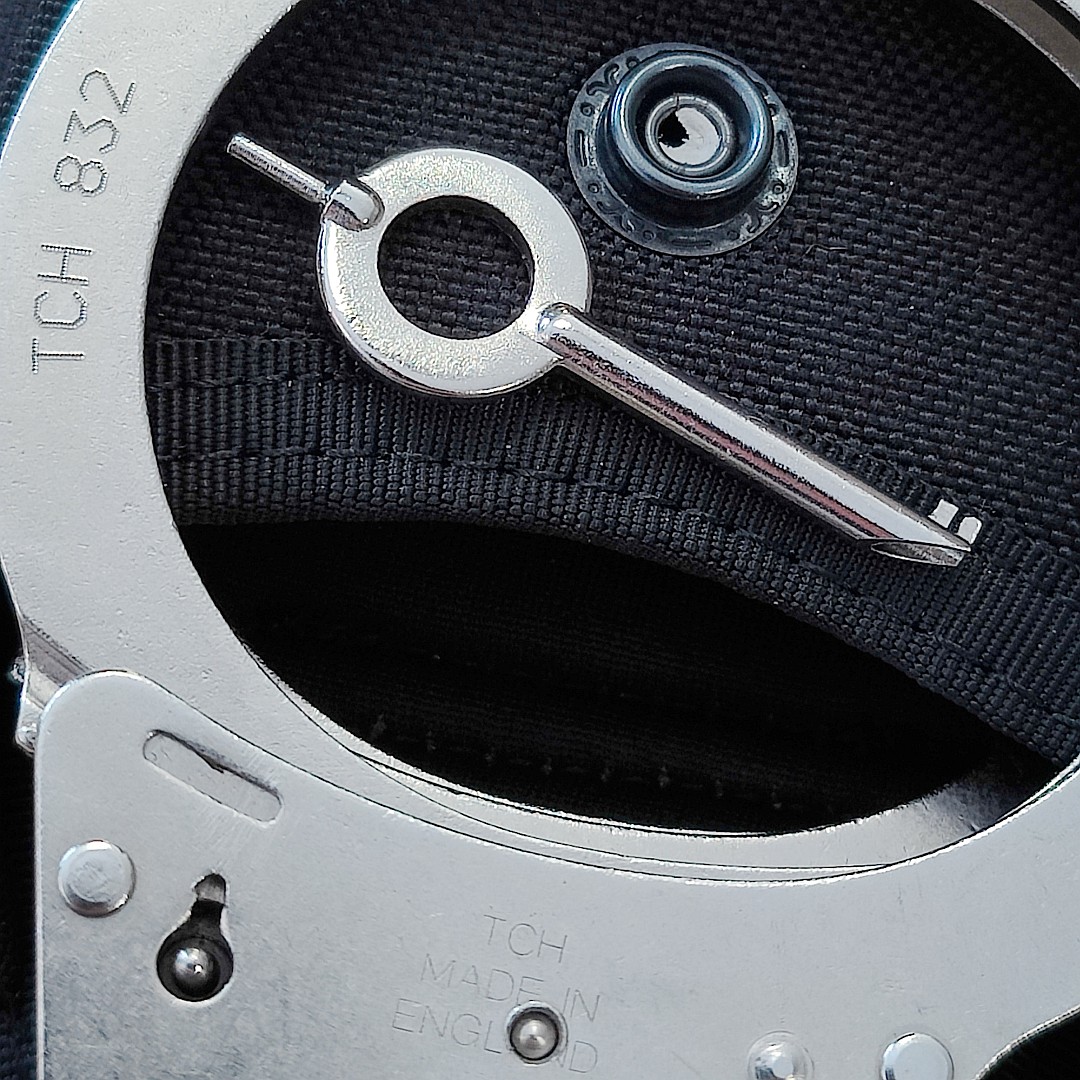
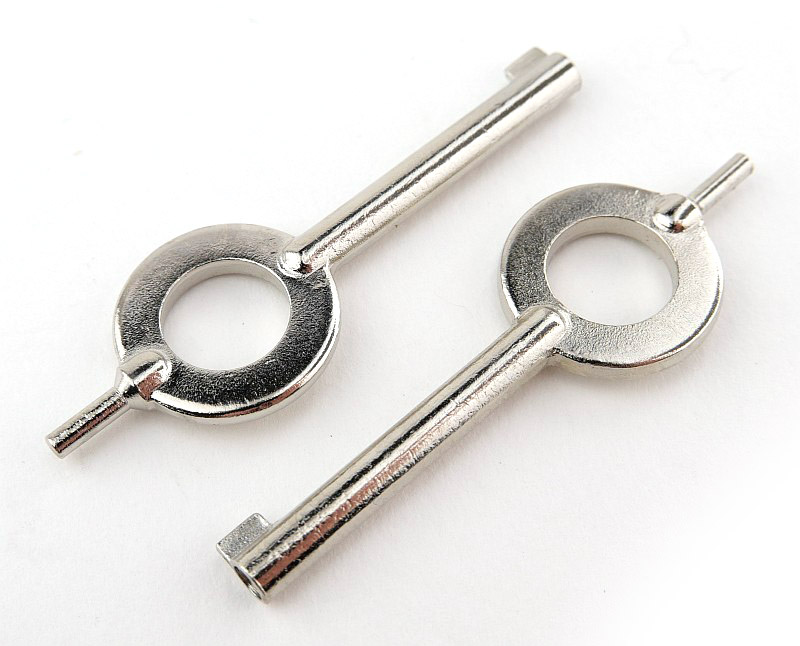
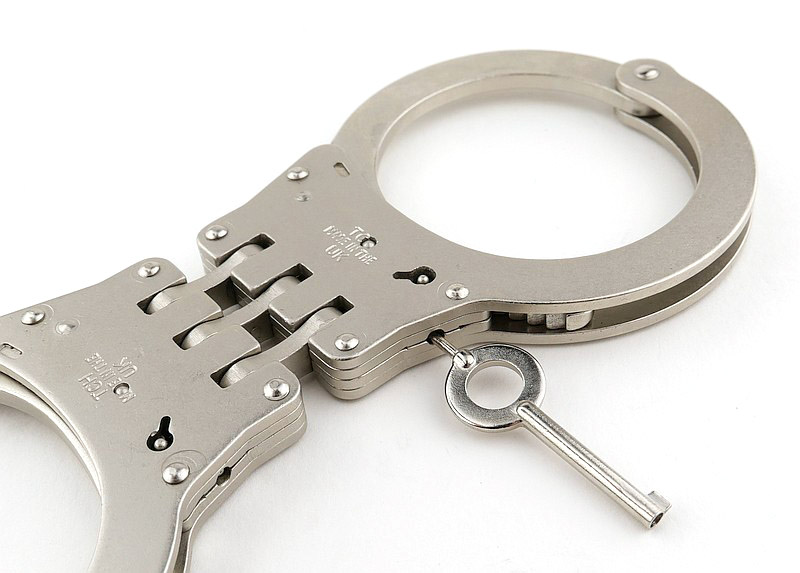
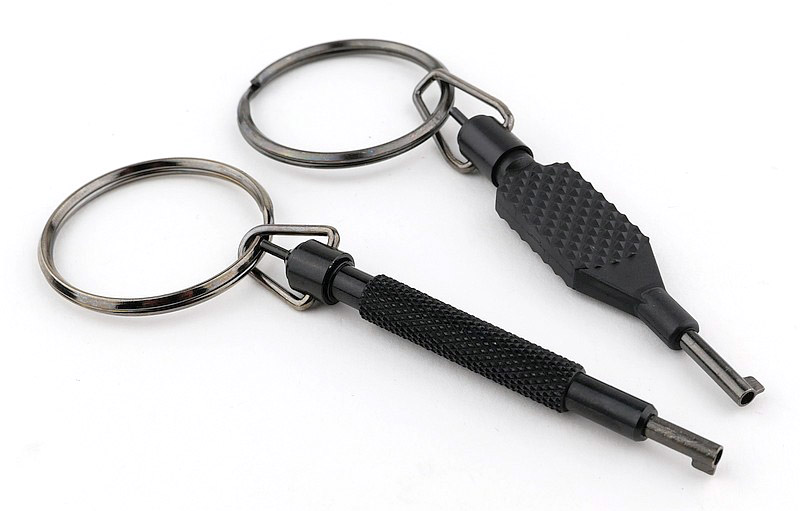
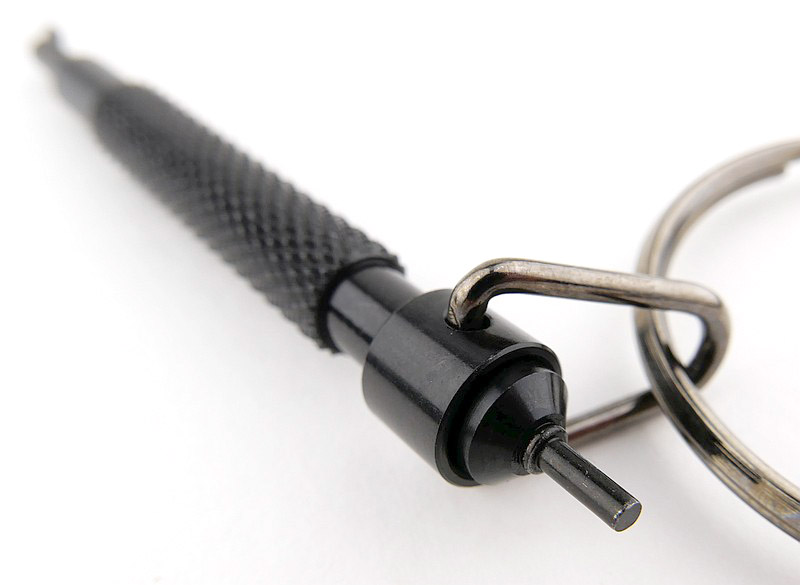
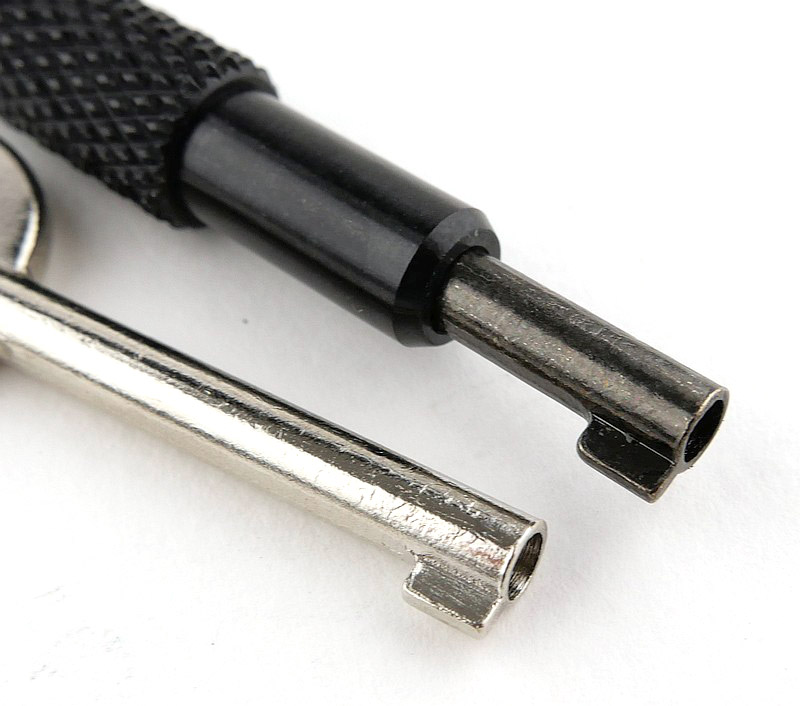
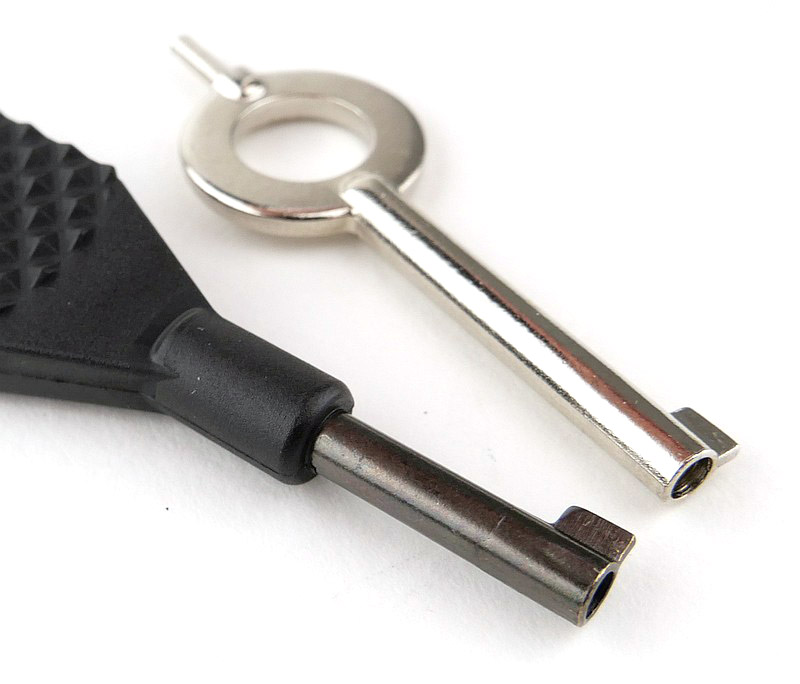
Tactical Reviews’ interpretation of the TOOOL universal handcuff key:
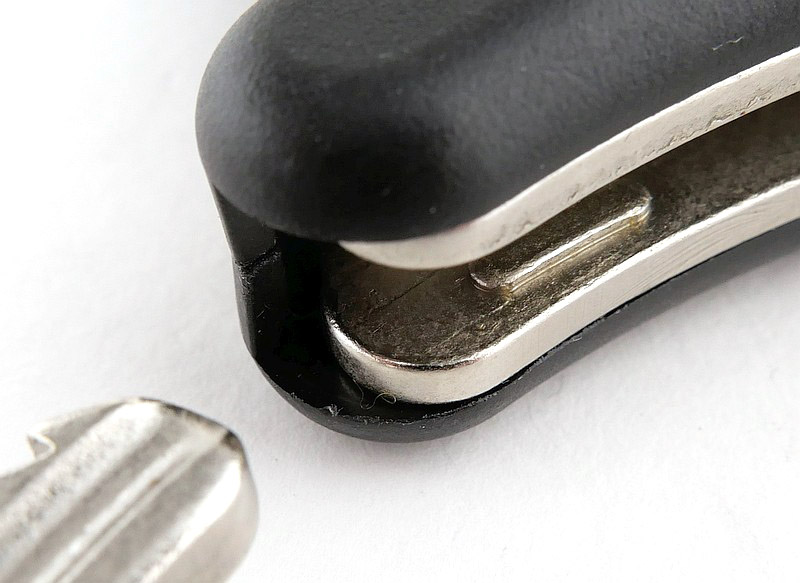
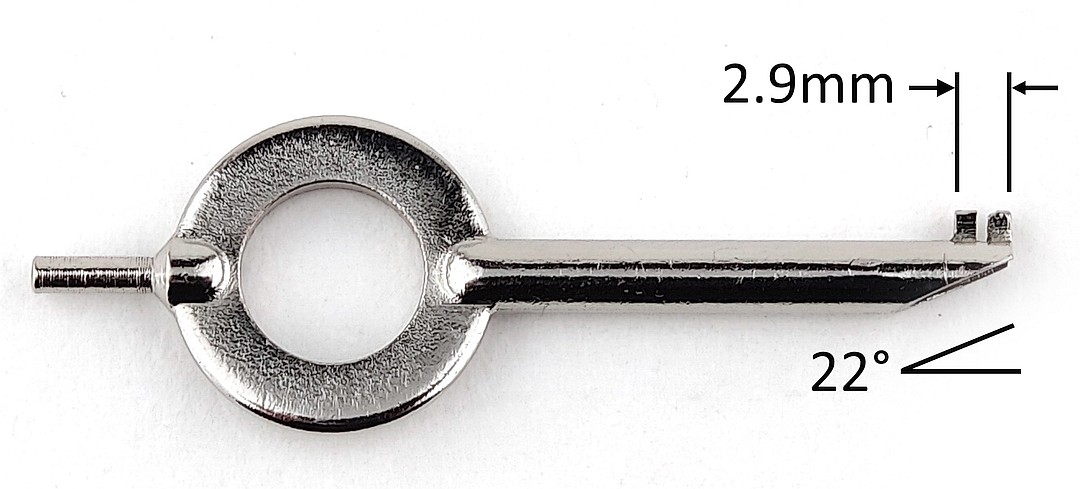
Taking a slight aside during this review I came across the TOOOL (The Open Organisation Of Lockpickers) Universal handcuff key with information posted by ‘Deviant Ollam’. Taking this as inspiration I brought together ideas from other universal handcuff keys, and produced a few Tactical Reviews Universal handcuff keys. The TOOOL version was based on the Smith & Wesson Handcuff key, but as I was not able to source one at a sensible price, I decided to use the TCH key. In fact the key flag on the Smith & Wesson key is too long to fit into TCH cuffs, so for that key you have to file the key flag down. By starting with the TCH key, it already fits TCH cuffs perfectly. The width of the key flag slot is governed by the width of the junior hacksaw blade used to cut it.
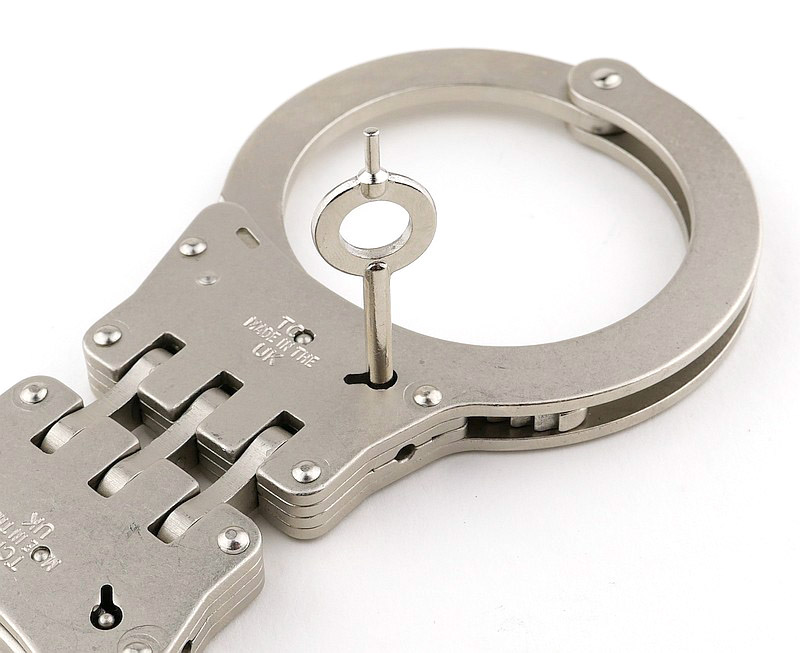
Building on the TOOOL key, I also added a back-cut at 22 degrees. This allows for the key to be rocked back and forward in case the key flag is too long or short. It also gives more allowance for the key post size otherwise being too large. In short to give wiggle room to help open different cuffs.
In this gallery, the first image is of the first version I made. Next up is a second key but this time with the back-cut added, with the last image just showing the dimensions that were altered to make the key. there is no height shown for the key flag, as this was not modified from the original TCH key.
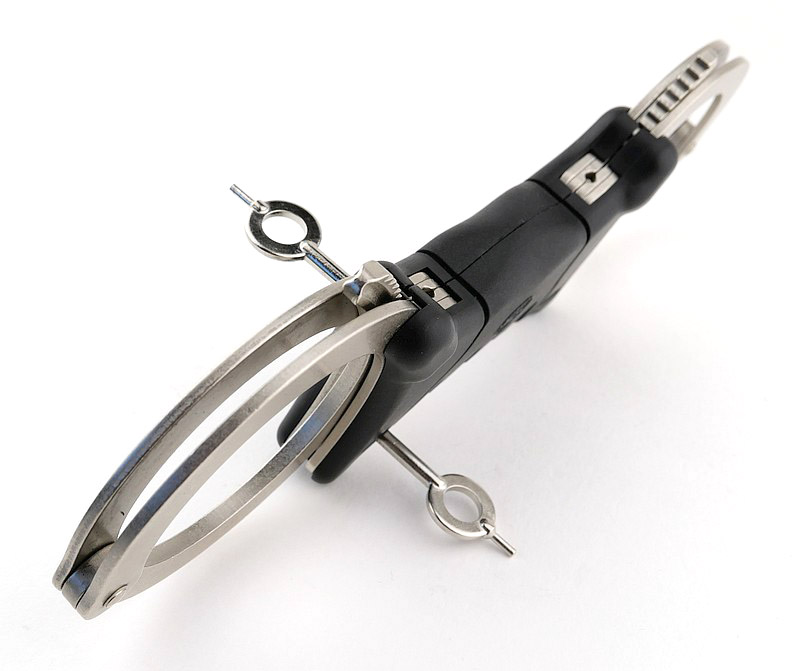
‘Alternative’ uses for handcuffs:
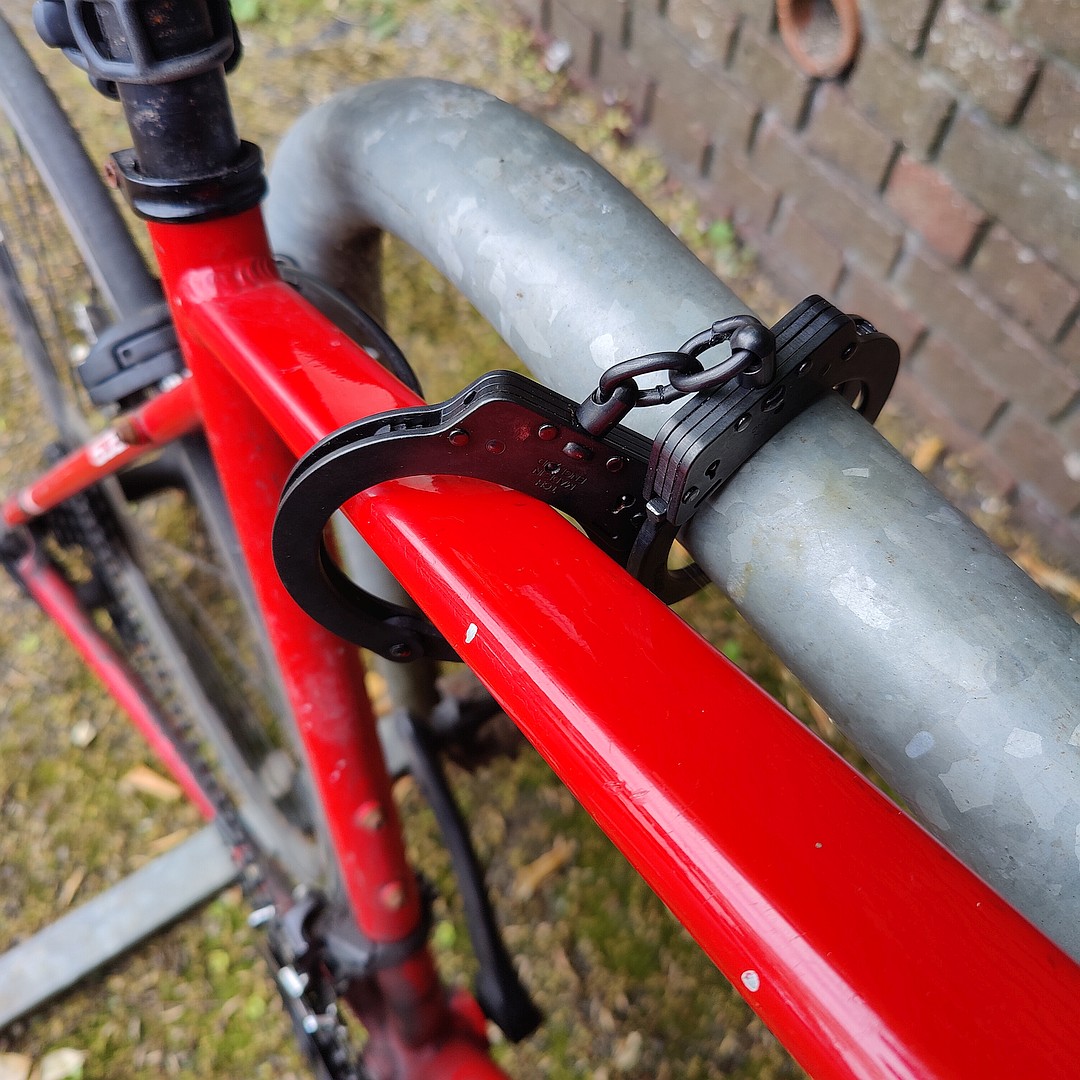
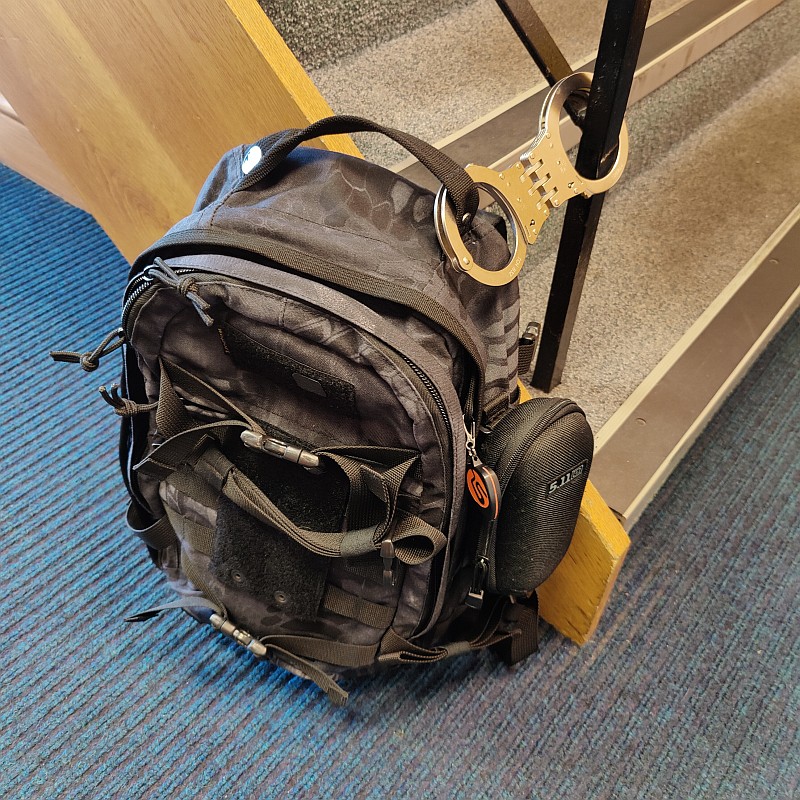
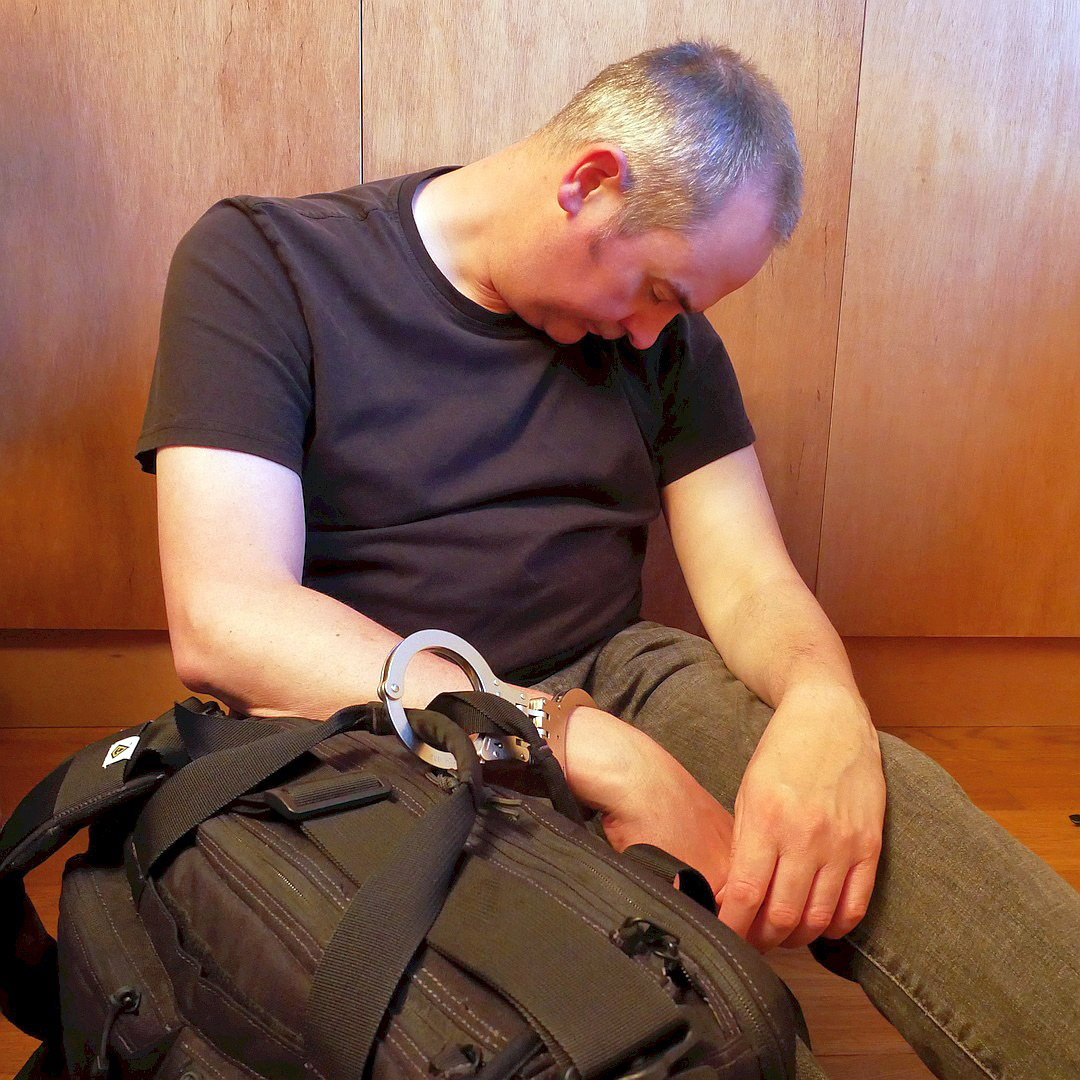
In terms of ‘Prepping’, handcuffs can actually be a very useful bit of kit to carry for several reasons. Here I am showing just three uses, as a bike lock, to secure a bag or other item you might want to leave for a few moments (in which time someone might take it). With the bag, clearly it doesn’t stop someone going through it, but is stops a quick snatch and run. And in the last photo, when you are resting, again to protect some possessions by preventing an easy theft.
Beyond these starter ideas, it can be used to hang items up, if required to secure someone that may be acting against you, as a rope weight if trying to throw a line to someone, to ‘hold’ a button down with the ratchet allowing adjustment as required. The list goes on for when you might need a second pair of hands.
TCH and the Twinlock:
A lot has been covered in this three part review, and hopefully you can see the quality, strength and reliability of TCH (chosen by the UK Police as the standard handcuff). The Twinlock concept makes for easier unlocking especially if the person is not cooperative so is well worth considering as when you want it, it will make a big difference.
This video covers all the TCH models that appear in the special three part review series, and will be included in all three parts of the review for ease of access. It might be worth taking a look over the image galleries before diving into the video.
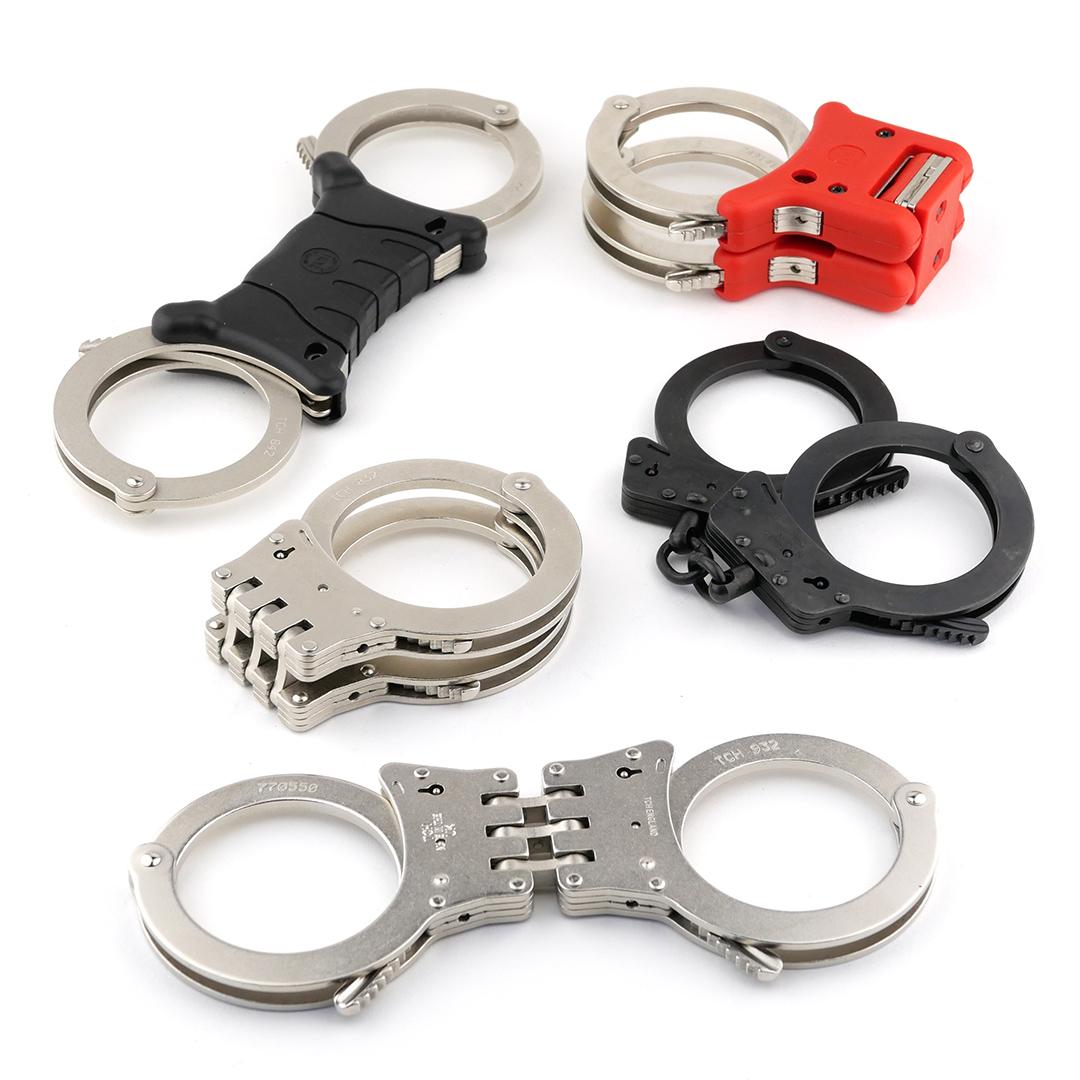
Full list of TCH products featured in the three part special series:
832 Superior Hinge Twinlock
932 Lightweight Superior Hinge Twinlock
852 Folding Rigid Twinlock – Red grip
842 Rigid Twinlock
822 Superior Chain Twinlock – Black finish
This is Part 2 of a TCH (Total Control Handcuffs) Handcuffs Special three part review series featuring the TCH Twinlock cuffs. In Part 2 we will be looking at the 852 Folding Rigid Twinlock, 832 Superior Hinge Twinlock, TCH HR Handcuff Reducer plus the 9200 and 9215 Handcuff Pouches. TCH Handcuffs Twinlock Special – Part 1 covered the 932 and 822 Twinlock cuffs, SK5 and SK6 keys, plus the 9201 belt pouch, and Part three will include the 842 Rigid Twinlock with RCP5 Handcuff Pouch, NCG Neoprene Cuff Guard along with handcuffing techniques, the TOOOL customised universal handcuff key and ‘alternative’ uses for handcuffs.
Join me here for Part 2 of the TCH Handcuffs Special review as we continue our look over these excellent cuffs and the Twinlock dual keyway design.
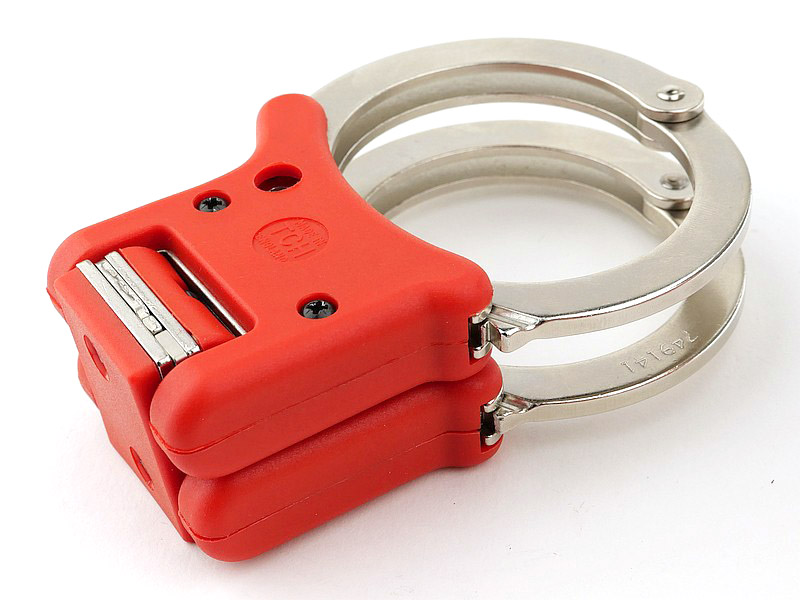
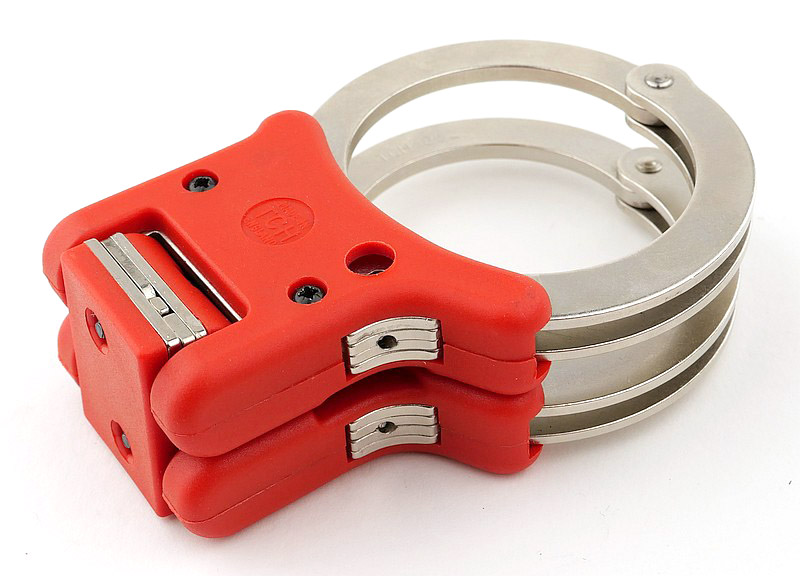
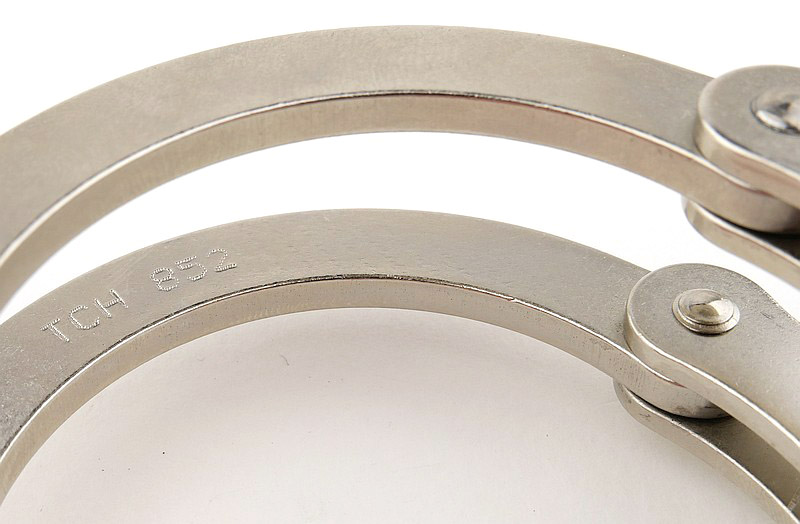
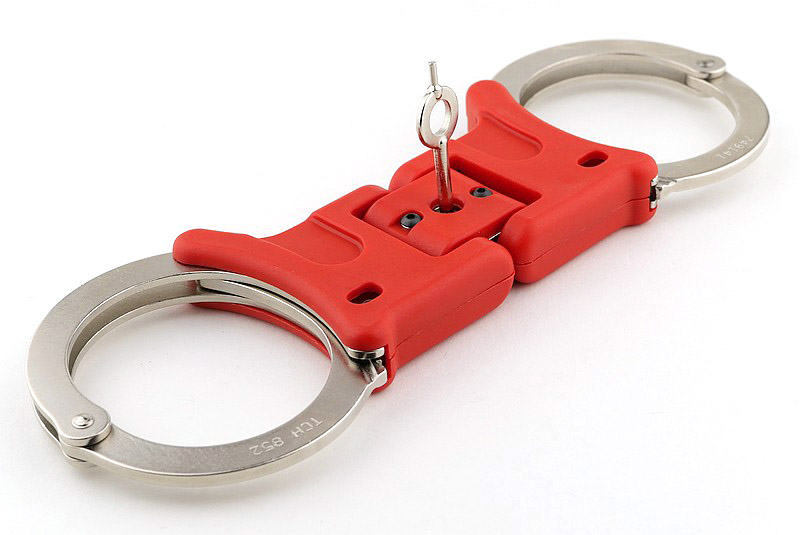
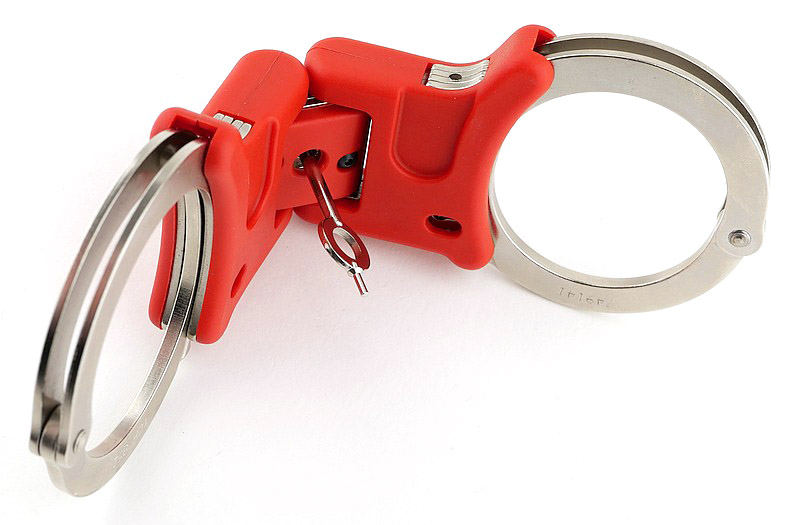
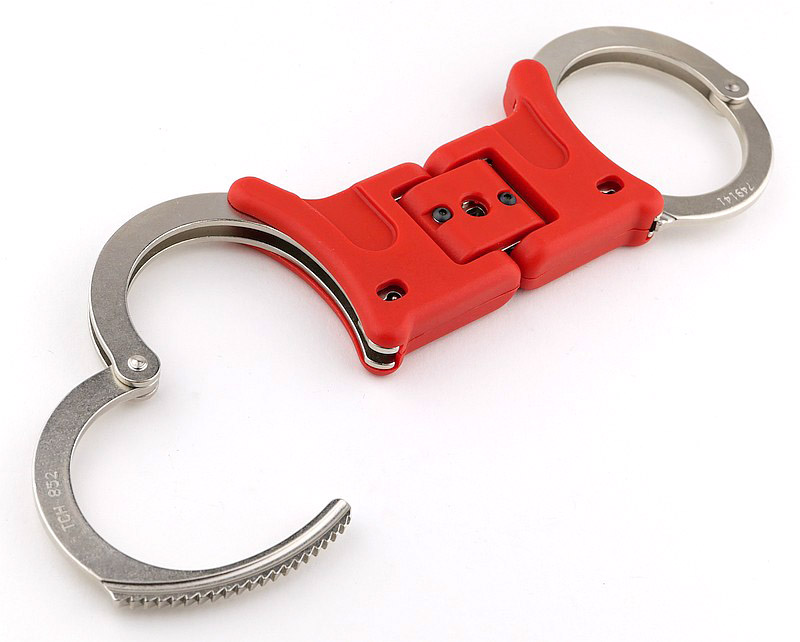
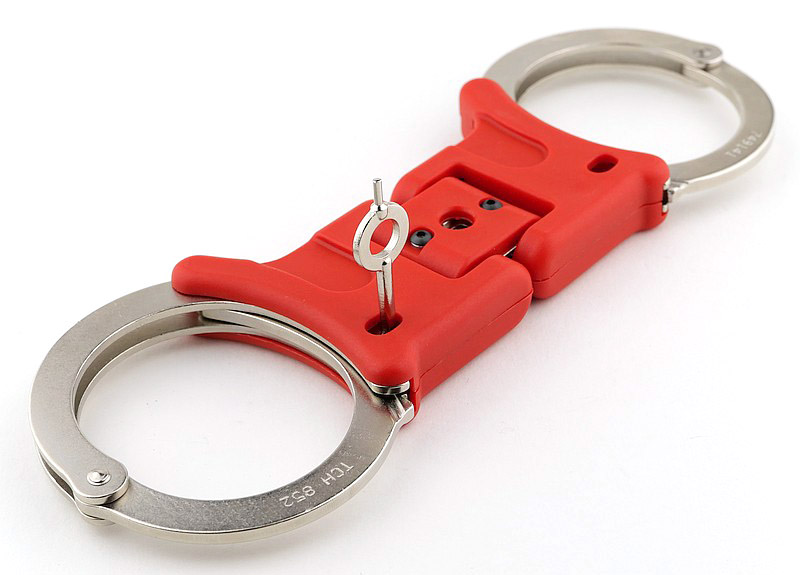
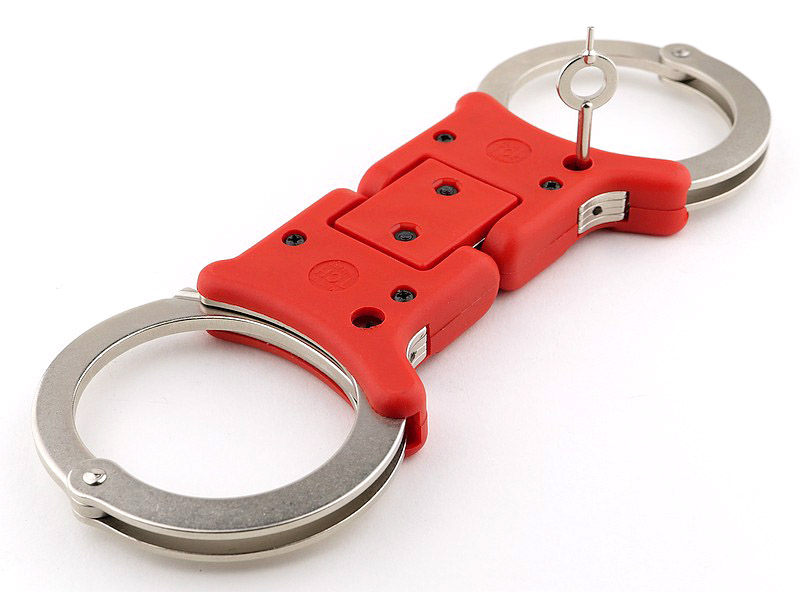
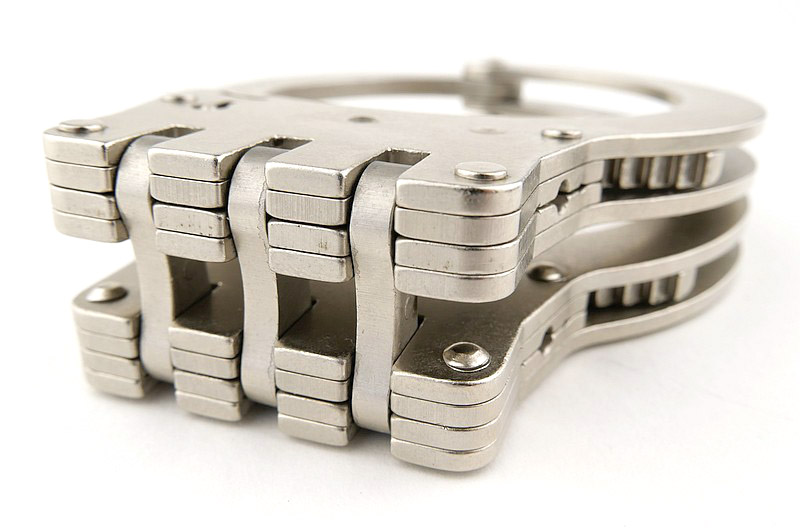
First look round the model 852 folding rigid handcuffs:
These 852 cuffs are in the ‘training colour’ of red, although there is no reason not to use red for restraint, the only difference is the colour of the plastic, and nothing else.
With the 852 folding rigid, although the first impression is ‘chunky’, but when you put them next to a pair of rigid cuffs, the space saving is clear. The folding mechanism makes them so much easier to carry but still gives you fully rigid cuffs.
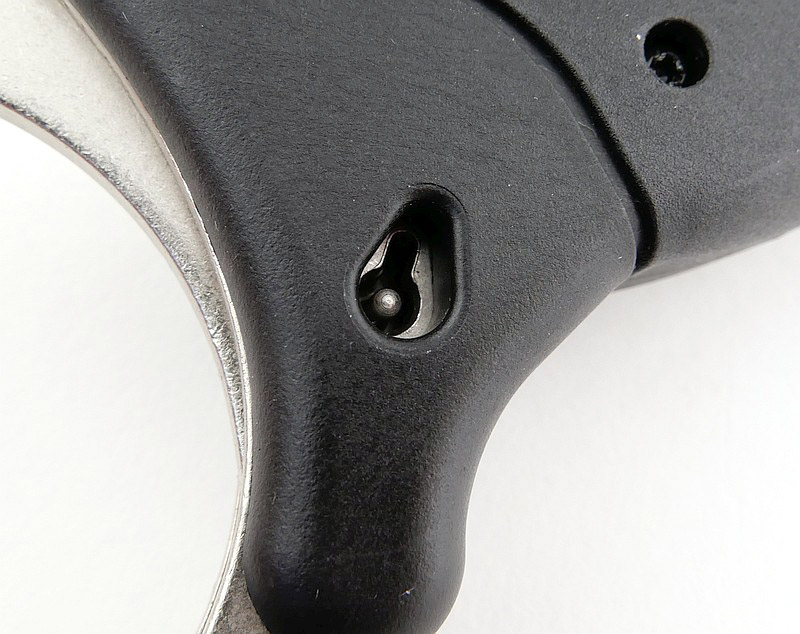
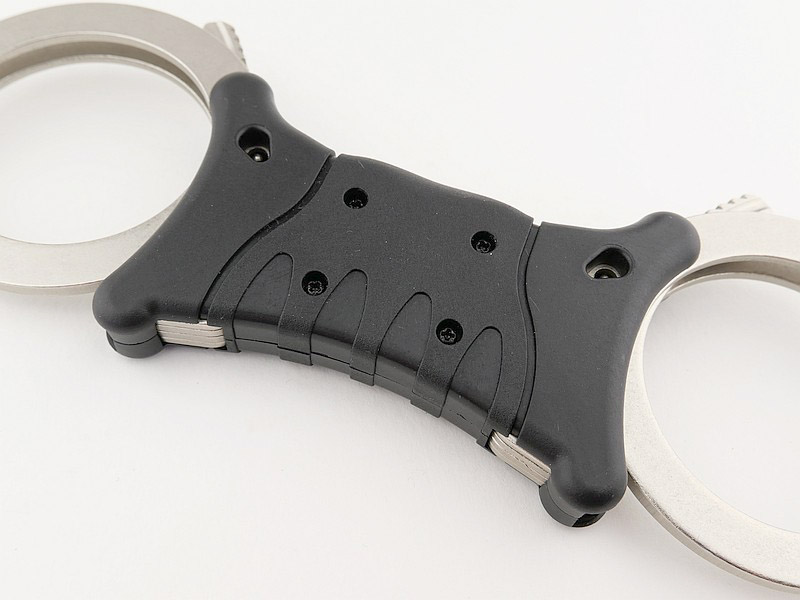
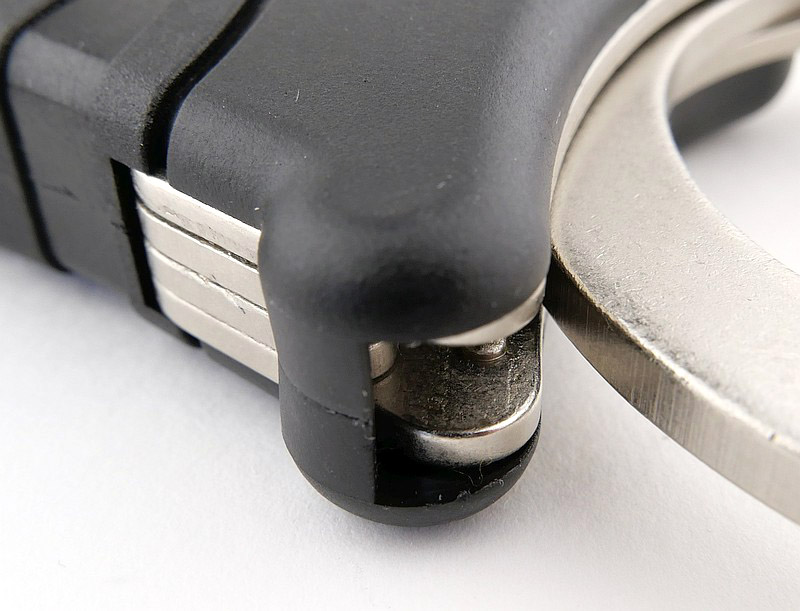
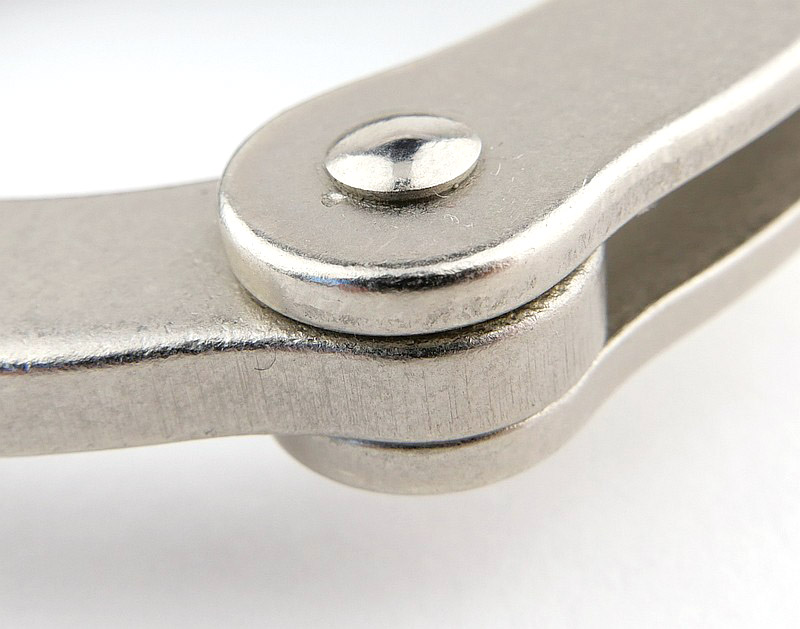
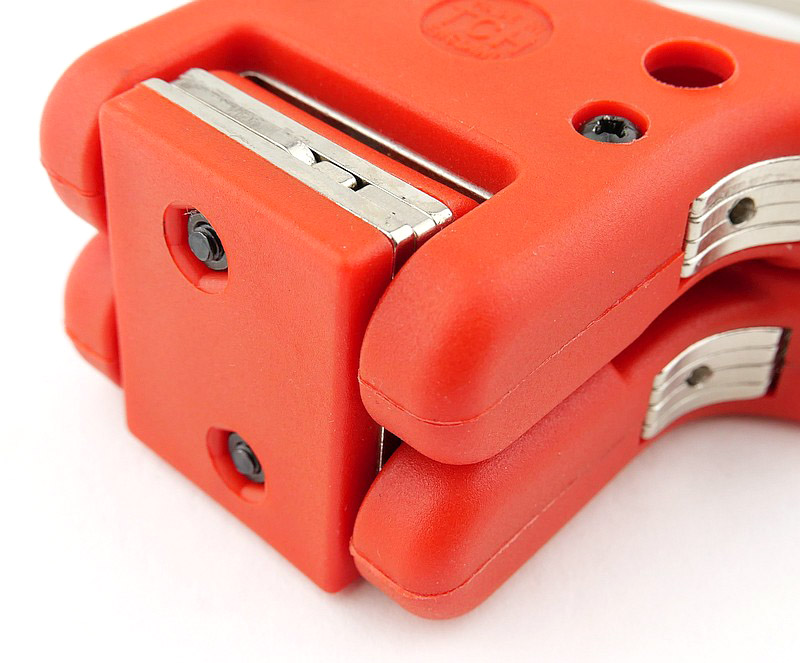
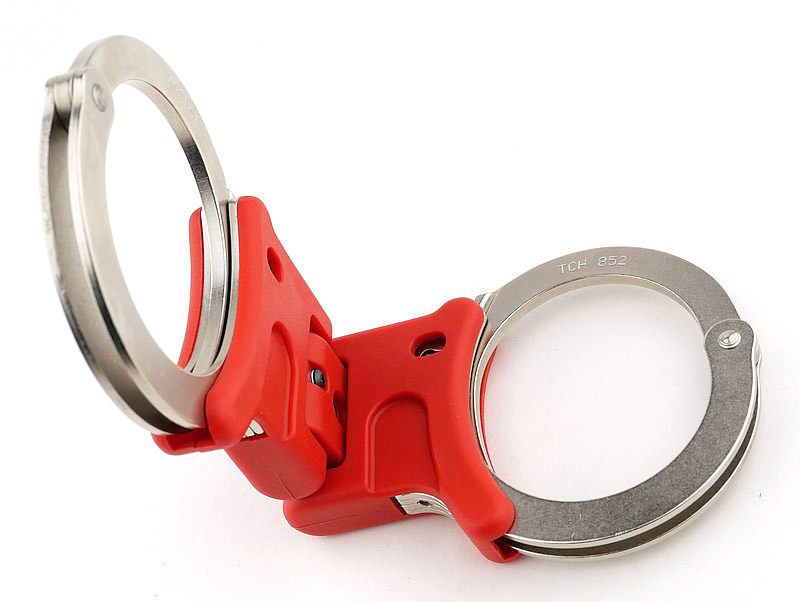
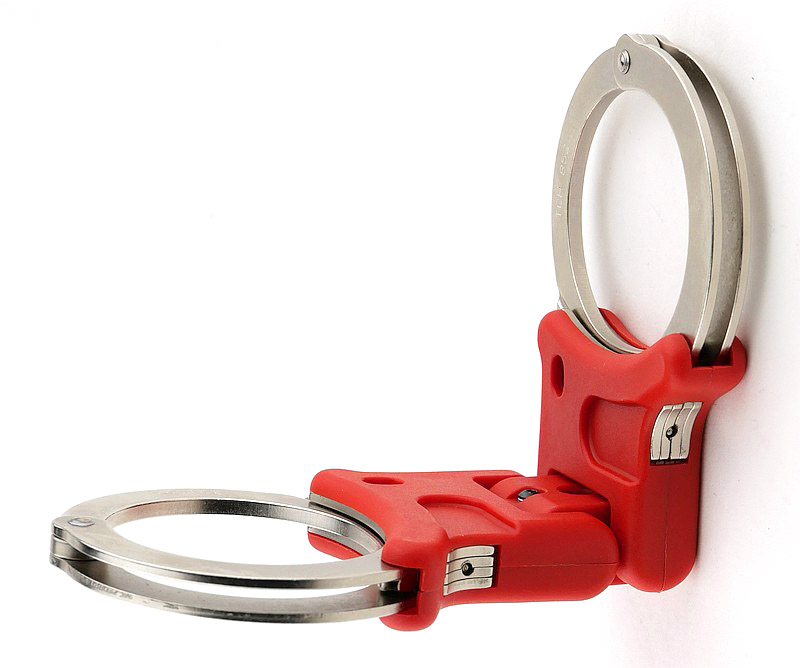
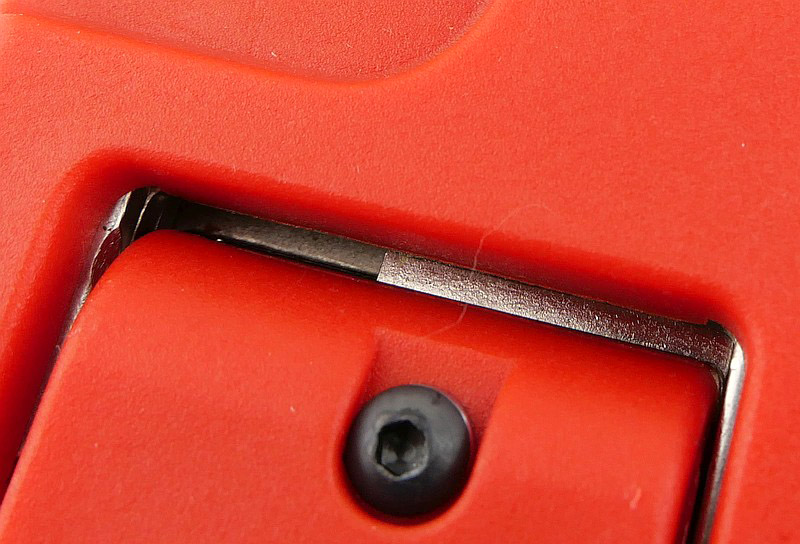
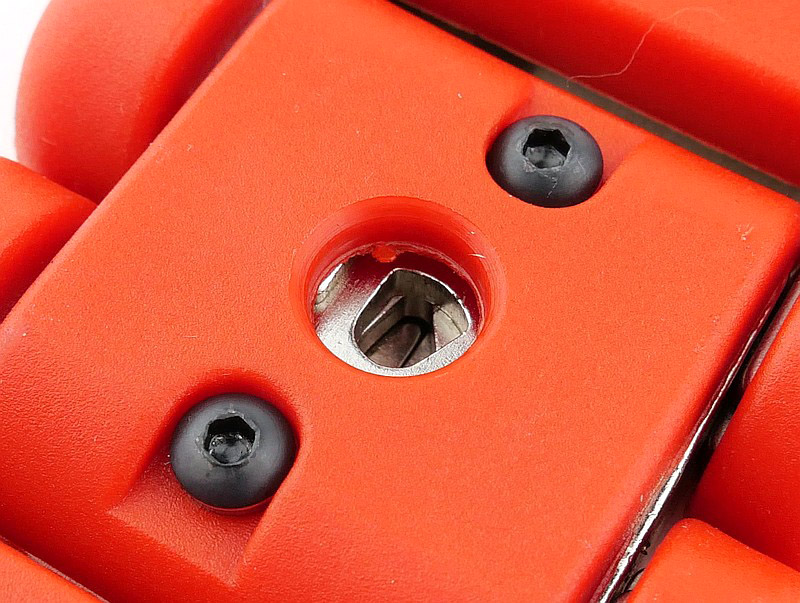
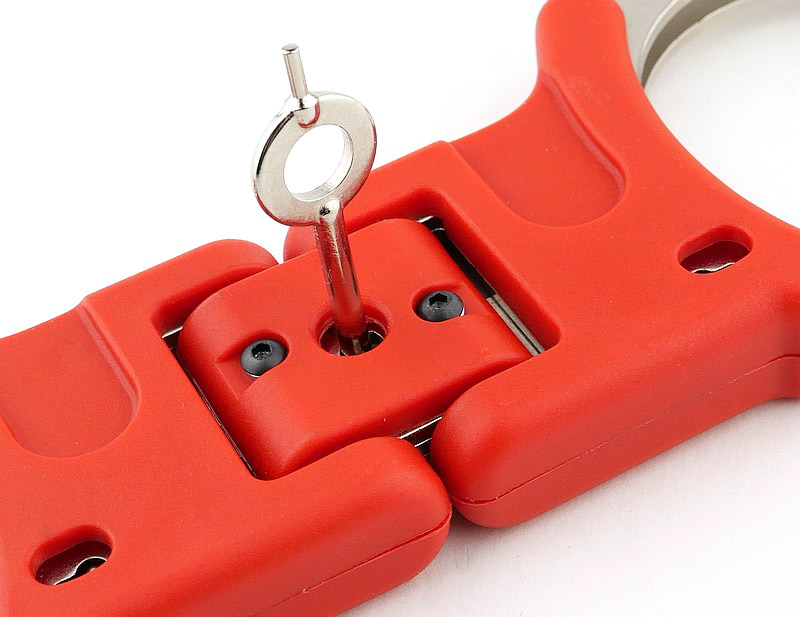
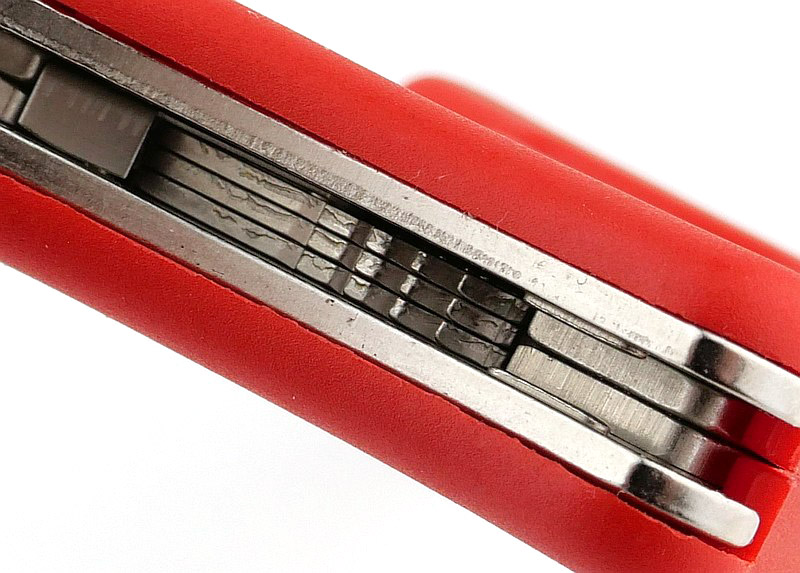
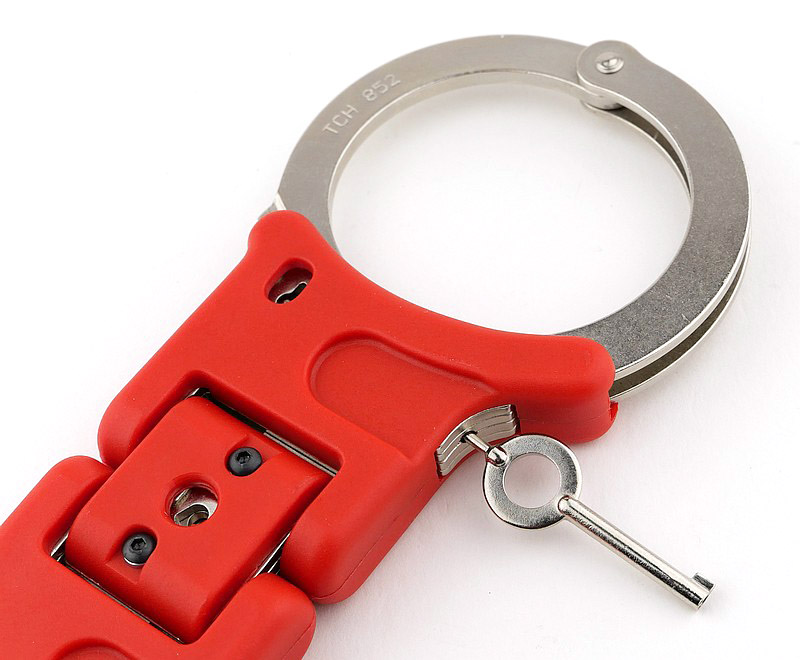
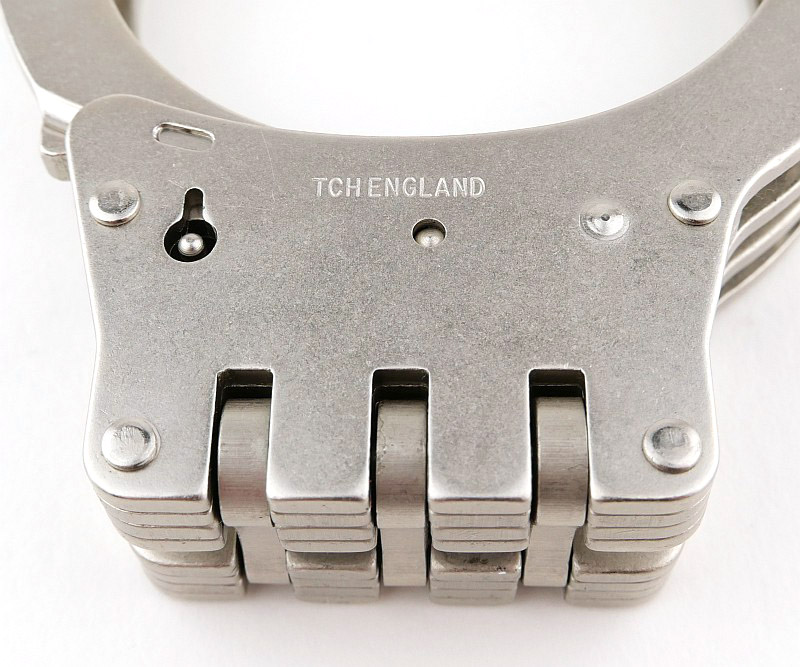
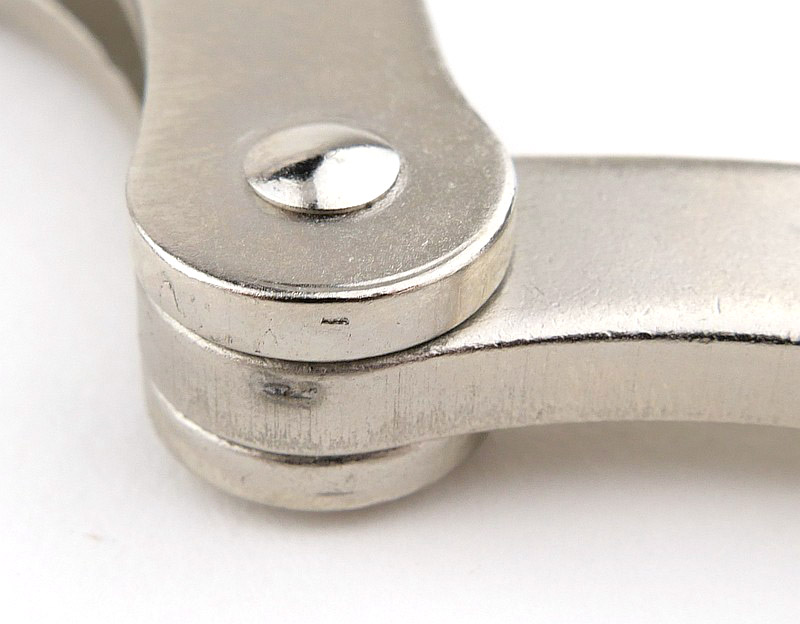
The 852’s special hinge – Things to look out for here are:
The 852 takes the power and control of the rigid handcuff and adds a locking hinge to allow then to be folded for easier carry. As the cuffs are opened, a wide latch engages on each side of the hinge. The centre of the hinge has another keyway for a standard TCH handcuff key to unlock the hinge and allow the 852 to fold.
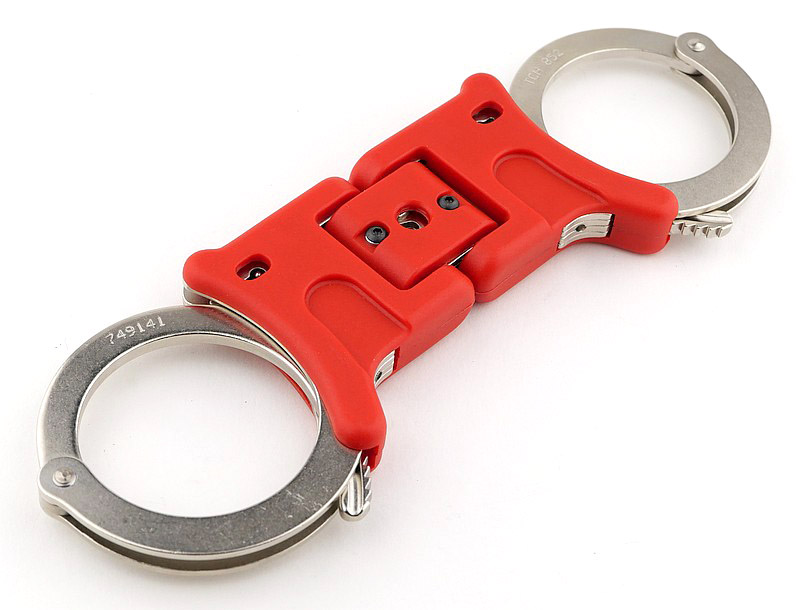
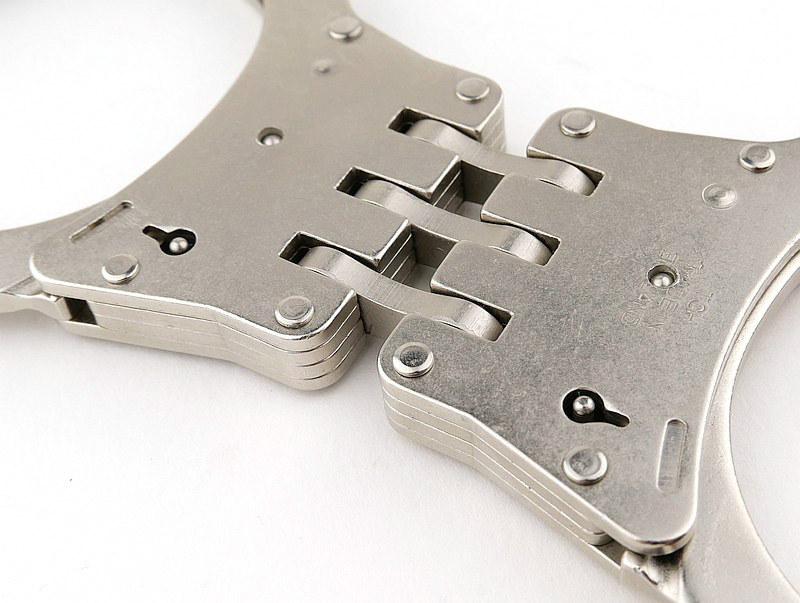
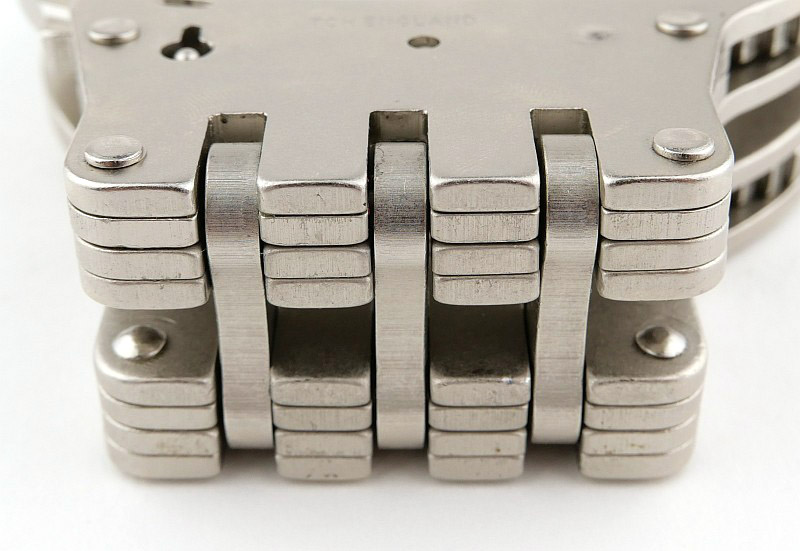
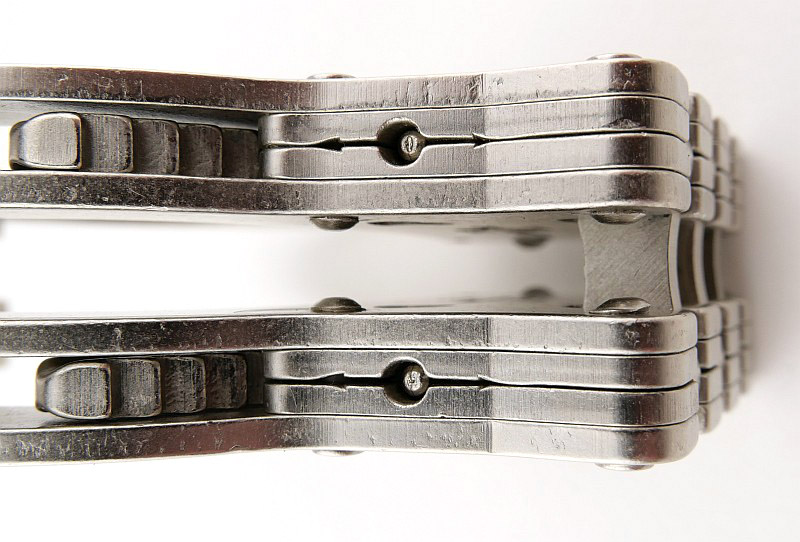
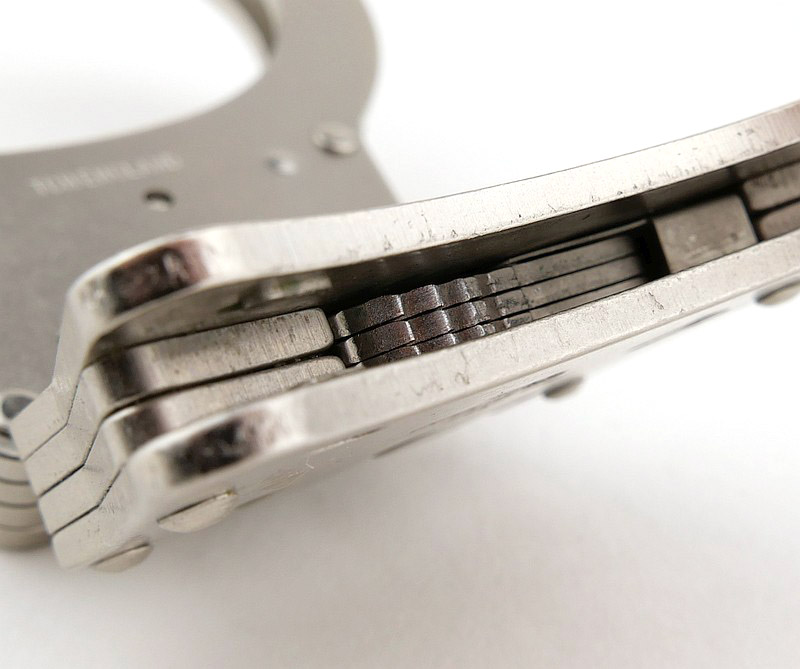
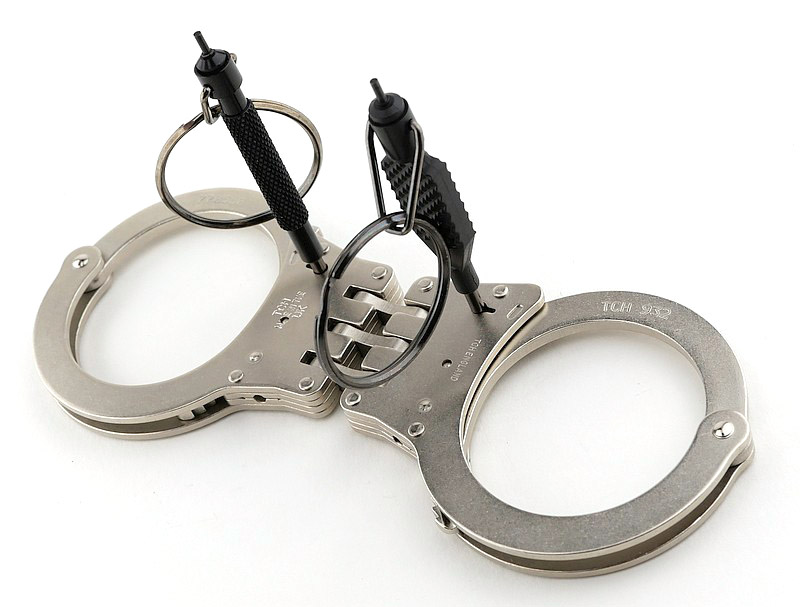
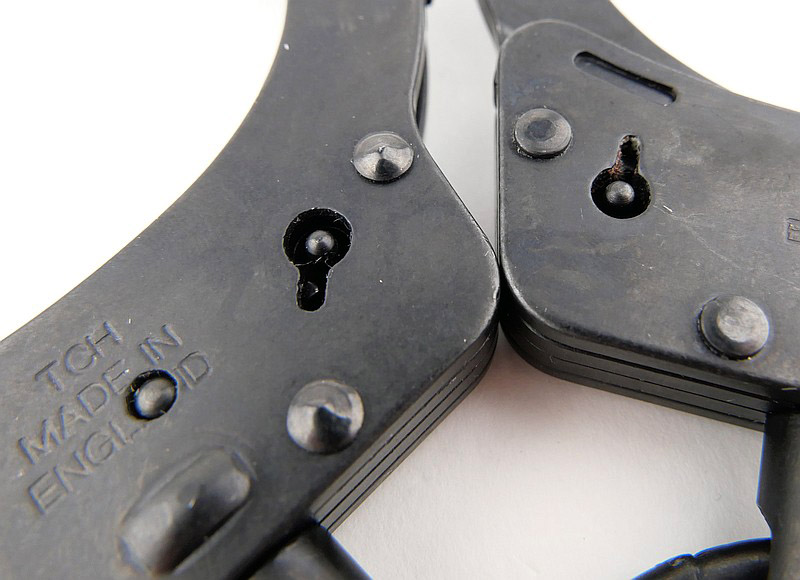
Twinlock security features:
As with the other Twinlock models, in this gallery I’m showing close-ups of the triple pawl locking mechanism, the double-lock pin mechanism, and a key fitted into the primary and secondary keyways. There is a difference in the key hole position and rotation for the primary and secondary keyways. Being a rigid model (folding but also rigid) the back-loading preparation of the rotating arm is relevant and one of these photos shows the 852 back-loaded.
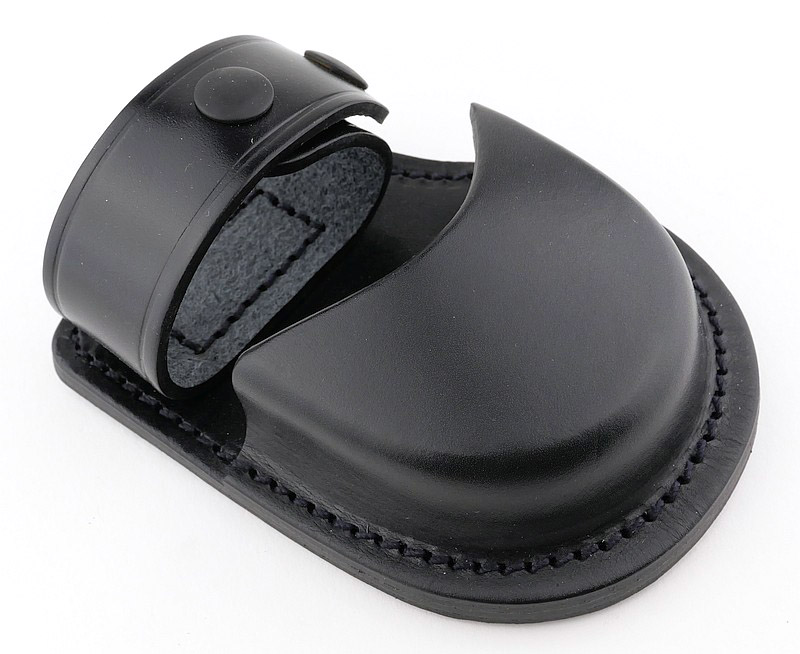
Looking round the 9215 leather belt pouch:
A quick aside to look at the 9215 leather belt pouch made for the 852 cuffs. Constructed from heavy duty leather, it will stand up to hard use.
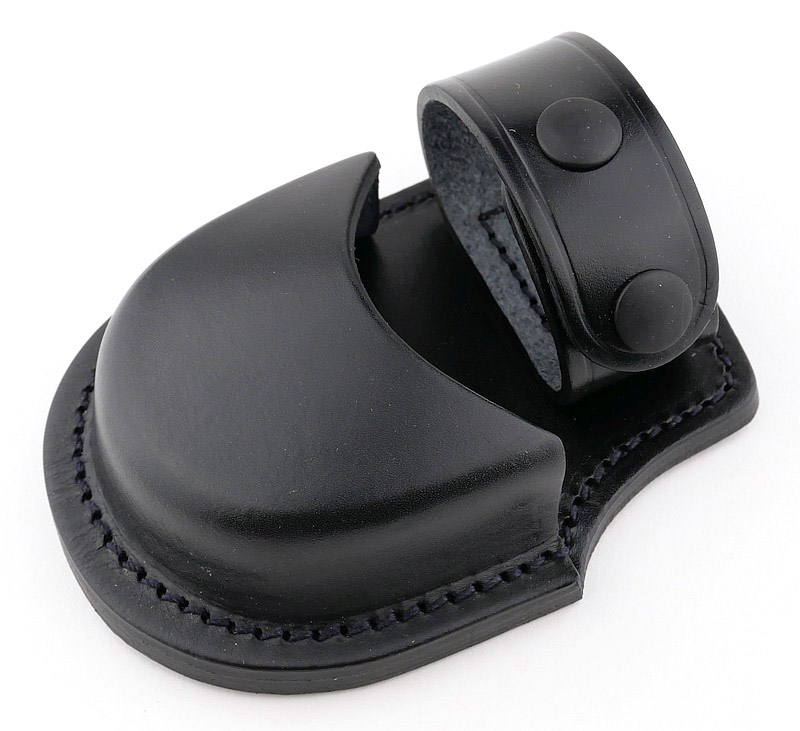
Looking round the 9200 leather belt pouch:
And the second pouch in this review is the 9200 leather belt pouch made for the hinged or chain cuff models. Here it is shown with the 832.
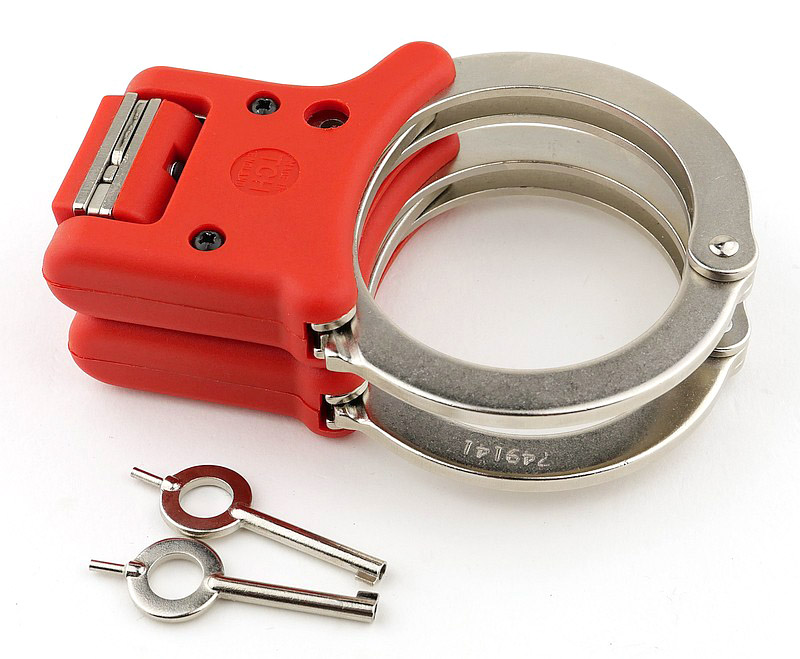
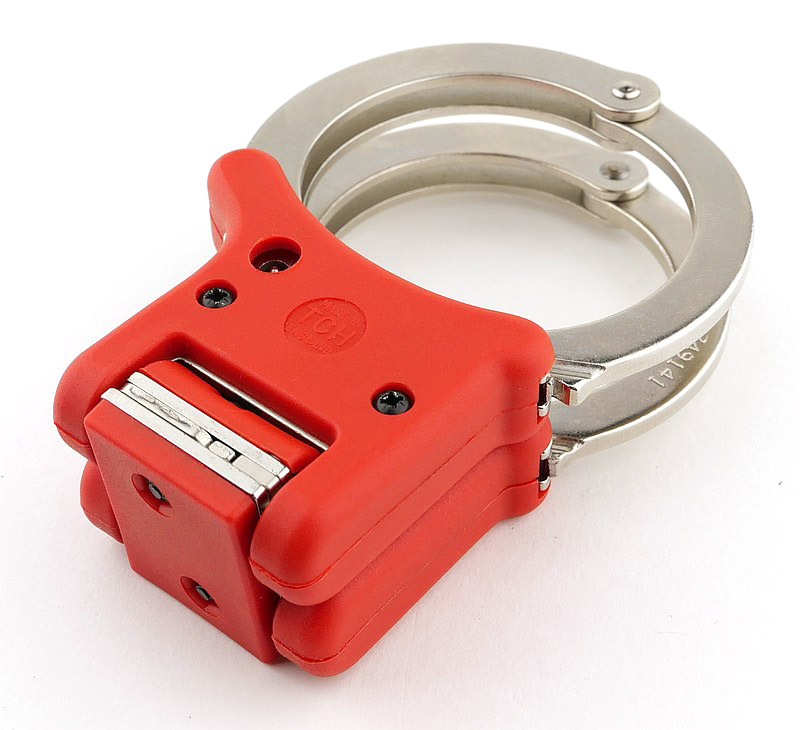
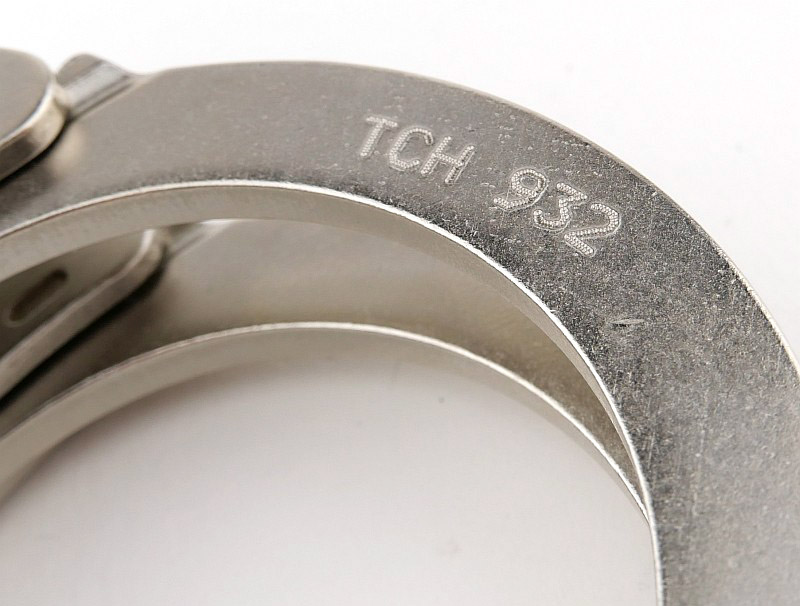
Model 832 – Superior hinged cuffs with Twinlock:
In part 1 we looked at the 932 which is the lightweight version of the all steel 832. Showing the main design features, this gallery looks more at the twinlock design with keys fitted to show the positions.
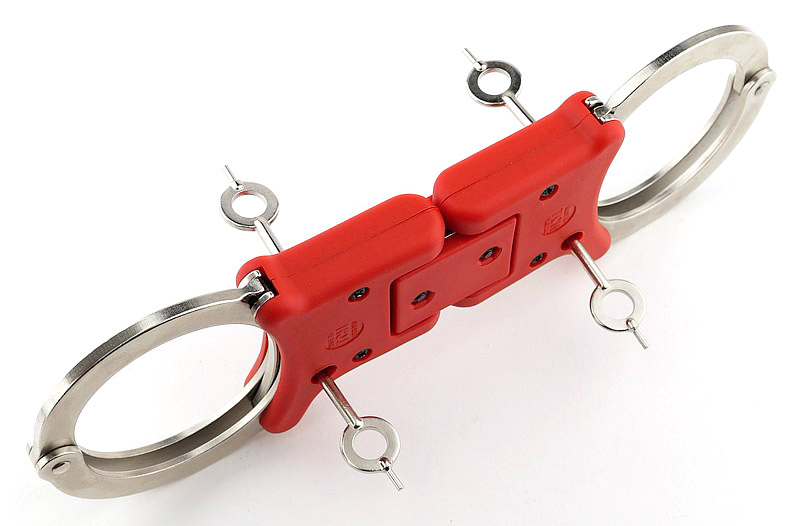
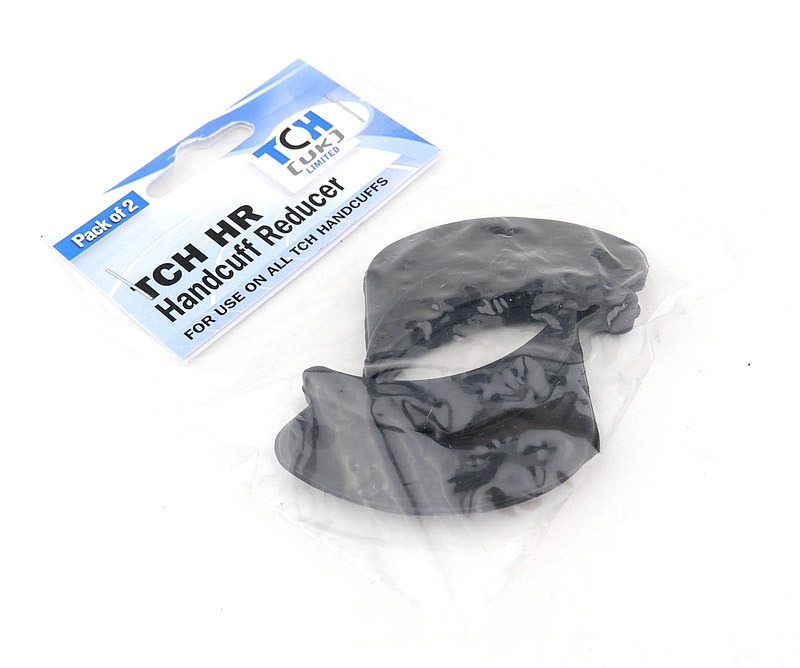
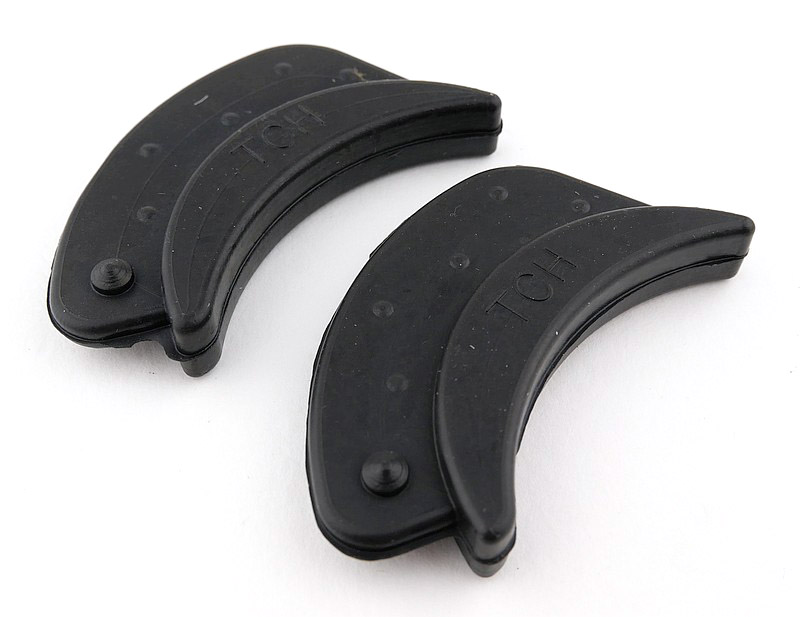
TCH HR Handcuff Reducer:
To allow for smaller wrists than average, TCH makes an insert for the cuffs that reduces the minimum size the cuff can hold securely. The insert slips in between the two halves of the double strand (the fixed part of the cuff), pushed up against the single strand rivet (Single strand being another term for the rotating arm). In this position the rotating arm can move past it and lock into place. With the reducer in place it is not possible to push the rotating arm all the way through the cuff, so it prevents speedcuffing.
Part three will include the 842 Rigid Twinlock with RCP5 Handcuff Pouch, NCG Neoprene Cuff Guard along with handcuffing techniques, the TOOOL customised universal handcuff key and ‘alternative’ uses for handcuffs.
Video Review
This video covers all the TCH models that appear in the special three part review series, and will be included in all three parts of the review for ease of access. It might be worth taking a look over the image galleries before diving into the video.
Full list of TCH products featured in the three part special series:
832 Superior Hinge Twinlock
932 Lightweight Superior Hinge Twinlock
852 Folding Rigid Twinlock – Red grip
842 Rigid Twinlock
822 Superior Chain Twinlock – Black finish
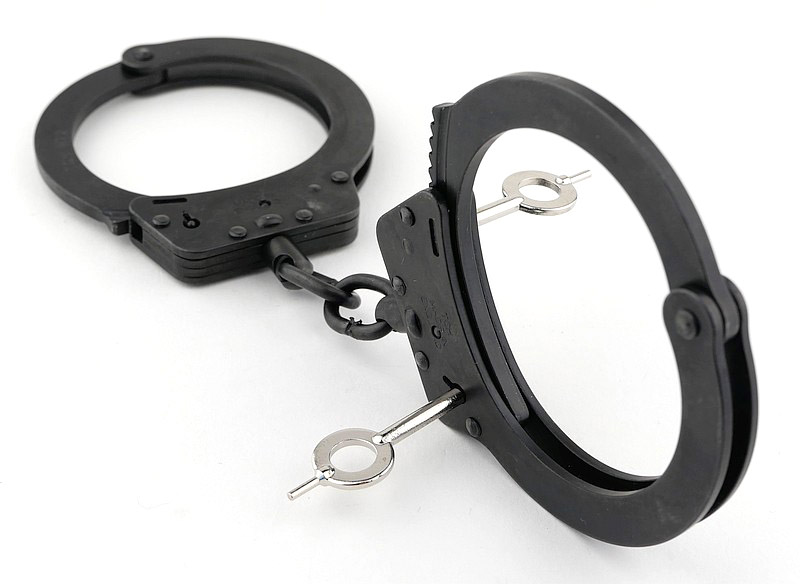
This is Part 1 of a TCH (Total Control Handcuffs) Handcuffs Special three part review series featuring the TCH Twinlock cuffs. After growing in size far beyond my originally intended group review, in this first part of the series we will be covering the 932 and 822 Twinlock cuffs, SK5 and SK6 keys, plus the 9201 belt pouch. The TCH Twinlock mechanism makes it much easier to unlock with a keyway on both sides of each cuff.
Parts 2 and 3 will include the 832, 852 and 842 cuffs, NCG Neoprene Cuff Guard, TCH HR Handcuff Reducer and the 9200, 9215 and RCP5 Handcuff Pouches, plus information on cuffing techniques and the TOOOL Universal Handcuff Key.
Join me here for Part 1 of the TCH Handcuffs Special review to start our look over these excellent cuffs and the Twinlock dual keyway design.
Video Review
This video covers all the TCH models that appear in the special three part review series, and will be included in all three parts of the review for ease of access. It might be worth taking a look over the image galleries before diving into the video.
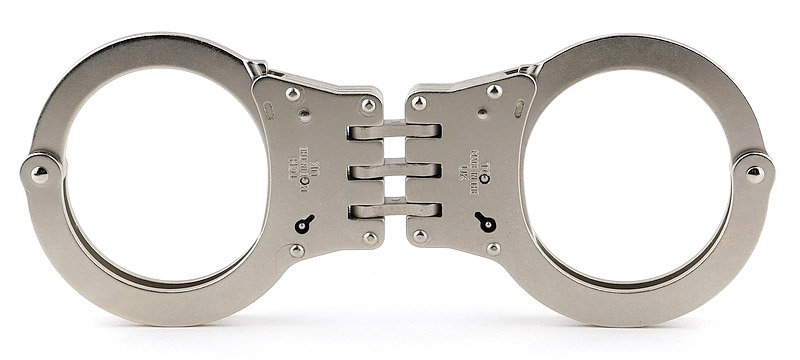
Unpacking the model 932 handcuffs:
A good look round the 932 – Things to look out for here are:
The 932 is the lightweight Superior Hinge Twinlock model. The hinge means it folds, but prevents the cuffs twisting. With twisting prevented, ‘stacked’ cuffing techniques can be used (See part three for more details).
In this gallery you can also see the Twinlock feature with photos of each side of the cuffs in the fully open position. There is a difference in the key hole position and rotation for the primary and secondary keyways.
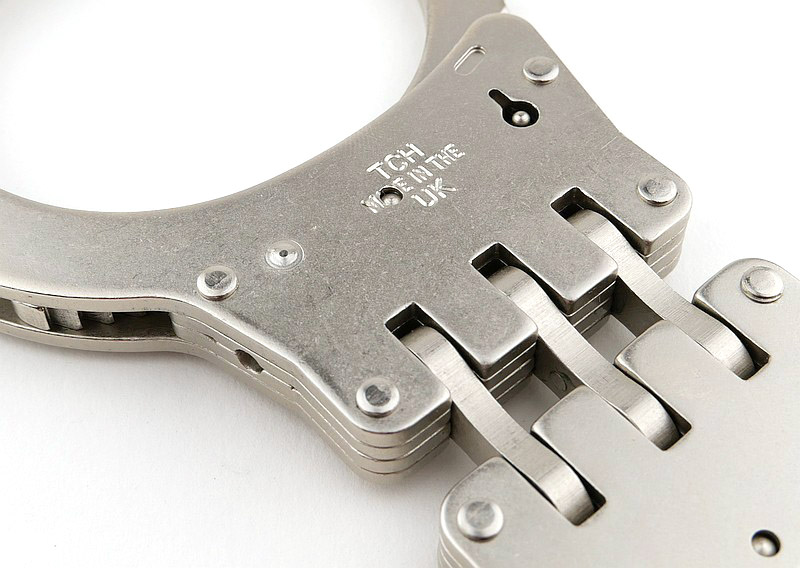
Twinlock security features:
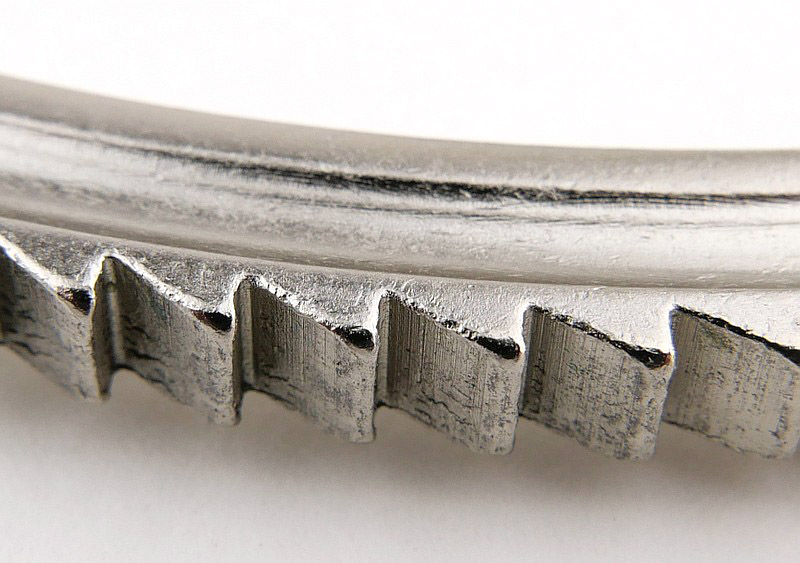
With this first detailed look at a Twinlock model, in this gallery I’m showing close-ups of the ratchet teeth on the rotating arm, the triple pawl locking mechanism, the double-lock pin mechanism, and a key fitted into the primary and secondary keyways.
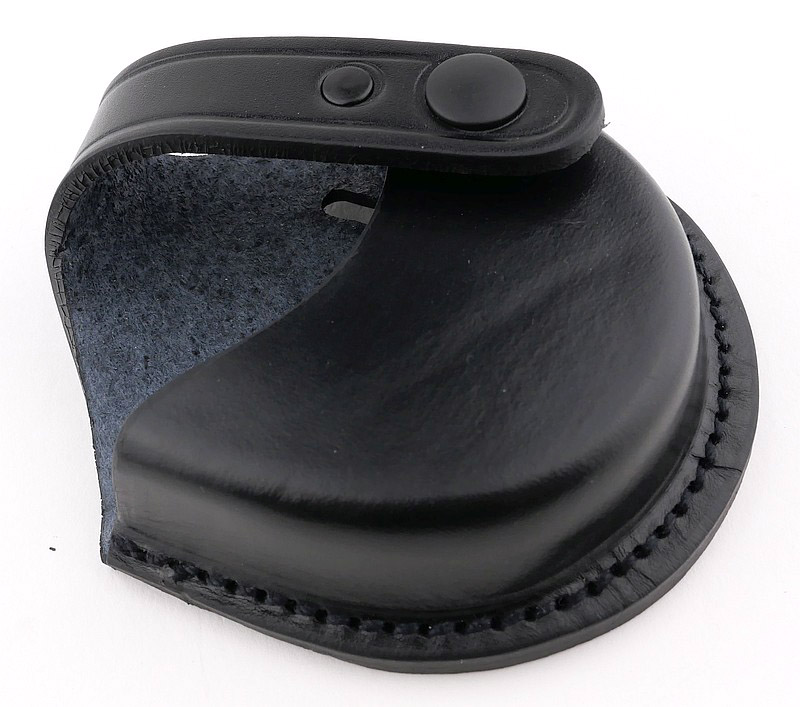
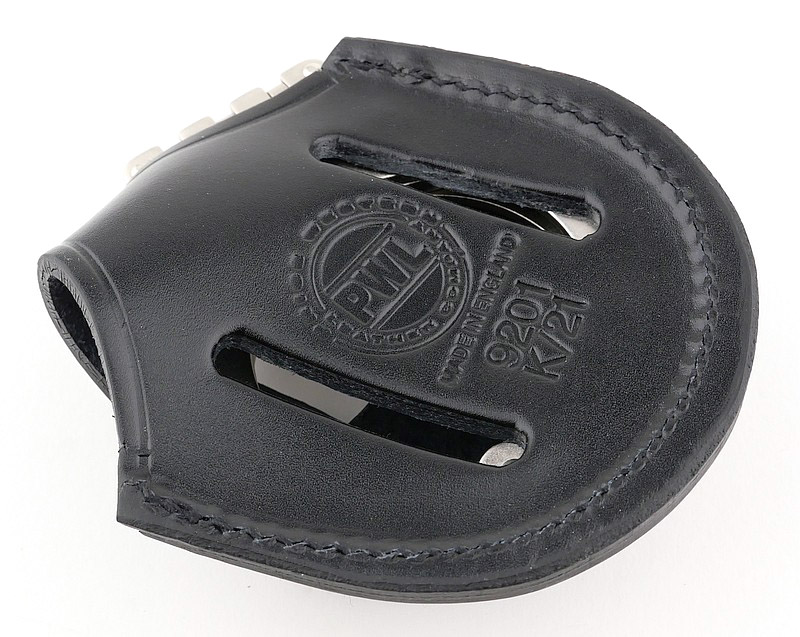
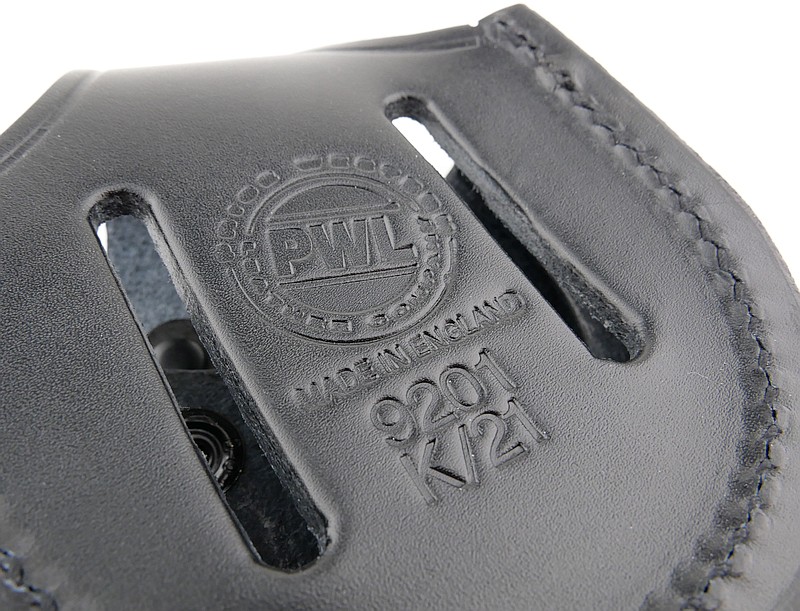
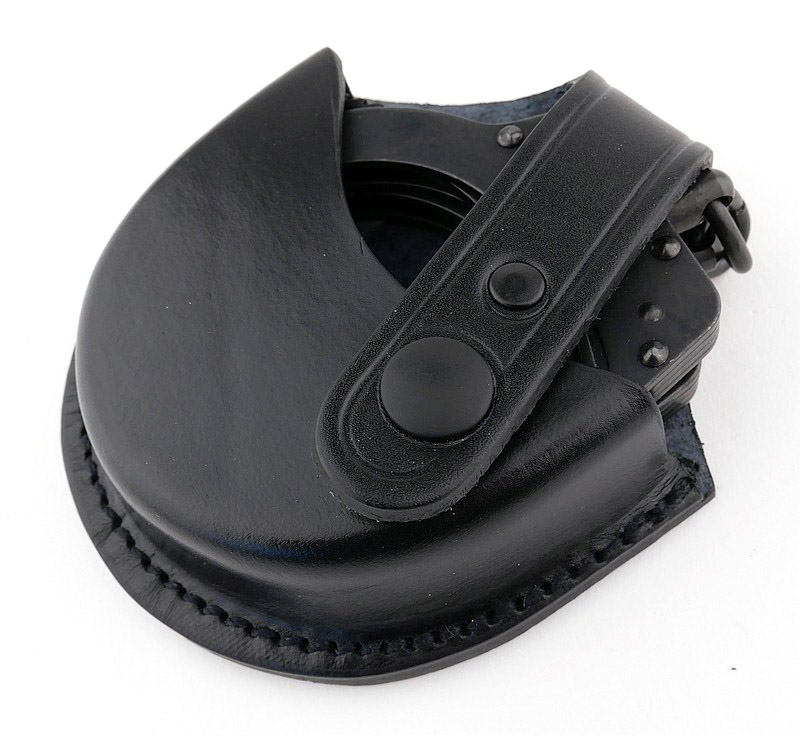
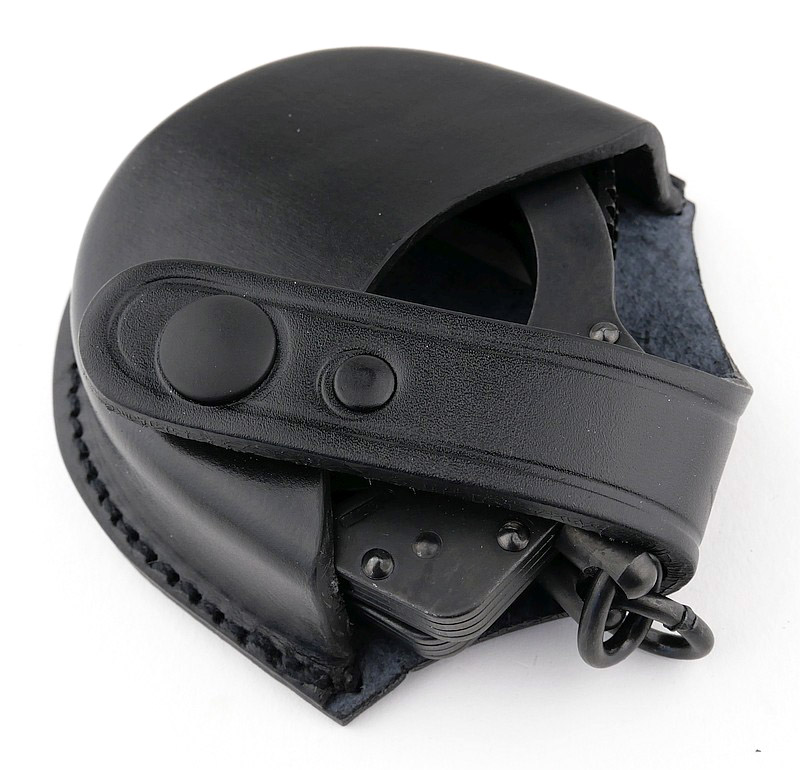
Looking round the 9201 leather belt pouch:
A quick aside to look at the 9201 leather belt pouch. Constructed from heavy duty leather, this pouch will take all the knocks you might give it.
Just about taking the 932 cuffs, but there is a version of this pouch with longer strap to better fit the hinged models.
Optional SK5 and SK6 duty keys:
For frequent use, and to improve handling of the standard handcuff key, TCH offer two optional bigger duty keys, the SK5 and SK6 both of which give you more leverage and are easier to use than the basic key.
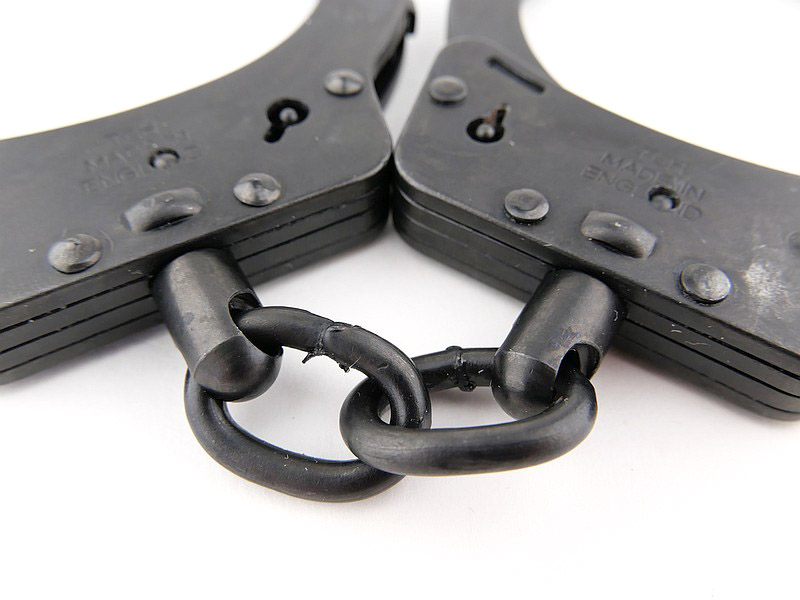
Model 822 – traditional chain cuffs with Twinlock:
The most traditional cuff to be shown in this series of reviews is a chain cuff model, the 822. In this case it is in the black finish. Traditional this may be, but it also has the TCH Twinlock mechanism, so making it much easier to unlock with a keyway on both sides of each cuff. Also shown fitted in the 9201 belt pouch.
Coming up in Parts 2 and 3:
Next up in Part 2 will be the 852 Folding Rigid Twinlock, 832 Superior Hinge Twinlock, TCH HR Handcuff Reducer plus the 9200 and 9215 Handcuff Pouches.
Part three will include the 842 Rigid Twinlock with RCP5 Handcuff Pouch, NCG Neoprene Cuff Guard along with handcuffing techniques , the TOOOL customised universal handcuff key and ‘alternative’ uses for handcuffs.
Full list of TCH products featured in the three part special series:
832 Superior Hinge Twinlock
932 Lightweight Superior Hinge Twinlock
852 Folding Rigid Twinlock – Red grip
842 Rigid Twinlock
822 Superior Chain Twinlock – Black finish
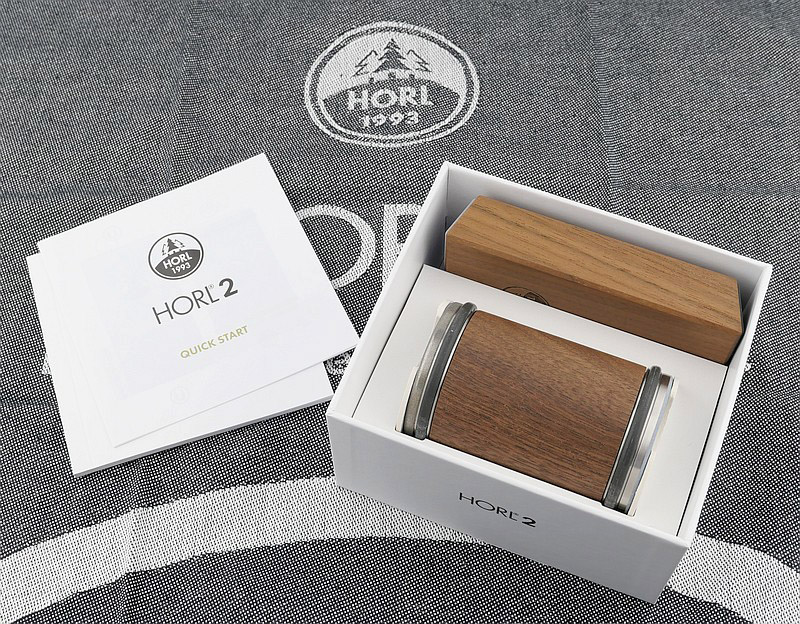
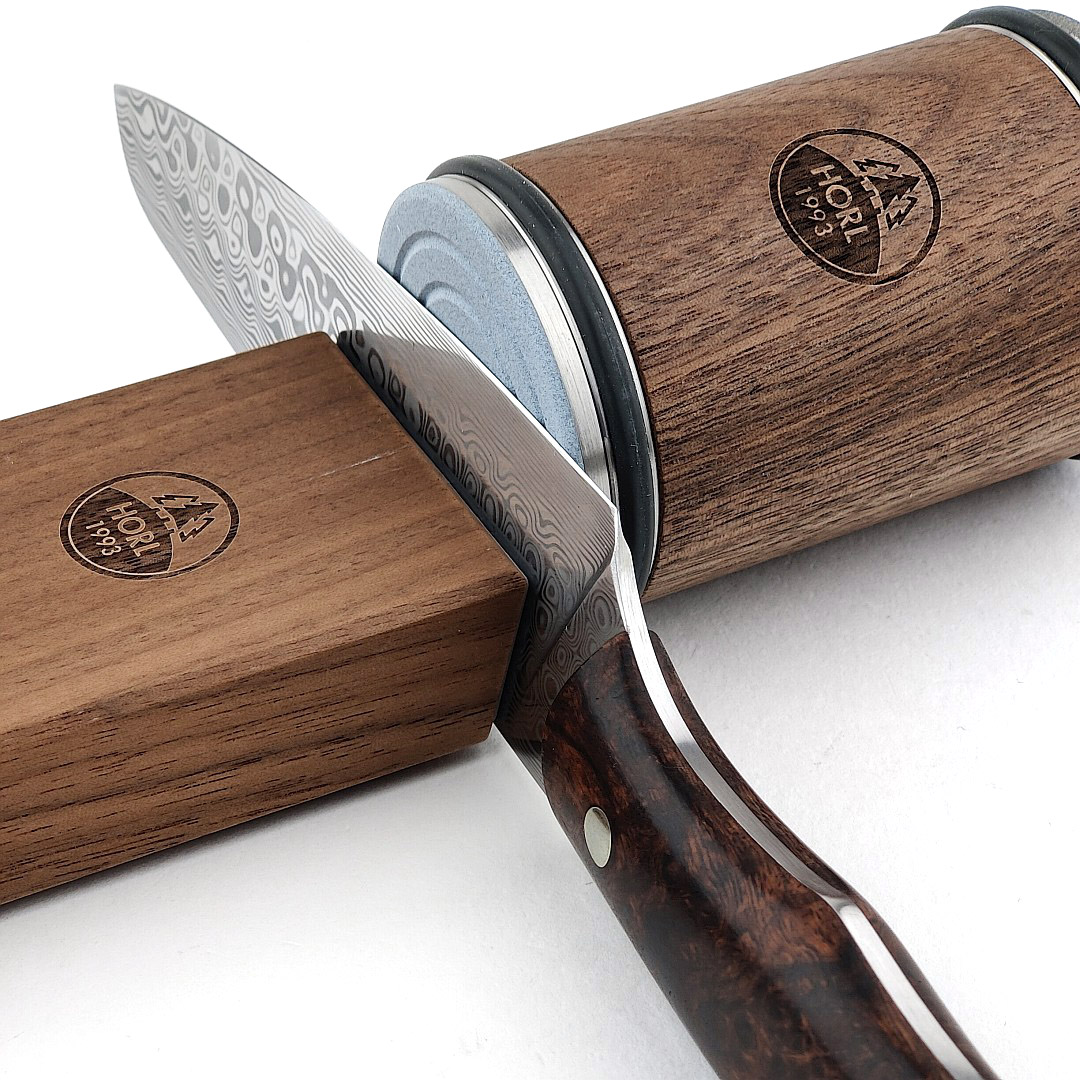
HORL 1993 are creating a revolution in sharpening with their innovative line of rolling knife sharpeners. Many of you will likely have seen their system popping up in various social media feeds, especially if you have any interests involving knives. Though primarily aimed at sharpening kitchen knives, having given the system a quick try out at IWA 2022, I was intrigued to test it in more depth and with other types of knives. Join me in this HORL 2 knife sharpener review for a closer look at this new approach to guided sharpening.
What is on test?:
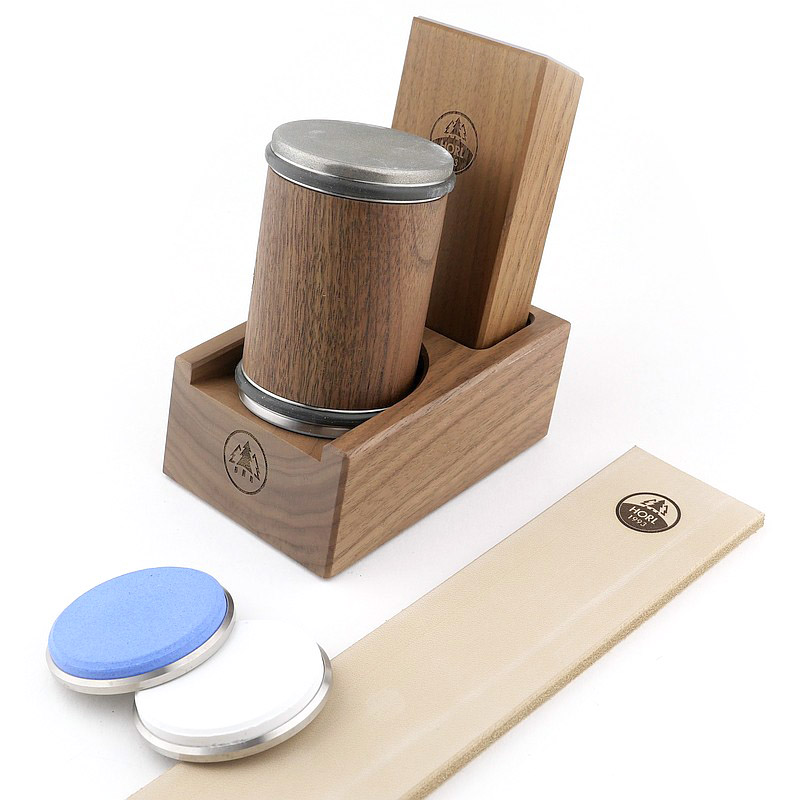
For this review, on test are the HORL 2 sharpener with add-on Premium Sharpening kit plus the storage block. HORL also sent the tea towel and branded plasters.
A good look round the HORL 2 – Things to look out for here are:
In this first part which includes the HORL 2 sharpener plus the optional storage block, I’m breaking it into three sections. First the HORL 2 box and first look over the knife holder / angle guide, then views all round the storage block, and finally the rolling sharpening stone itself.
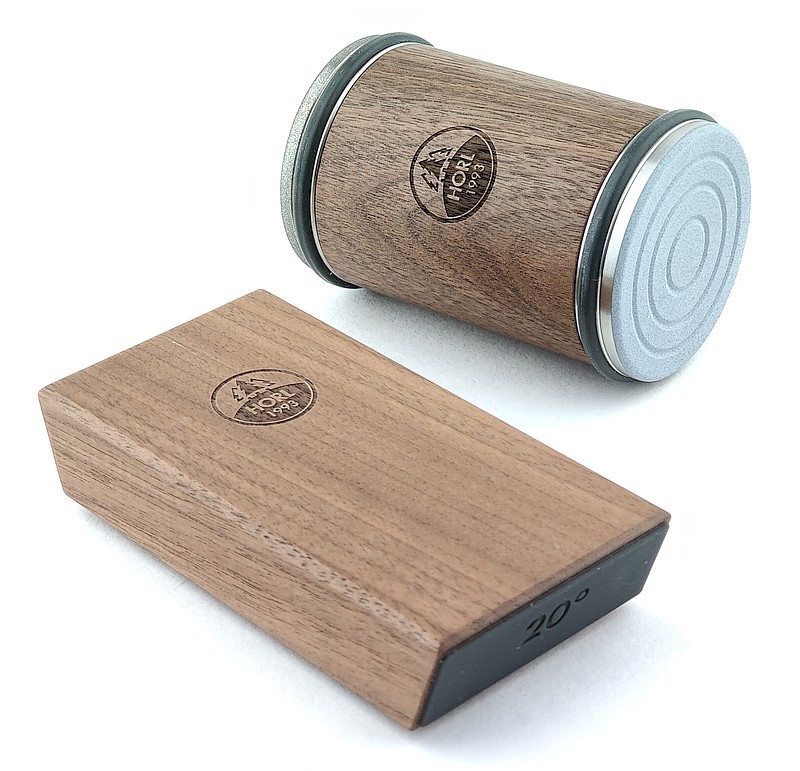
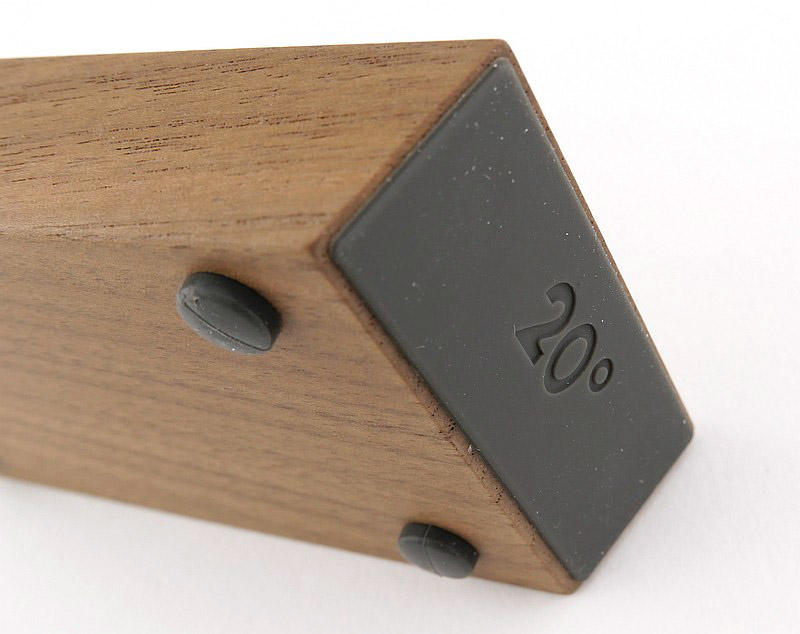
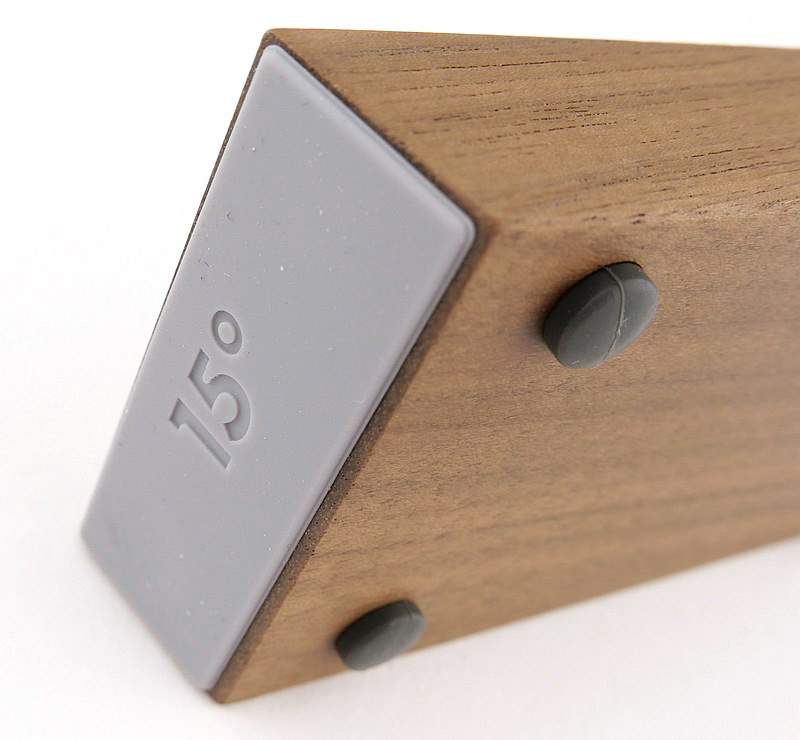
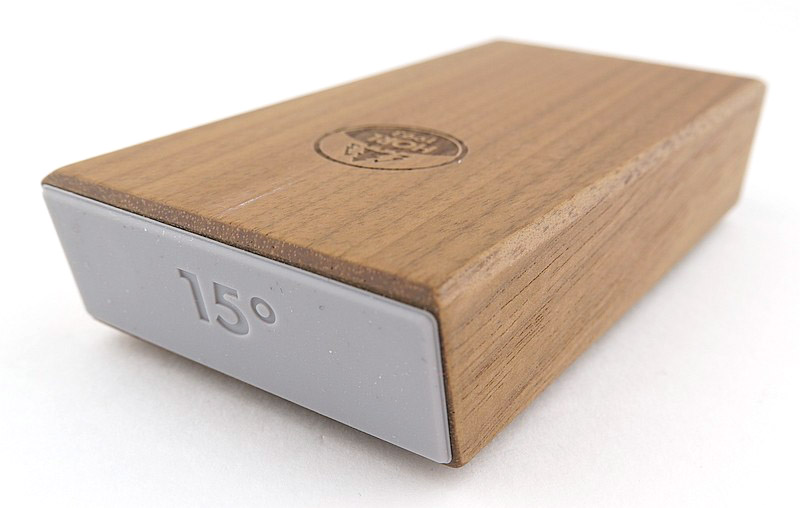
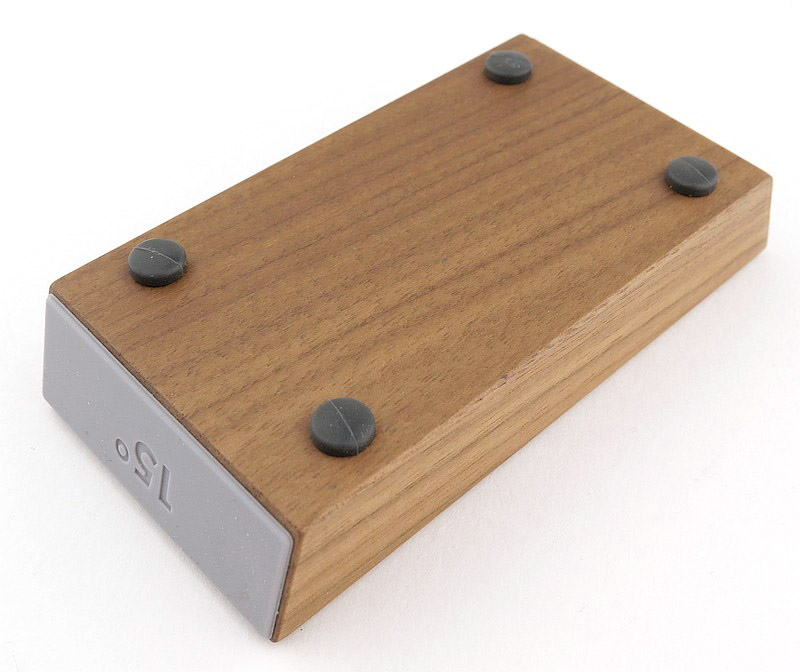
Inside the box are a couple of printed guides, and the two main components, the rolling sharpener and the magnetic guide block. The precisely finished wooden guide block has two angled ends, 15 degrees and 20 degrees. The ends are marked with their angle and have a rubber surface to cushion and hold the knife.
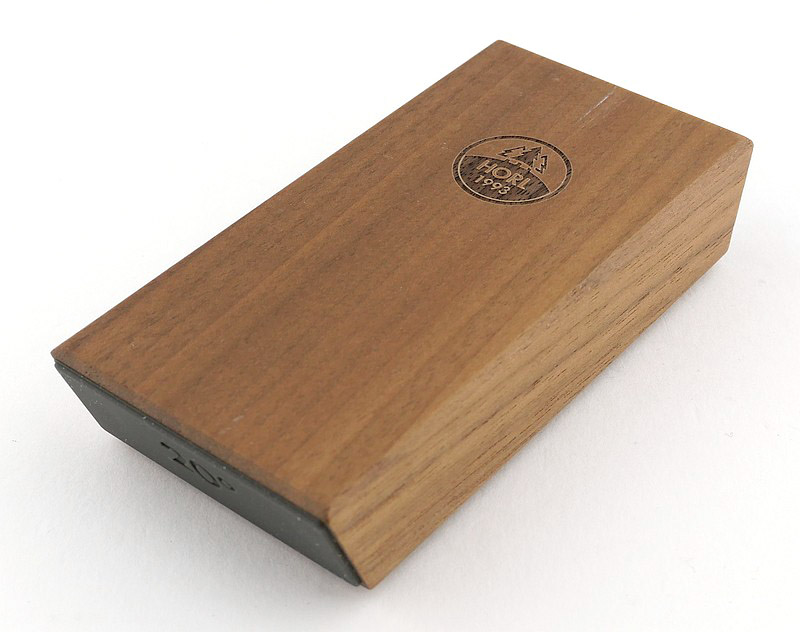
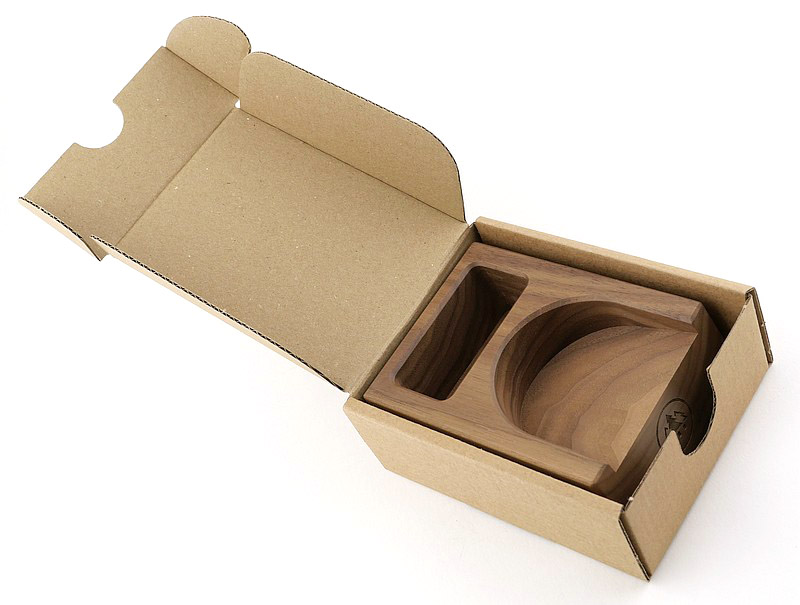
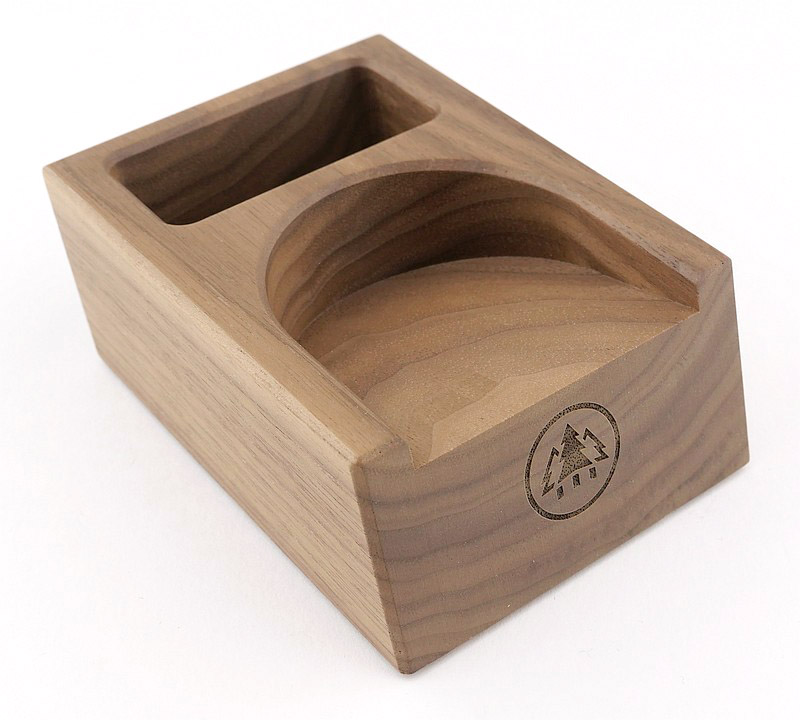
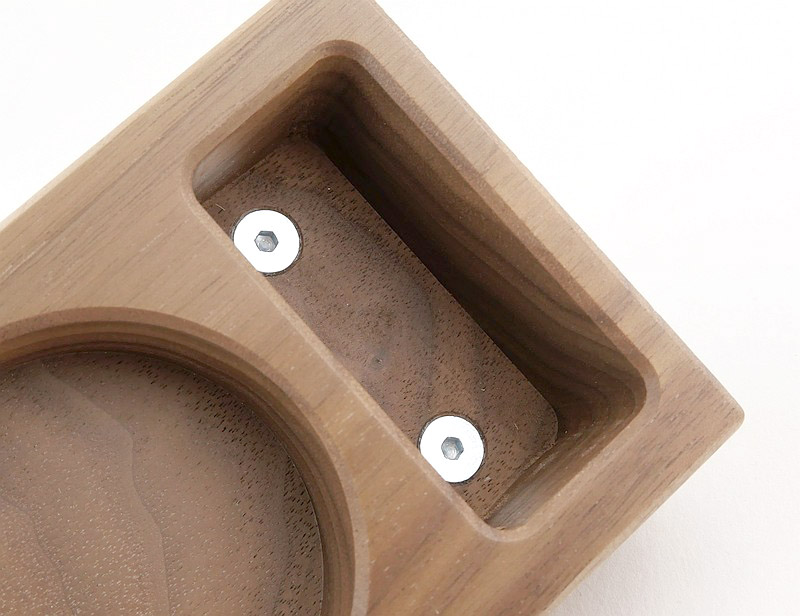
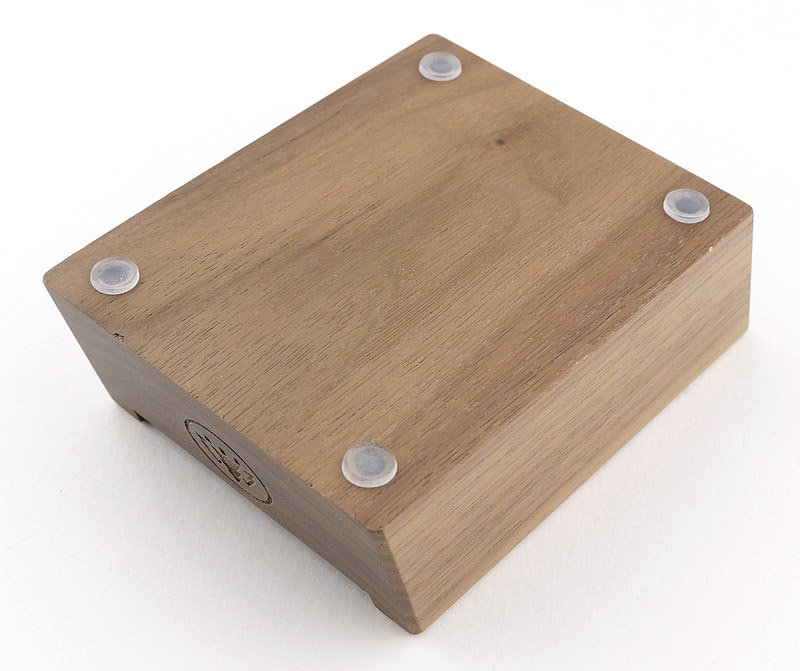
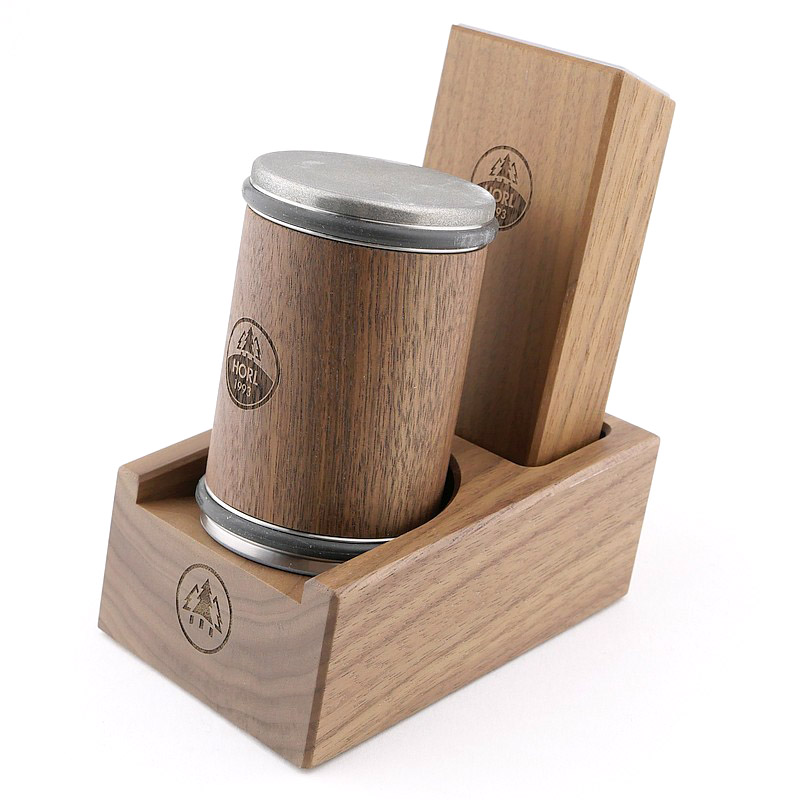
An optional extra that goes with the sharpener so well you really should get it, is the storage block. Available in either of the two woods used for the sharpeners themselves you can match the sharpener or go with a wood contrast. The block has two cut-outs, one is an angled pocket to sit the rolling sharpener in, and the other is a slot that has a couple of bolt heads which the magnetic guide block grabs on to. The quality of finish is very high.
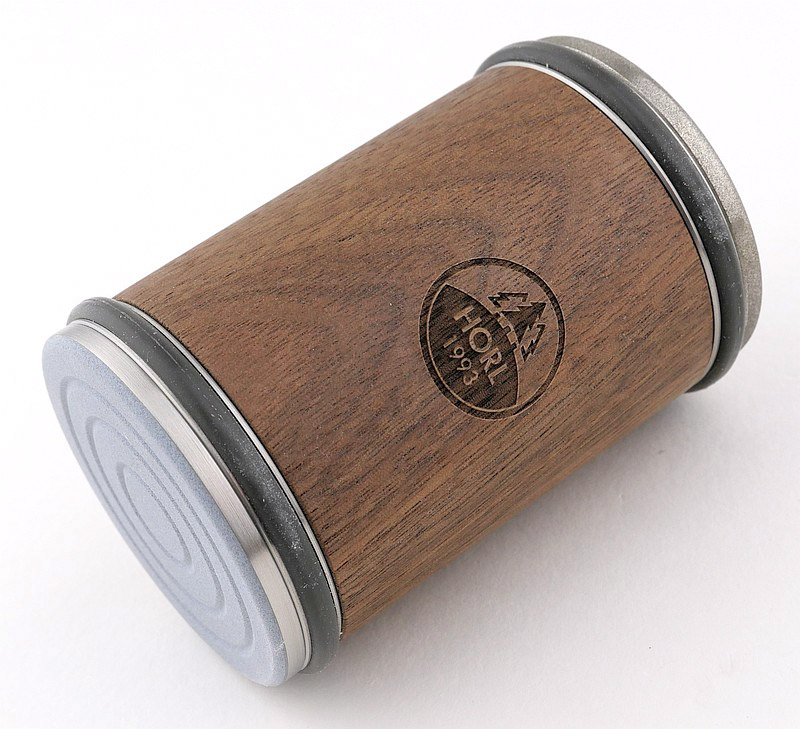
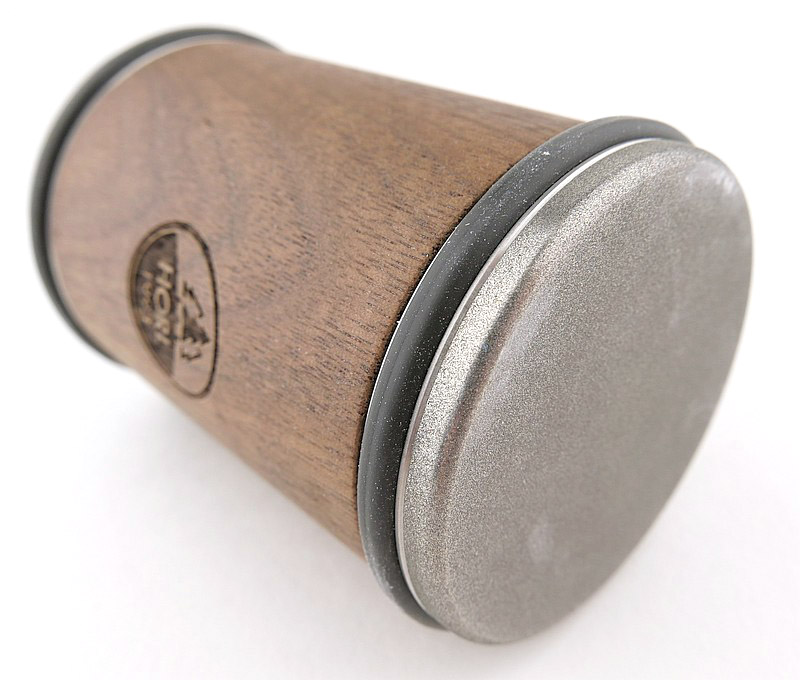
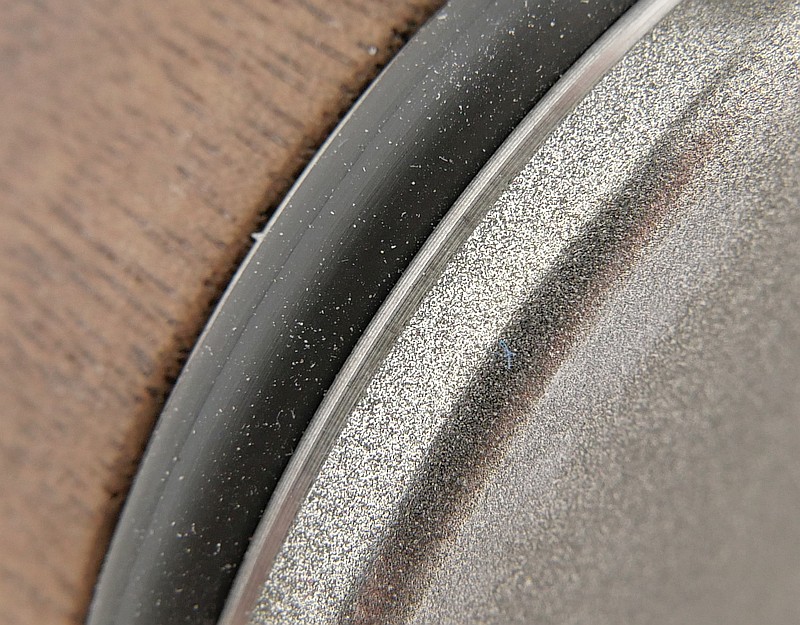
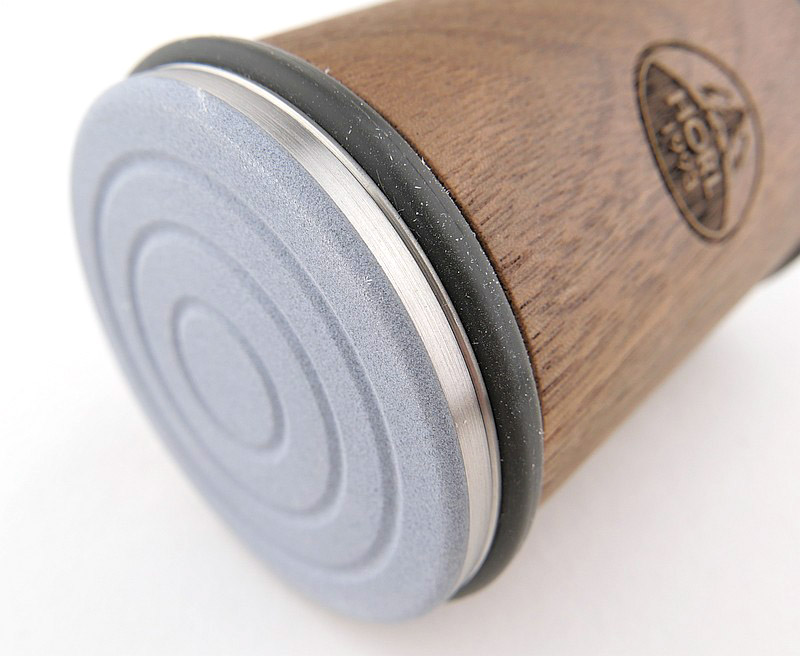
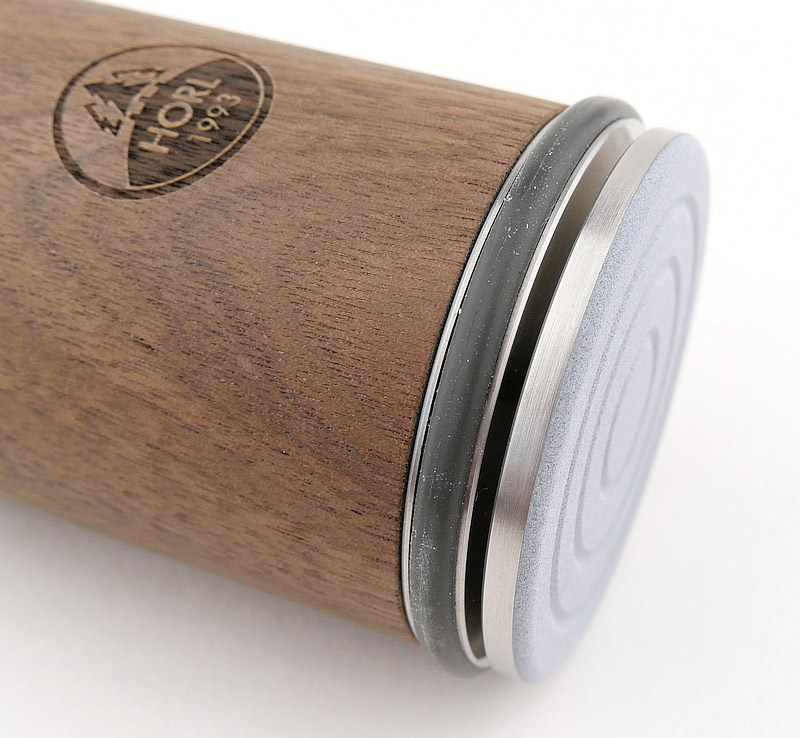
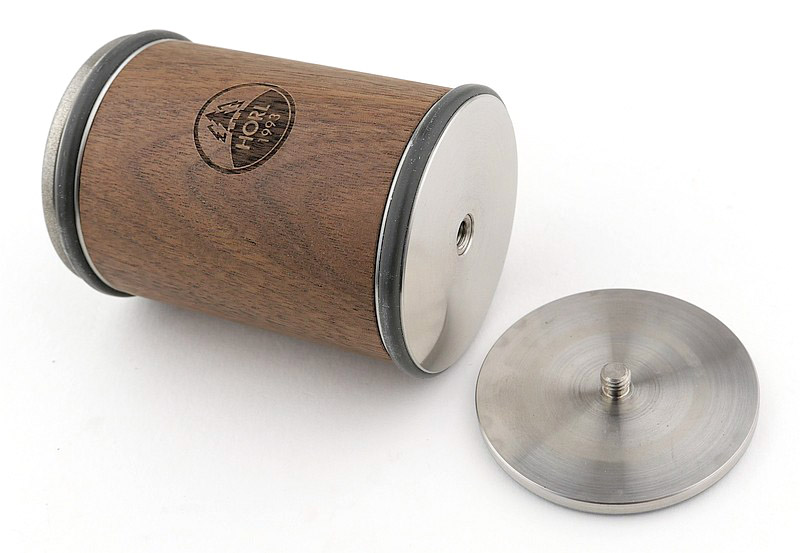
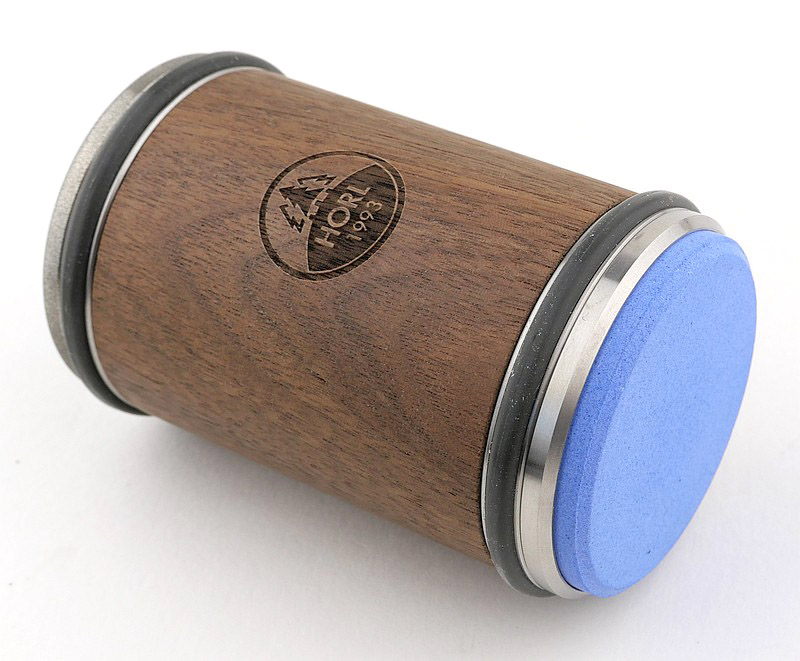
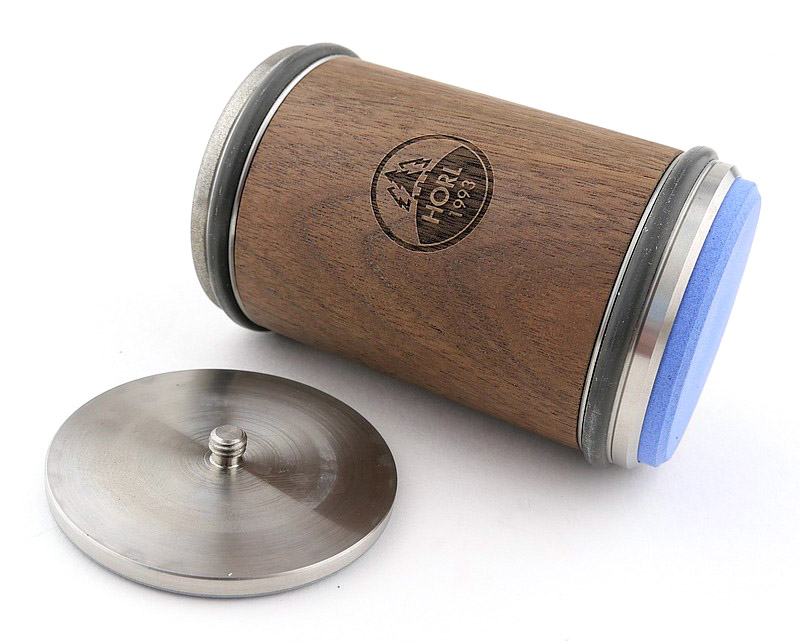
Lastly in this detailed look at the components is the rolling sharpener itself. A cylinder with a round sharpening stone at each end.
The wooden centre grip section of the rolling sharpener is in the matching wood to the guide block, and rotates freely. At each end are rubber rings to act as wheels, and the sharpening disks. As it comes this includes a diamond disk and a grooved ceramic coated disk.
Also shown here is how the HORL 2 neatly sits on the storage block.
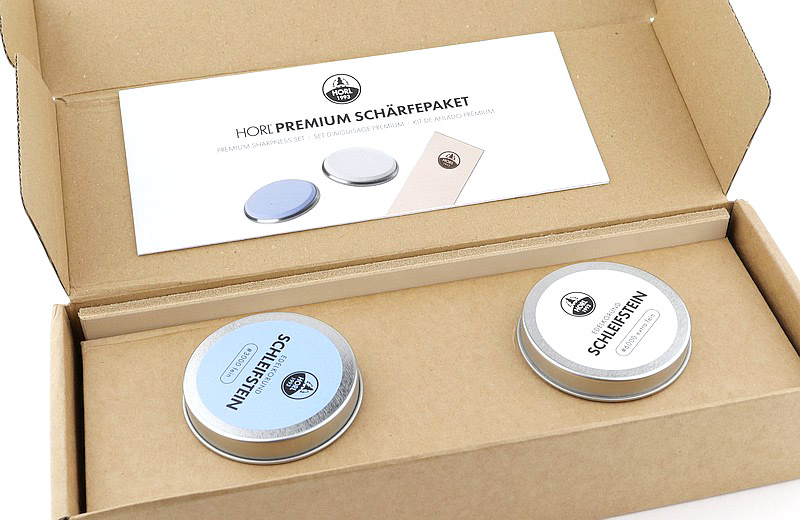
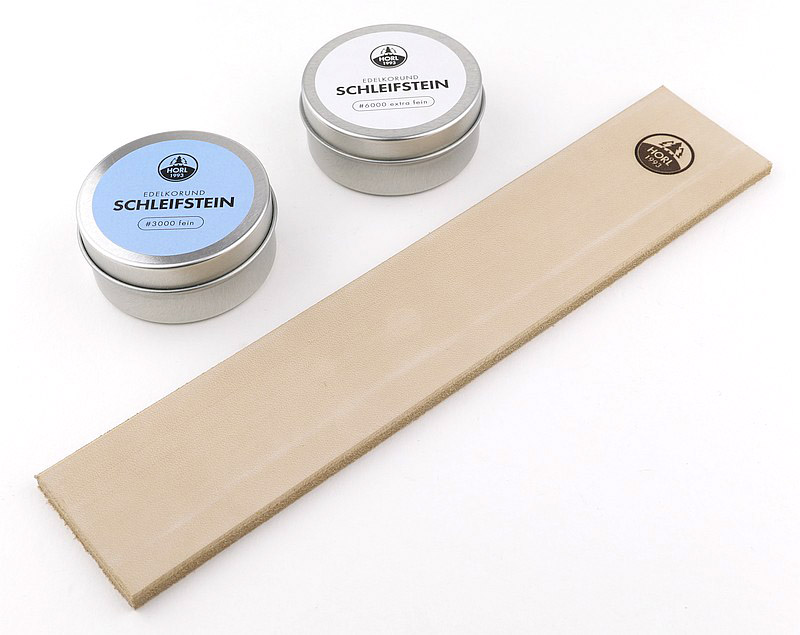
The Premium Sharpening Kit add-on:
Though you can produce a good edge with the standard HOLR 2, the premium sharpening kit is designed to further refine that edge and take it to another level.
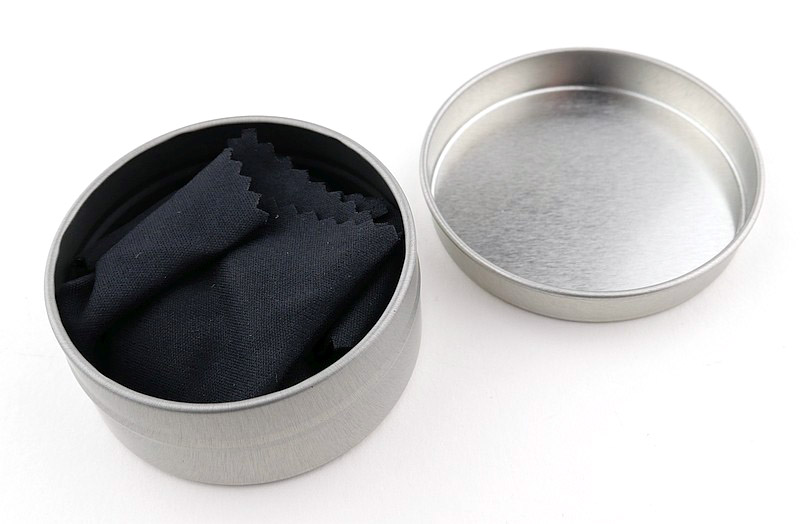
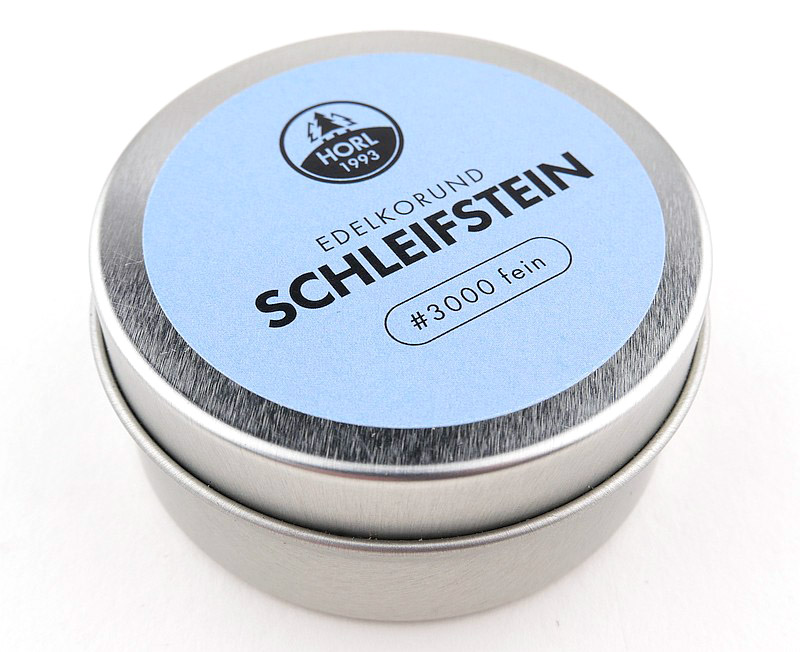
The kit includes two extra sharpening disks of 3000 and 6000 grit. These are found inside matching storage tins, wrapped in a cloth square. As well as these two fine stones, you also have a thick leather strop for cleaning and deburring the edge.
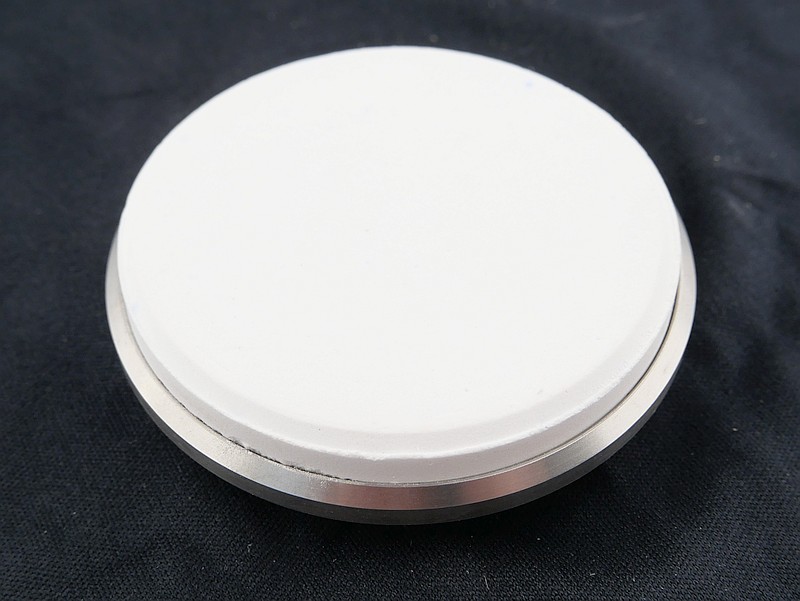
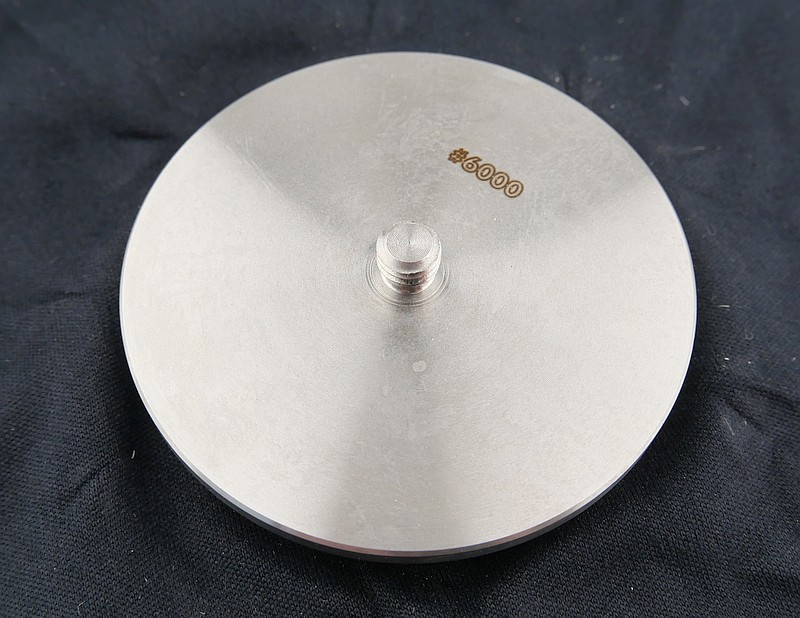
The 3000 grit stone is blue and the finest 6000 grit stone is white. Both are marked on the back of the disk with the grit.
Changing the Stone:
Changing stones on the HORL 2 is simple. Grip the rubber wheel firmly and simply unscrew the stone you want to change; then screw in the replacement. My own preference was the diamond and 3000 grit as a pair.
Video overview and sharpening test.
This video takes detailed look at the HORL 2 being used for the first time on a Santoku kitchen knife and an outdoor / hunting knife. It is quite long but also uncovers a few tips and tricks you might be interested in as well as showing a reprofile of the edge angle. It is worth watching for the insights into how the sharpener interacts with parts of the knife and possible precautions you might want to take.
What it is like to use?
If you have watched the whole video you will have seen what I’m going to describe in this section for real. For this review I’m using the HORL 2 along with two optional extras, the storage block, and the premium sharpening kit with its finer grit stones and leather strop.
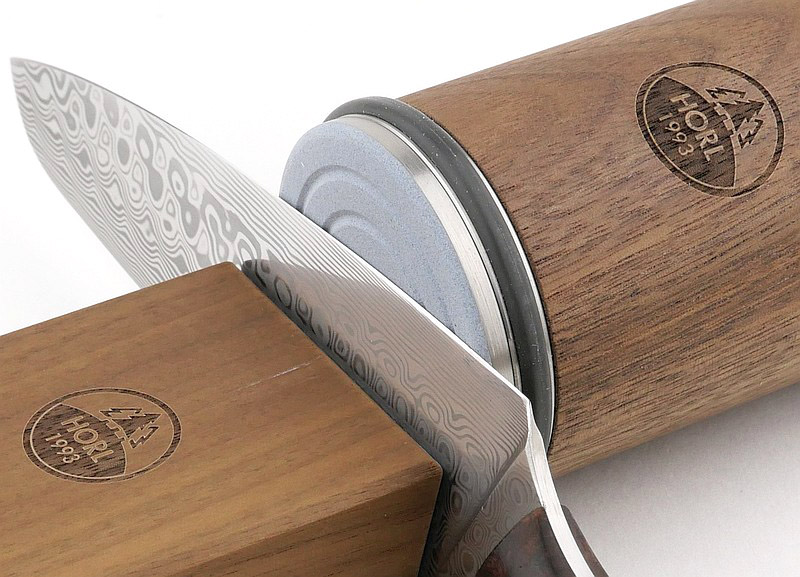
As the simplest and most basic look at using the HORL 2, these photos show how you set up the knife on the magnetic angle block with the roller sharpener against the knife edge. You can see how the edge-to-stone angle is maintained and allows sharpening by rolling the sharpener backwards and forwards.
Of note is that your kitchen work surface (or table) is used as part of the sharpening system because you need a large surface to working the rolling sharpener along the blade. Typically a sharpening system will contain the dust and metal filings produced to the sharpener, but the HORL 2 drops the filings that don’t stick to the magnetized blade all over the work surface. It is a bit of a messy eater when it comes to sharpening systems.
Beyond the basic operation of the HORL 2 here are a few general observations:
Operation is incredibly simple for use with most kitchen knives.
If the depth of the blade is more than the diameter of the sharpening disk you have to use ‘riser blocks’ (like a chopping board) to be able to sharpen the edge.
It is very easy to bump the sharpening stone into the knife bolster or handle. I use masking tape to protect these areas from damage.
You will magnetise the blade by using the magnetic angle guide block.
The sharpening dust collects on the magnetised blade and edge during use.
Shorter / narrower blades (paring knives or pocket knives) need very careful positioning on the angle block.
As your worktop is part of the sharpening system, this will be covered in metal filings
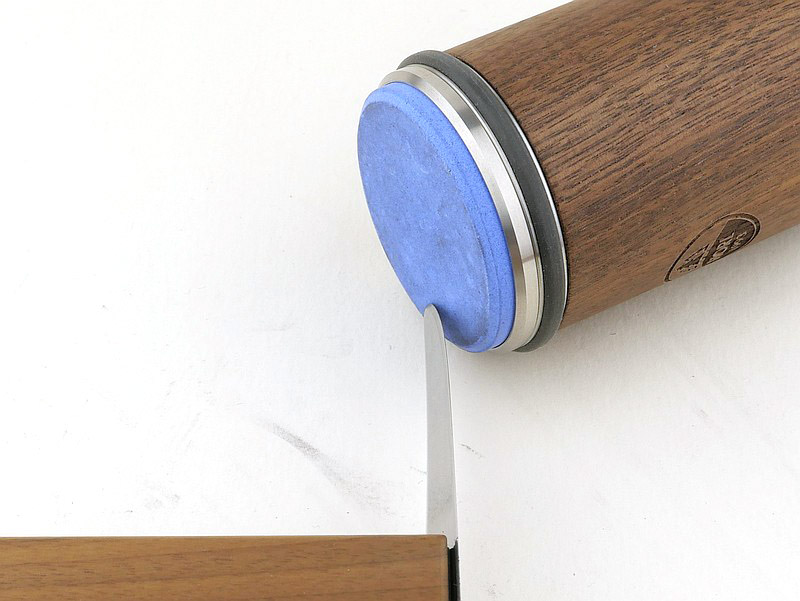
When swapping from a kitchen knife to an outdoor / hunting knife, it became apparent of an issue you need to work round regarding the tip of the knife.
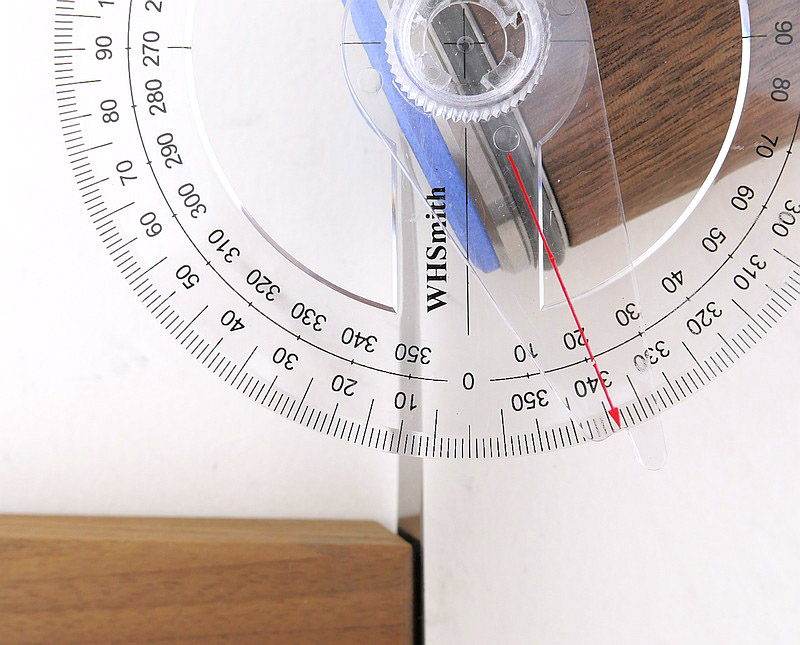
With many hunting knives, the blade edge curves upward to meet the spine of the blade at the tip. This introduces challenges of maintaining the edge angle all through the sweep of the edge on any sharpening system. On the HORL 2 it requires the user to no longer rely on the angle block to provide the correct angle, instead the user has to twist the rolling sharpener to the correct angle at the tip.
Illustrated below is the angle the roller needs to be moved to sharpen this knife all the way to the tip. It is actually 20 degrees, the same angle as is used on the magnetic angle block. With the rubber wheels on the roller gripping the work surface, this does need the user to force the roller to twist round and get the hang of following the angle near the tip.
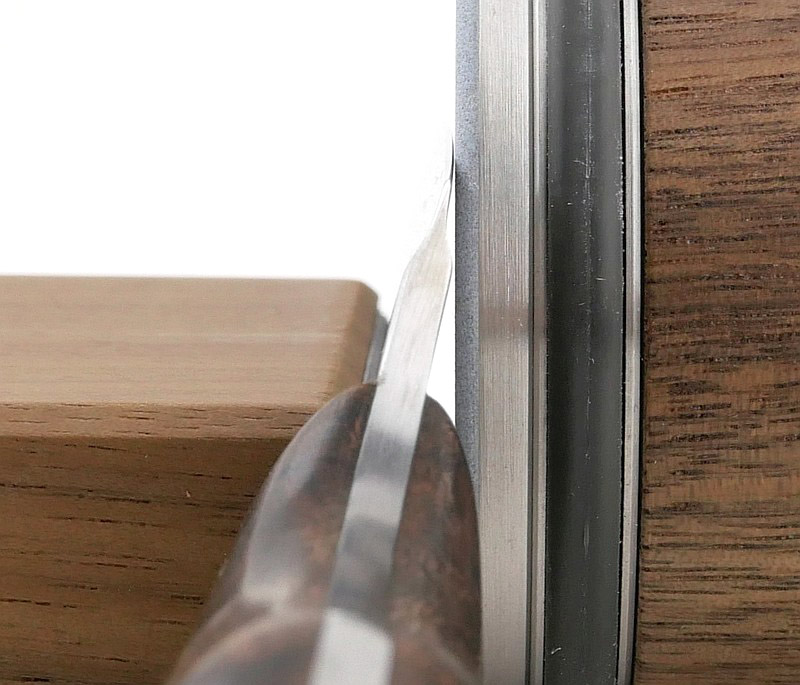
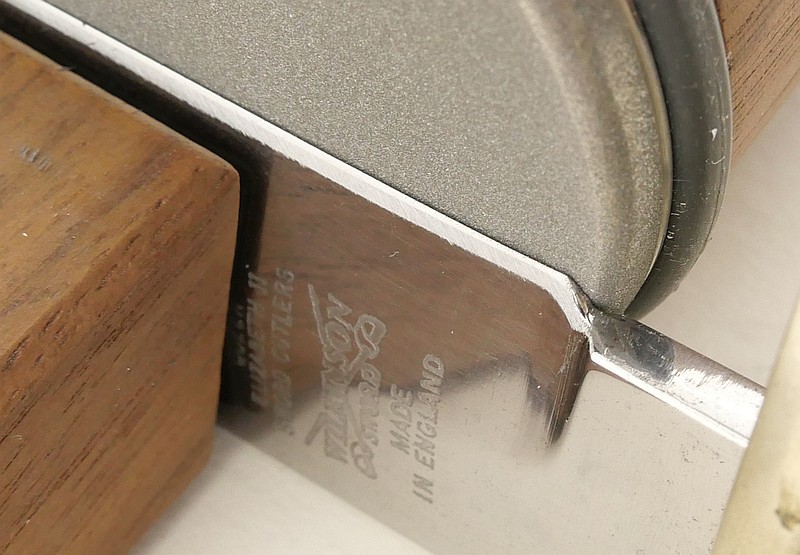
Another feature of a hunting knife verses a kitchen knife it that typically there is a ‘plunge line’ where the blade profile and ricasso meet. Also shown below are photos of how the corners of the HORL 2 stones hit the plunge line and might not quite reach the very end of the cutting edge. You will also likely mark the ricasso with the stone.
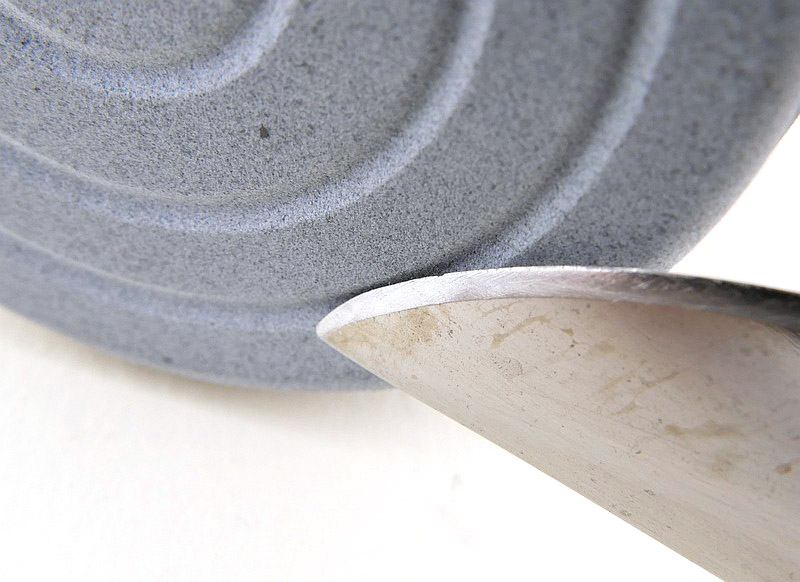
Finally with the grooved ceramic stone of the HORL 2 and the tip of a knife with a curve there is a possibility of the edge catching into the groove. This happened a couple of times in the video when turning the sharpener to work the tip of the blade, and prompted me to abandon the ceramic stone for a blade with curved tip like this. For kitchen knives this was not an issue.
Review Summary
The views expressed in this summary table are from the point of view of the reviewer’s personal use. I am not a member of the armed forces and cannot comment on its use beyond that covered in the review.
Something that might be a ‘pro’ for one user can be a ‘con’ for another, so the comments are categorised based on my requirements. You should consider all points and if they could be beneficial to you.
I’m starting with what doesn’t work so well, so I can finish on a more positive note
_______________________________________________
What doesn’t work so well for me
_______________________________________________
Needs ‘riser blocks’ for blades wider than the sharpening disk.
Magnetises the blade and this collects metal filings on the blade and angle block.
Covers the kitchen work surface in metal filings.
Still requires the user to control the angle of the stone at the blade tip.
Easy to hit and mark the handle or other parts of the knife with the rolling stone.
_______________________________________________
Things I like
_______________________________________________
For most typical straight-edge kitchen knives it makes sharpening super simple and easy.
Elegant and attractive solution that looks good in any kitchen.
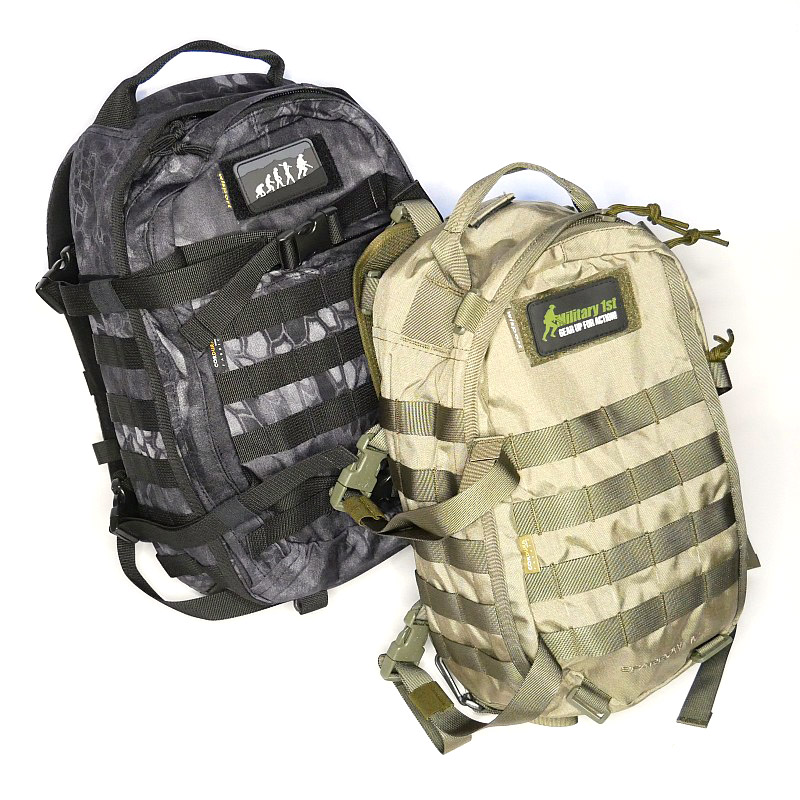
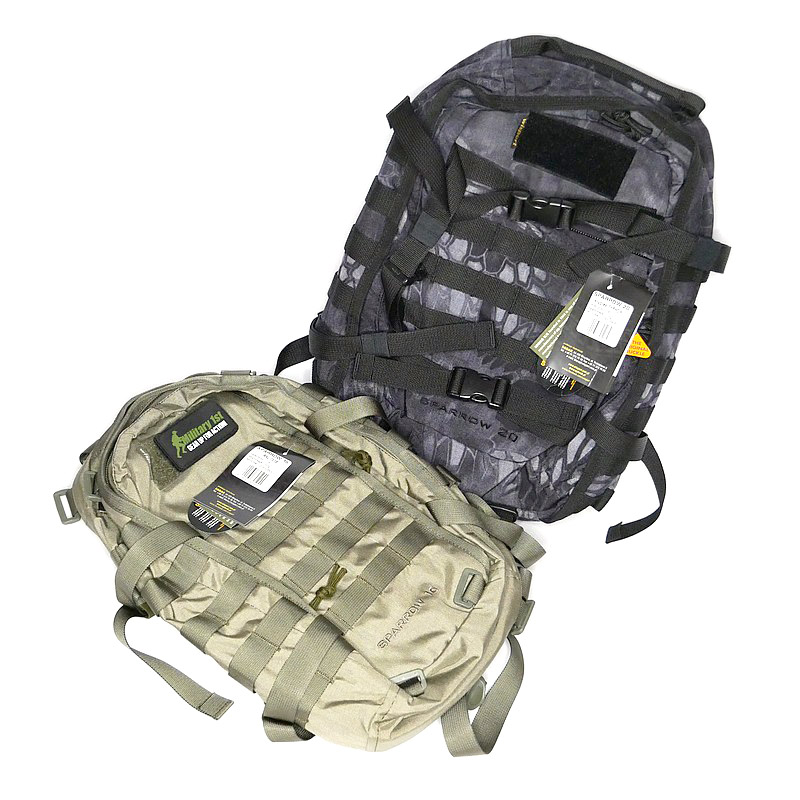
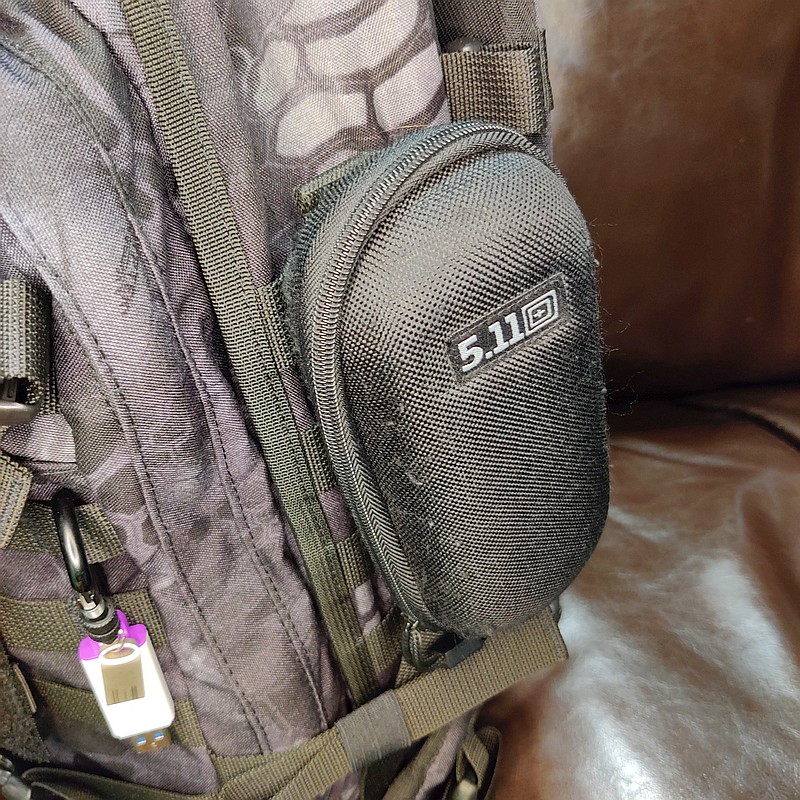
Inspired by a project to assemble an urban emergency grab-bag / evac-bag / bug-out-bag / go-kit using a maximum 20l rucksack, I chose the Wisport (from Military 1st) Sparrow 16 and 20 rucksacks. This review is to take a detailed look at these bags and their features. As well as the photo galleries there is also a video showing the features of each bag. (Keep an eye out for the emergency bag article, or subscribe for updates to make sure you get notified.)
Diving into the details:
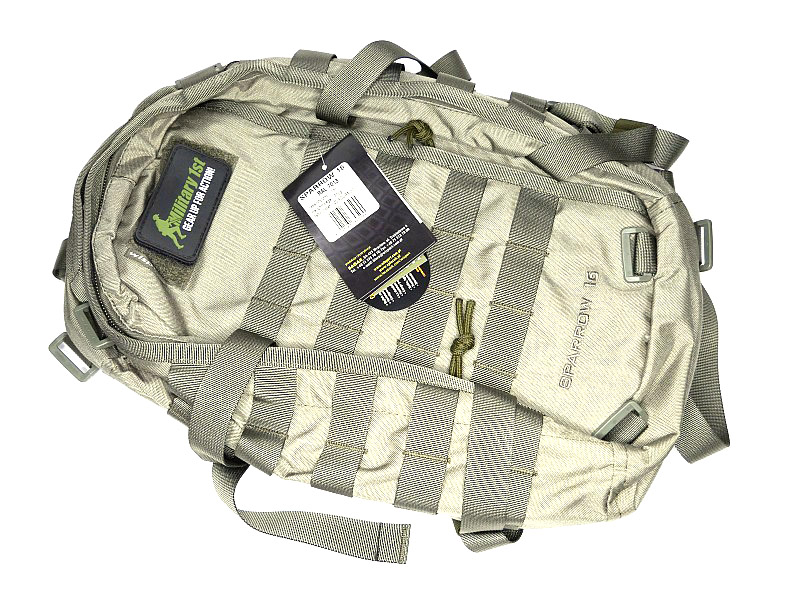
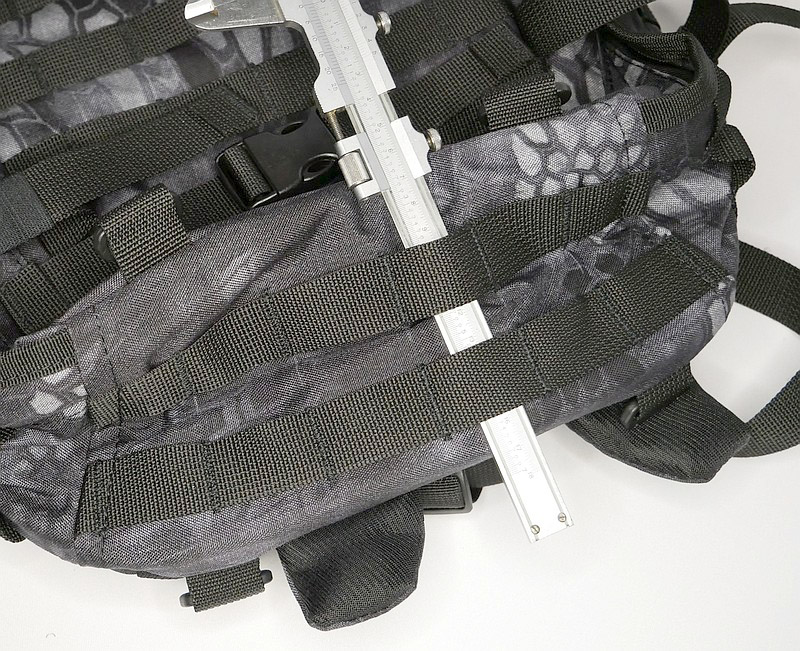
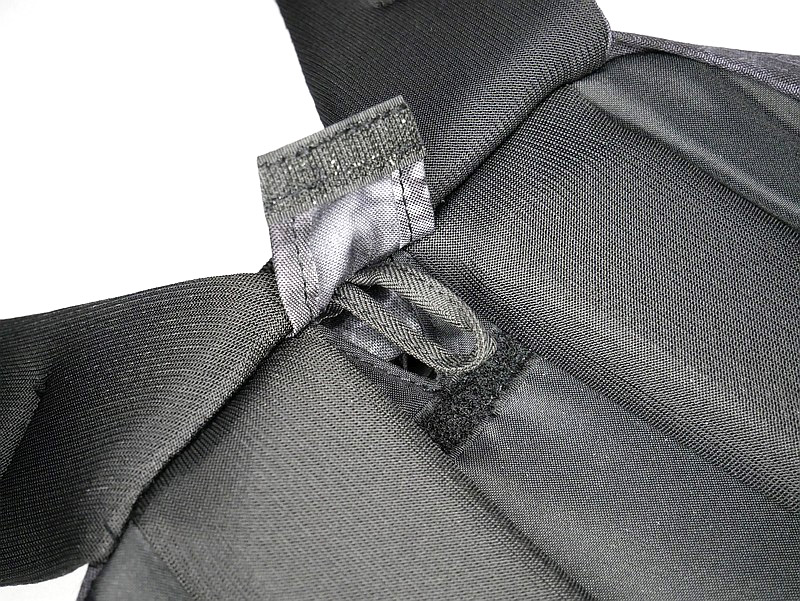
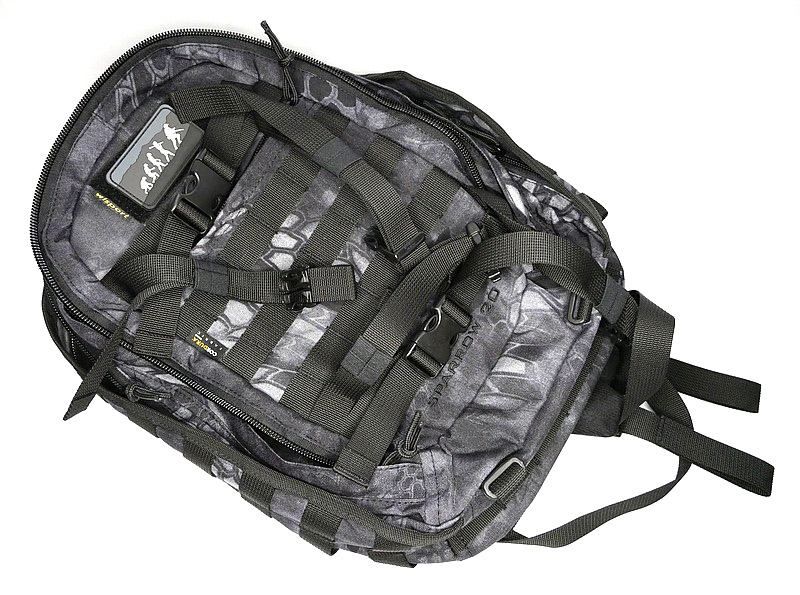
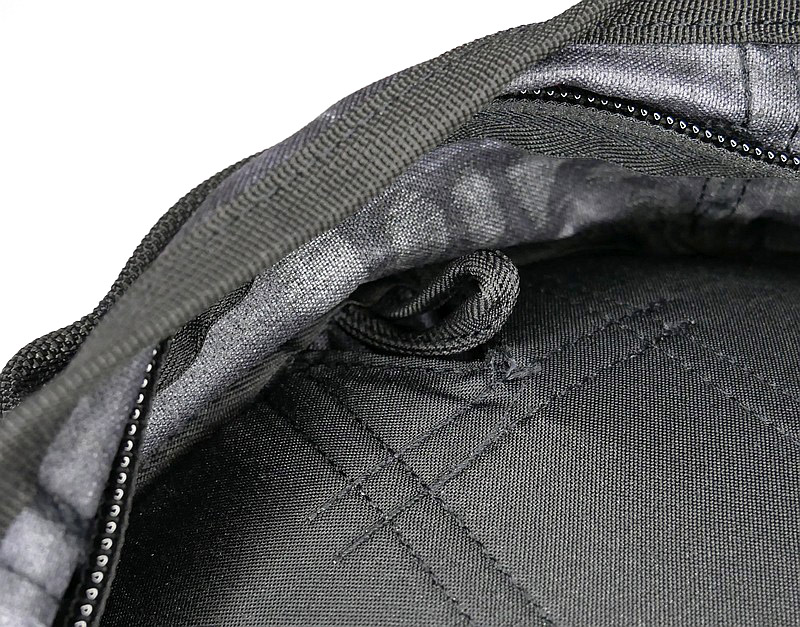
Starting with the smaller Sparrow 16 and the images are split into three galleries to cover the main external features, carry strap details, and the bag’s compartments.
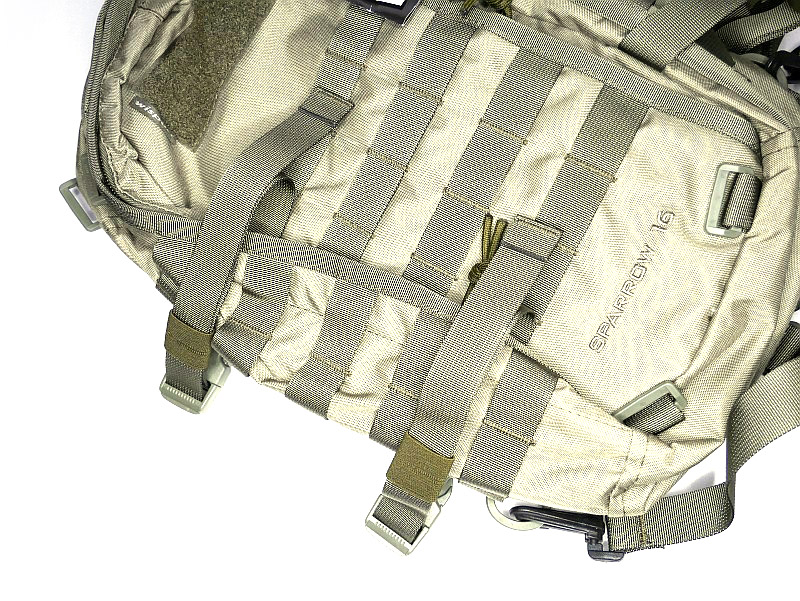
External features:
The Sparrow 16 shows how even a small bag, with a few extras on it, can have a pretty impressive carrying ability. Each side of the Sparrow 16 has a set of two compression straps with quick release buckles (as well as MOLLE panels). These make it easy to adapt the bag, stabilise the load or even strap on additional equipment or clothing.
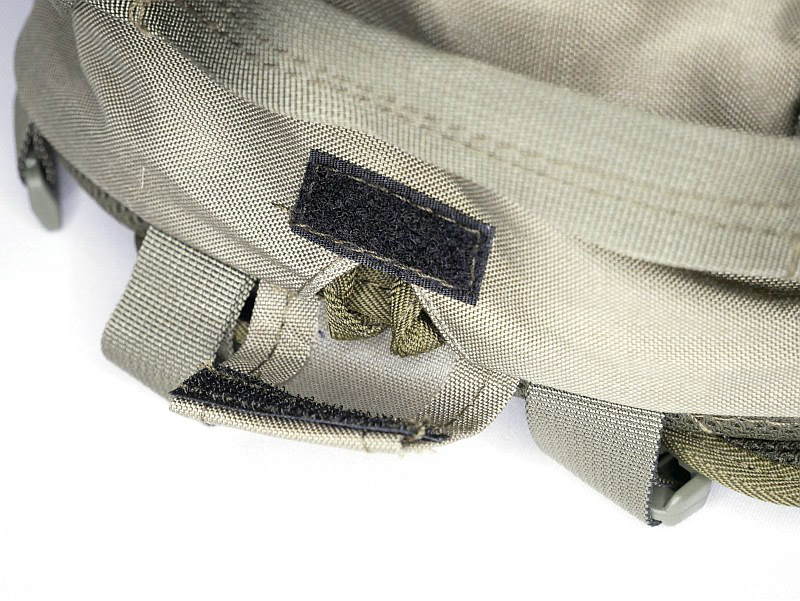
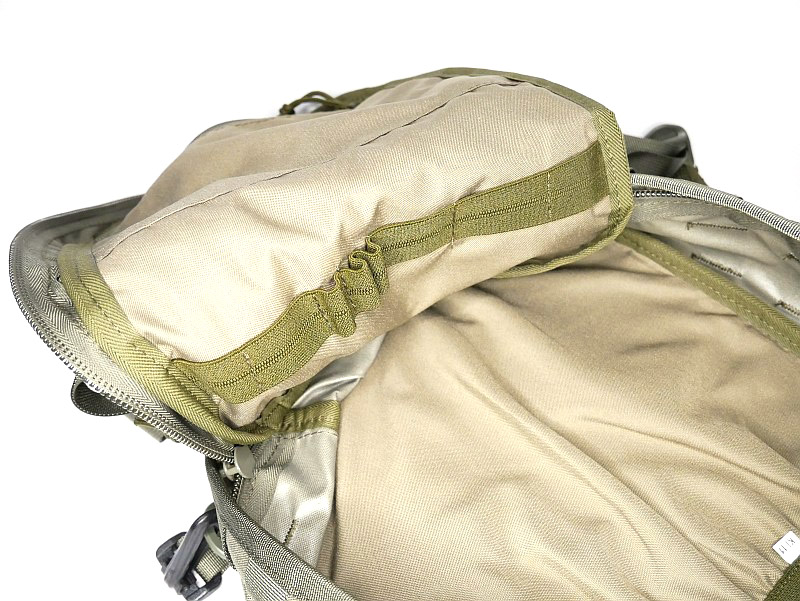
Even though it is a small bag, it has a good comfortable strong top strap. Under this strap is the hydration pouch tube port.
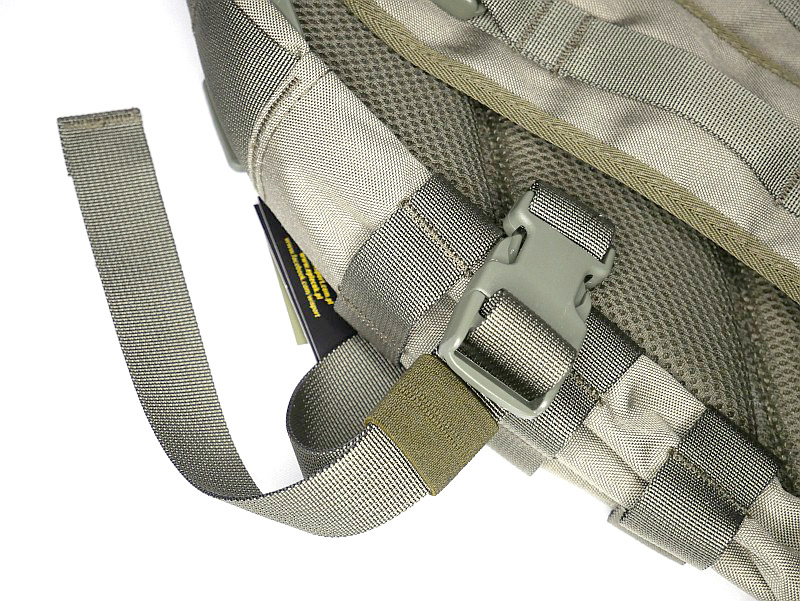
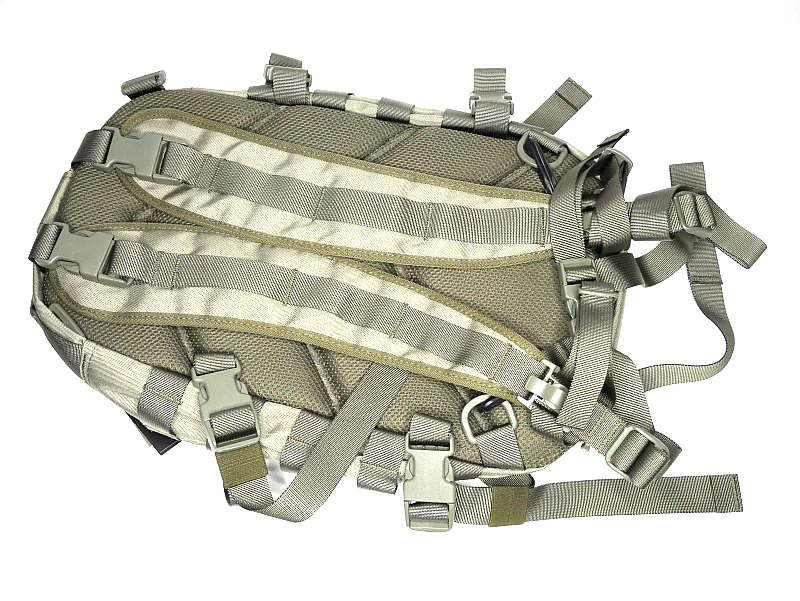
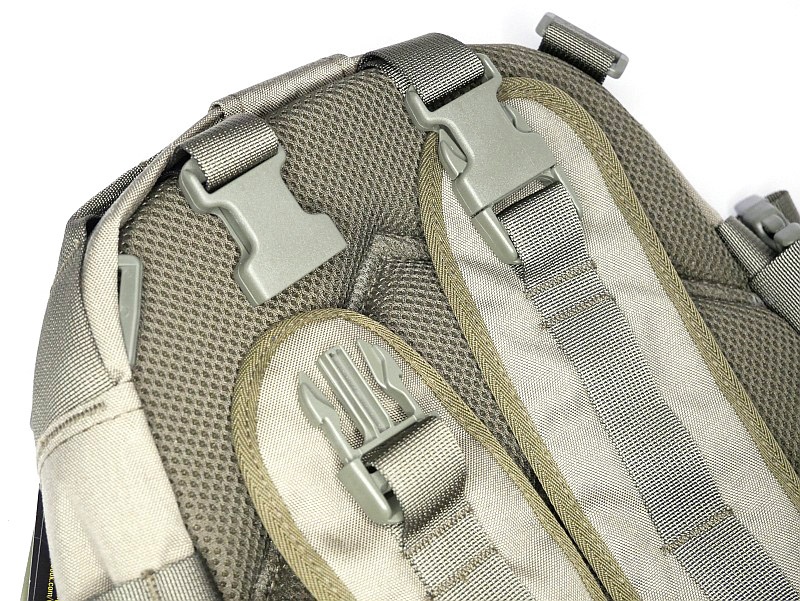
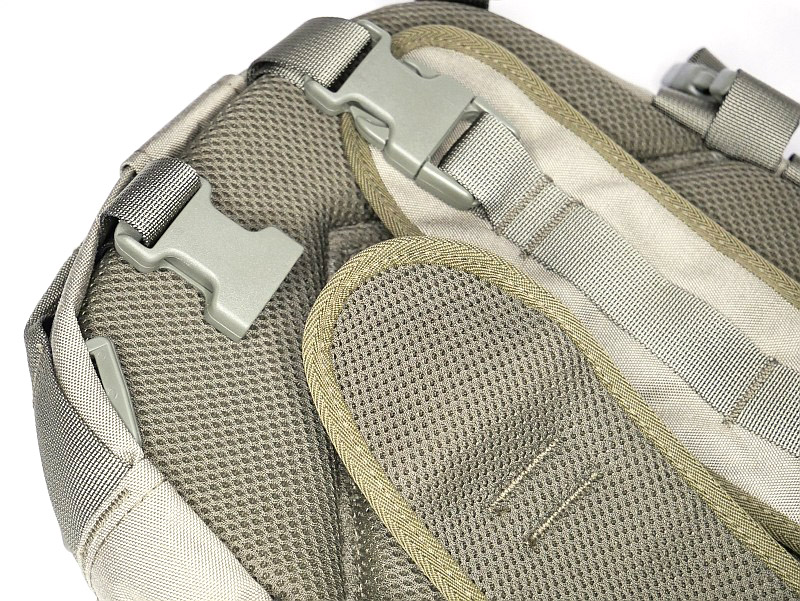
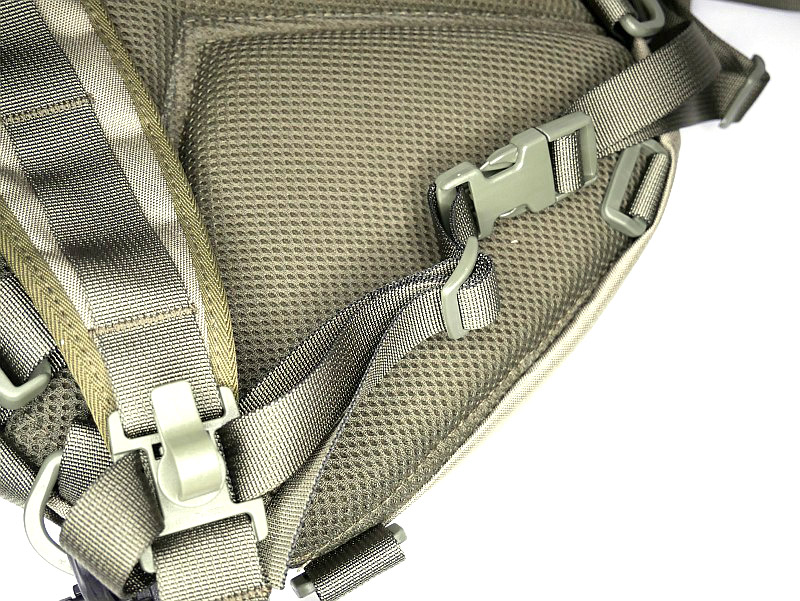
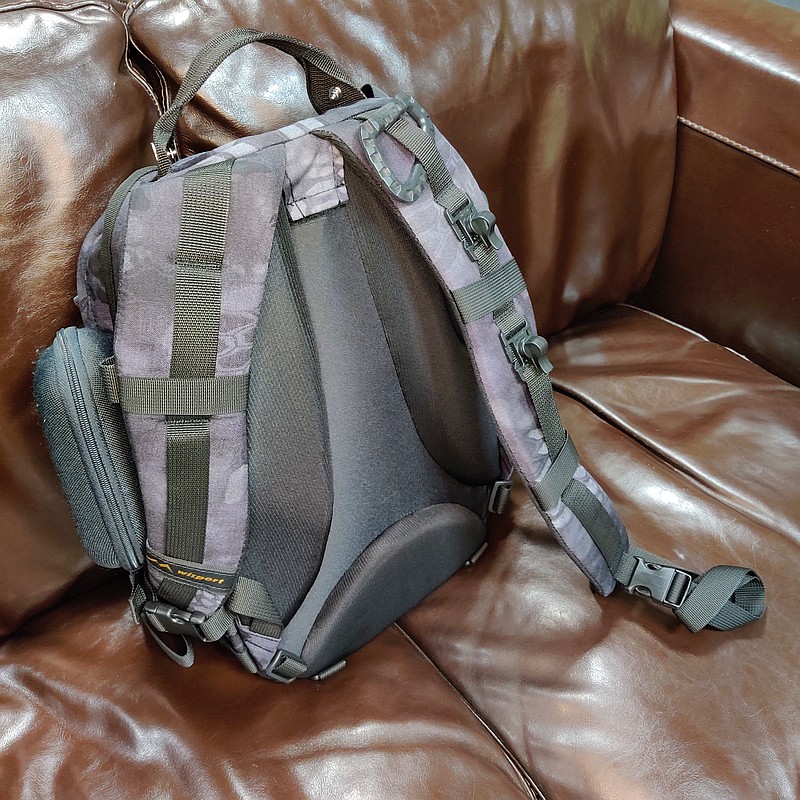
The carry straps:
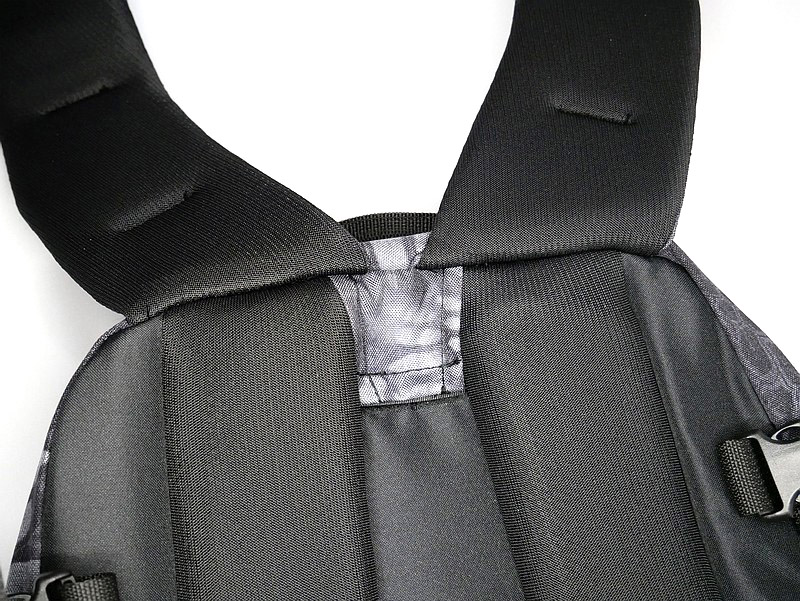
Despite being a small 16l bag, the Sparrow 16 has a lot of details in its design – the carry straps are no exception. Both shoulder straps are fully removable, not just one end of the strap, but both, can be unclipped. You can use remove one strap to make it a neat single shoulder bag (in the way many people carry a rucksack), or both and have a large organiser that you carry with the handle.
Even on this smaller bag there is a chest strap, and the hydration tube clips.
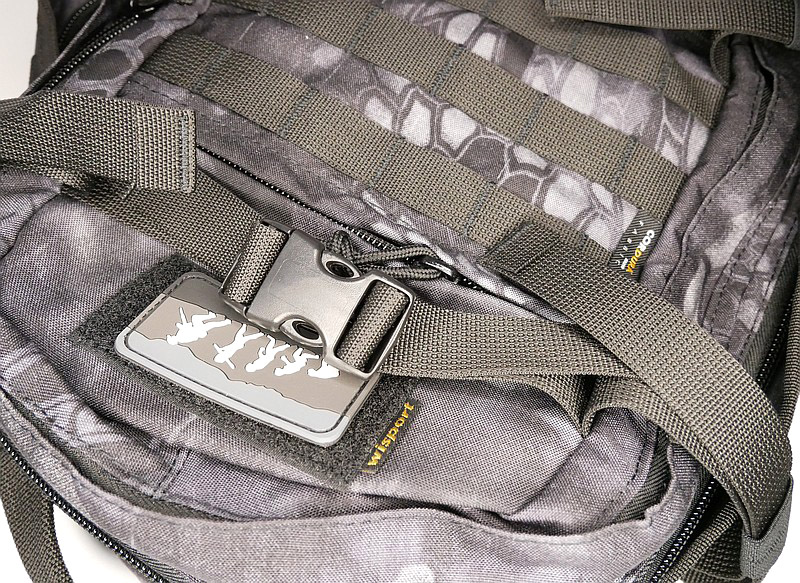
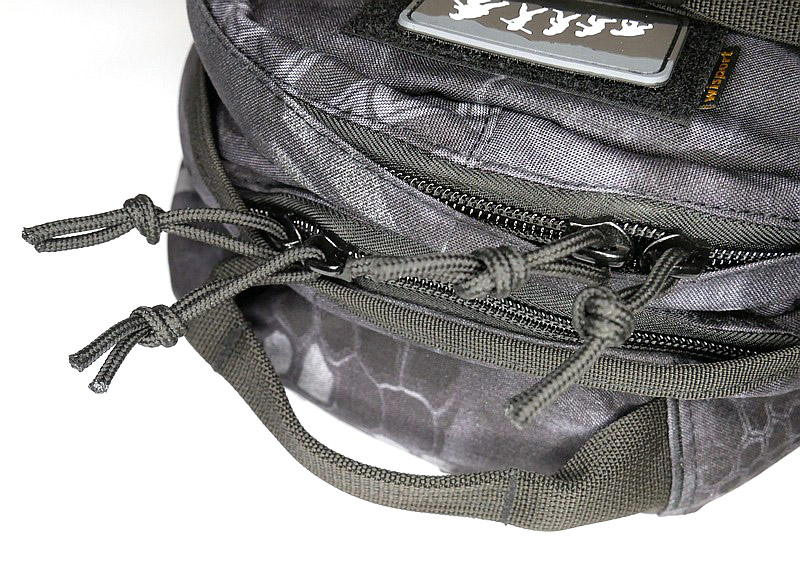
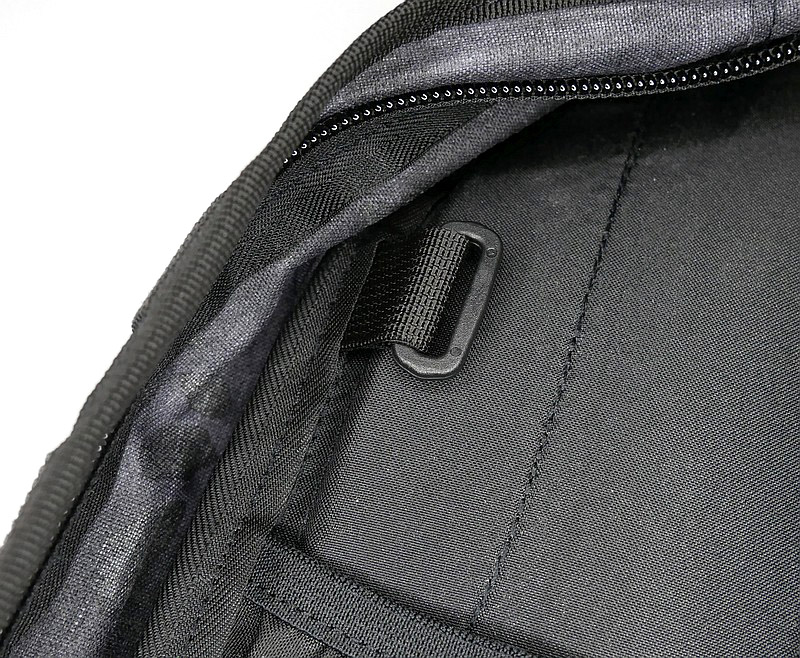
Compartments in the Sparrow 16:
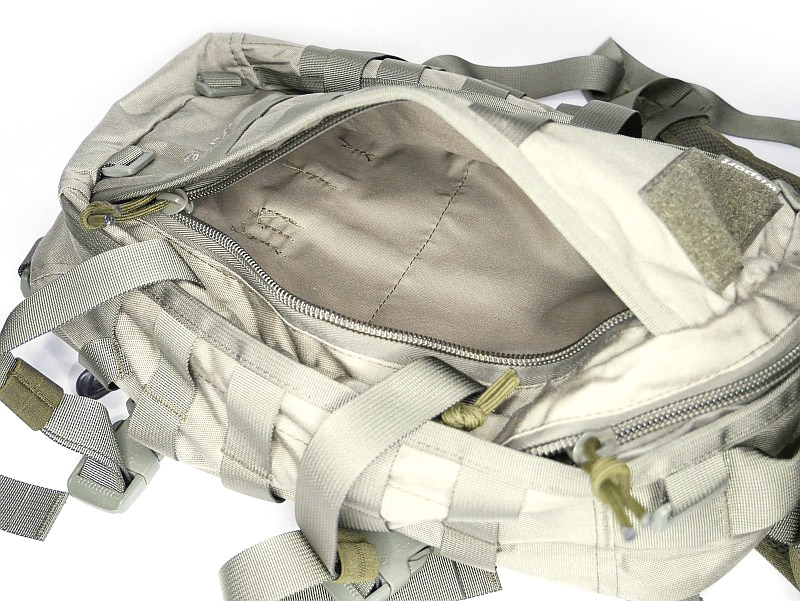
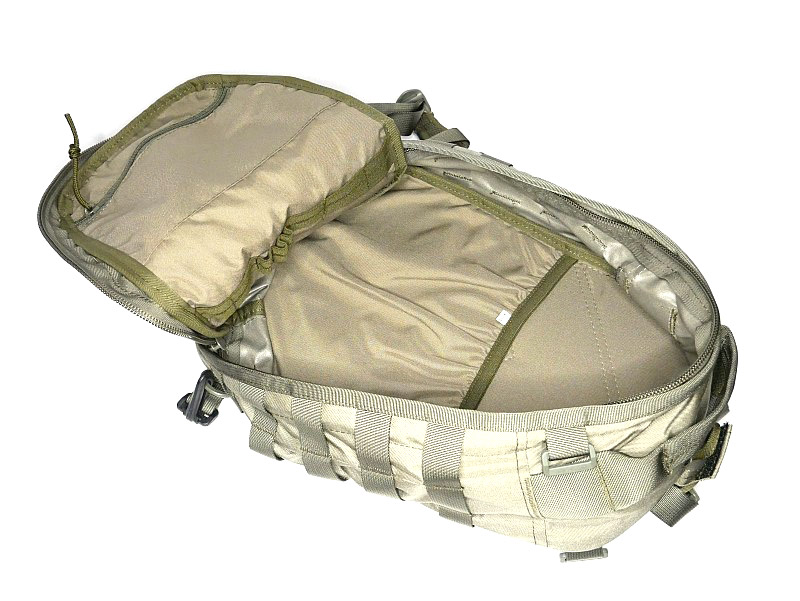
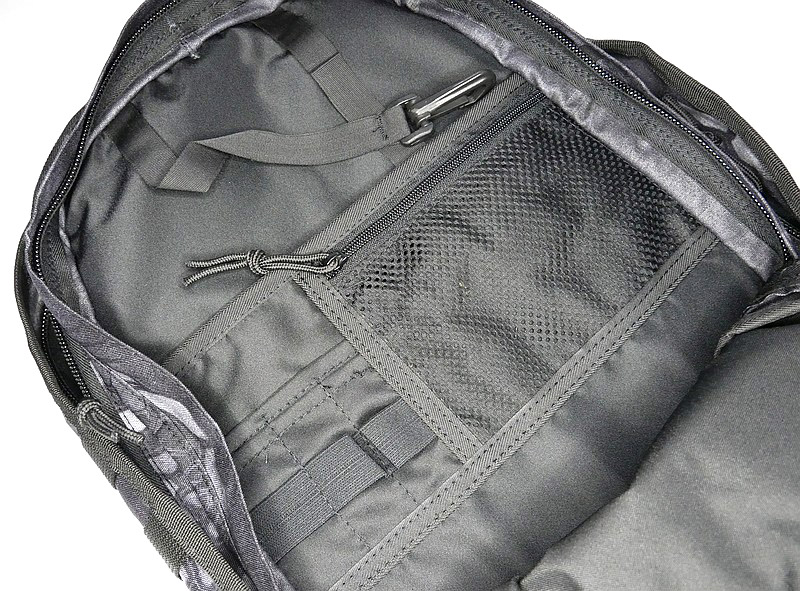
On the very front panel of the bag is a side zip accessed compartment, the same size as the whole front panel. Moving onto the main compartment, which has a full clamshell opening (once you undo the side straps). At the front of the main compartment is a zip up compartment, and below this is an elastic strap with loops for organising items. The back of the main compartment has a pocket with elastic edge, to hold a hydration pouch, or any other flat items.
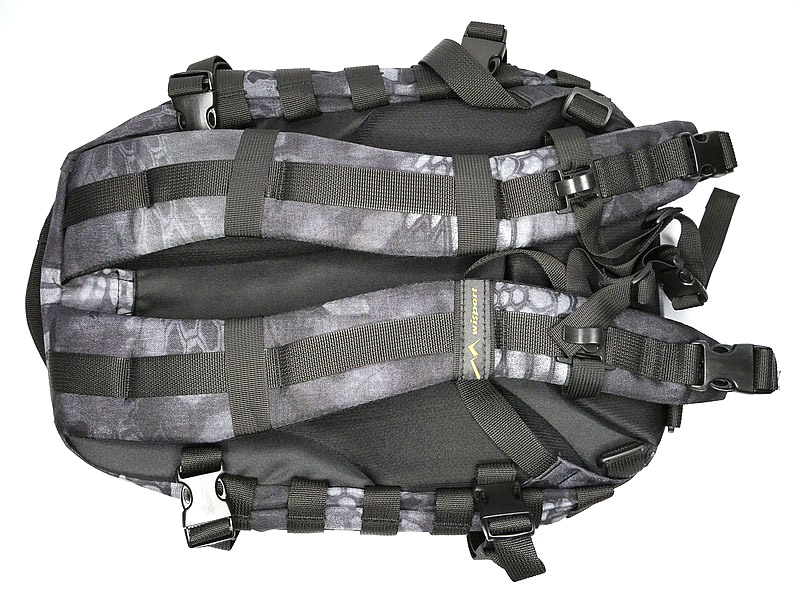
Moving onto the Sparrow 20.
External features:
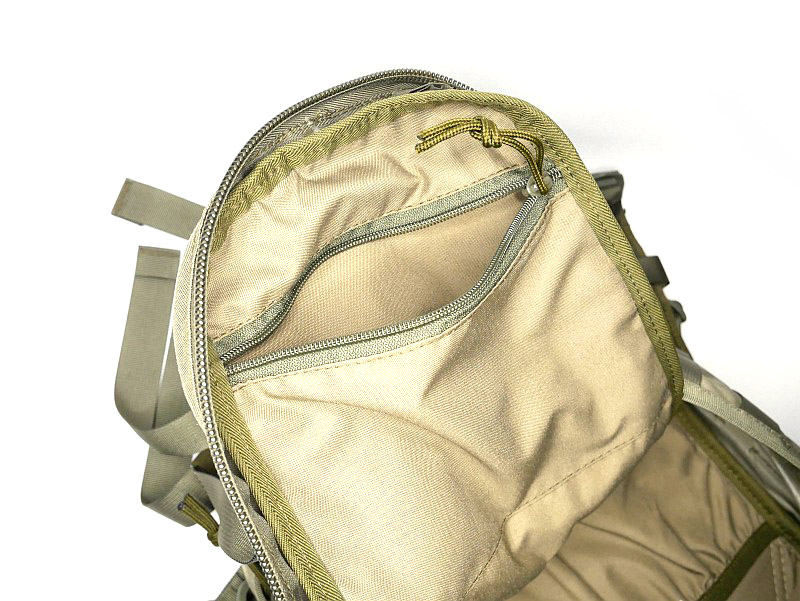
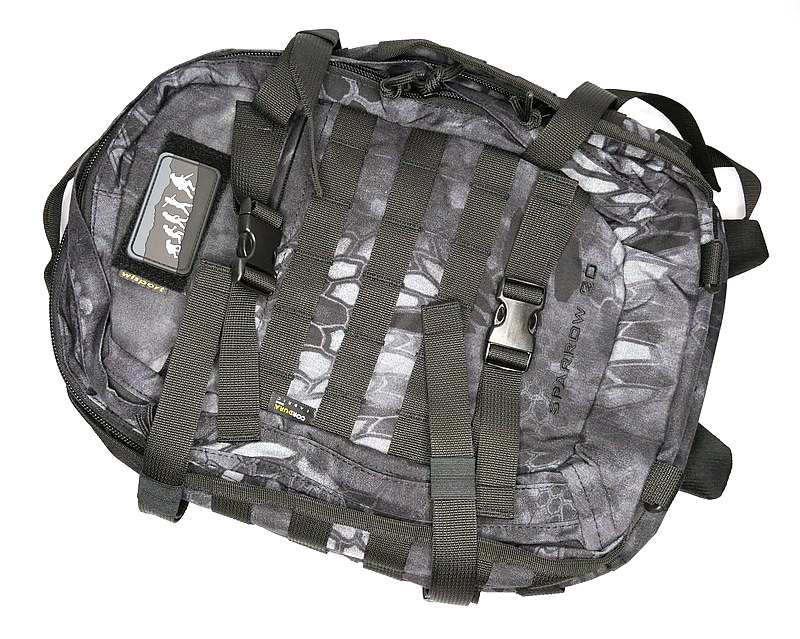
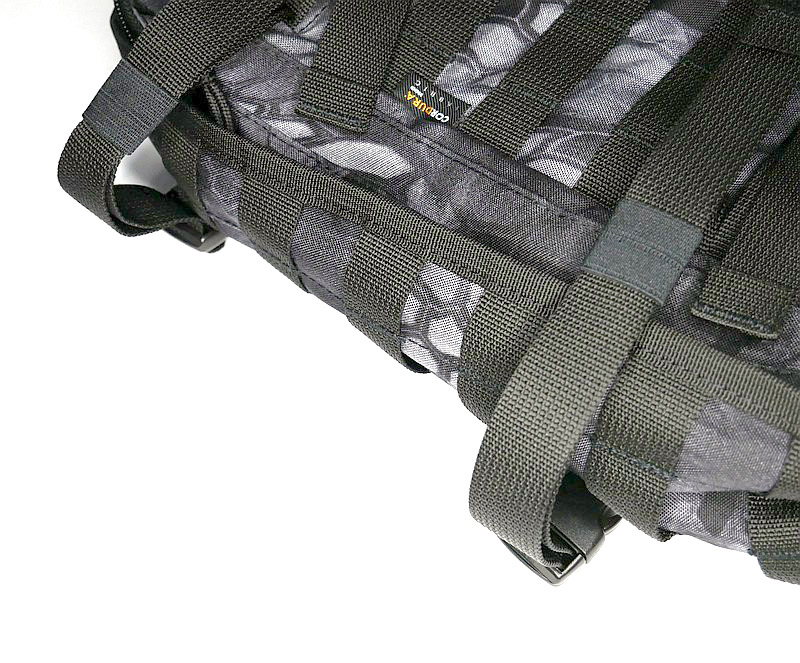
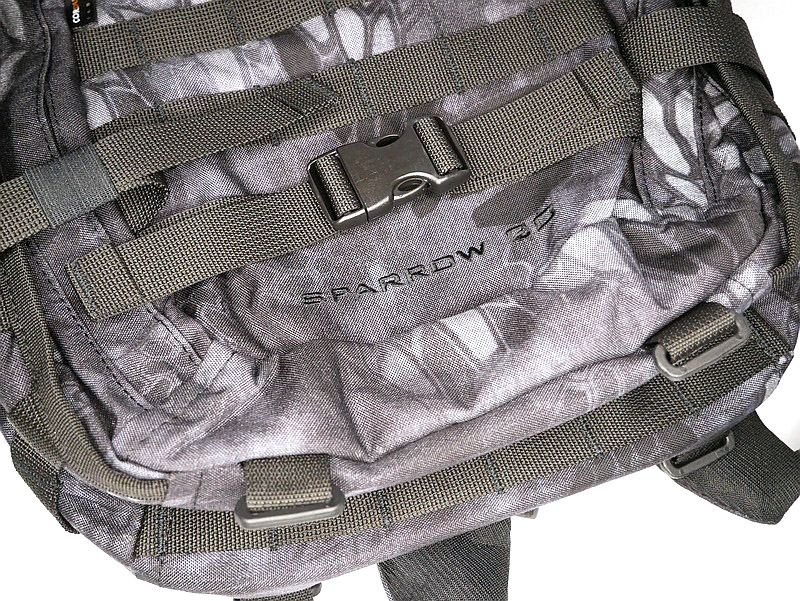
The Sparrow 20 steps up the ‘strappage’ to another level. Like the 16, each side has a set of two compression straps with quick release buckles (as well as MOLLE panels). The front panel has a further two compression straps with quick release buckles, and the base of the bag has both MOLLE webbing and a set of four attachment points for webbing of your own configuration. The front panel also has a top opening zip up compartment. It’s all topped off with a sturdy carry strap.
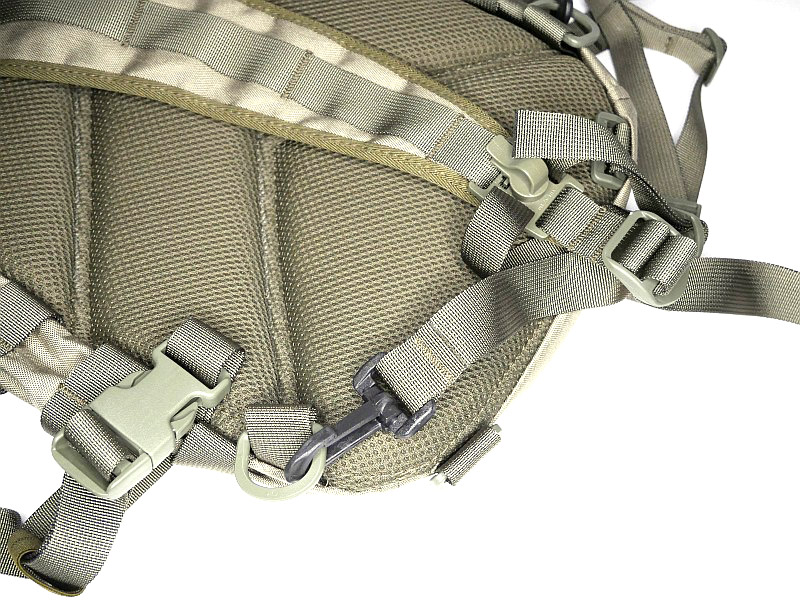
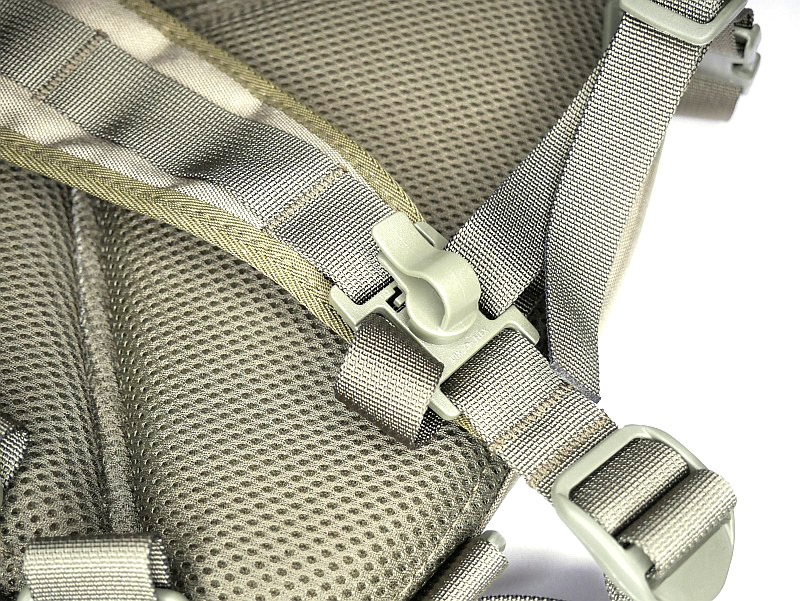
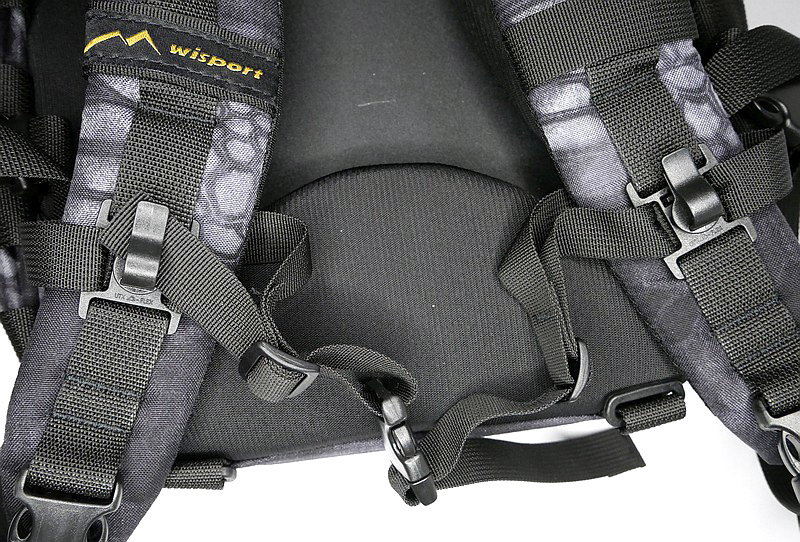
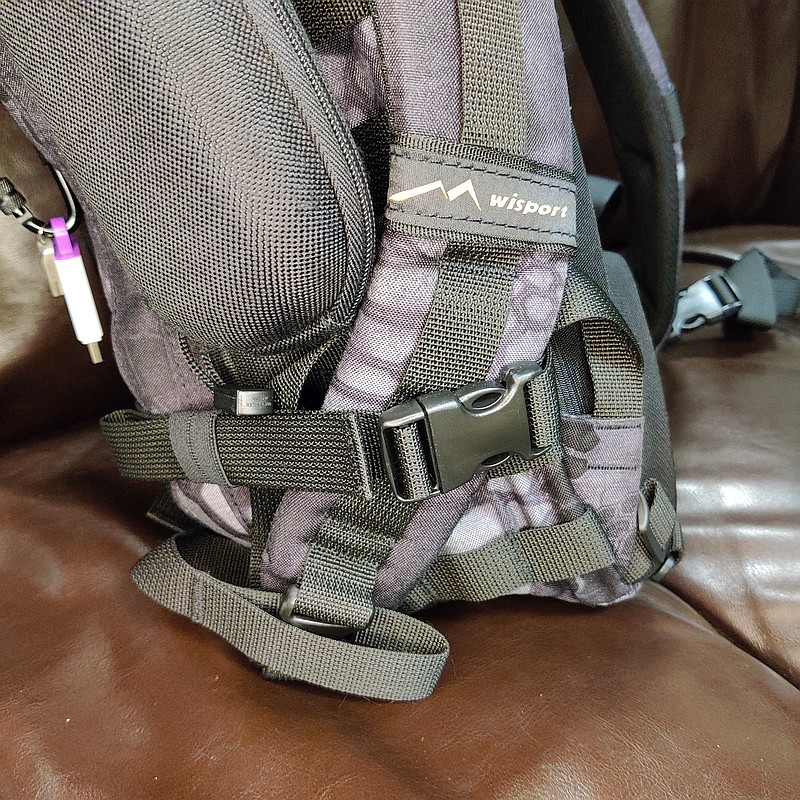
The carry straps:
In the case of the sparrow 20, the shoulder straps are much more substantial, wider, and padded. The tops of the straps are fixed, but the bottom have quick release buckles to give you a quick exit from the straps when needed. Under the straps at the top of the back panel is the hydration tube port. The back panel has large padded contours and space for air to flow. At the bottom end of the shoulder straps there is an angled load spreader where it is fixed to the bag. Next to this, on either side, is a webbing attachment point that could be used for fitting a waist strap.
Hydration tube clips sit in the same place on the shoulder straps as the chest strap.
Compartments in the Sparrow 20:
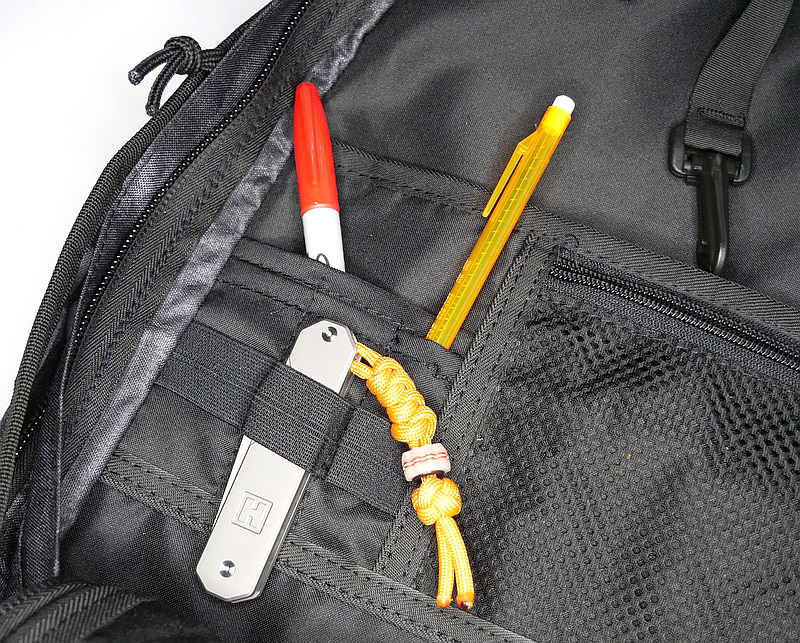
With the extra 4l in space comes a jump in equipment and more organisation. Starting on the front panel is a pocket for very quick and easy access. For the full clamshell opening of the front panel compartment you need to unclip the four side straps. Inside the front compartment is a clip hanger strap and a D-loop hanger strap (for keys and the like), a small organiser panel with pen pockets and elastic strap, a mesh zip up pocket, and an open pouch pocket.
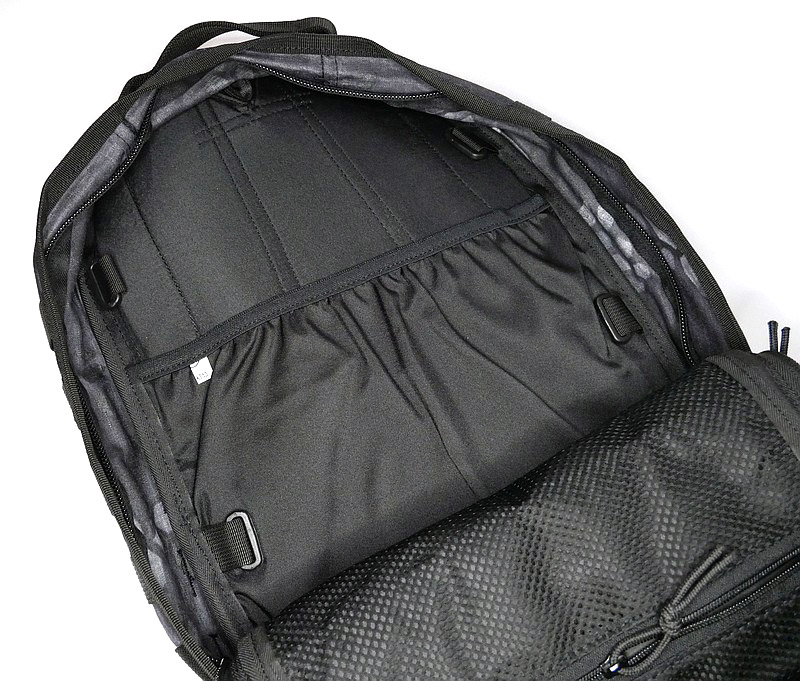
Moving into the main compartment, again with full clamshell opening, and the back has an elasticated pocket for a hydration pouch. Around this are four webbing attachment points so you can add further restraints. Covering the front of the main compartment are two zip-up mesh pockets.
What it is like to use?
To add more of the impression of these bags, this video takes a tour round both the Sparrow 16 and 20.
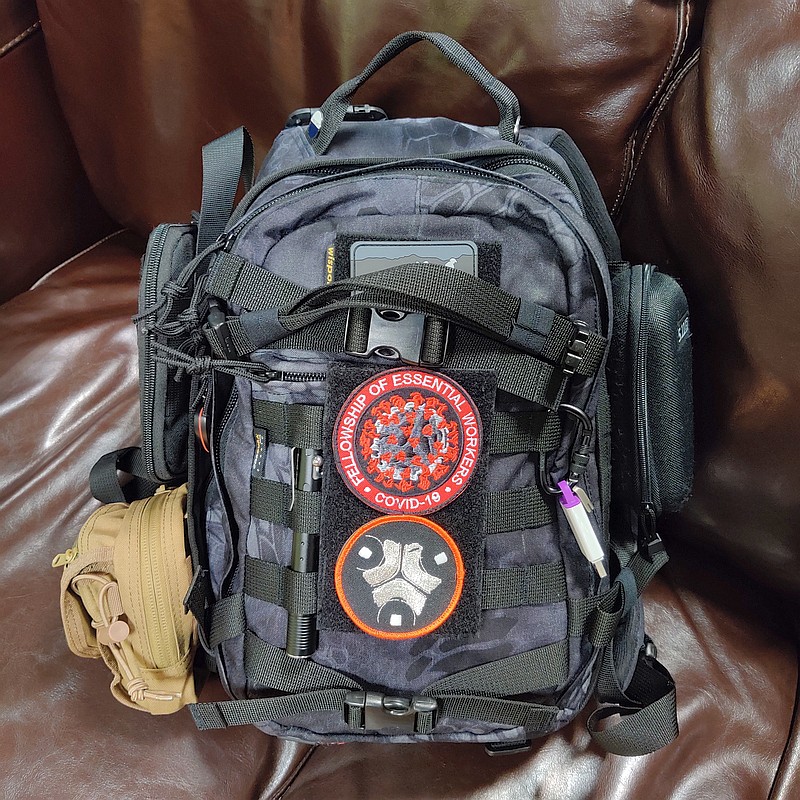
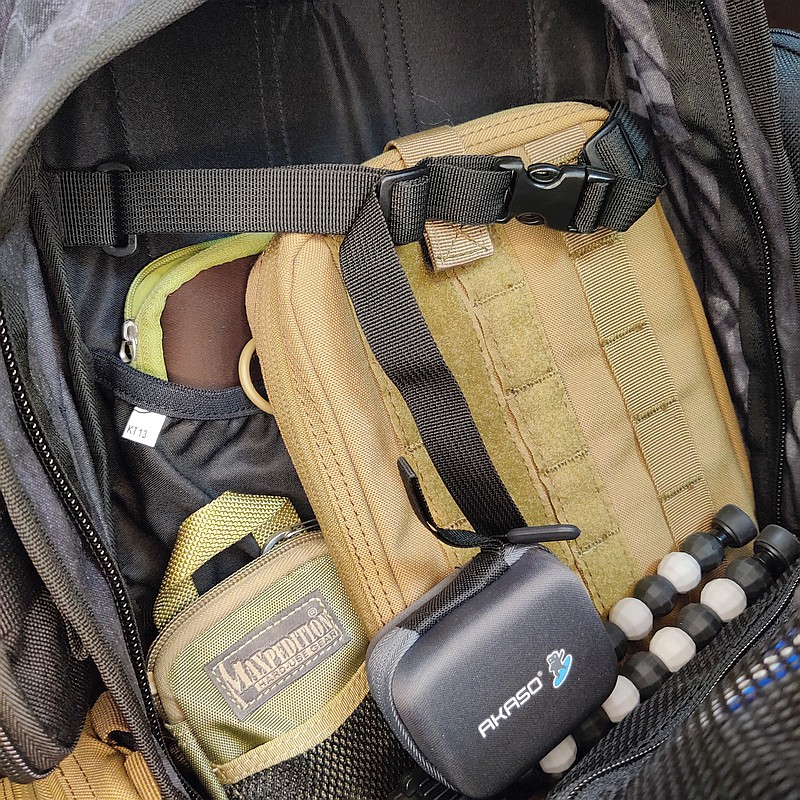
As the more ‘equipped’ of the two bags, the Sparrow 20 has stepped into my EDC while I develop the bug-out-bag system, so here is a quick look round the way I’m using it.
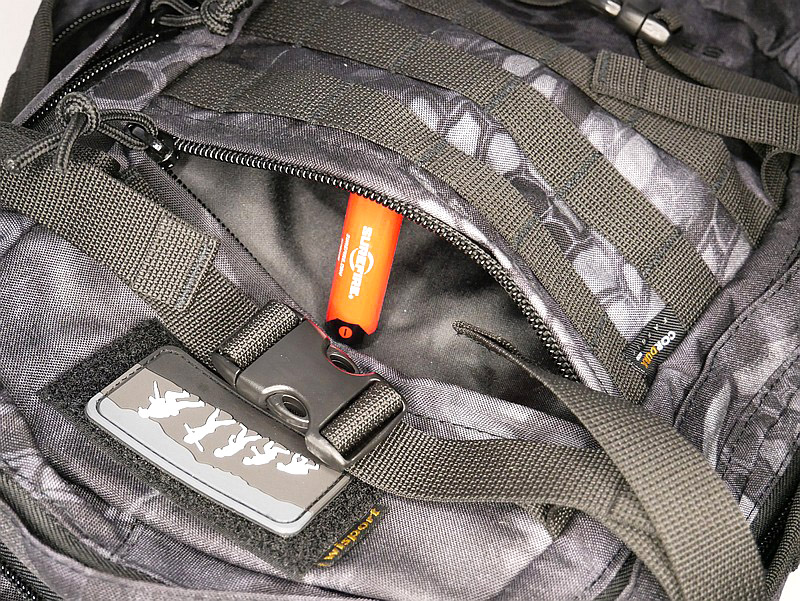
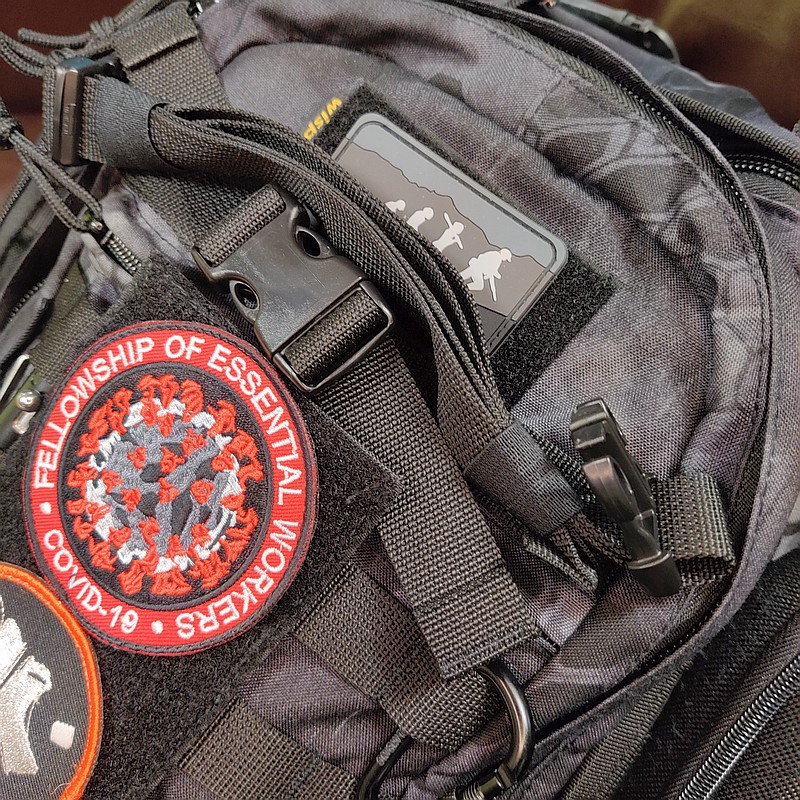
On the front panel I’ve added a MOLLE fixing patch panel to give me more room for velcro patches. There is a torch / flashlight slipped into the webbing to be immediately to hand, but with the top put under the strap above to hopefully stop it falling out by itself.
To keep the compression straps that I’m not currently using out of the way (so the compartments can be unzipped easily), I have actually laid these across each other and used the elastic loops on each strap to hold the other one in place. (Each strap was threaded into the elastic strap loop of the opposite strap.)
On one side panel is a MOLLE glasses case, and on the other are a further two MOLLE pouches. One of these takes my phone and the other has various small items I want within easy reach.
For my EDC use, I only use one of the shoulder straps to quickly pick it up and put it down. The other strap is held neatly out of the way by tucking it into the lower side compression strap.
In the front compartment I have medication pouches, two more lights and a pen, plus many ‘useful’ items tucked into the mesh pouch and pocket.
Not being a fan of chest straps I removed this from the bag, however, inside the main compartment are some webbing attachment points, and here I have re-purposed the chest strap inside the main compartment to hold tall items in place. You can see a tablet case, large and small organiser pouches plus an action camera with mini tripod.
My initial temptation was to cut off a few of the Sparrow 20’s numerous straps to tidy it up. Unused straps can become more of a hindrance than a help. However, I stopped myself; currently the work-arounds I found for the various straps I wanted out of the way are working nicely.
The way I am EDCing the Sparrow 20 should show any potential shoulder strap issues quickly enough, especially considering I’ve made it quite heavy already. No signs of strain or overloading as yet.
So far these bags appear well made, strong and packed full of features.
Review Summary
The views expressed in this summary table are from the point of view of the reviewer’s personal use. I am not a member of the armed forces and cannot comment on its use beyond that covered in the review.
Something that might be a ‘pro’ for one user can be a ‘con’ for another, so the comments are categorised based on my requirements. You should consider all points and if they could be beneficial to you.
_______________________________________________
What doesn’t work so well for me
_______________________________________________
Almost too many straps.
Side straps can prevent easy opening of clamshell compartments.
Main zips a little ‘sticky’ (this may improve with use).
_______________________________________________
Things I like
_______________________________________________
Plenty of Webbing and Straps.
Good ‘organiser’ design features.
Break-out shoulder straps.
Strong top carry handle.
Hydration pouch compatible.
Main compartments have full clamshell opening.
Padded back.
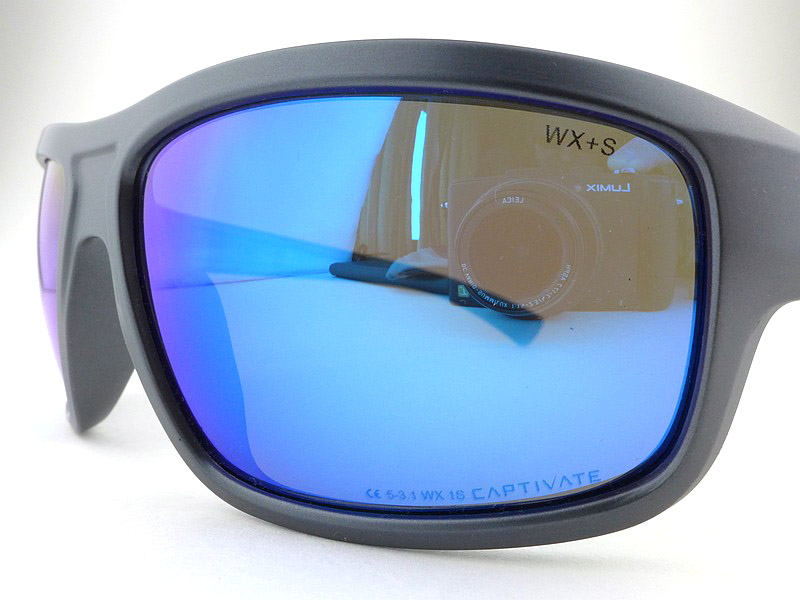
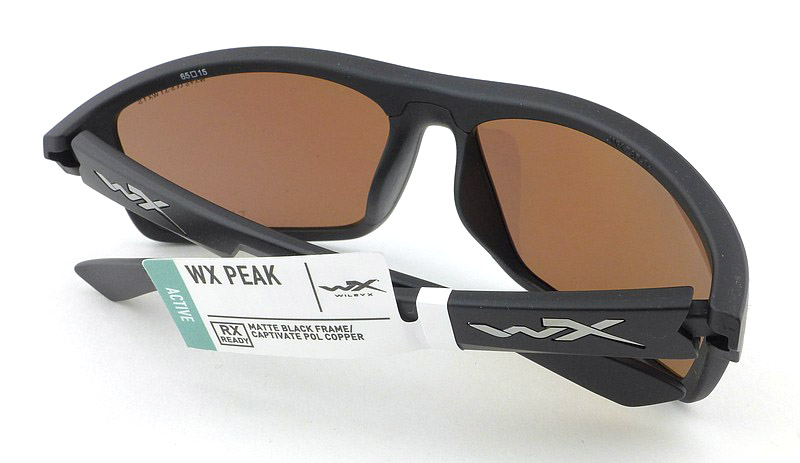
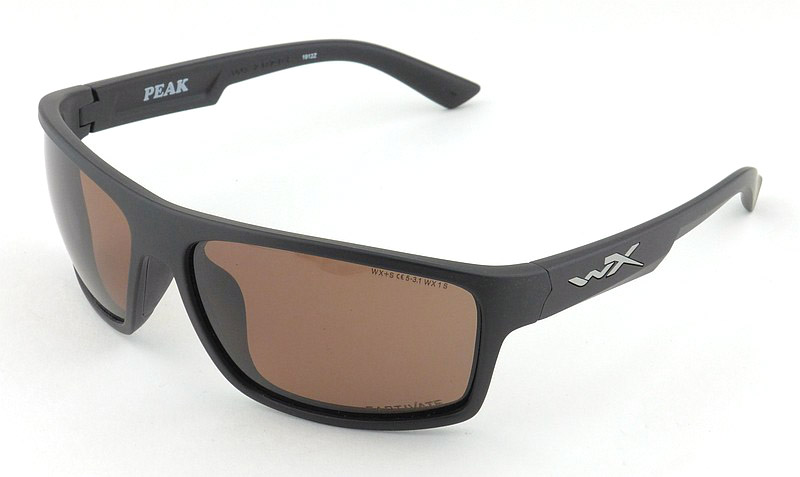
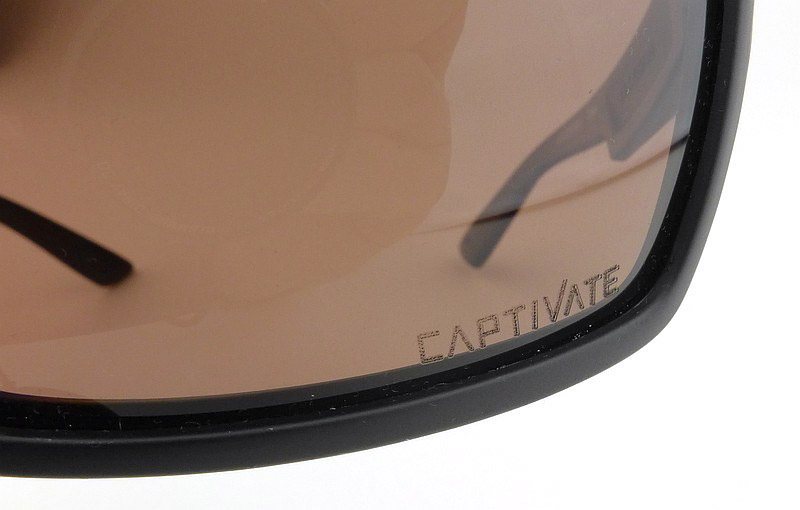
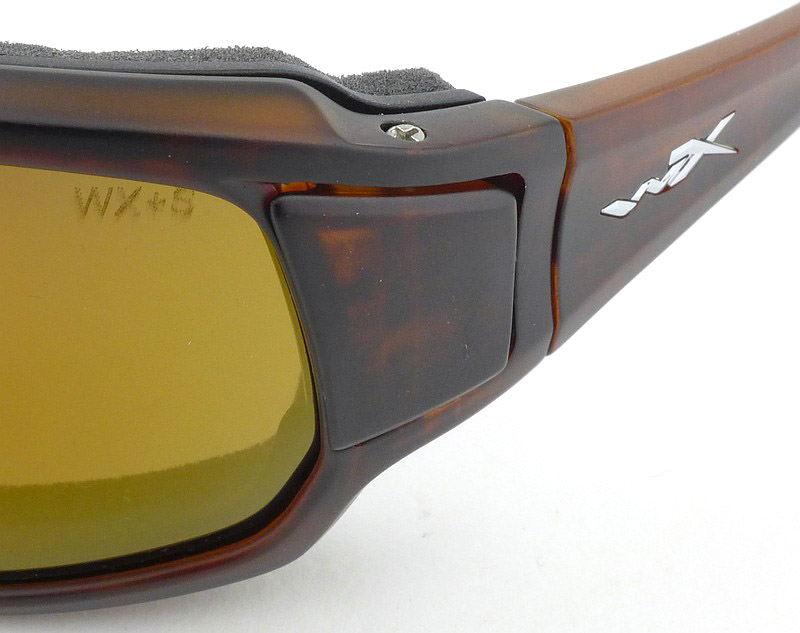
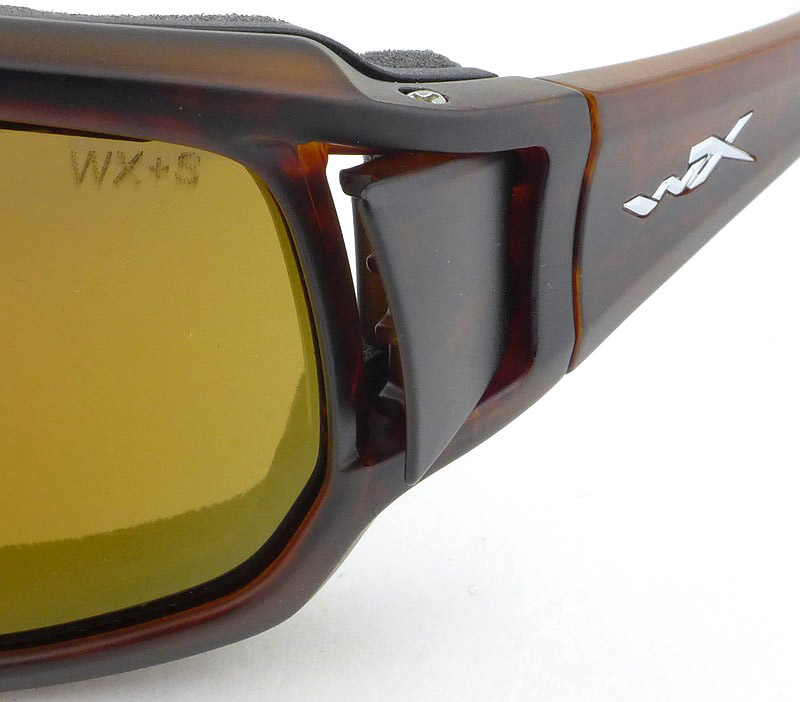
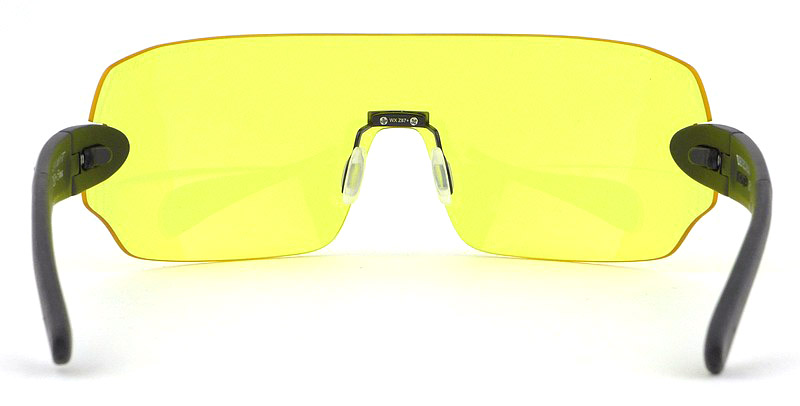
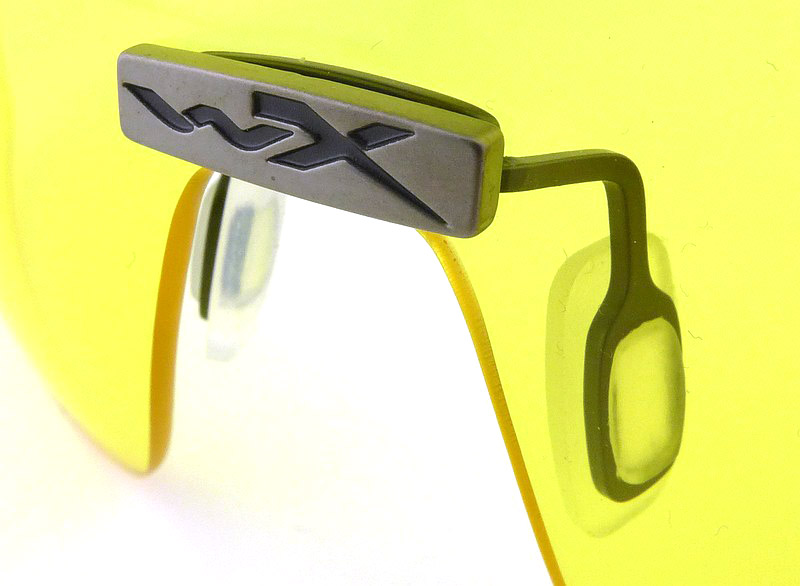
In this review, it’s all about a lens; a new Wiley X lens. As someone who relies daily on the best quality sunglasses, but that also needs EN. 166 & ANSI Z87.1 safety standards, Wiley X has been my go-to brand and has never let me down. I also, in most cases, prefer polarized lenses for glare reduction and enhancing colour depth. Wiley X have now produced a further enhancement to the polarized lens by increasing colour contrast with the CAPTIVATE lens. In this review the focus is primarily on this new lens itself, but can be seen in three of the first models to feature the lens; Contend, Peak and Breach (which also has the gasket technology).
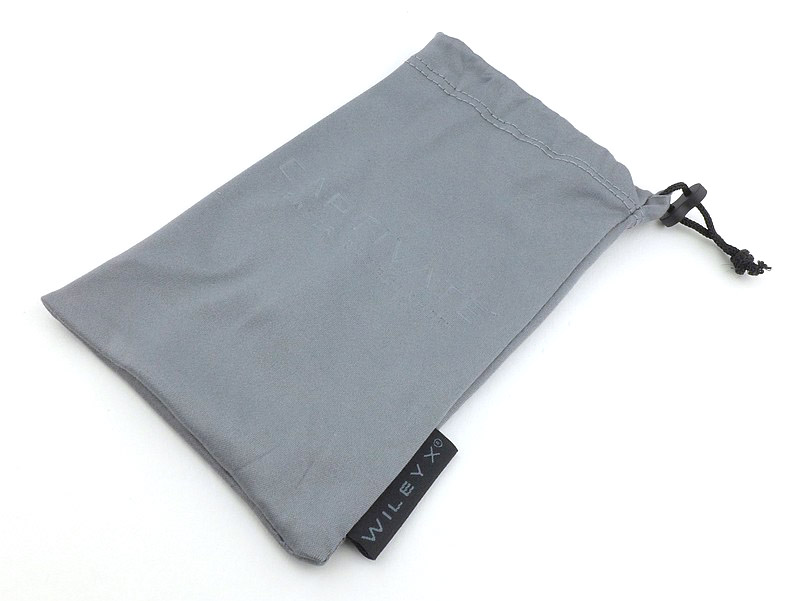
What’s in the box?:
Here is what is included for all three models.
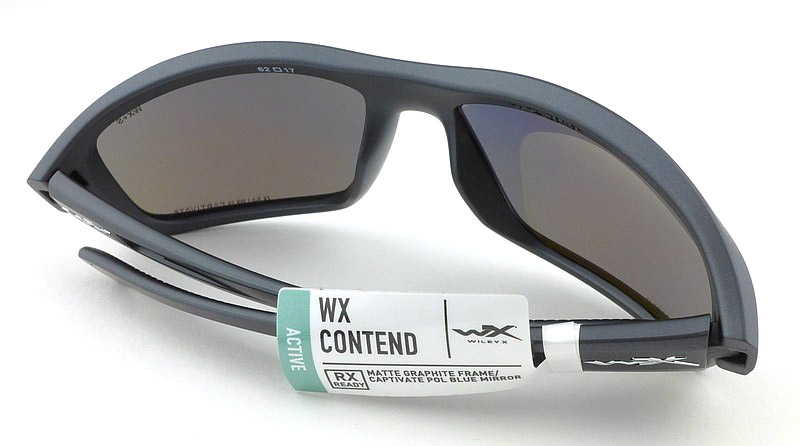
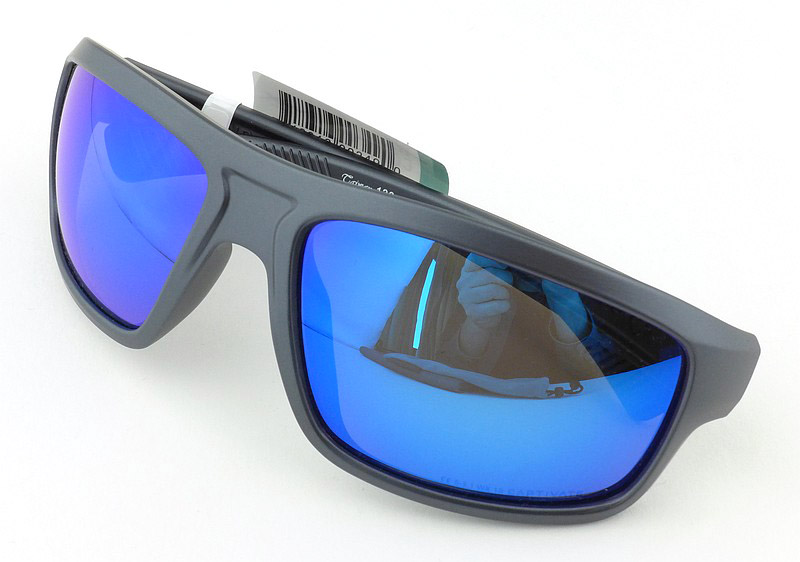
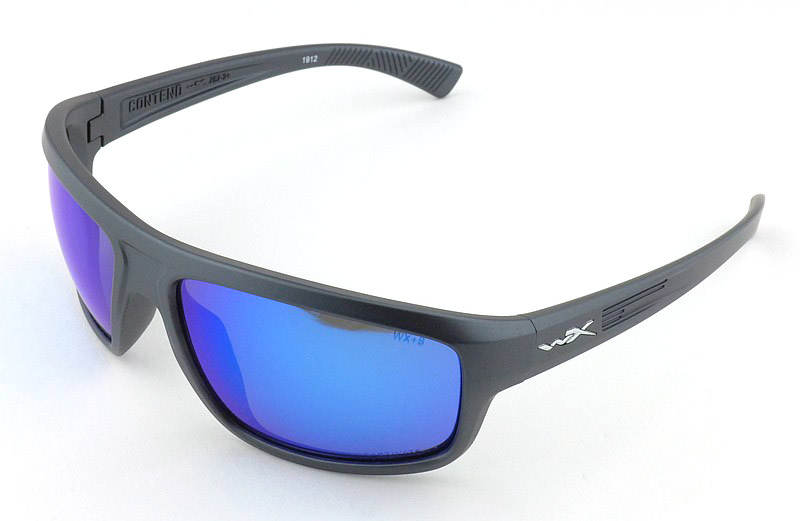
A look round the Contend:
This ‘Contend’ has the Blue mirror version of the CAPTIVATE lens.
A look round the Peak:
For the ‘Peak’ it is the Copper CAPTIVATE lens.
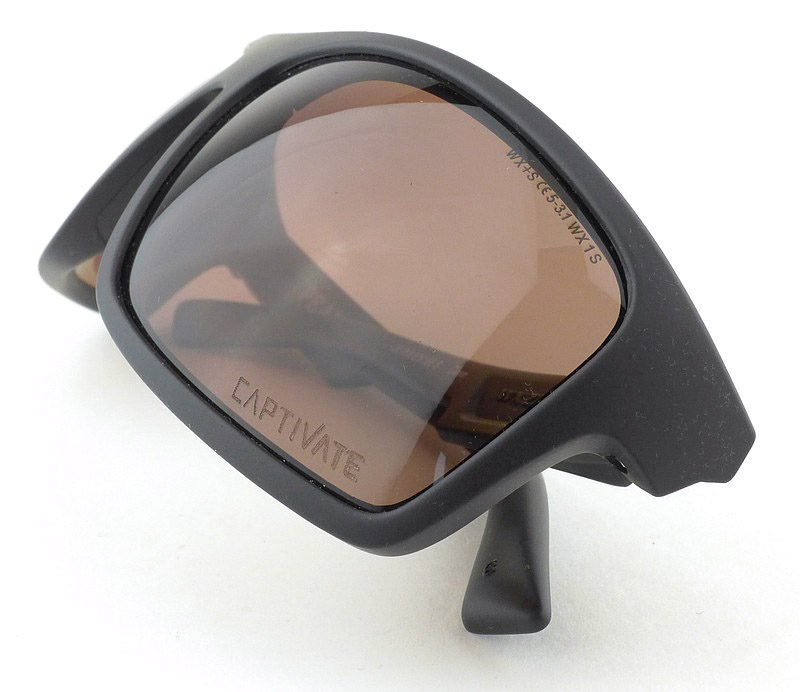
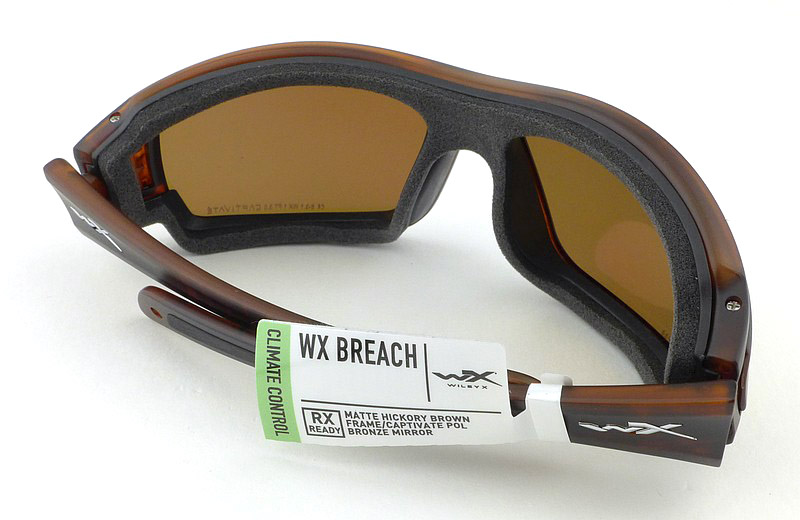
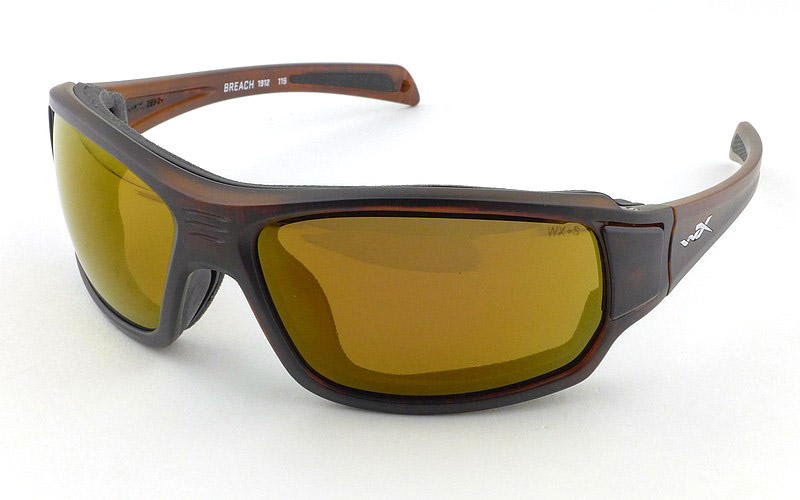
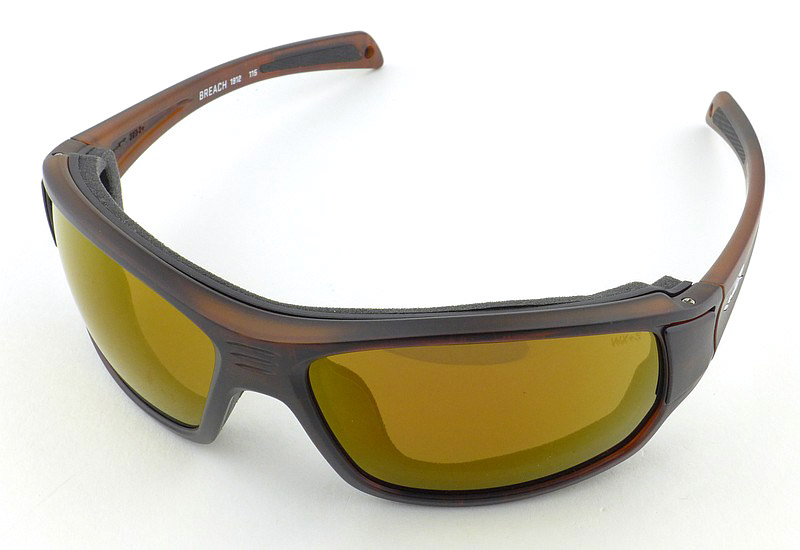
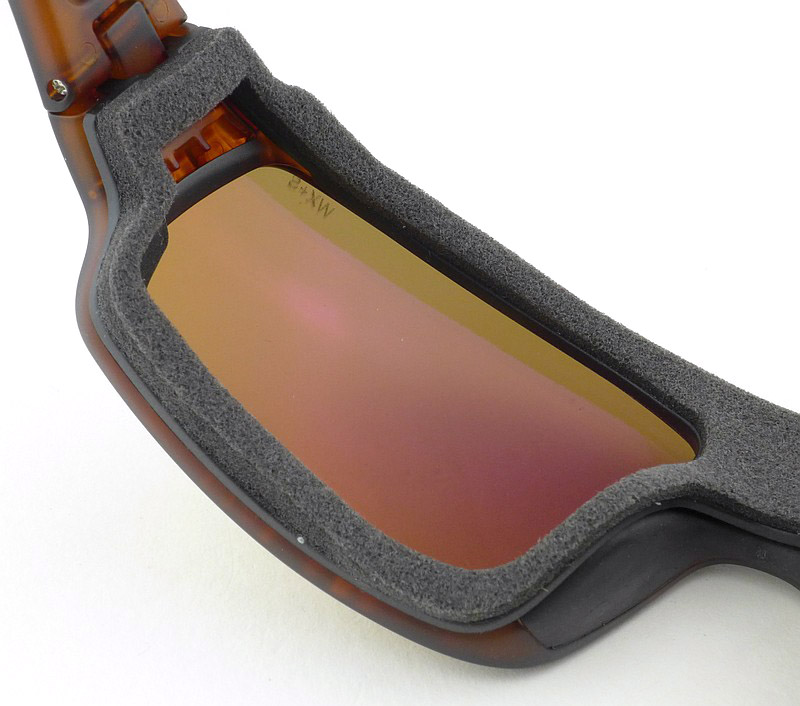
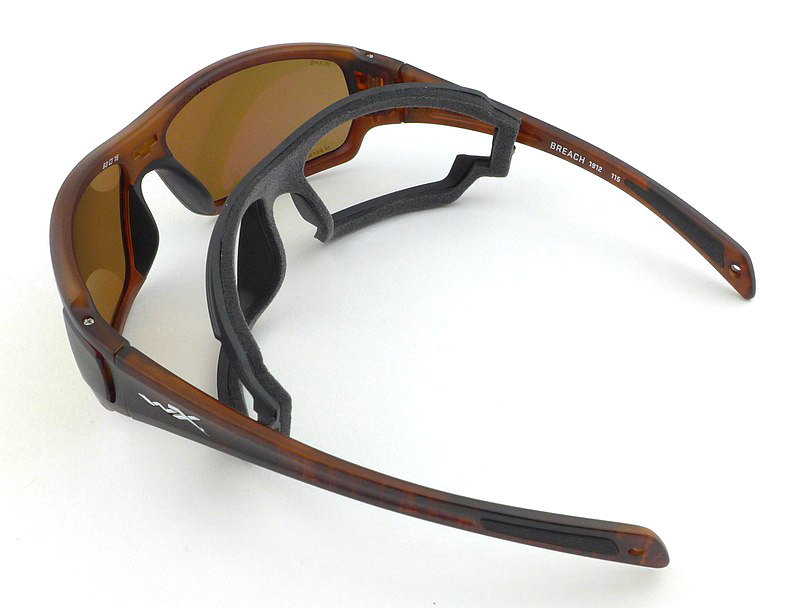
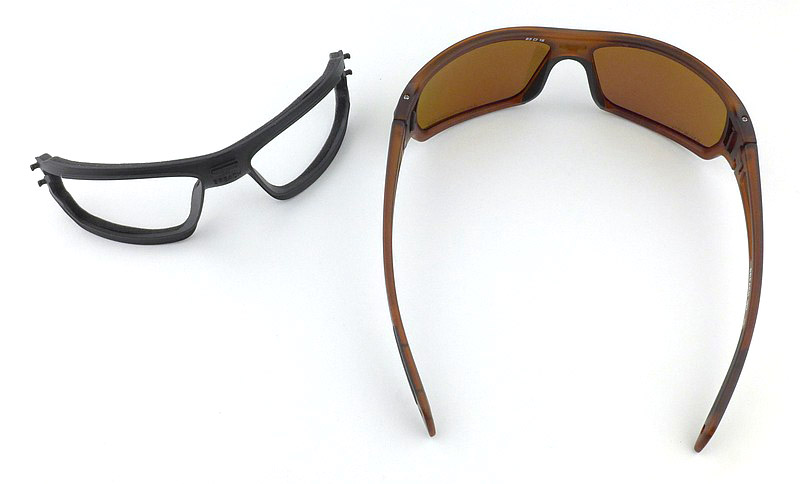
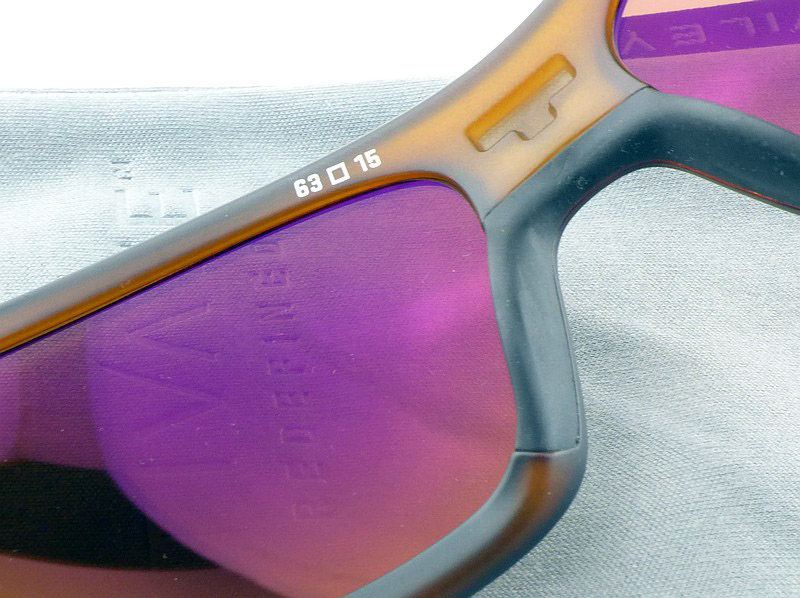
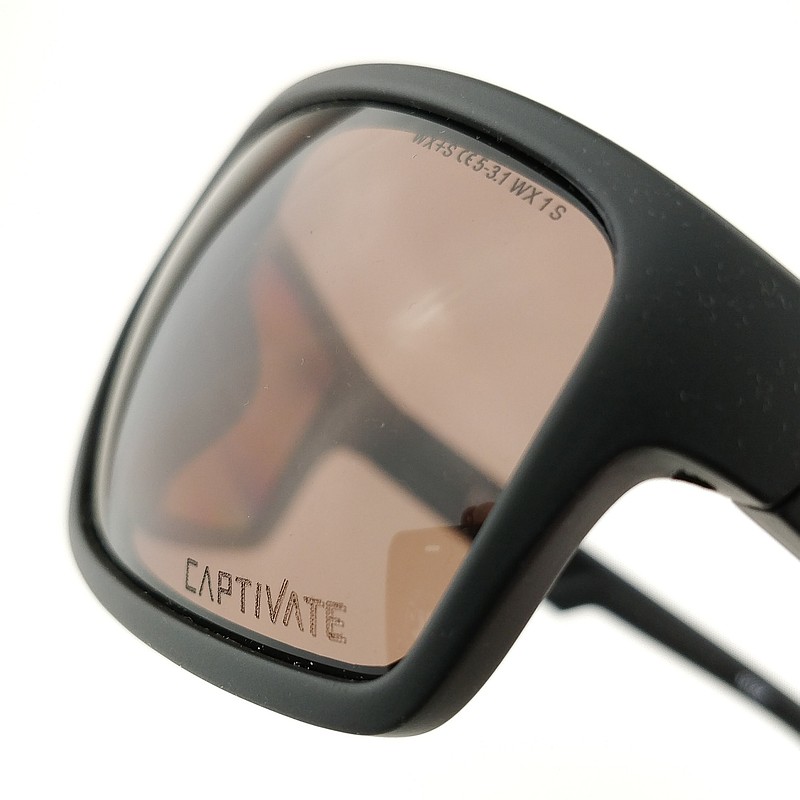
A look round the Breach:
Lastly the ‘Breach’ has the Bronze Mirror CAPTIVATE lens. Also look out for the gasket, and in this model, the side vents that can be opened and closed as required.
What is the CAPTIVATE lens like to use?
First impressions? That is actually very difficult to describe when you go from one of Wiley X’s already superb polarized lenses to the new enhanced CAPTIVATE polarized lens. Between one Wiley X polarized lens and the CAPTIVATE lens, is there a marked difference? It is simply not possible for there to be a massive difference. Instead it has taken a longer period of use to really appreciate the improvement, as I have now experienced a wide range or lighting conditions and locations with differing colour ranges.
None of the lens versions on test are completely neutral, so all give a slight colour cast to the overall rendition of what you see. This is one aspect of the eyewear we choose that adds an extra dimension and allows us to see more and differently than without any lens.
Since getting to know the new CAPTIVATE lens, I’ve been trying to work out how to best show what this lens does, and am still no satisfied, but here goes with my attempt.
Bear in mind, that like all of our senses, we have our own built in ‘automatic balance’, so like a camera has a White Balance setting, and this can be set to Auto White Balance, our eyes also do this to some degree, and after wearing a lens for a period of time our eyes adjust to them.
Coming from daily use of Wiley X lenses already, first impressions were of an excellent lens, but could I see what made them different? Over time, and with swapping back to the standard polarized lens, the answer was yes. What I was seeing through the CAPTIVATE lens was clearer and more defined. It was subtle, but the impression was of sharper edges, and a higher clarity. As we are seeing objects which don’t typically have a ‘border’ or ‘outline’ in a different colour, we are seeing the edge of an object as its colour meets the next background or object colour.
The intent of the CAPTIVATE lens is for it to reduce light in the parts of the light spectrum where Blue merges with Green, and where Green merges with Red so that you see a more significant difference between blue/green and green/red boundaries.
This is not done to such an extent that you can’t see certain shades, but so that you have an impression of higher contrast between colours. As I said before, this is not so marked you put them on and see something so unreal, but rather that with more use you can appreciate how clearly you are seeing your surroundings.
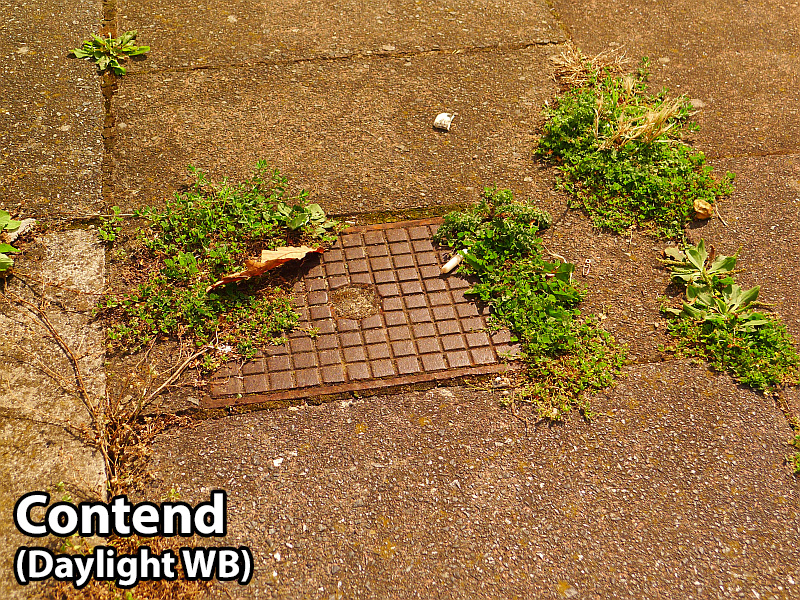
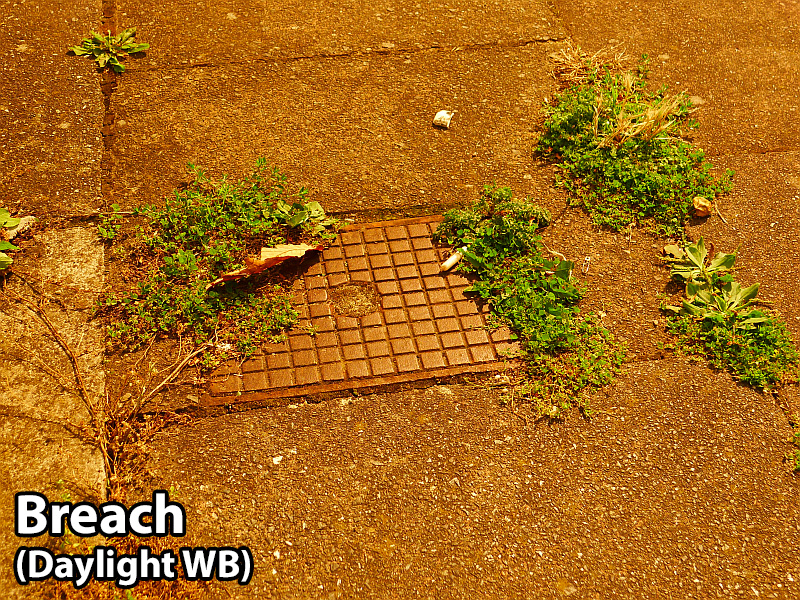
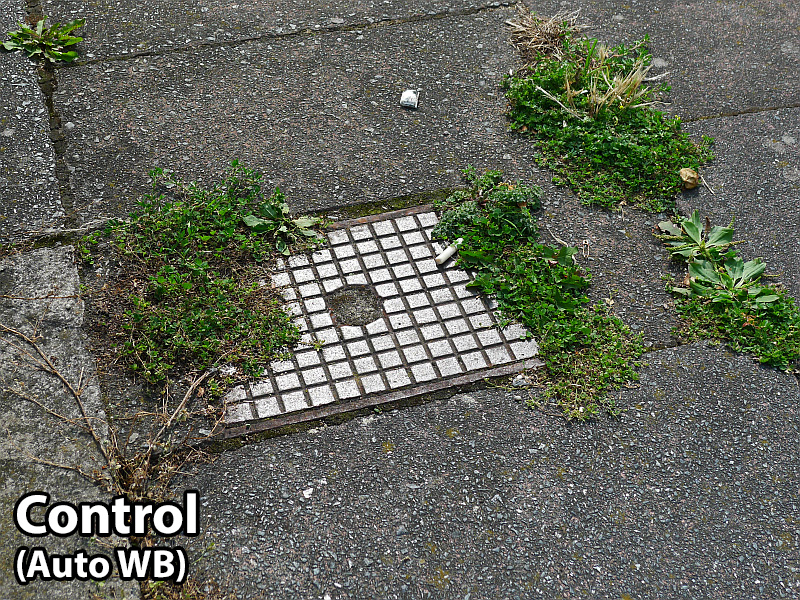
In an attempt to show the effect of these lenses, I am including two galleries with photographs taken through the different lenses. In the first set, the camera is set to a fixed Daylight White Balance (so is not adjusting the colour balance), and in the second set the camera is set to Auto White Balance to try to introduce some of the acclimatisation our eyes have.
There is a control shot first with no lens in front of the camera, then the three different models.
Daylight White Balance set
Auto White Balance set
This is the set I feel, more closely represents what your eyes see (but not exactly) for each lens type. The stand-out photo is probably the one of the metal cover in a pavement which has weeds growing round it and when you go from the control shot to the Contend lens. The green really stands out.
Another characteristic I like about the Bronze Mirror lens in the Breach was how it gave a pleasing deep bronze cast to the rusted metal surfaces in road furniture (manhole covers etc).
Review Summary
The views expressed in this summary table are from the point of view of the reviewer’s personal use. I am not a member of the armed forces and cannot comment on its use beyond that covered in the review.
Something that might be a ‘pro’ for one user can be a ‘con’ for another, so the comments are categorised based on my requirements. You should consider all points and if they could be beneficial to you.
I’m trying something slightly different and starting with what doesn’t work so well, so I can finish on a more positive note
_______________________________________________
What doesn’t work so well for me
_______________________________________________
Sorry, not being biased, but really nothing.
_______________________________________________
Things I like
_______________________________________________
Lens quality.
The clarity of vision.
Subtle effect of the enhanced colour contrast.
Strong and comfortable frames.
More innovation from Wiley X.
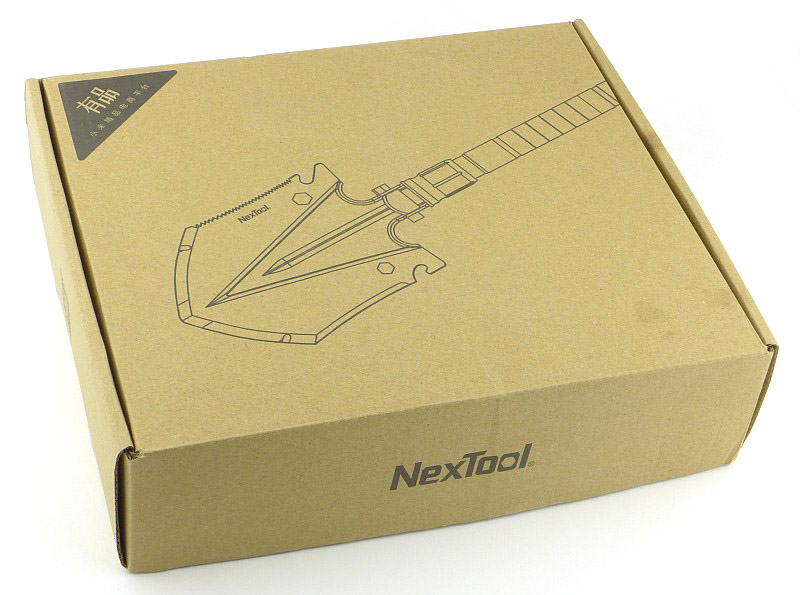
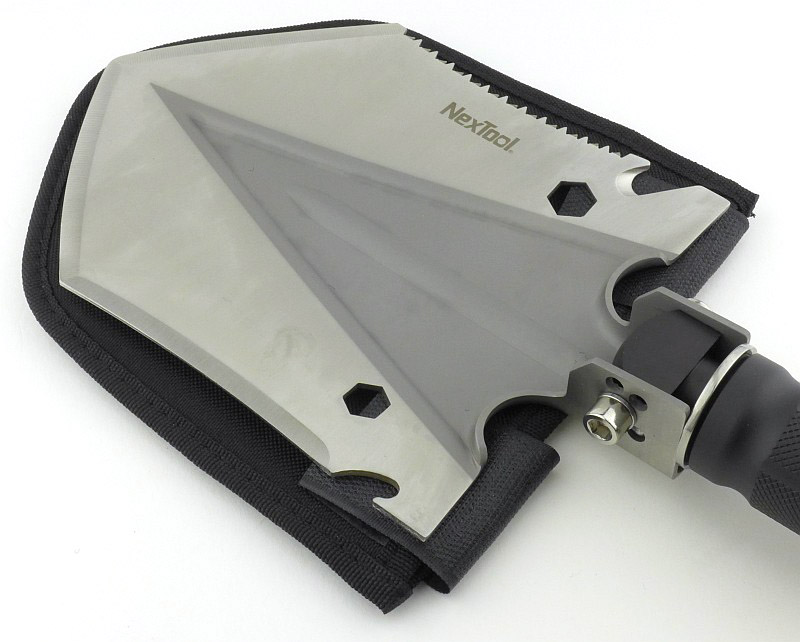
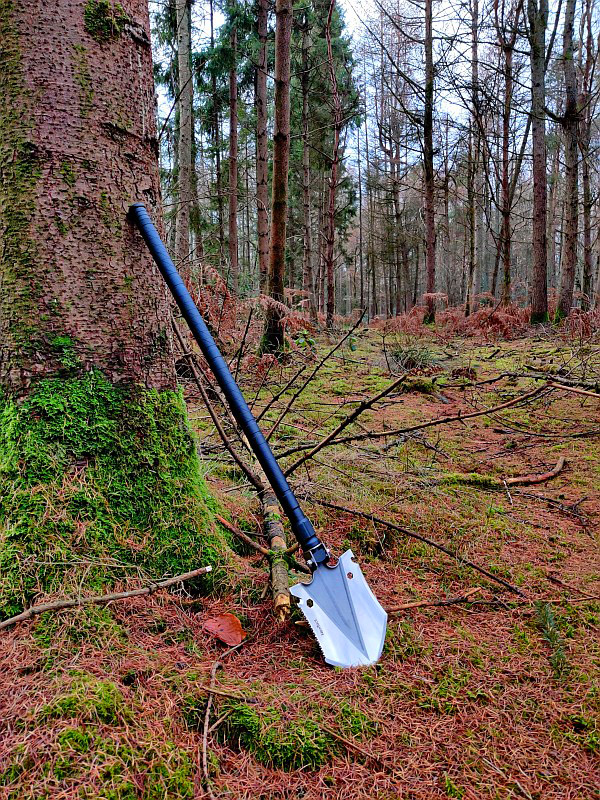
When I first picked up the NexTool (14-in-1) ‘Frigate’ shovel I was struck by how solid it felt, this was no ordinary folding shovel. Large and substantial, with plenty of heft and leverage to make this a properly effective tool. With a head that can be set to multiple angles to enhance its digging ability, changing from a shovel to a grubbing hoe, and a few extra functions thrown in to make it even more useful. Keep reading this review of the NexTool Frigate 14-in-1 Folding Shovel for all the details.
A few more details:
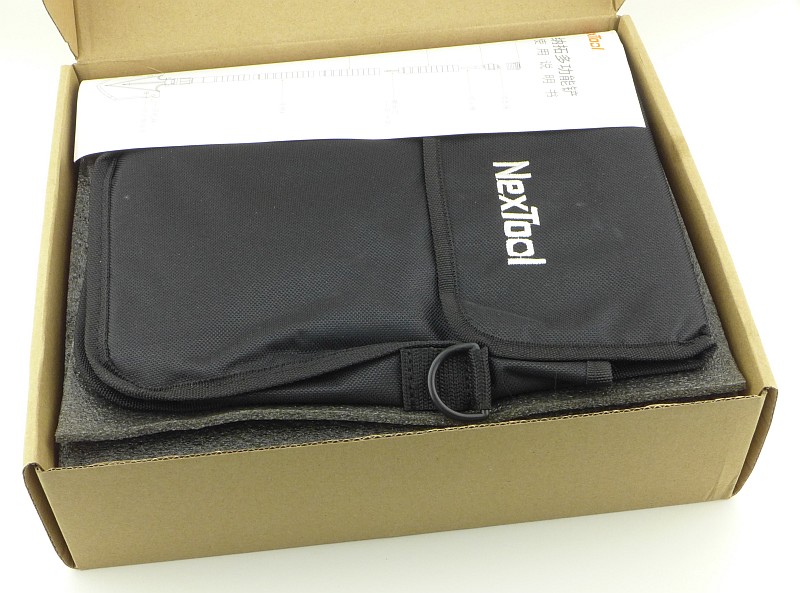
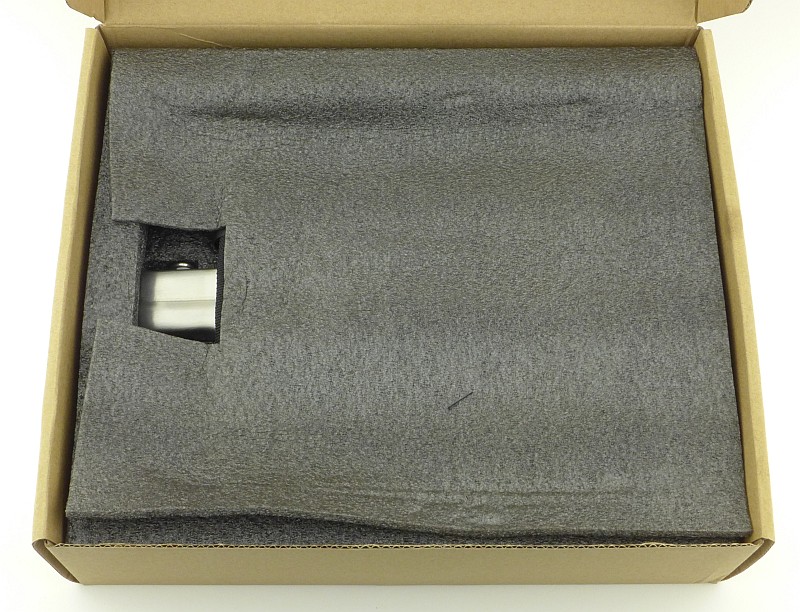
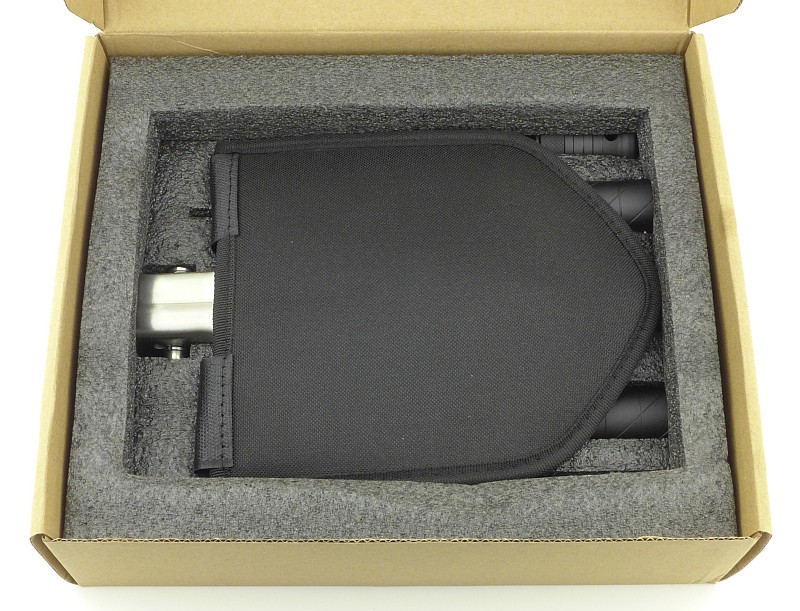
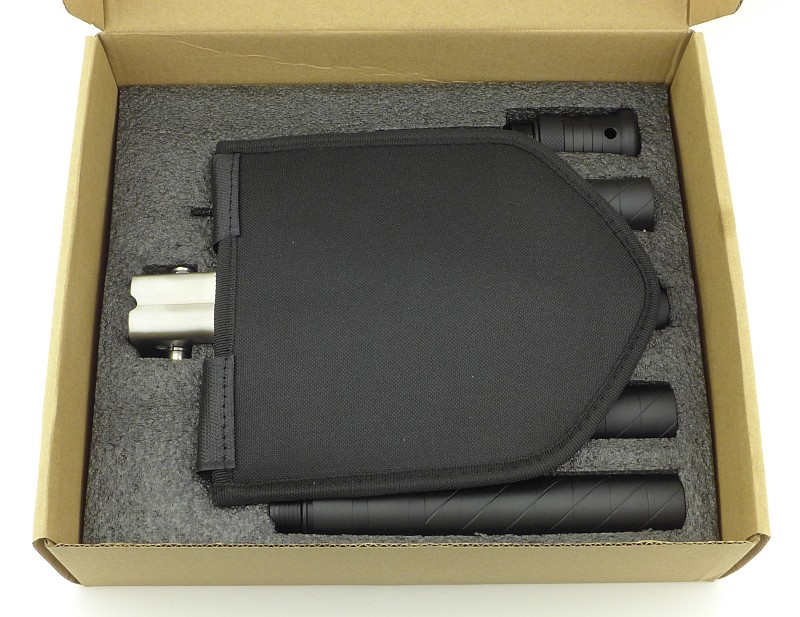
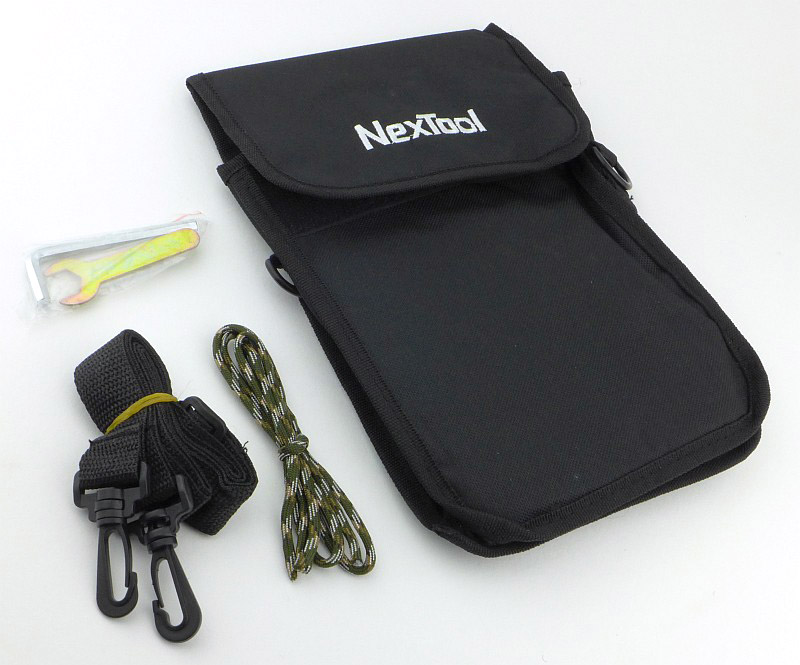
What’s in the box?:
Revealing the contents layer by layer.
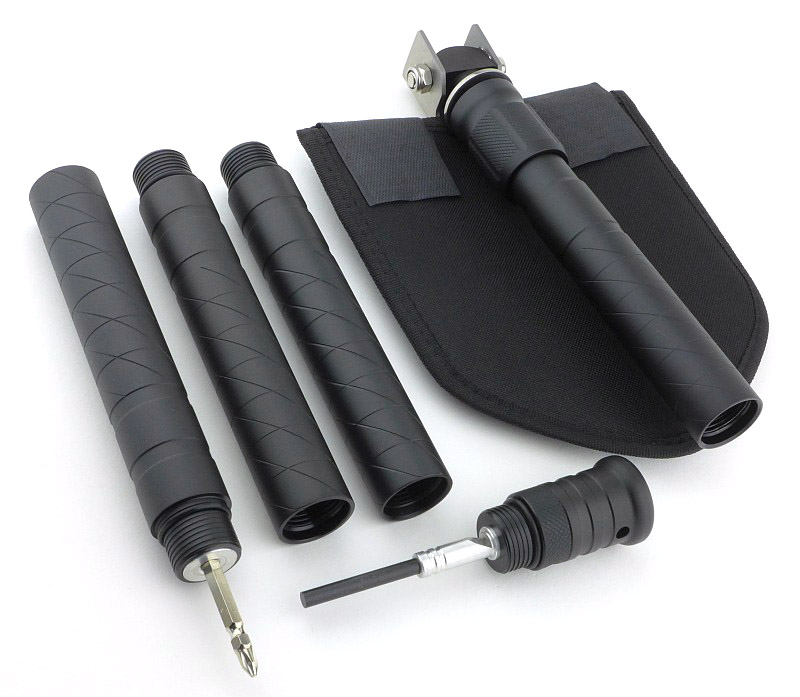
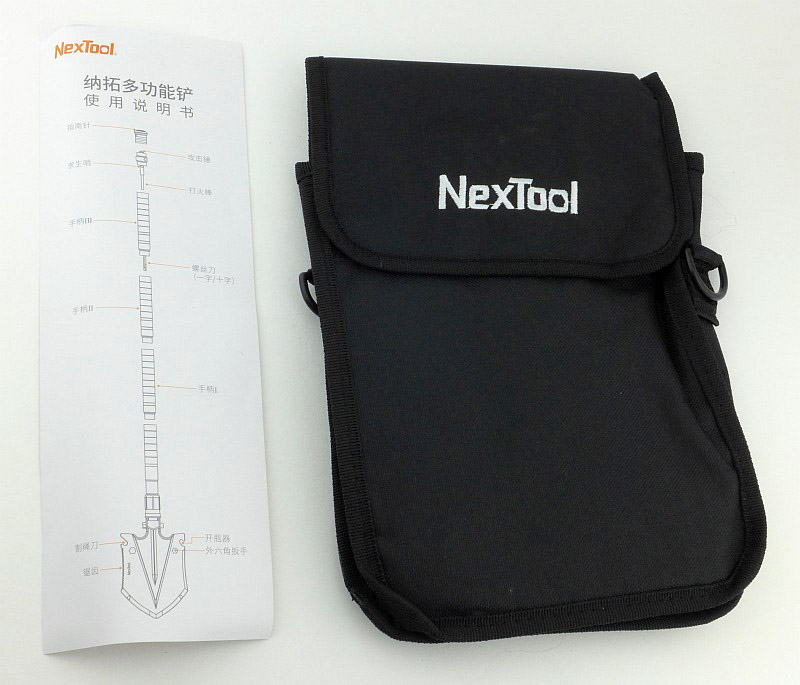
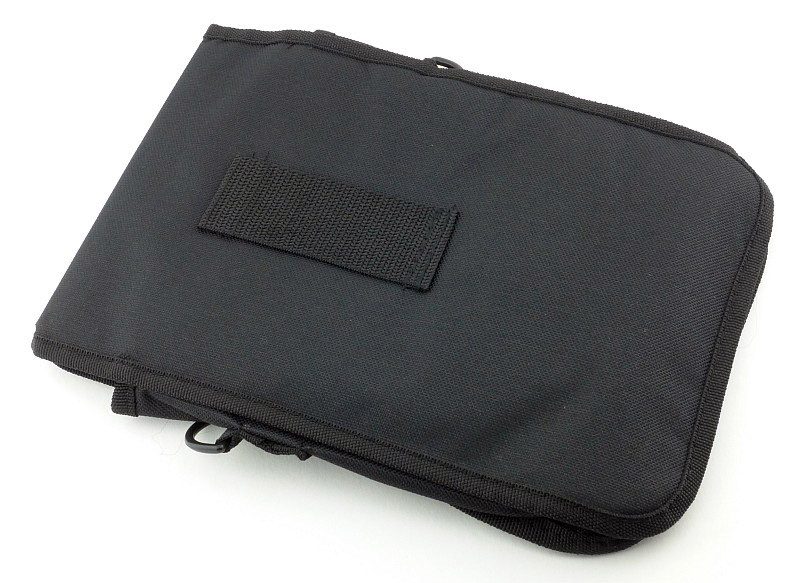
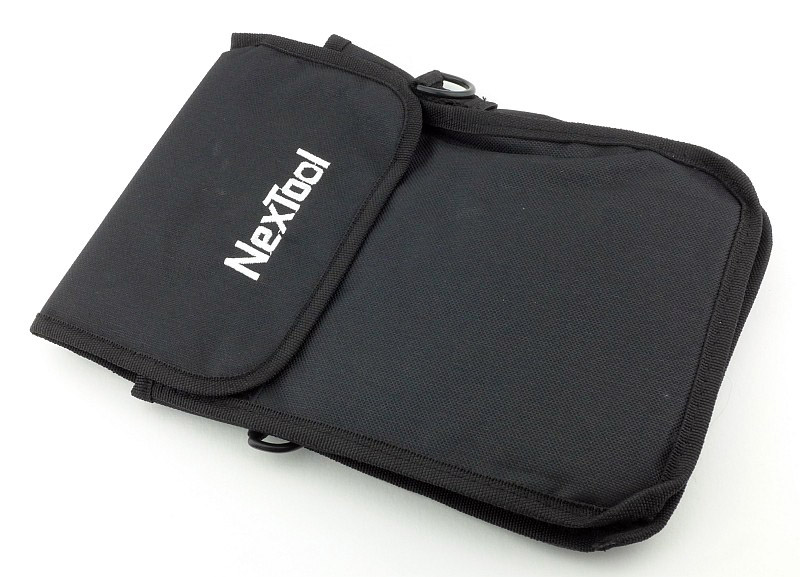
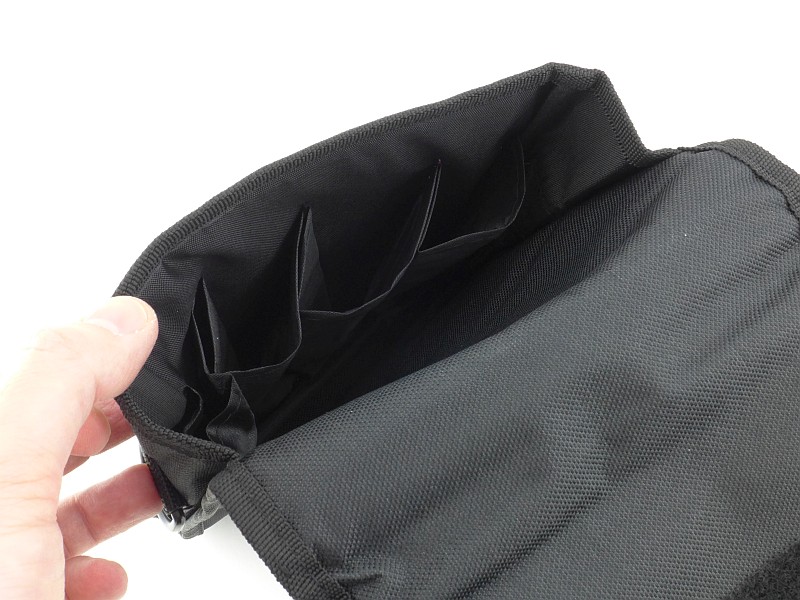
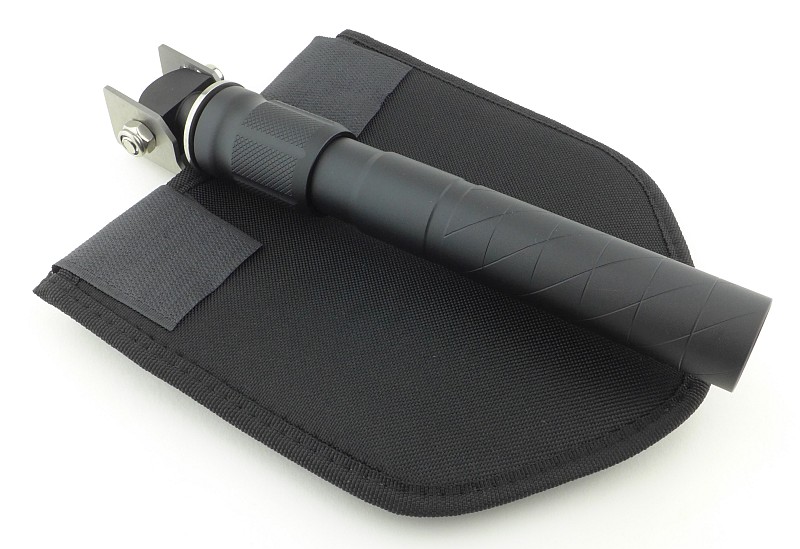
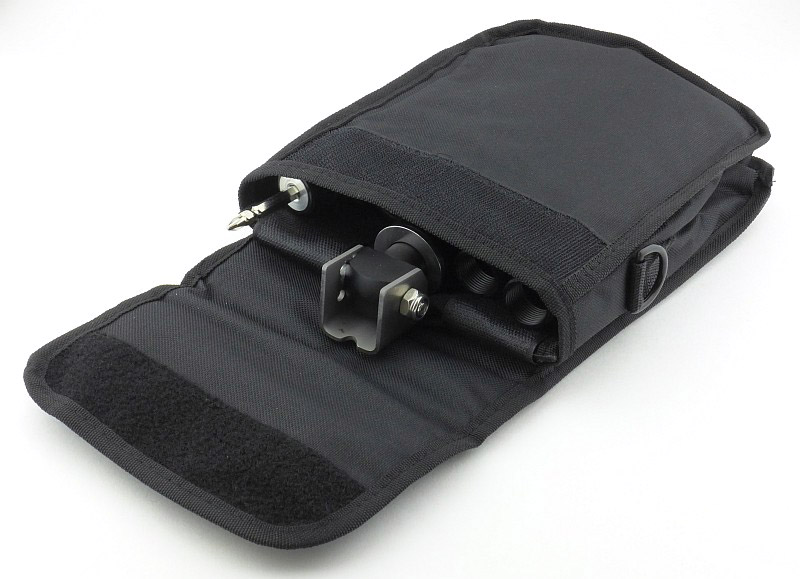
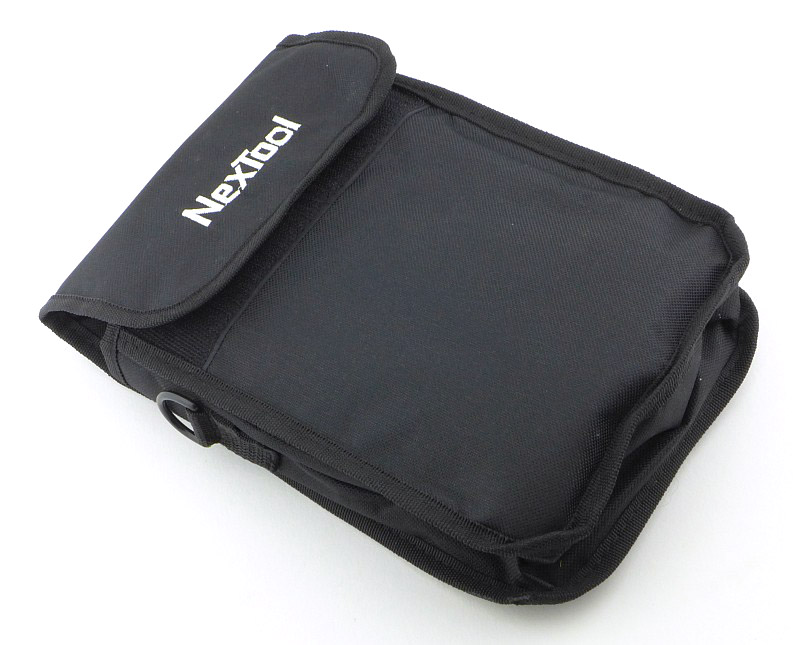
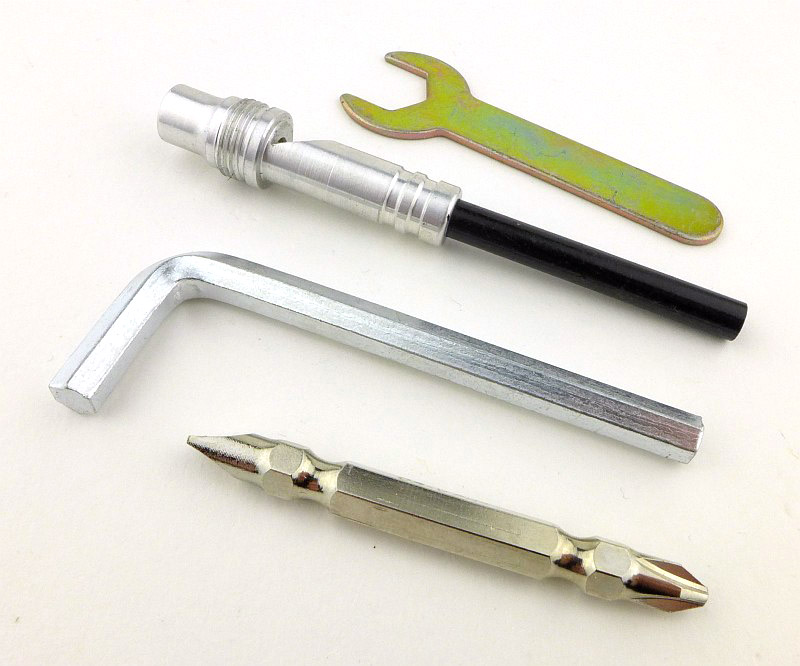
A good look round the carry case – Things to look out for here are:
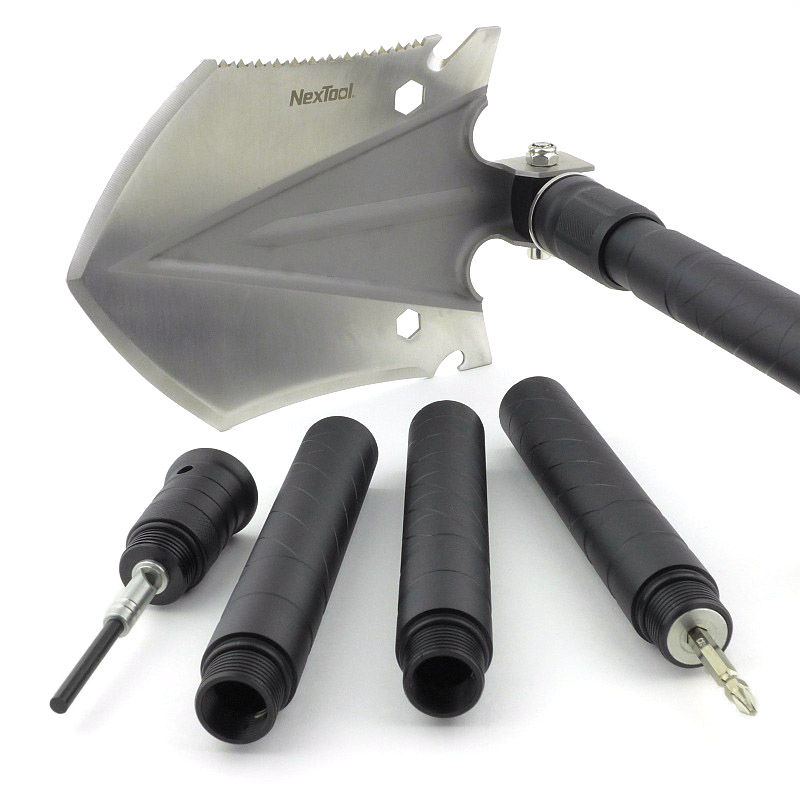
As well as the well provisioned case and carry strap, it is supplied with an Allen key and small spanner (to maintain the shovel’s folding mechanism) and some paracord. Inside are compartments for each section of the shovel.
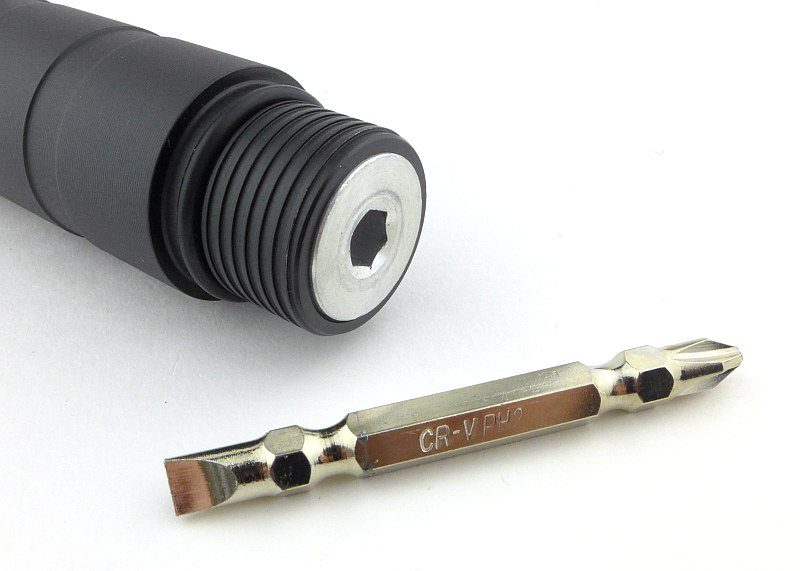
A good look over the handle and included tools – Things to look out for here are:
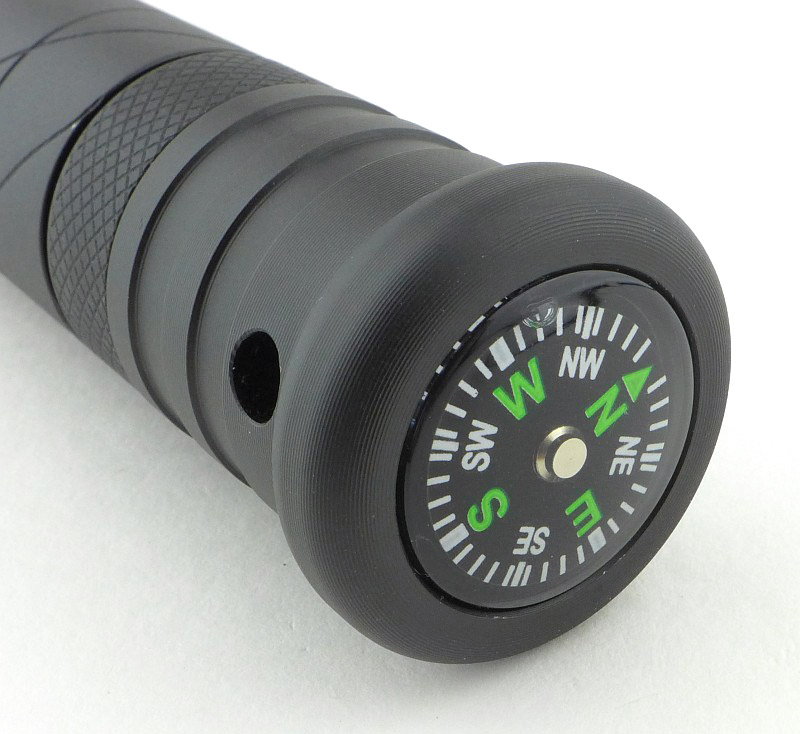
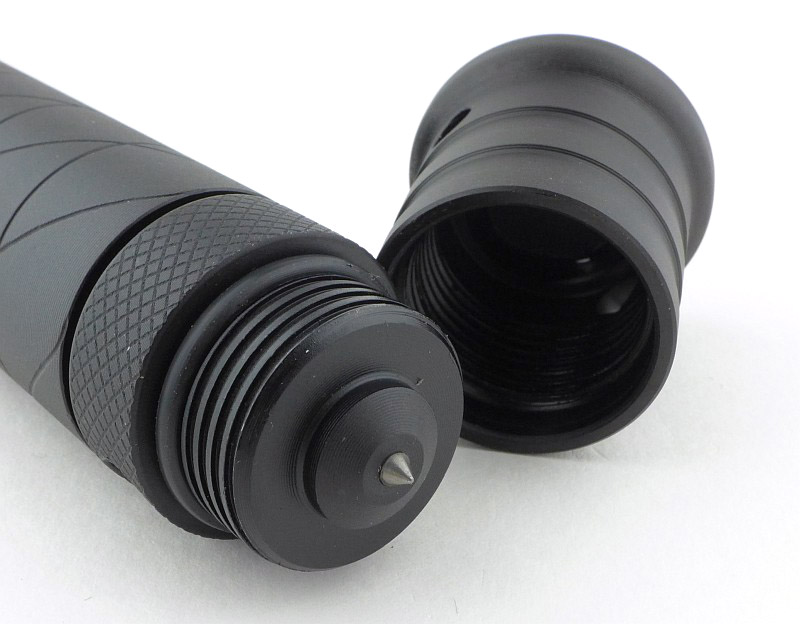
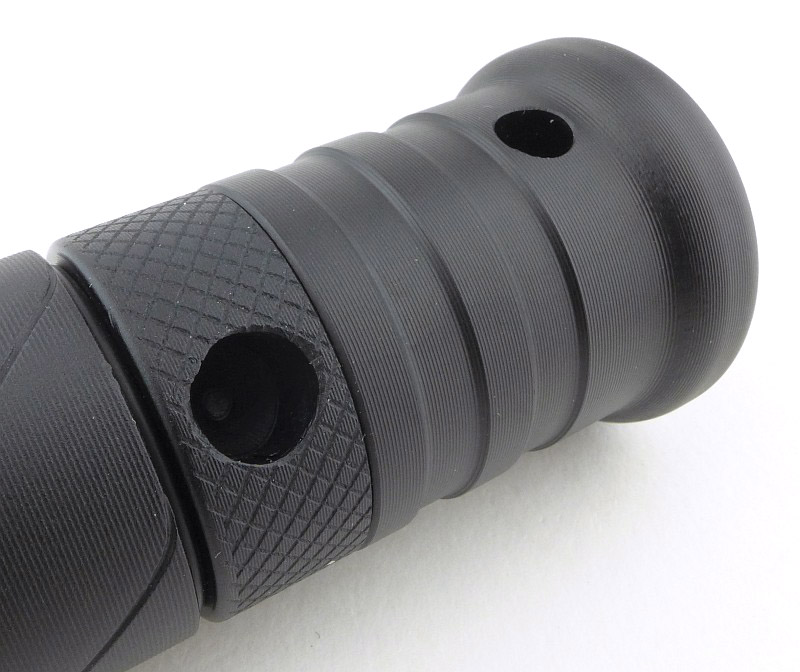
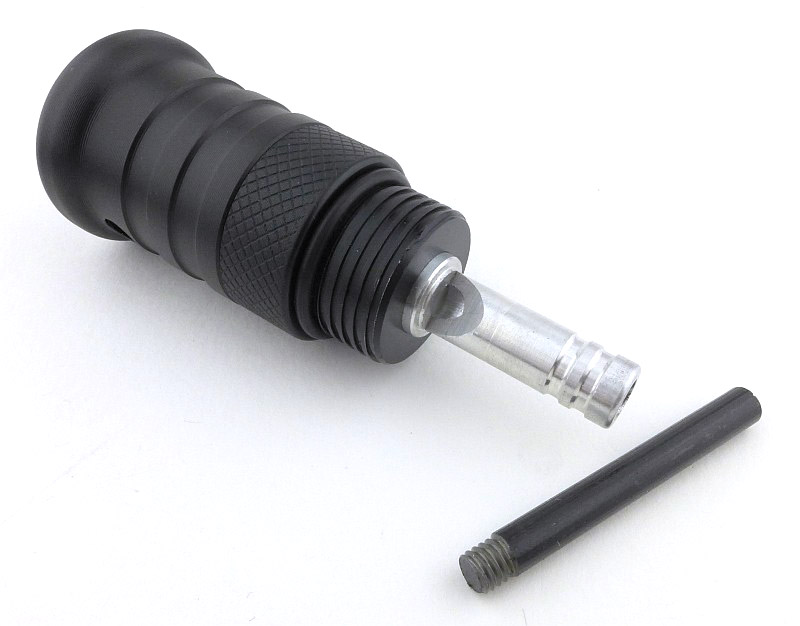
One handle section incorporates a standard magnetic hex screwdriver bit holder and comes with a double ended bit. The end-cap of the handle incorporates a fluid compass, and removing that end-cap reveals a glass-breaker spike. Unscrewing the glass breaker part reveals a dual purpose whistle and firesteel. The two other handle sections are simple empty tubes.
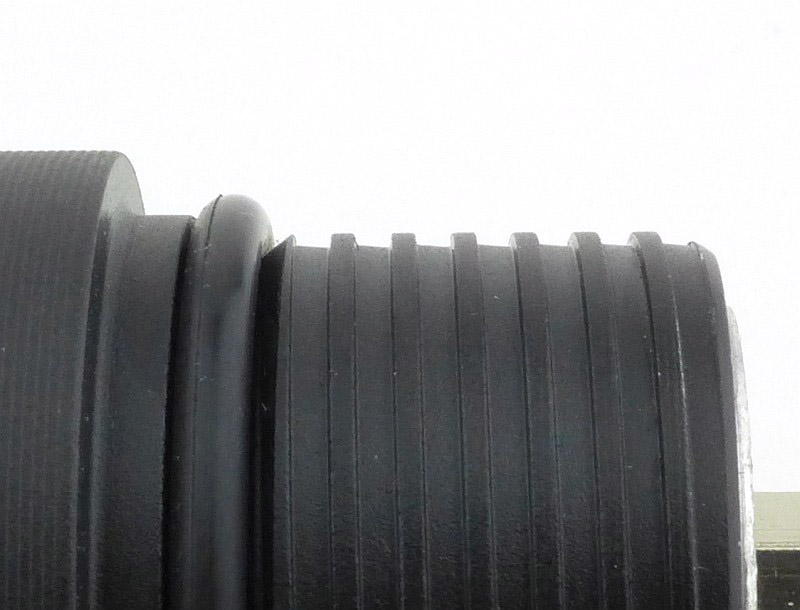
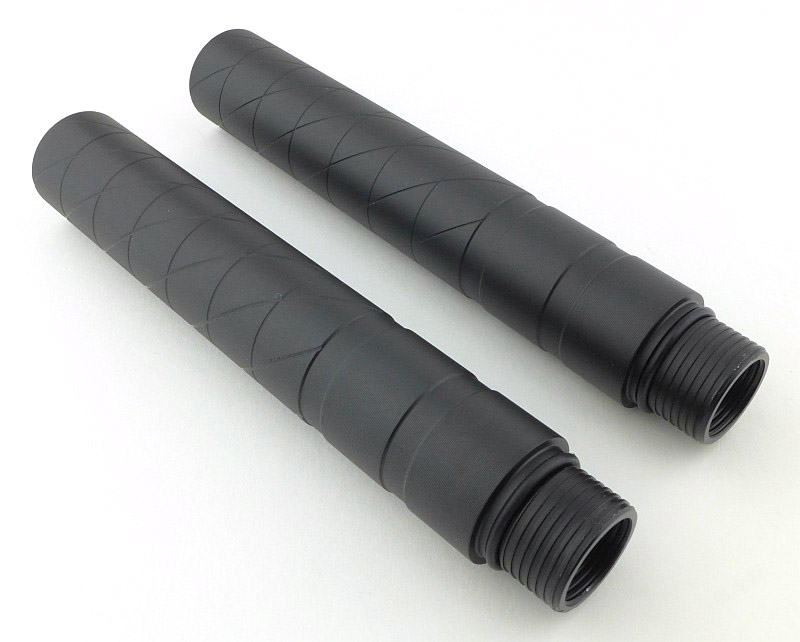
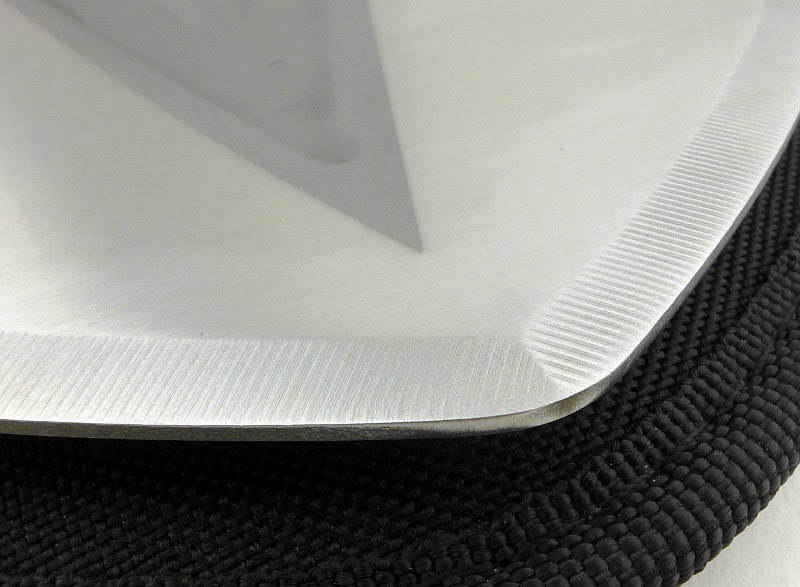
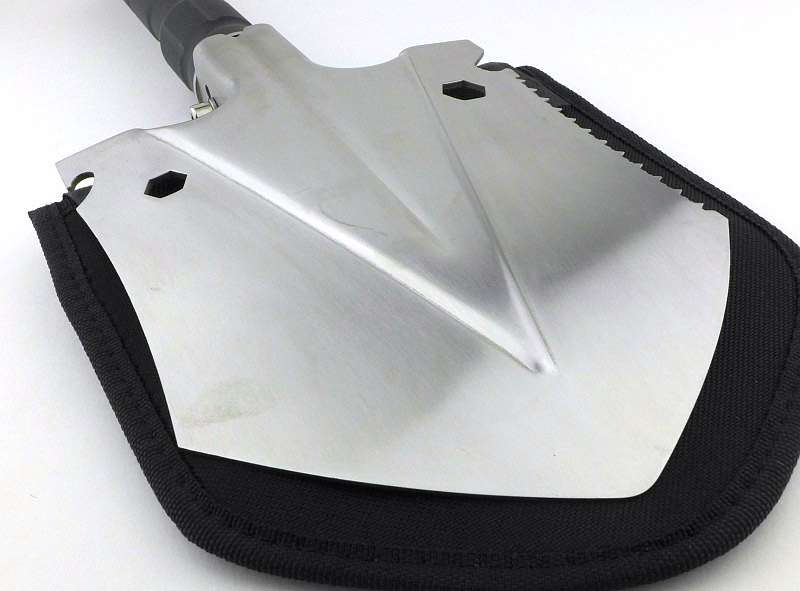
A good look round the head of the shovel – Things to look out for here are:
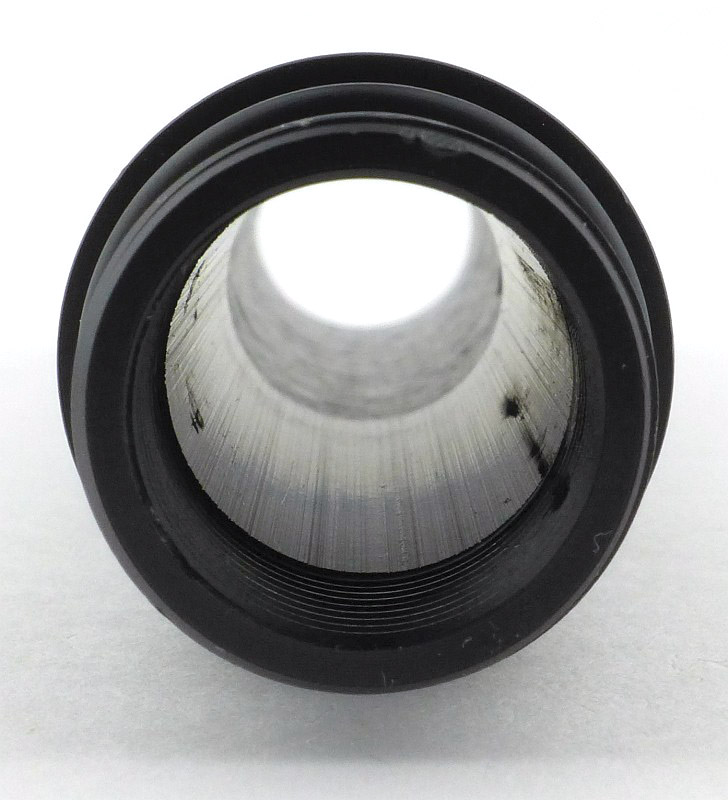
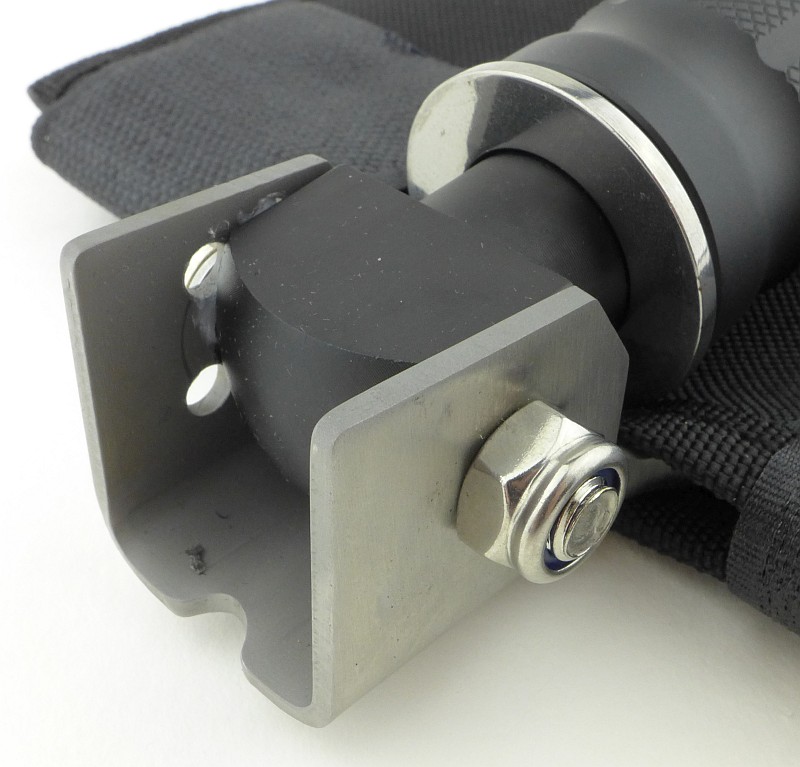
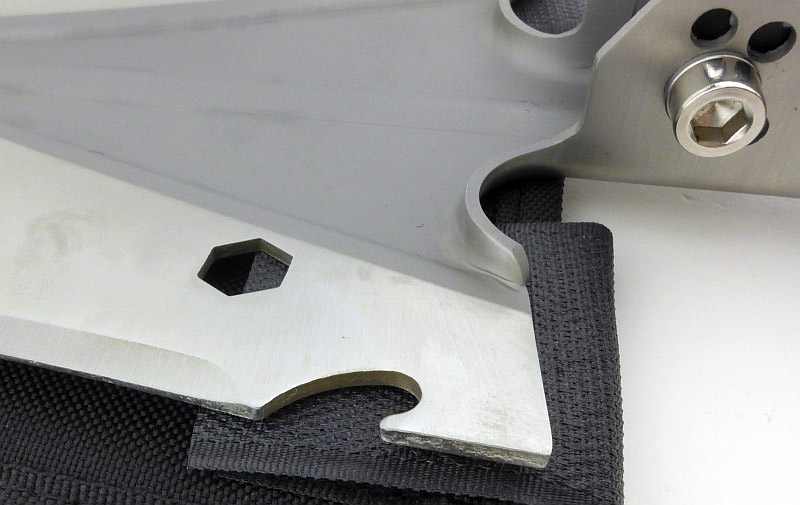
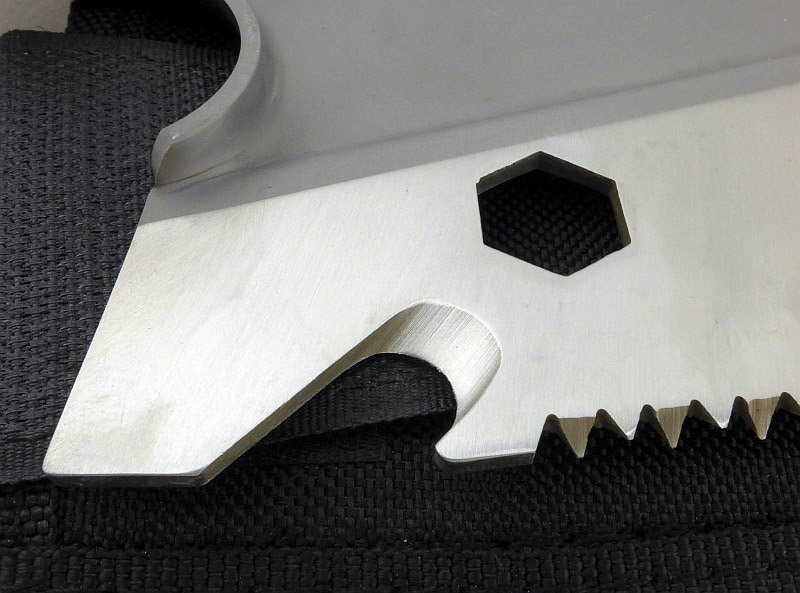
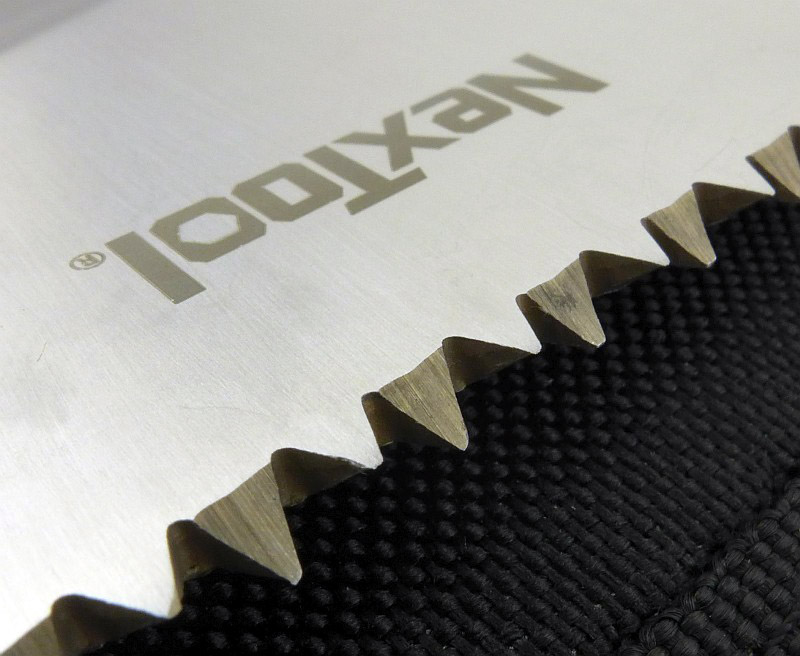
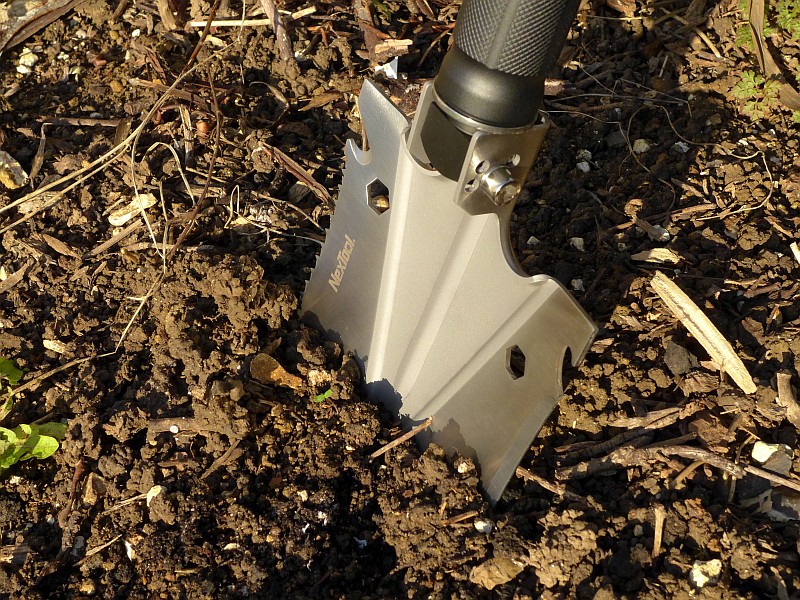
The main event, the head of the shovel. There is a protective slip covering the shovel head when packed away. A ball-detent system locates the head at one of three angles/positions, 45 degrees, 90 degrees open (from closed) and fully open. Once the head is located by the detent, a locking collar then secures the head in the chosen position. The shovel head has an incorporated saw, two spanners, a bottle opener and a line cutter. The side opposite the saw could be sharpened for chopping, but is not sharp as supplied.
What it is like to use?
I’ve split this section’s photos into two galleries as the first relates to some general observations and the second to the results of the actual testing.
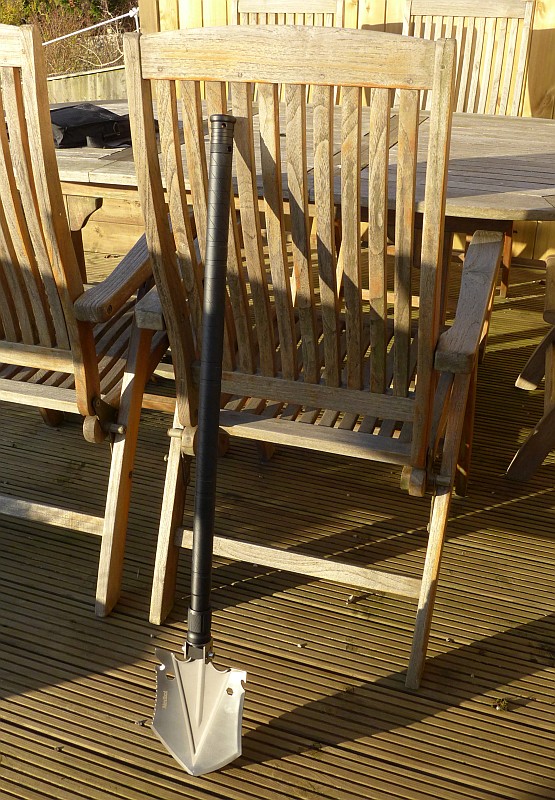
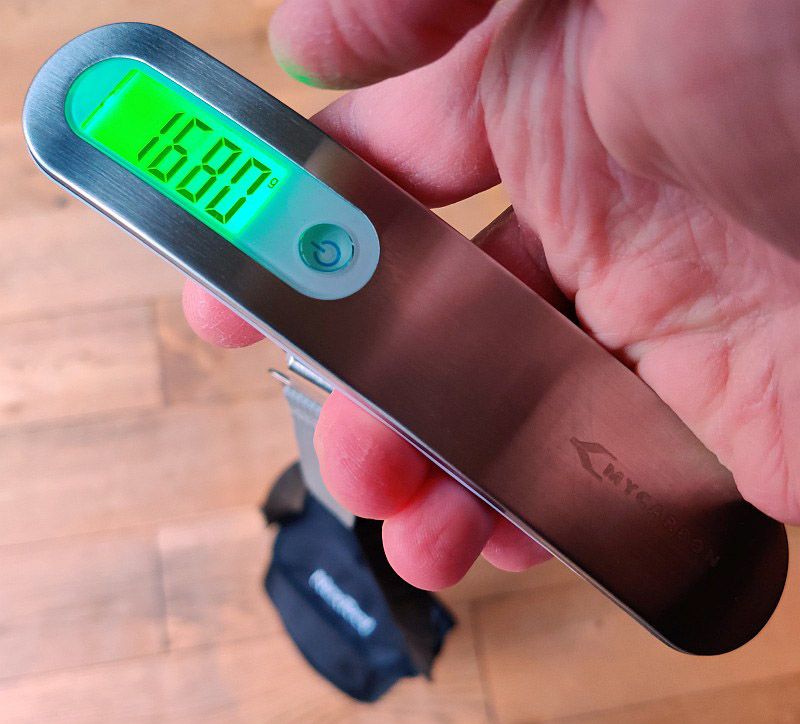
This first gallery is intended to give an impression of its portability and size. The fully packed tool weighs in at 1.68kg which is more than many folding shovels, so the important factor here is to decide how much work you are really going to do with it. Light weight shovels are great in most ways up until you have to use them, and may as well have a garden trowel. With that weight comes ability to do serious work. Look at the shovel leaning against a high-back garden chair, it is a size you can use standing up, you won’t need to be on your knees to dig.
The compartmentalised carry case ensures it easily all fits together and is surprisingly compact.
With the shovel begging to be used and do some serious work, I quickly came across a consideration and suggestion for anyone using this shovel – Take out all the ‘extras’ from inside the handle tubes and keep them separate.
The hex bit immediately comes out of the magnetic holder and then just bounces about. More annoyingly, the whistle and firesteel quickly shakes loose, falls into the tube and the firesteel will break. This is not a fault as such, but a practicality for when you start digging properly, so avoid the broken firesteel and annoying rattles, and just take these parts out before you start.
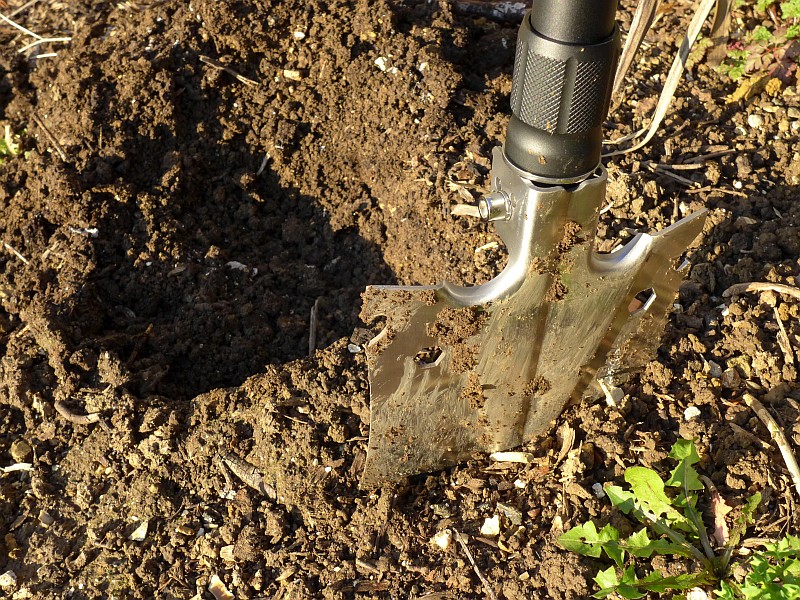
This is the most comfortable and effective folding shovel I have used. Its weight allows you to easily stab into the ground (as there is not a suitable surface to apply foot pressure) and then a long lever to make quick progress.
Personally I would not count on the additional functions but focus on the effectiveness of the shovel and its digging ability. The saw is useful for small notches, but not much more, and things like the spanners and bottle opener in the shovel blade might have use for prying and twisting jobs, but anything really needing these tools will want proper versions. Of course having is these functions is better than not having them.
Unlike some folding/telescopic shovels (that are less capable), the NexTool shovel becomes a little fussy when packing away. There is a separate shovel blade cover needed due to the saw, and the handle breaks down into a set of completely separate tubes. Depending on how far (or not) you travel each day, you might be leaving the full handle assembled and just fold the blade over for carry to your next camp site.
Having said this, the NexTool Frigate Shovel is actually a serious working tool, that can be packed down very neatly when you need to.
Review Summary
The views expressed in this summary table are from the point of view of the reviewer’s personal use. I am not a member of the armed forces and cannot comment on its use beyond that covered in the review.
Something that might be a ‘pro’ for one user can be a ‘con’ for another, so the comments are categorised based on my requirements. You should consider all points and if they could be beneficial to you.
I’m trying something slightly different and starting with what doesn’t work so well, so I can finish on a more positive note
_______________________________________________
What doesn’t work so well for me
_______________________________________________
Overall weight makes this a more considered carry.
Some extras (whistle/firesteel/screwdriver) need to be removed for digging.
Slightly fussy to pack.
_______________________________________________
Things I like
_______________________________________________
Seriously good at digging – far more so than most folding shovels.
Long handle makes digging while standing easy.
Very strong all metal build.
Takes-down into a very neat package.
Additional functions useful.
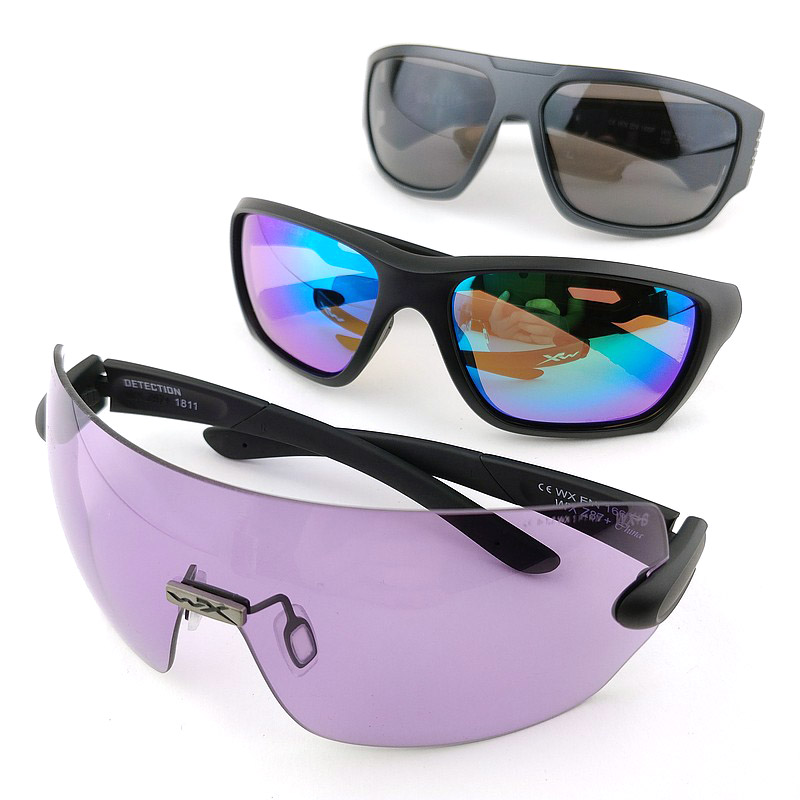
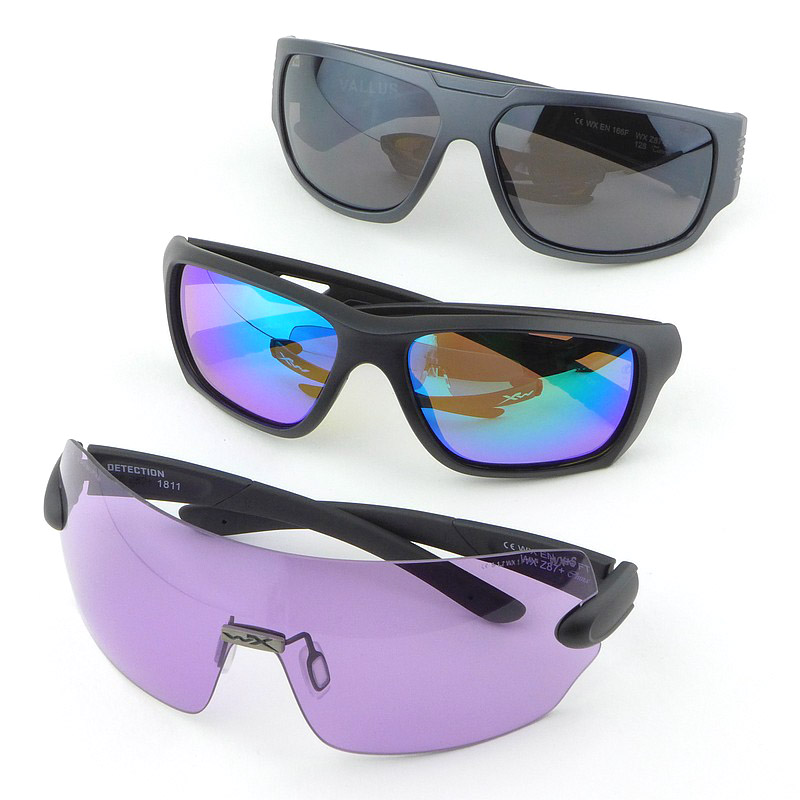
In this Wiley X Mega Review, I’m testing three recent models, the Detection, Aspect and Vallus. Each of these provide different looks, fit, features and lens specifications, giving this group a nice balanced mix. Since first finding Wiley X many years ago, I’ve not looked back when it comes to eye protection, lens quality, fit and style.
A little more Background:
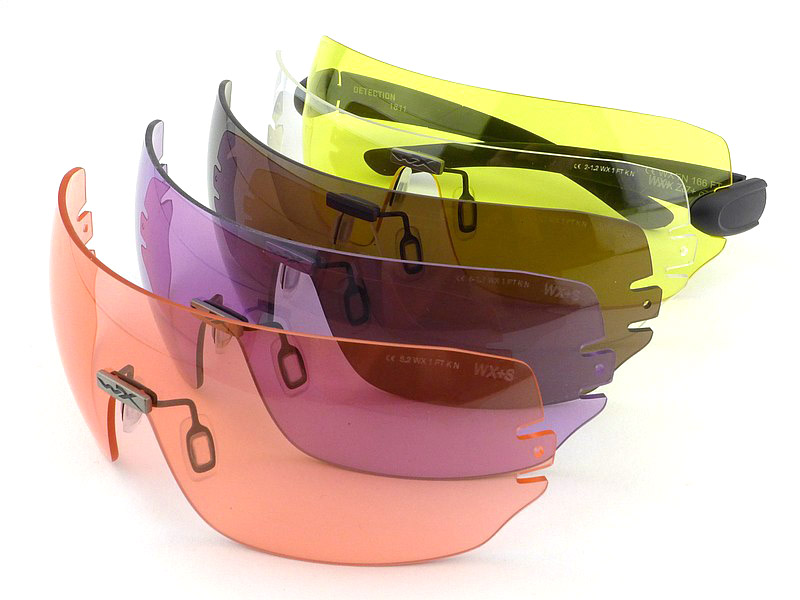
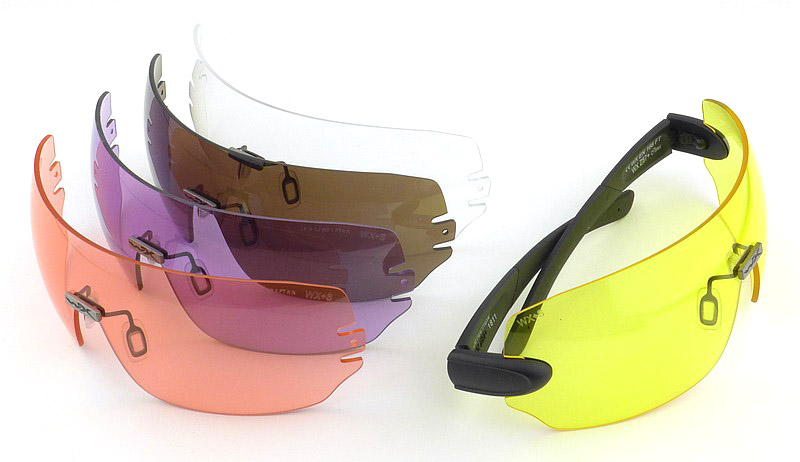
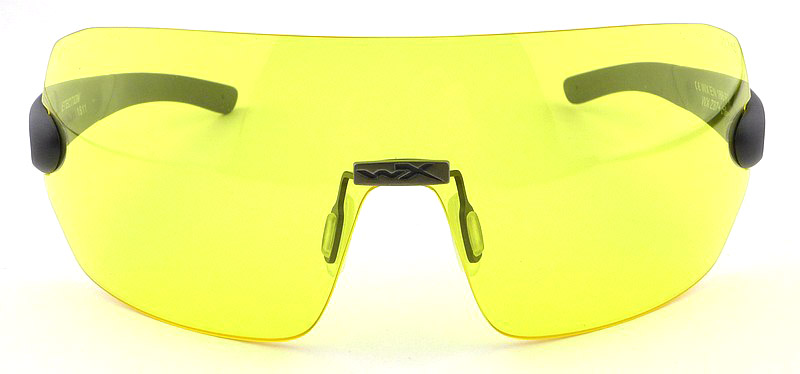
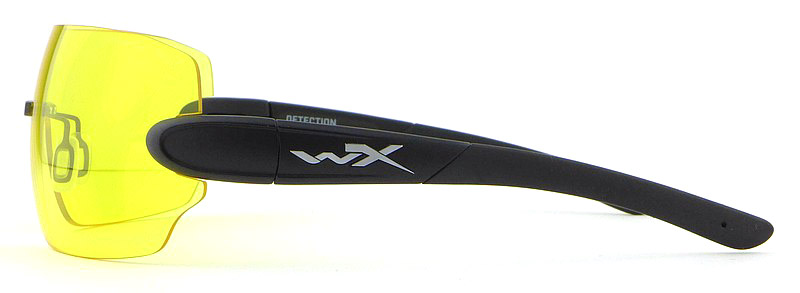
In this group we have a flagship model, the Detection, with its set of five lenses to suit all lighting conditions without any reduction in eye protection. Frameless and with large wrap-around lenses the Detection is intended to provide maximum visibility and coverage ideal for, but not limited to, shooting.
Adding in the Aspect with emerald polarized lenses fills in more of the Wiley X offering, and the Vallus taking a third spot in this line-up rounds off a nicely balanced group.
Another crucial factor in the selection are those models in a size suited to my face. Wiley X offer a wide range of sizing options with the specifications clearly shown so you can find the right fit for you – another reason I find Wiley X difficult to beat.
The Detection:
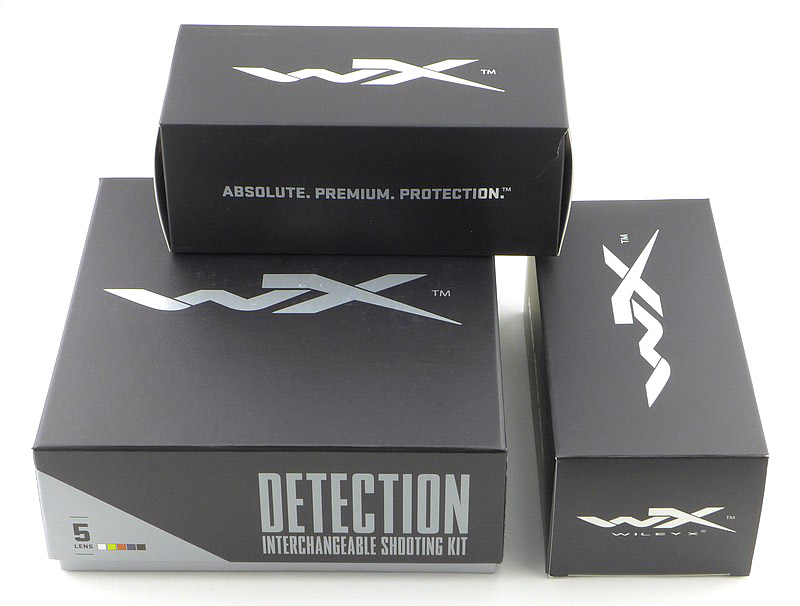
What’s in the box?:
With the lid lifted off the box.
Lens specifications are listed.
A pocket sized lens cleaner spray is supplied.
The full kit fits into a zip up case.
First look inside the case.
Instructions and a cleaning cloth are also in the case.
The full line-up.
A good look round the Detection – Things to look out for here are:
Starting this gallery is a quick spin round the front, side and rear views, before moving onto the smaller details. Unlike most lens swapping glasses, the Detection lenses keep their nosepieces.
Looking closer at the arm.
Hinge detail.
The inside of the hinge.
A permanent nose-piece.
Checking how the arms fold together.
Inside the arms are moldable wires.
The bendable wires allow custom fitting of the arms.
Lens swap on the Detection:
Most lens swapping designs have a moment of ‘should I be pulling/pushing that hard?’, but not with the Detection’s arm lock making swapping easier than any other I’ve used to date.
First, the instructions.
Start by gripping the arm lock.
Squeeze the rocker.
Slide off the arm.
Both arms off. The nosepiece stays on the lens.
Pick another lens.
Push the arm into place.
Ready to go.
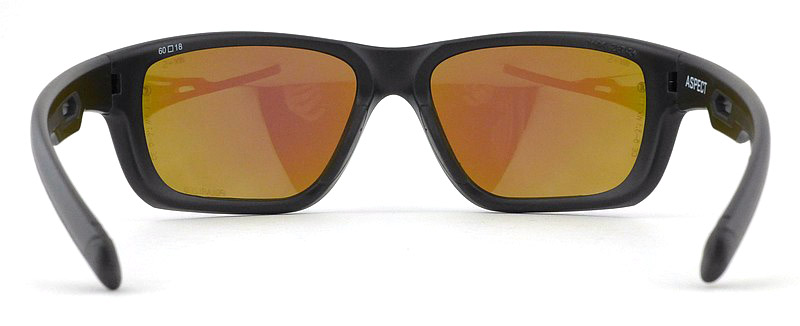
The Aspect:
What’s in the box?:
The outer cardboard box.
Inside the case and a sticker.
First look in the case.
Also included are a neck strap and cleaning cloth.
The glasses are fully wrapped.
One arm is also wrapped.
Freshly emerged.
A good look round the Aspect – Things to look out for here are:
Starting this gallery is a quick spin round the front, side and rear views, before moving onto the smaller details. The Aspect has sprung hinges that allow the arms to both open up wider than the normal open position, to conform to larger heads, and also protect the hinges from over extension. This pair of Aspect glasses has the Emerald, polarized lenses for all the bells and whistles.
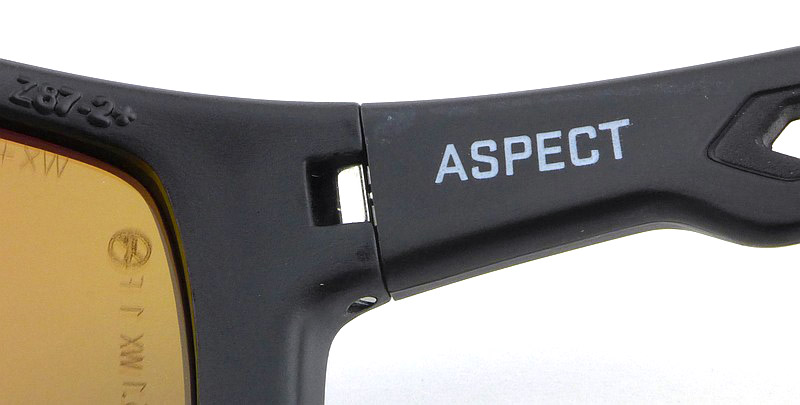
Unlike many WileyX models, the Aspect has a sprung hinge.
The spring allows the arms to bend the wrong way.
A closer look at the sprung hinge.
Detail of the arm.
Various specifications.
Those glorious emerald lenses.
Seeing how the arms fold together.
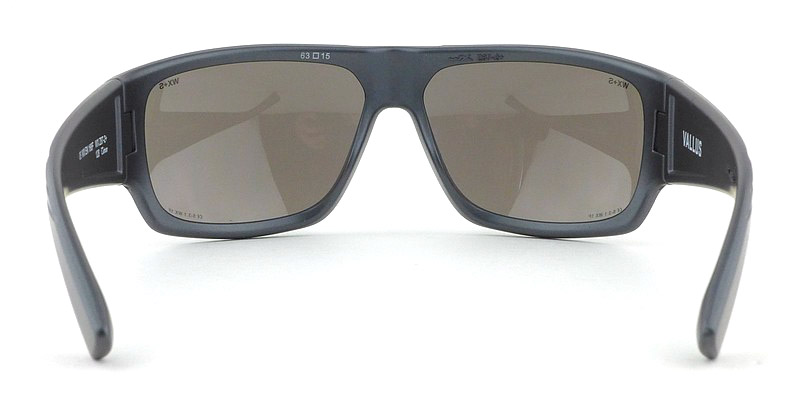
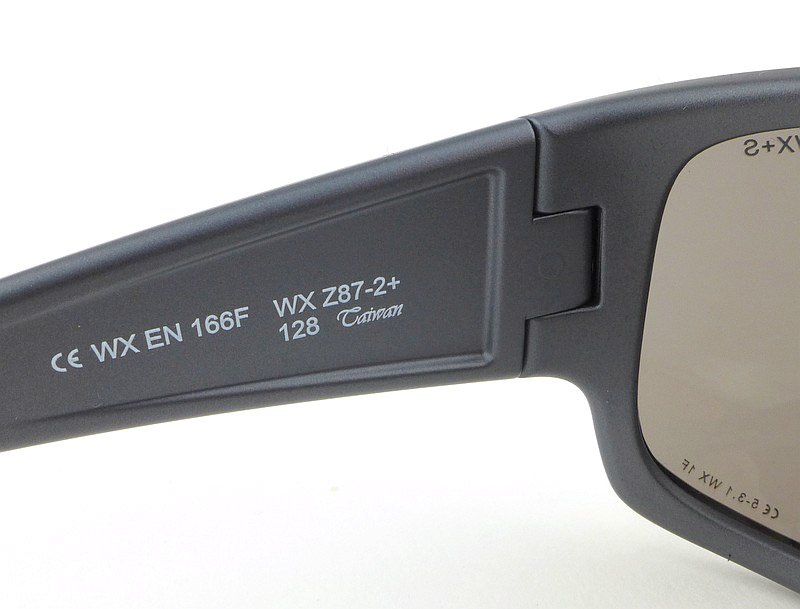
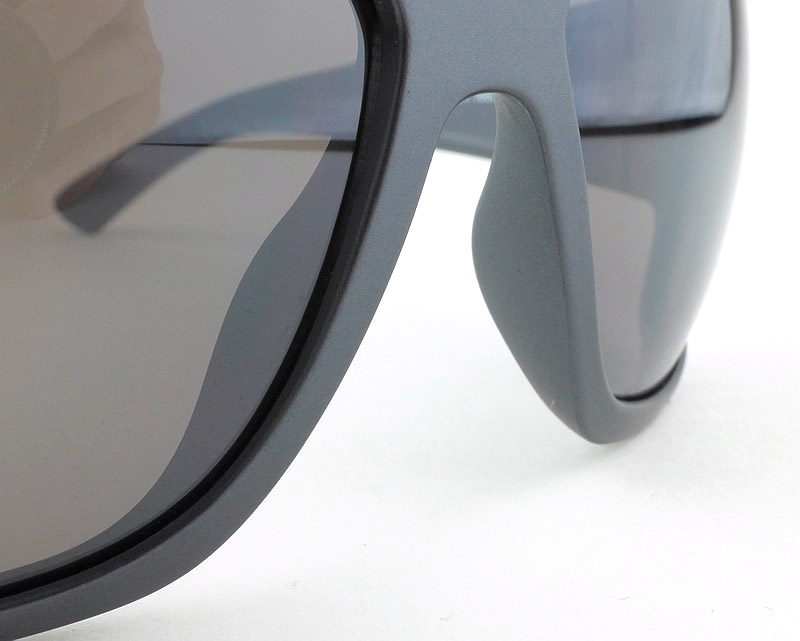
The Vallus:
What’s in the box?:
The standard outer box.
A first look inside the case.
The case has a soft fabric lining.
A neck strap and cleaning cloth are standard.
Taking off the wraps.
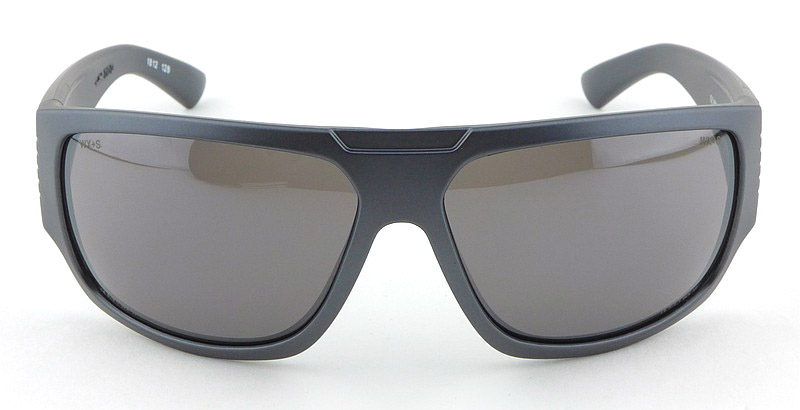
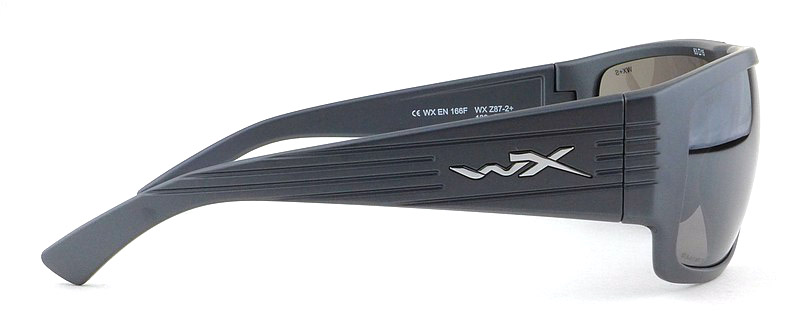
A good look round the Vallus – Things to look out for here are:
Starting this gallery is a quick spin round the front, side and rear views, before moving onto the smaller details. The Vallus is the most conventional in terms of ‘features’, but keeps thing simple and solid.
Nice wide arms provide side protection.
The hinge.
Smooth comfortable nosepiece.
The inside surface.
Neatly folded arms.
Technical Testing:
With a wide range of lenses, one of the specifications that is important to me is the light transmission. (I also have a hyper-sensitivity to light) using a fixed and stable light source and a lux meter, the transmission was measured to compare it to the Wiley X specifications. The results are shown as comments in the raw photos included in this gallery.
A control lux reading.
Detection Copper - 12.4% light transmission.
Aspect - 15.7% light transmission.
Vallus - 13.5% light transmission.
What it is like to use?
Truly an EDC for me, the time so far (as it does not end with this review) has given me some interesting material for three specific sections.
Protection test:
I couldn’t quite bring myself to shoot the brand new Wiley X models, but had an old pair of Wiley X made 5.11 Cavu glasses which were past their best. Testing these three new models inspired me to take the older Wiley X lenses out for a shootout!
Needing to choose silenced guns, I had a .410 shotgun, using .410 Long plus the Chiappa Little Badger in .22LR using subsonic hollow-point. Clearly the impact energy of the projectiles is quite different, but gives a stepping up of hitting power.
For the test, the glasses were held loosely and shot from around 15m. In both cases the lenses did come out of the frames, but had they been on a face, they would have been supported. The .410 was stopped by the lenses, but the .22 was not – still a very impressive result for a direct shot.
An old WileyX lens vs .410 long.
An old WileyX lens vs .22lr.
Wiley X saved me from serious eye injury:
It only has to happen once, so never let your guard down. Never, never go without eye protection even for seemingly safe jobs – the Wiley X Vallus has saved me from serious eye injury.
Despite spending plenty of time on ranges and using power tools and machinery, I have actually never had anything significant hit my eye protection. The mark on the lens shown in the gallery came from the freshly cut end of some coiled steel fencing wire that slipped from my grip and sprung straight into my face, with force, literally scoring a bullseye. Were it not for the Wiley X Vallus lens, I’d have been pulling out this wire from deep inside my eye; it all happened so quickly.
Initially I was annoying that it happened with a two week old pair of glasses, but I’d rather that than the alternative. I’m always super paranoid about eye protection, and in this case I have no doubt it would have been very bad, so am extremely glad it was Wiley X I was wearing.
The Vallus saved my right eye during some fencing work.
Minor damage to the Vallus that would have meant losing an eye without them.
Saved from sharp wire.
Every day with Wiley X:
Readers who know me might remember I have a condition giving me hyper-sensitivity to light, and that this means I wear sunglasses every day at all times I am outside during daylight hours, and frequently indoors as well.
So when I say I have lived with these sunglasses from Wiley X, I have lived with them and worn them for hours and hours every day for months.
Detection – For shooting or any action sport, the Detection is superb. Its large wrap-around frameless lenses give you uninterrupted vision covering all your peripheral vision as well (good for picking up moving objects). The level of cover also ensures the highest level of protection from flying fragments.
Aspect – With glare being one of the worst things for my light sensitivity, polarized lenses are a real eye-saver. Generally I prefer the neutral type of lens (smoke/grey) so the Emerald is not something I might have jumped at, but if I allow myself to consider looks, well, these got more compliments than any eyewear I’ve worn before.
Aspect – The sprung arms on the Aspect afford it a level of comfort and ease of putting them on, but there is a small ‘feature’ which becomes more obvious over time. When you put them on, compared to arms without the sprung hinges, the Aspect will stay where it was when you let go. So if it is slightly crooked, the arms are not strong enough to straighten them on your face. You do need to ensure you put them straight. If you are popping them on and off quite a bit, this becomes more noticeable, where the standard hinge glasses, just snap into place, these don’t. A trade-off for the comfort.
Vallus – I’d not normally go for the non-polarized lens for my main eyewear, but the Vallus has claimed its spot thanks to the great comfort and excellent side protection due to the wide arms. The neutral colour lens works well, and not being polarized also means there are absolutely no ‘screen viewing issues’ which are a common hazard of the polarized lens.
Vallus – As described earlier, the Vallus has also actually saved the sight in my right eye, so I do have an even greater affection for them.
The Detection at sea.
More than any other, the Aspect received many admiring comments.
Worn daily for over six months now.
Review Summary
The views expressed in this summary table are from the point of view of the reviewer’s personal use. I am not a member of the armed forces and cannot comment on its use beyond that covered in the review.
Something that might be a ‘pro’ for one user can be a ‘con’ for another, so the comments are categorised based on my requirements. You should consider all points and if they could be beneficial to you.
I’m trying something slightly different and starting with what doesn’t work so well, so I can finish on a more positive note
_______________________________________________
What doesn’t work so well for me
_______________________________________________
Detection – lens holder in case can leave a mark on the lens which can be cleaned off. (Wiley X are already fixing this)
Aspect – Arm sprung hinge prevents the glasses auto-centring on your face.
_______________________________________________
Things I like
_______________________________________________
Detection – full coverage without the loss of any peripheral vision.
Detection – super easy lens swapping.
Detection – lenses to suit all lighting conditions.
Aspect – great comfort due to sprung arm hinges.
Aspect – fantastic Emerald polarized lens.
Vallus – light and comfortable.
Vallus – good side protection from wide arms.
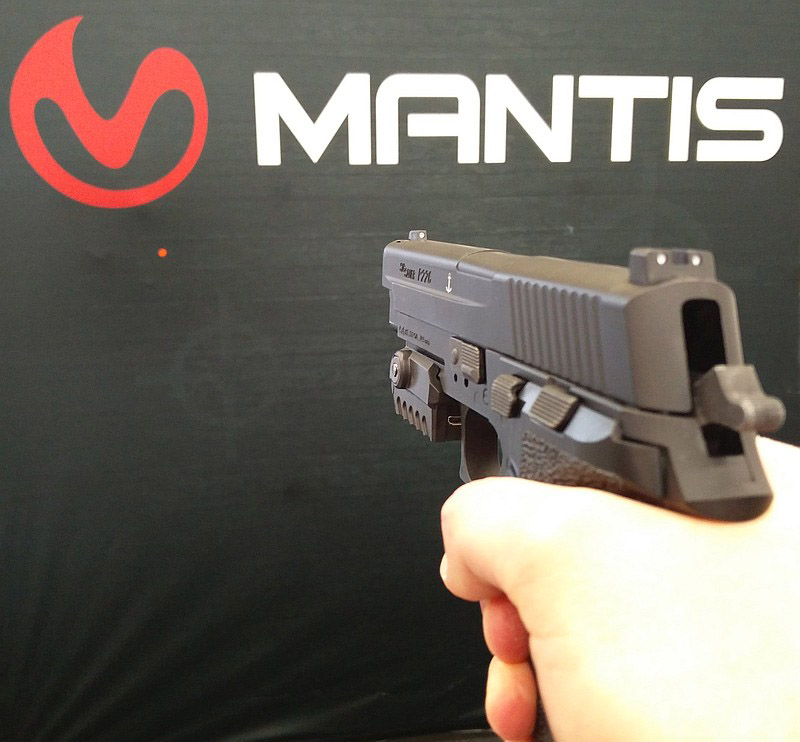
From the moment I saw it, I knew that in the MantisX, Mantis had created a product that every shooter can benefit from, beginner or competition winner. The MantisX gives you information you just can’t get in any other way, and it tells you exactly what is going on in that critical split second before each shot, in dry-fire or live-fire training. This review of the MantisX shooting analysis system will show how this can help you improve your trigger control and grip through the shot.
A few more details:
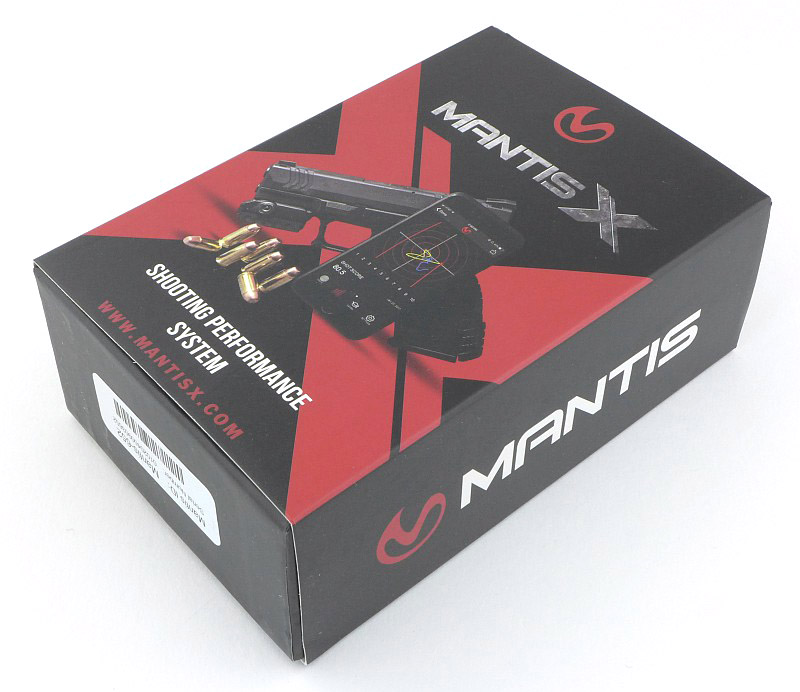
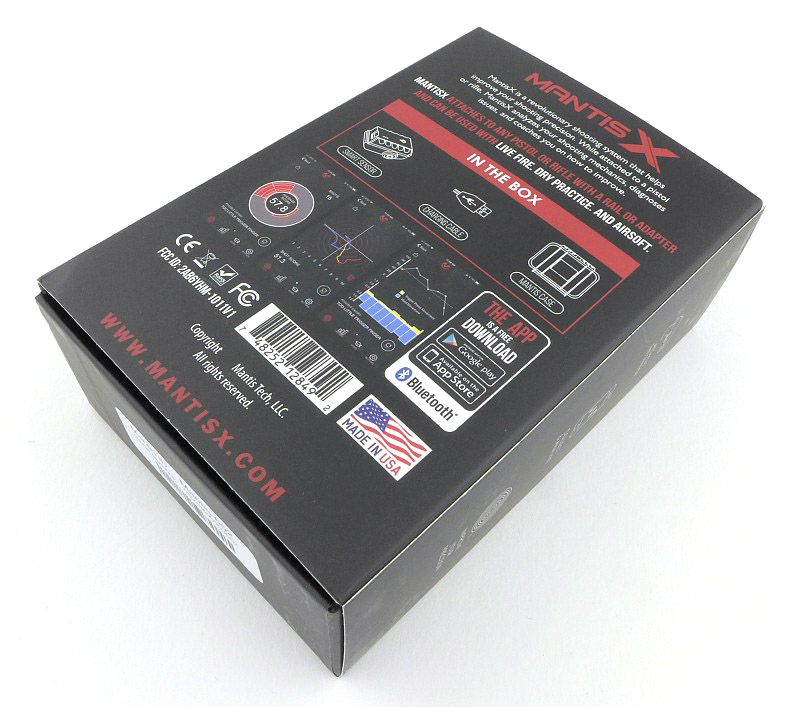
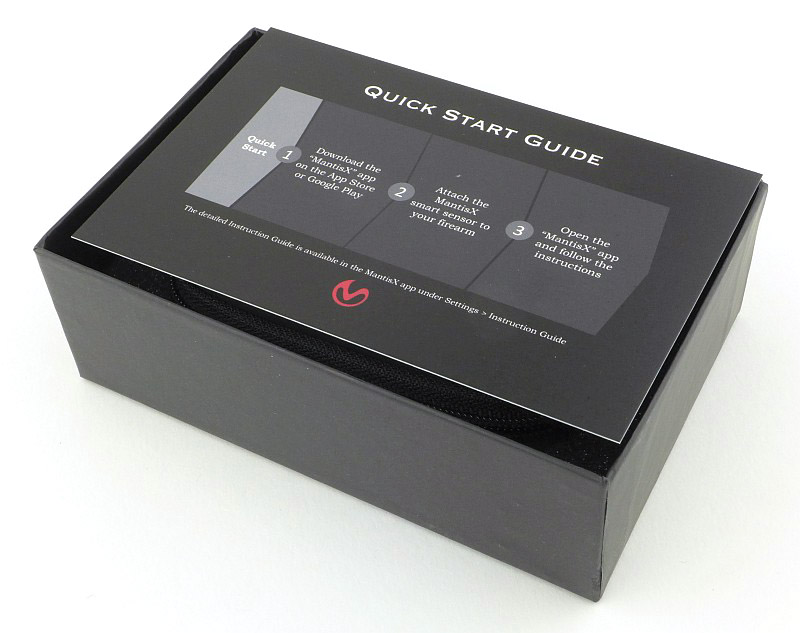
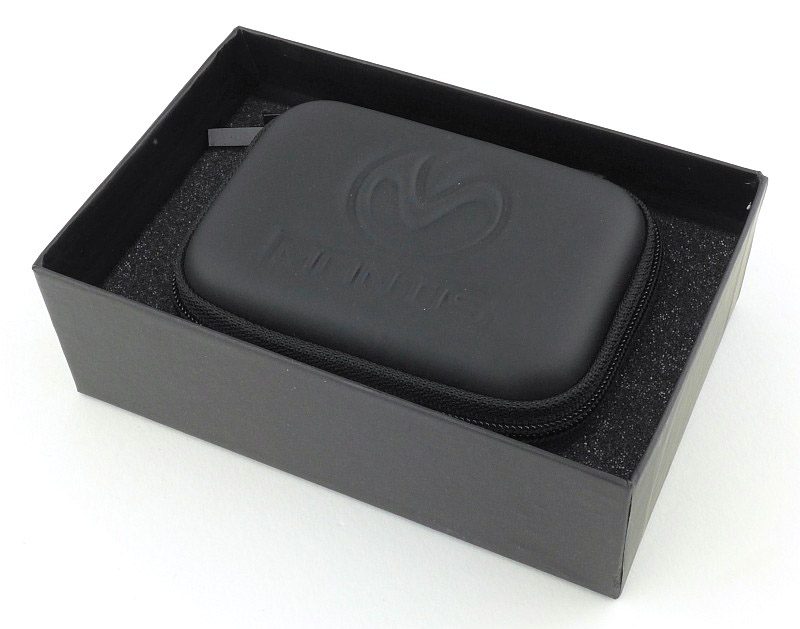
What’s in the box?:
Very well presented, the MantisX comes inside a zip up case.
After removing the outer sleeve.
Everything comes in the carrying case.
The major components laid out.
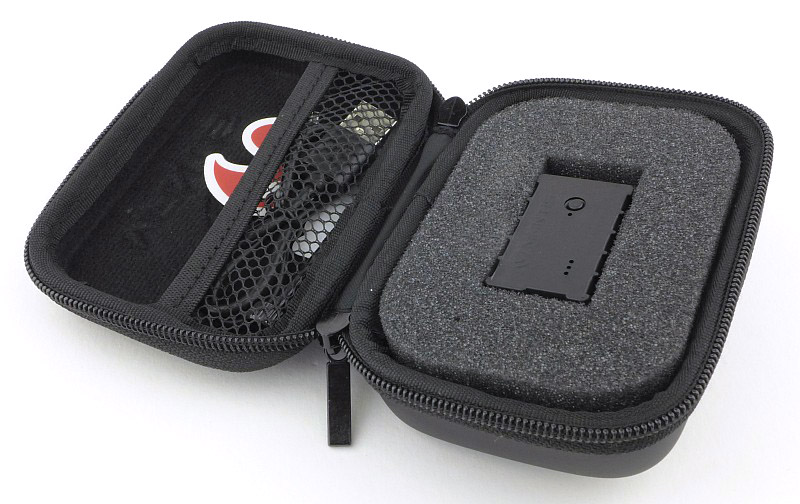
A good look round the MantisX – Things to look out for here are:
Actually as far as a product goes, the MantisX unit itself doesn’t have much to look at. It is basically a small black box with built in rail mount, a power button a few lights and a USB charging socket. For this review ‘A good look round’ is one of the smaller sections; here it is.
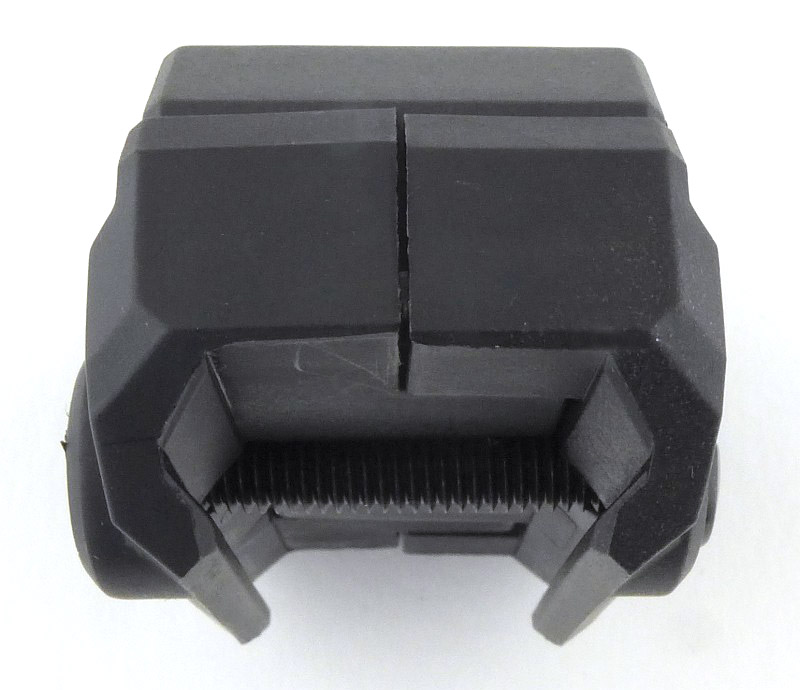
The MantisX unit.
A micro-USB socket is used for charging.
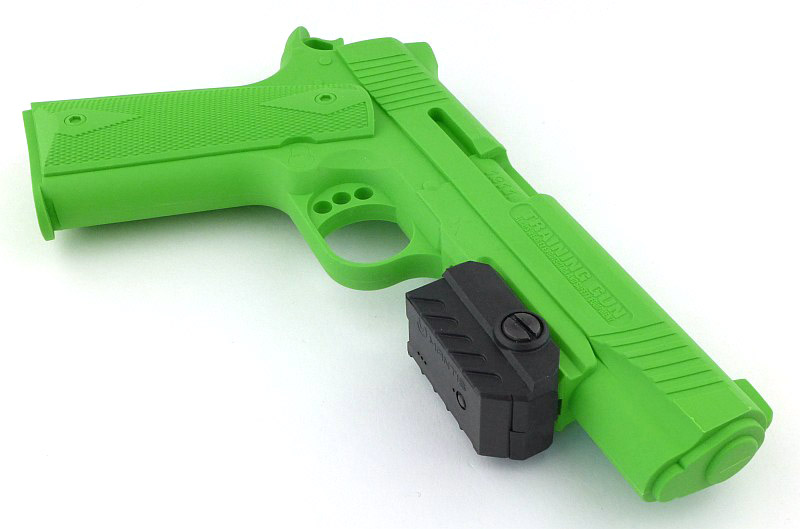
It has a rail mount.
An indicator light next to the power switch.
Charging the MantisX.
Getting Started:
We have seen the small MantisX unit, and this is only part of the story, as it is essentially just a sensor. It is the output of that sensor and how it is interpreted that is what matters.
Getting started with the MantisX means first installing either the Android or iPhone app from Mantis and the pairing the MantisX unit via bluetooth with your device (phone or tablet).
Of course you need to be fully familiar with your training gun, be it a firearm, airgun, or airsoft gun and its dry-firing setup. The MantisX can be used in dry-fire practice or live-fire practice.
With the MantisX mounted, and paired to the app, you can get started and this involves an initial benchmark (you will want to see where you are, and what improvement you achieve, so don’t miss this out). There are also some settings you might want or need to adjust depending on the gun and dry/live-fire training.
Before you get going, take an initial benchmark test.
Some of the app settings.
What it is like to use?
And diving into using it. I’ll share something I came across very early on which Mantis support helped me with, and it makes the crucial difference in dry-fire training.
When I was cocking the hammer on my training pistol between shots, it kept picking up this as a really bad shot. I did try deleting these afterwards, but my results were horribly skewed.
My preference for training is dry-fire with manual hammer/trigger reset. If live-fire training with a semi-auto, or using a gas powered airsoft semi-auto, there is no issue, the shot cycle resets the hammer and you don’t have this issue.
Such a simple answer! If the MantisX is held sideways, or if the gun it pointed up or down, the mini shocks it uses to detect a hammer falling are completely ignored, so when cocking the hammer in manual dry-fire, tilt the gun sideways or up/down and you can reset the hammer without a misdetection.
Nothing in the instructions at the time told me this, and when I’d seen it being demonstrated, it was with gas operated semi-auto airsoft guns.
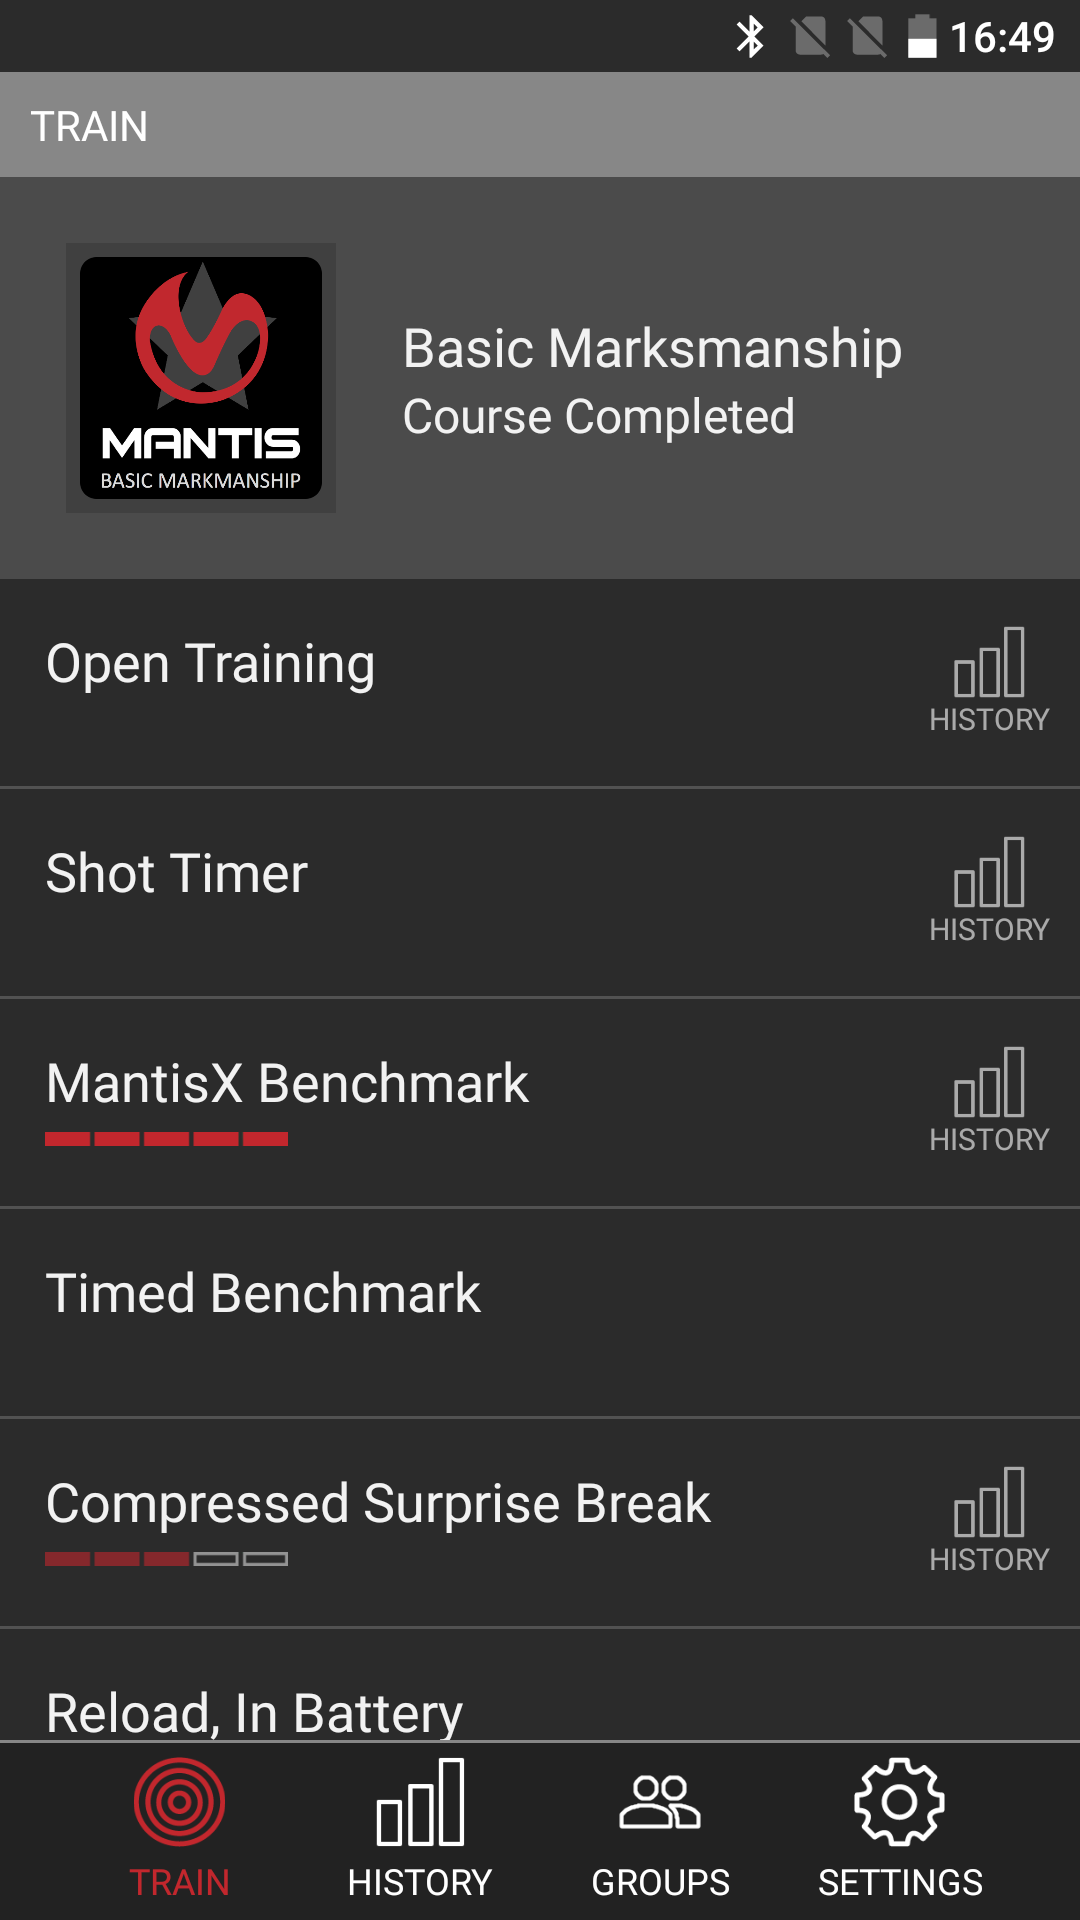
The app has an introductory course to get you started, and then you can move onto the basic marksmanship course. You can go through this basic course entirely dry-fire. The course is split up into a number of challenges so you can work your way up.
It is important to note that the more advanced courses require live-fire, or simulated live-fire, to progress, so once through the basic course it will get noisier.
There is nothing to stop you practicing the basic skills over and over if you want to continue with dry-fire practice.
Ready to go.
You are guided by an introductory course.
Then onto a basic marksman course.
You are scoring with both hands.
Ensuring you reduce any weaknesses.
With a few other tests.
Progressing through the course.
Test results are displayed clearly.
Easily showing improvements.
Chasing your personal best scores.
Completion of the basic course.
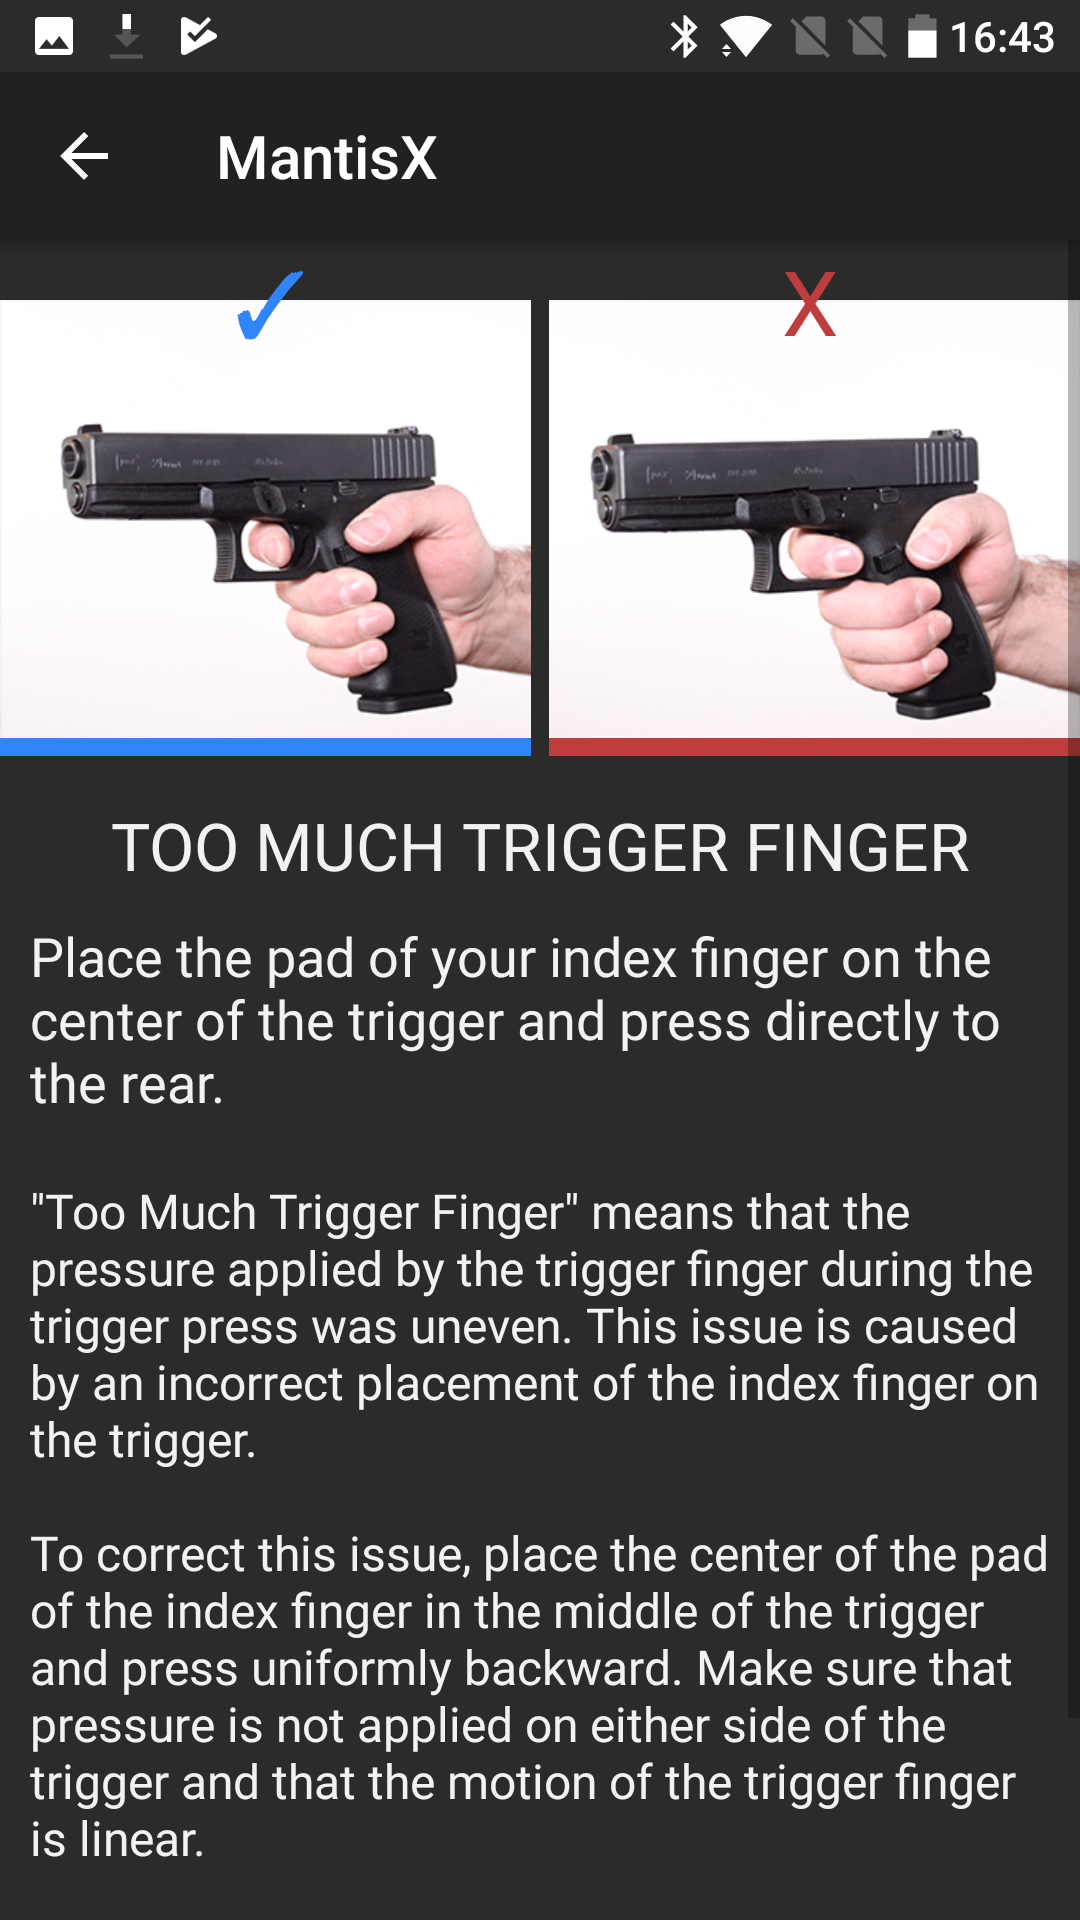
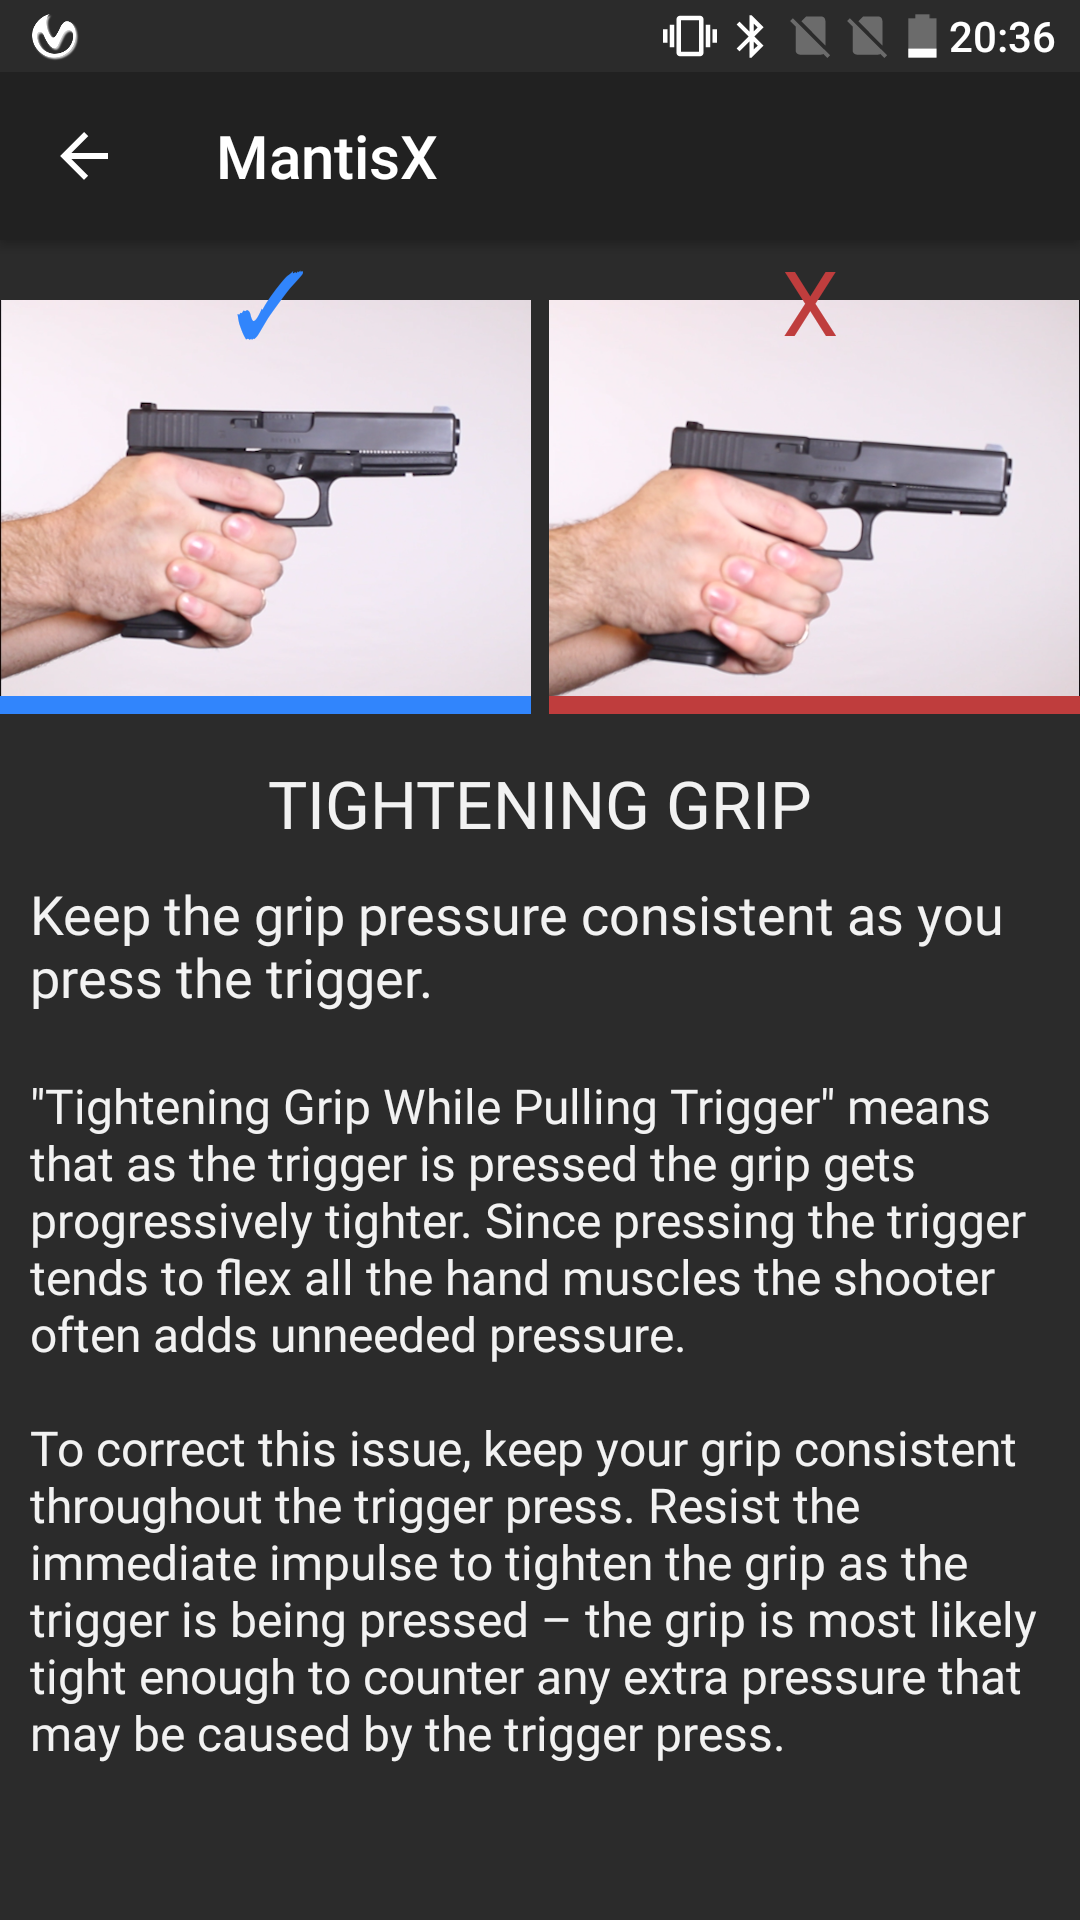
You don’t just get a score for each shot, the app understands the types of mistakes a shooter can make and based on your results suggests what you might be doing wrong. Something that wasn’t really possible without real lead-slinging before, and even if you did manage to pull the shots back onto target with a nice combination of mistakes, there is no fooling the MantisX.
In the analysis of each shot and your shot history, you get statistics galore, and a load of hugely valuable information you can use to work on your weaknesses.
I particularly like the individual shot analysis where you can see the actual movement of the gun in the split second before the hammer falls to see if you are jerking the trigger, pushing/pulling, changing your grip, or any other problem, or if you settle and break the trigger cleanly.
Detailed analysis Page 1 of 5.
Detailed analysis Page 2 of 5.
Detailed analysis Page 3 of 5.
Detailed analysis Page 4 of 5.
Detailed analysis Page 5 of 5.
There are more results when you scroll down...
...after scrolling.
As you start to tune in to the better results and what made the shot good, you can connect the ‘feel’ of the shot, and the quality of the actual shot. Certainly in all forms of shooting I participate in, be it pellet, shot, arrow, bolt or bullet, there is always a great feel with a great shot; MantisX quantifies that, and also tells you what went wrong when it wasn’t good.
The good shots feel good.
Amazing analysis of each shot.
Something to remember is that the shot placement shown by this system is ‘virtual’ and based solely on the quality of the trigger pull and grip, NOT on actual alignment. In reality the strain on ensuring correct sight alignment often introduces issues in the grip or trigger control, so scoring perfectly with the MantisX is not a guarantee you will actually group well.
Having said that, the MantisX is giving you incredible information you could never otherwise see, so coupled with live-fire targets, you can see if that flier was down to your technique or something else.
Review Summary
The views expressed in this summary table are from the point of view of the reviewer’s personal use. I am not a member of the armed forces and cannot comment on its use beyond that covered in the review.
Something that might be a ‘pro’ for one user can be a ‘con’ for another, so the comments are categorised based on my requirements. You should consider all points and if they could be beneficial to you.
_______________________________________________
Things I like
_______________________________________________
Compatible with almost any gun with a hammer strike.
Captures detailed information on each shot.
Analysis of shooting performance.
Historical data stored showing progress.
Android and iPhone apps.
Live or dry-fire shot analysis.
Advice and hints based on your actual shot data.
Mount adapters available for non rail equipped guns.
_______________________________________________
What doesn’t work so well for me
_______________________________________________
Some courses can’t be completed in dry-fire only.
Difficult to fully remove incorrectly captured ‘shots’ from the history.
The system captures ‘virtual’ shot placement so can be fooled.