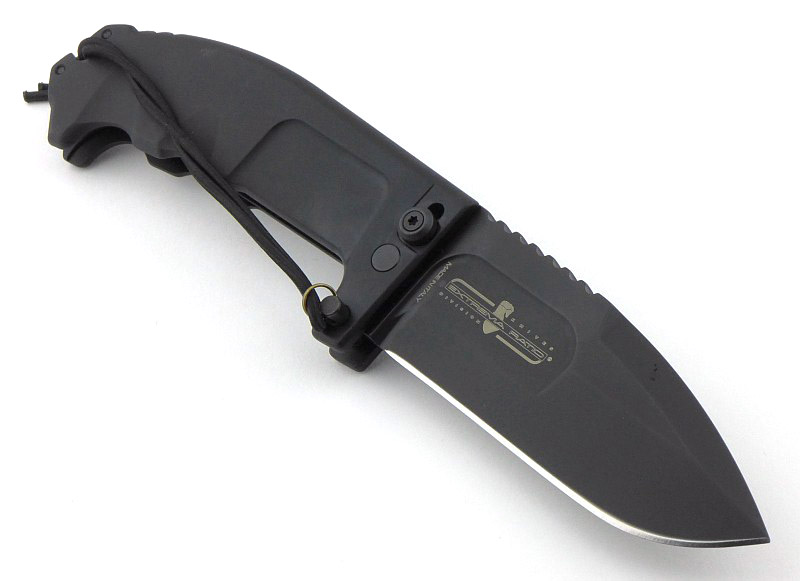
Gerber’s Center Drive multi-tool may be one of many in the highly competitive multi-tool market, but its name clearly tells you what its key design feature is. Gerber have gone all out with the capabilities of the built-in screwdriver bit holder, along with considering the ergonomics when using a screwdriver which has a multi-tool as the handle. So Gerber aligned the axis of the bit holder to be as close to the centre line of the tool as possible. The Center-Drive tool also includes a larger than normal knife blade, powerful sprung pliers with replaceable wire cutters plus even more.
A few more details:
We’ll be taking a good look round this tool, first what is in the box, then focusing on the headline feature before taking in the rest of it.
What’s in the box?:
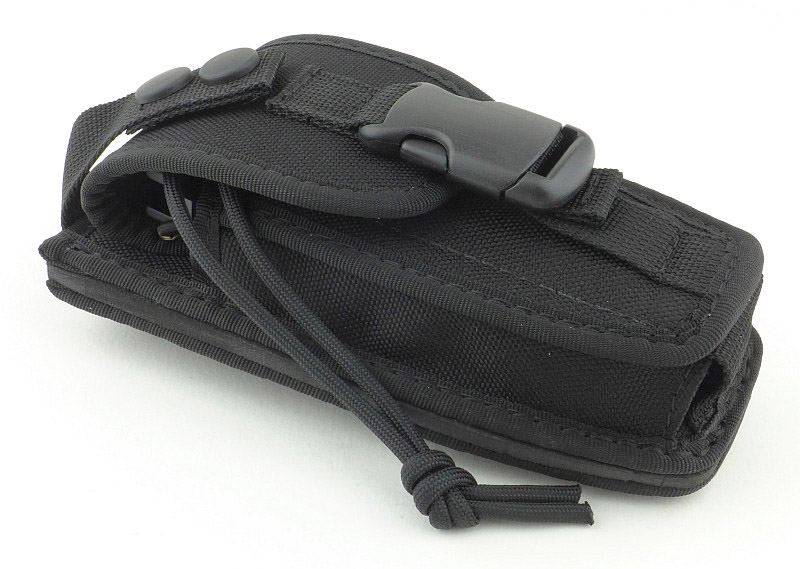
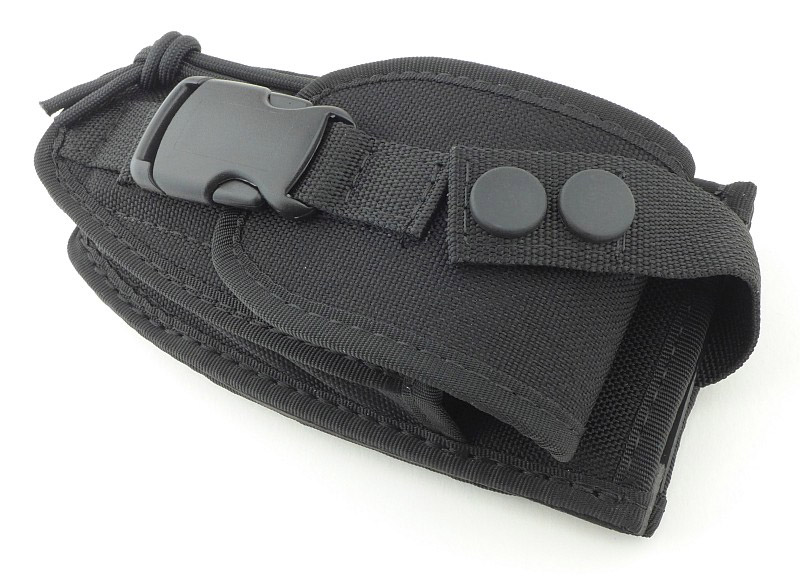
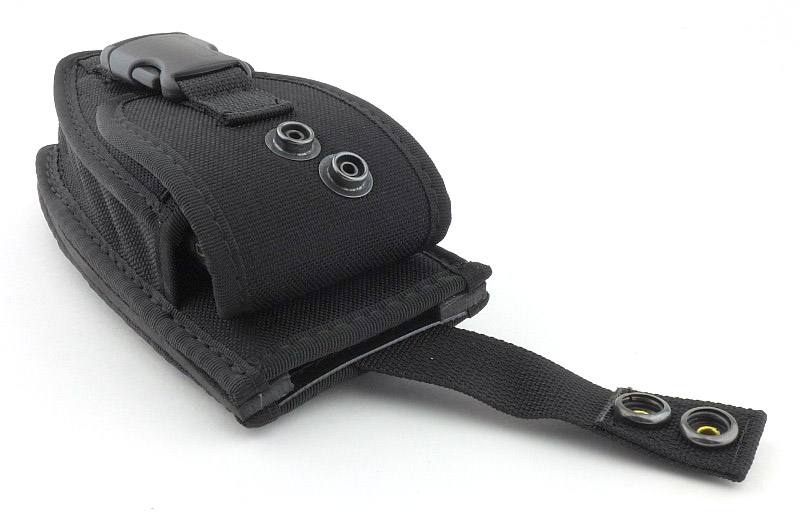
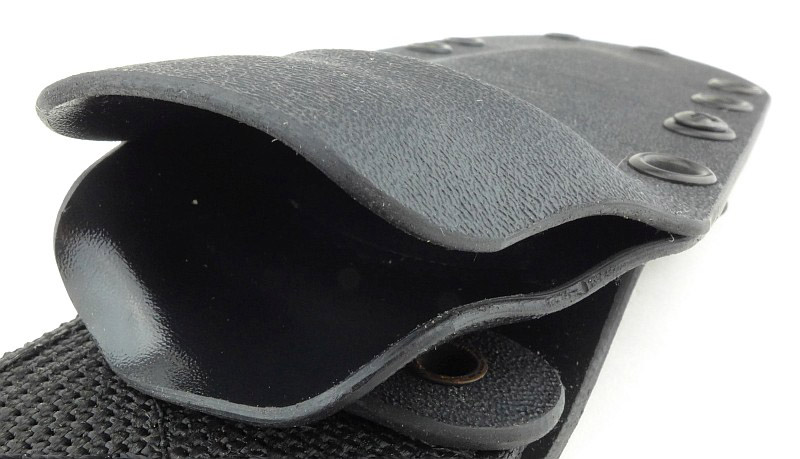
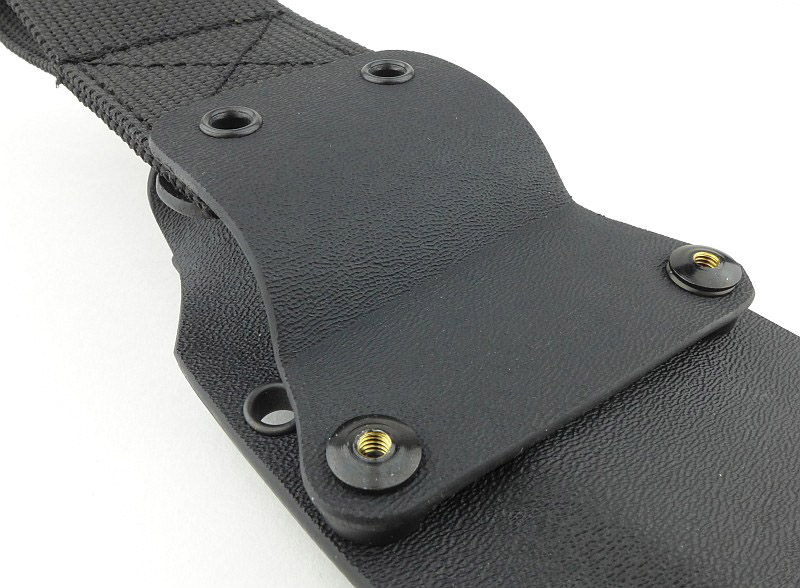
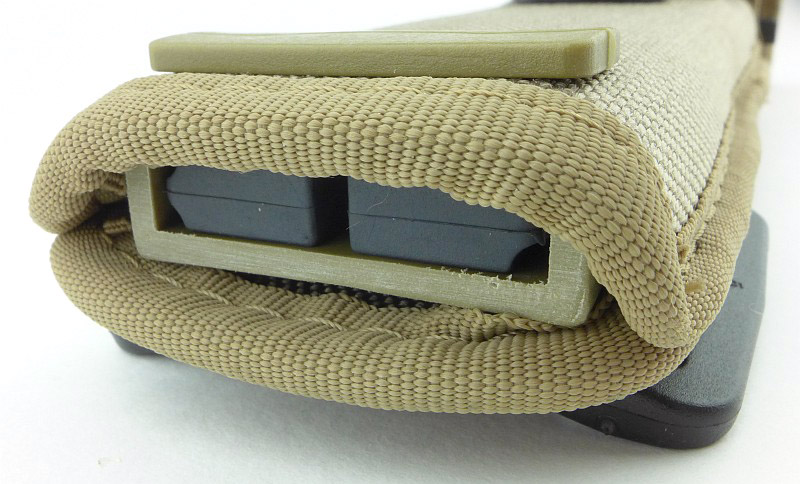
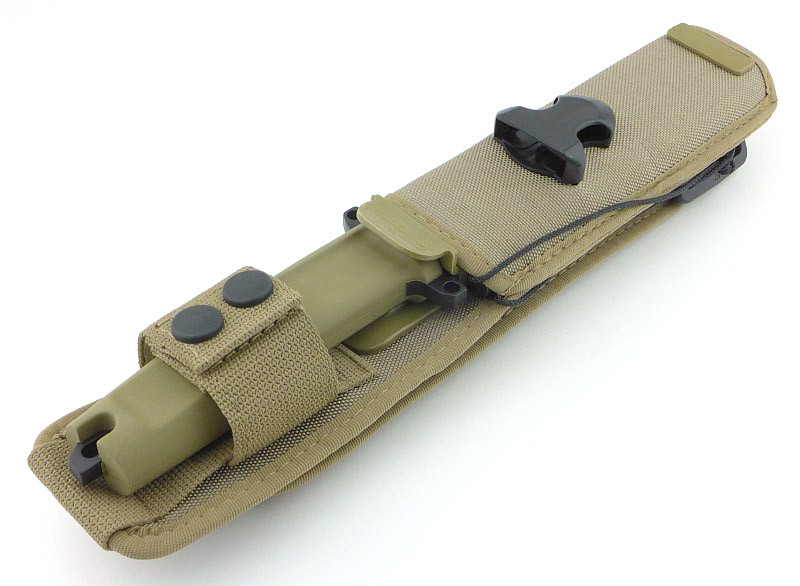
A quality pouch is provided.
The bits are standard 1/4" Hex fitting.
The pouch has an embroidered logo.
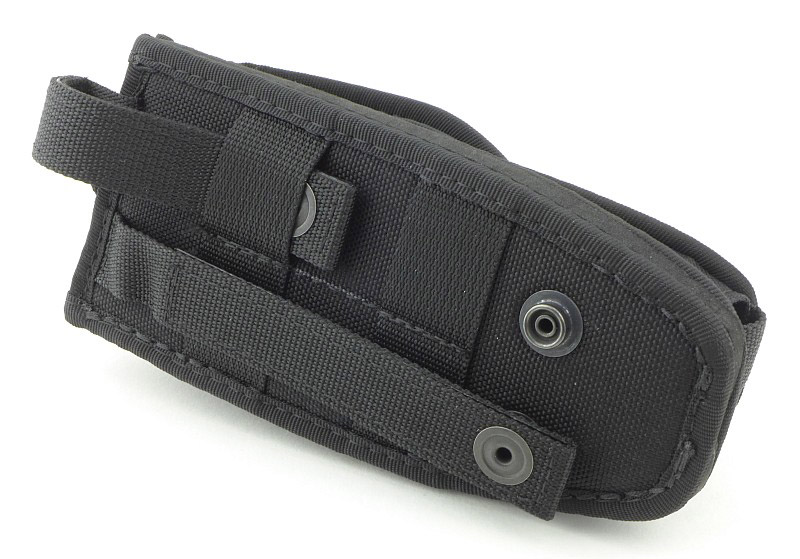
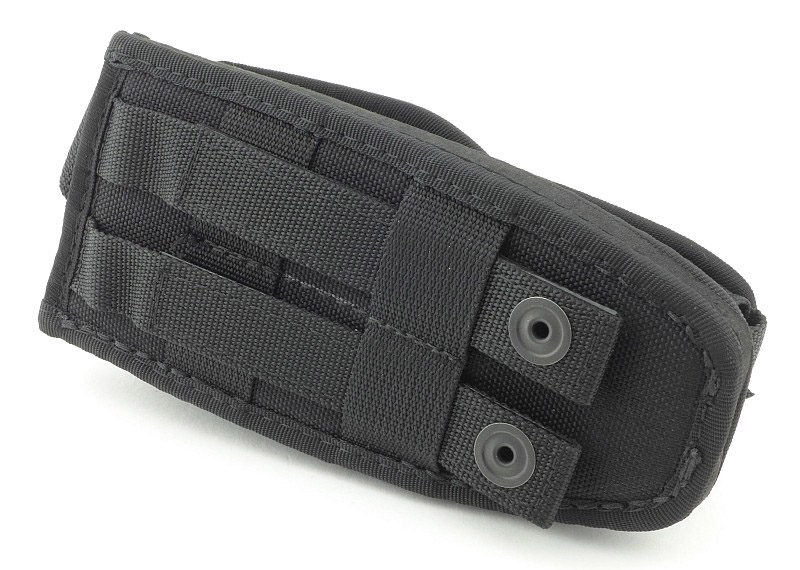
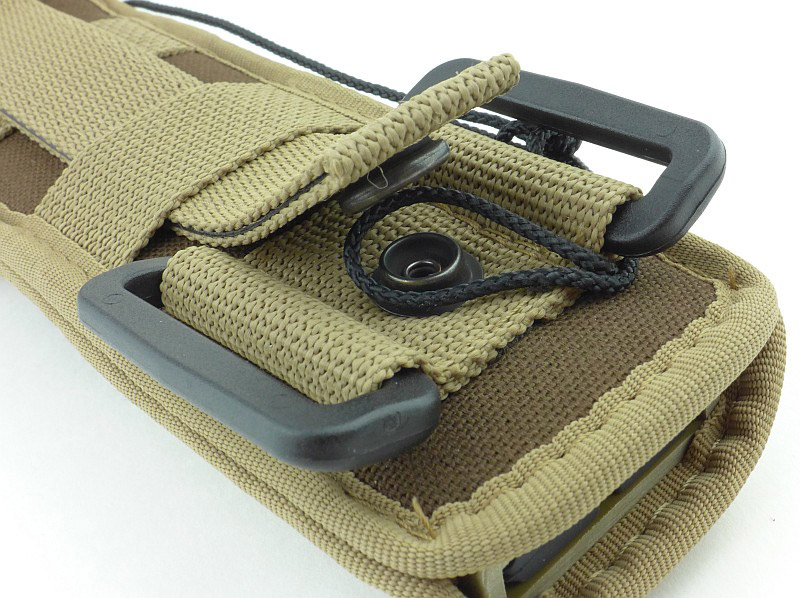
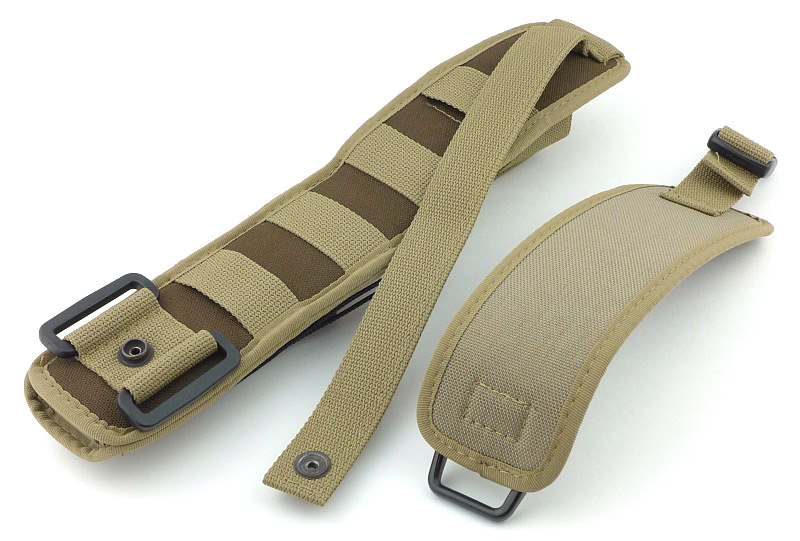
Usable as a belt pouch or MOLLE mount.
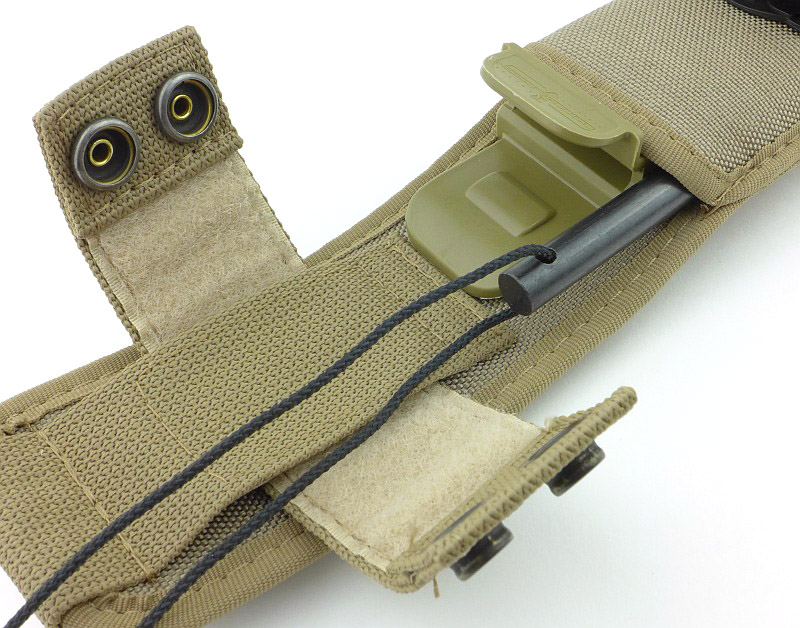
Separate compartments for the tool and bits keeps things neat.
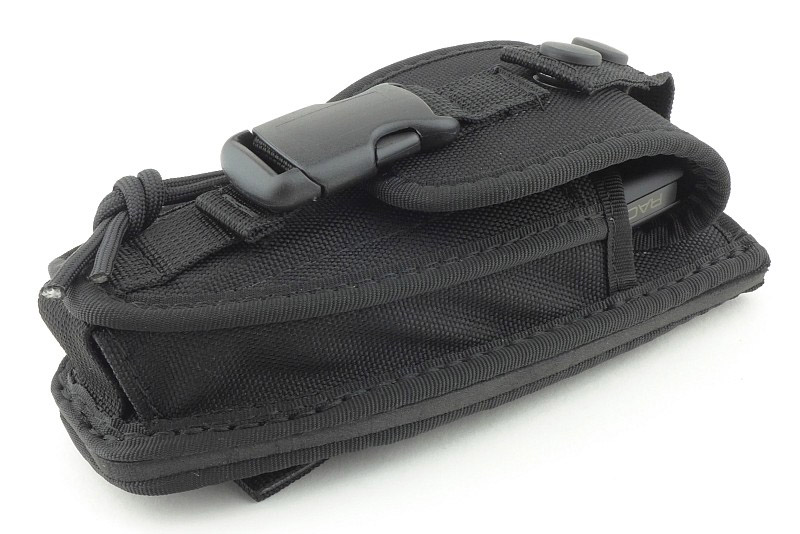
Tool and bits both fitted in the pouch does make it a bit thicker.
Beware the black finish (as is typical) initially comes off enough to make things dirty.
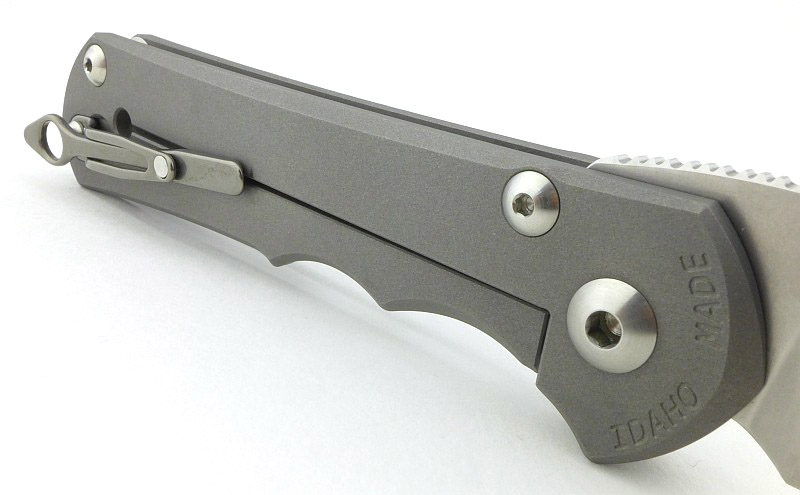
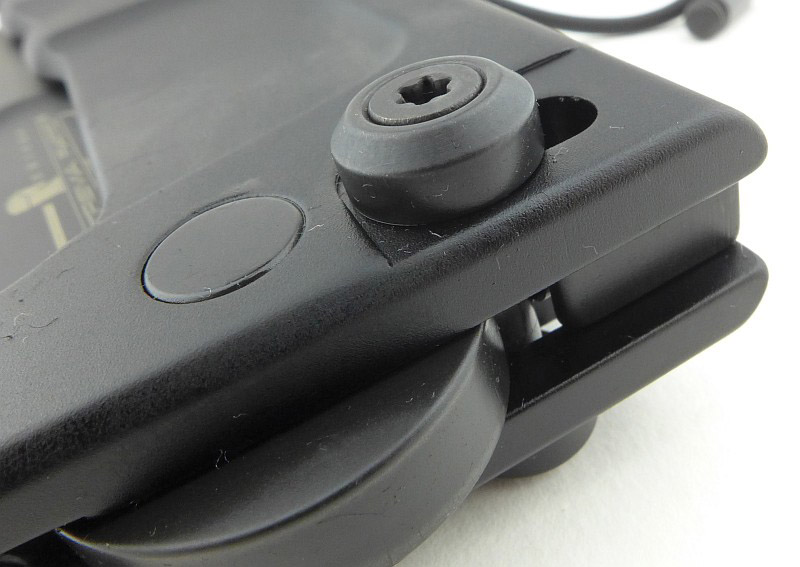
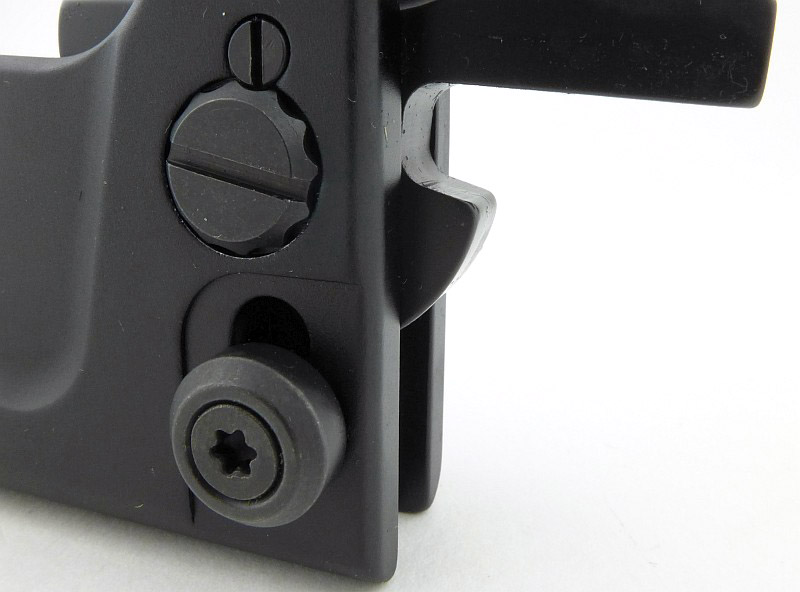
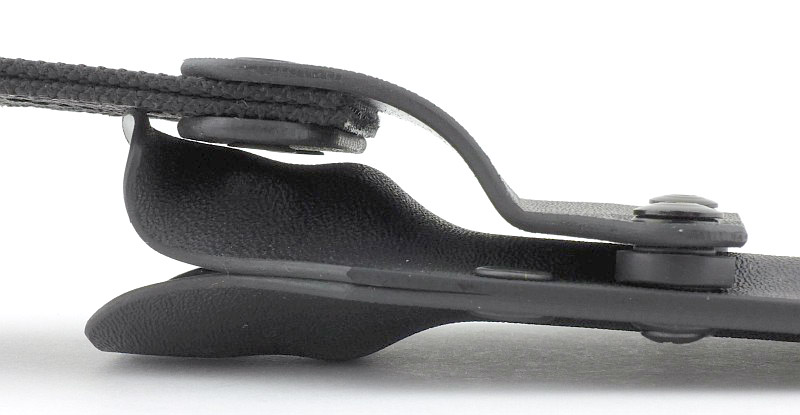
The driver in the Center Drive:
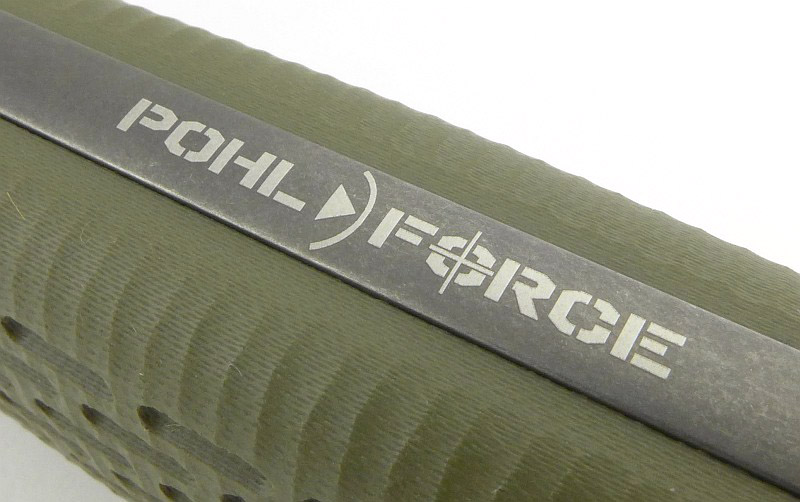
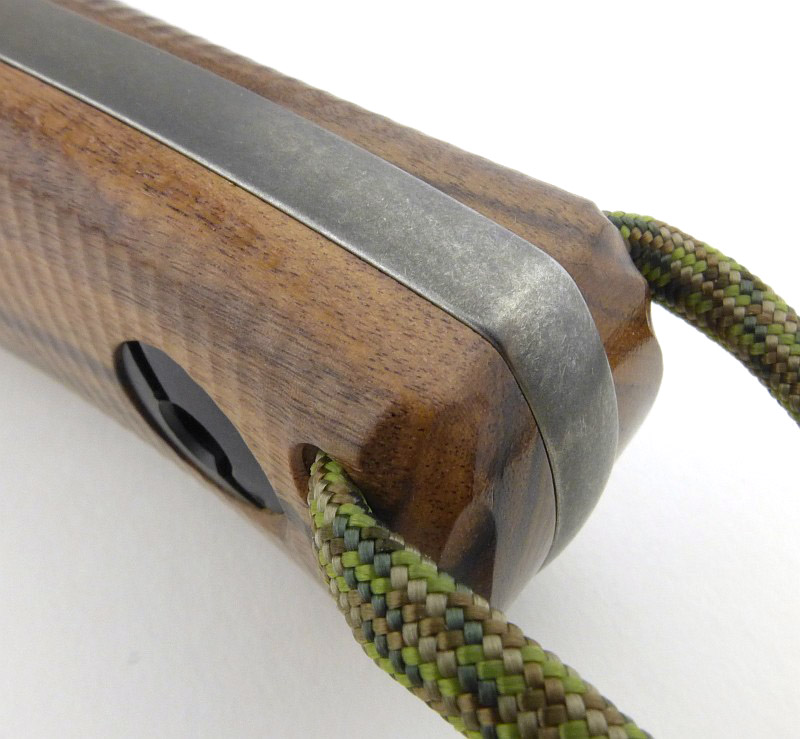
The 'centre' in Gerber Center-Drive.
That long bit holder folds in neatly.
The Center-Drive's bit holder gives more reach than other multi-tools.
A liner-lock style lock secures the bit holder in the open position.
Though centred in one axis, the bit holder does sit slightly to one side.
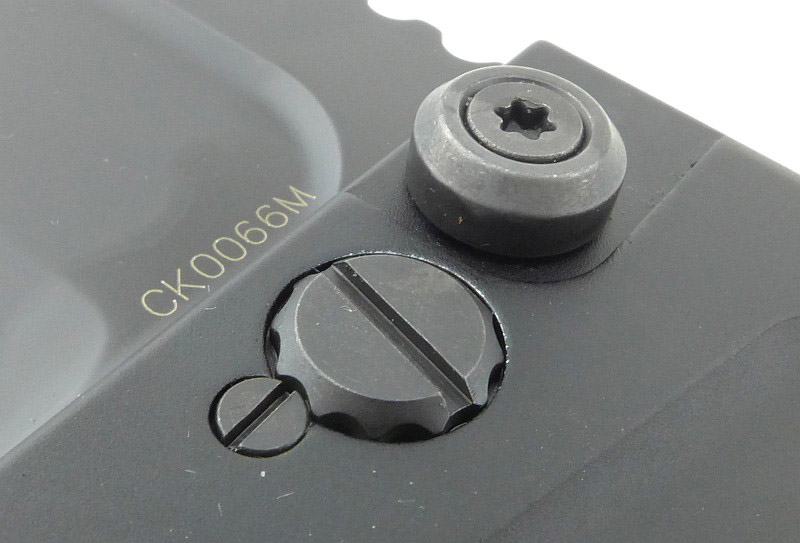
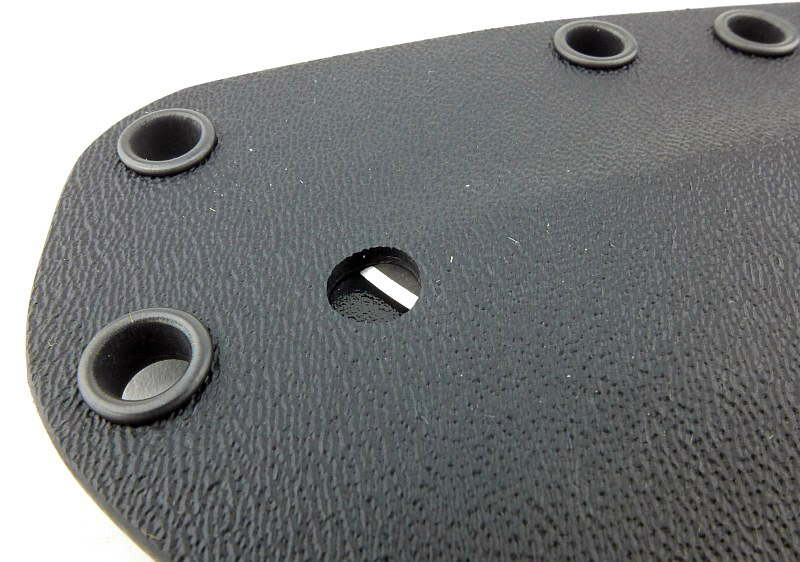
It takes standard 1/4" Hex bits.
A magnet holds the bits in place.
A small friction-ramp holds the bit holder in the closed position.
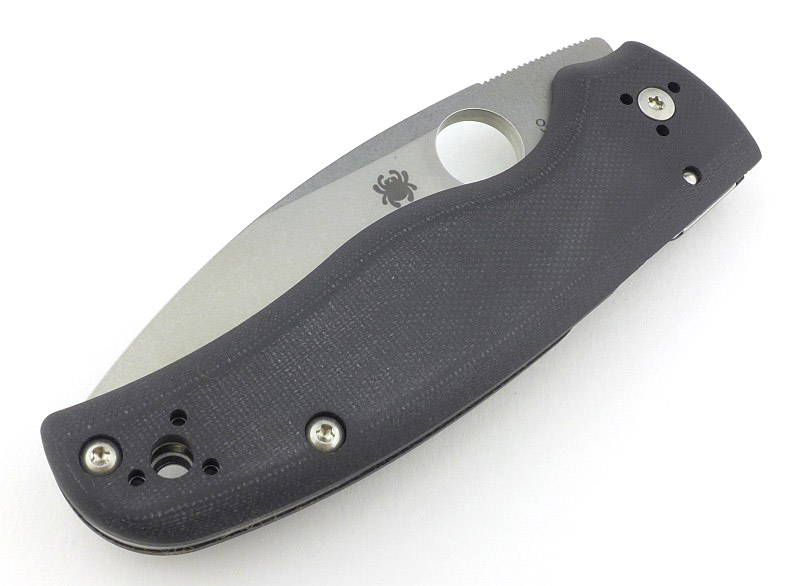
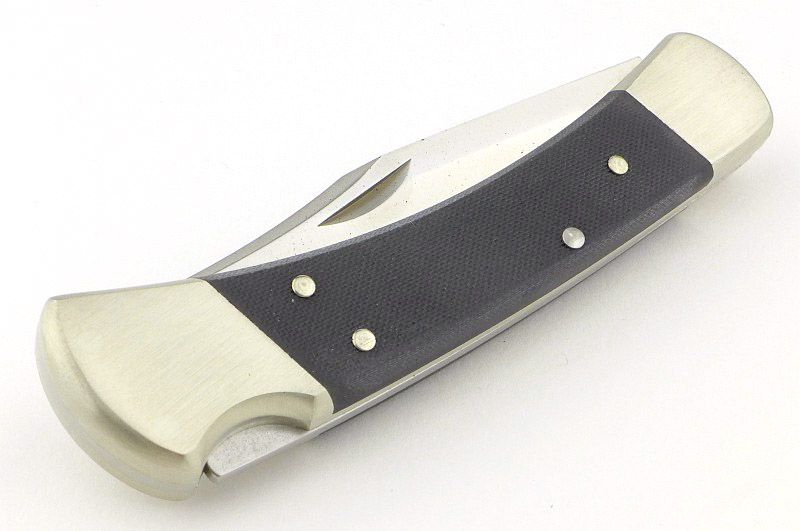
A good look round the Gerber Center Drive – Things to look out for:
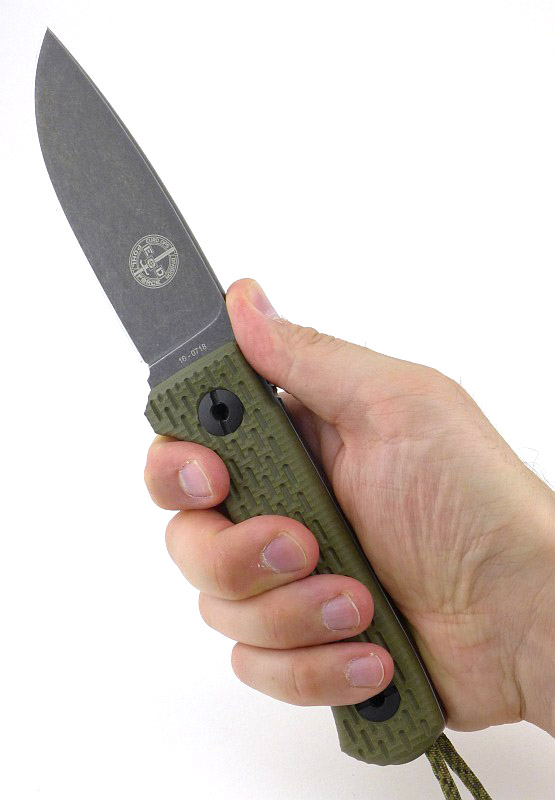
With the featured functions of the bit driver and large knife blade, the Center Drive has an asymmetrical layout with one handle carrying these features on the outside, and the other handle having further tools folded into the inside; this gallery takes you around all of these.
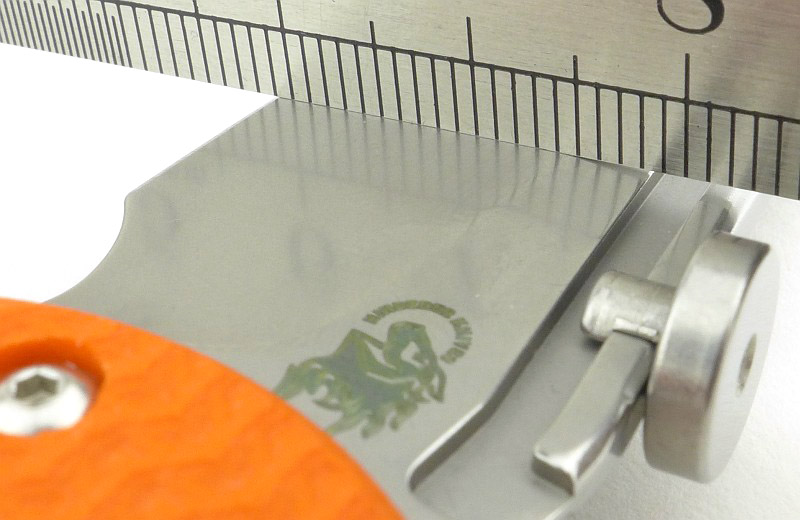
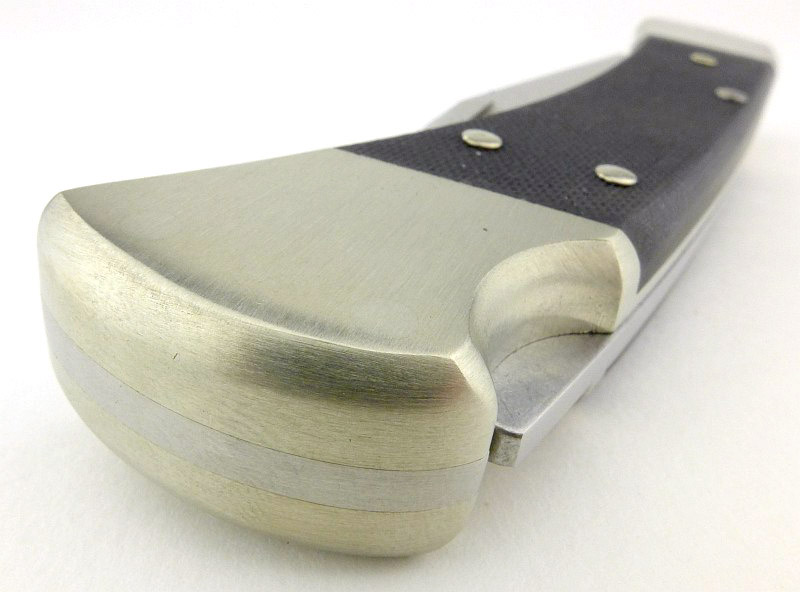
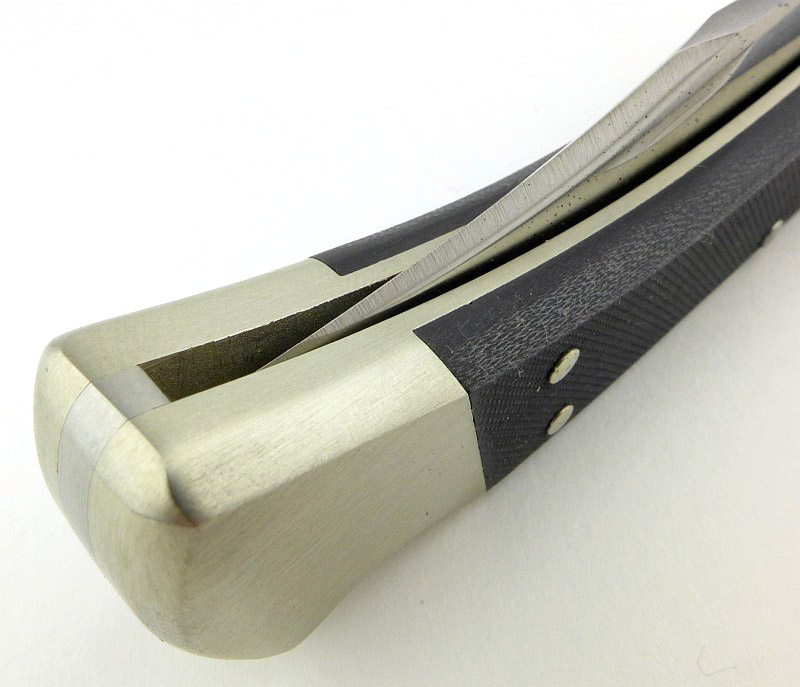
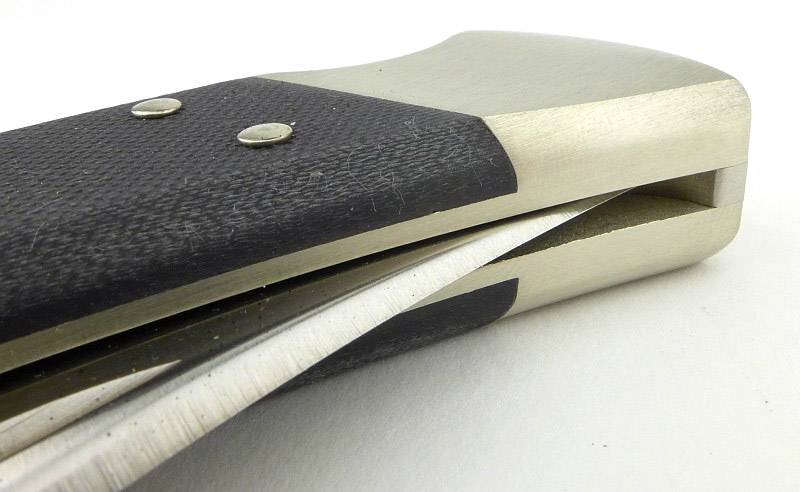
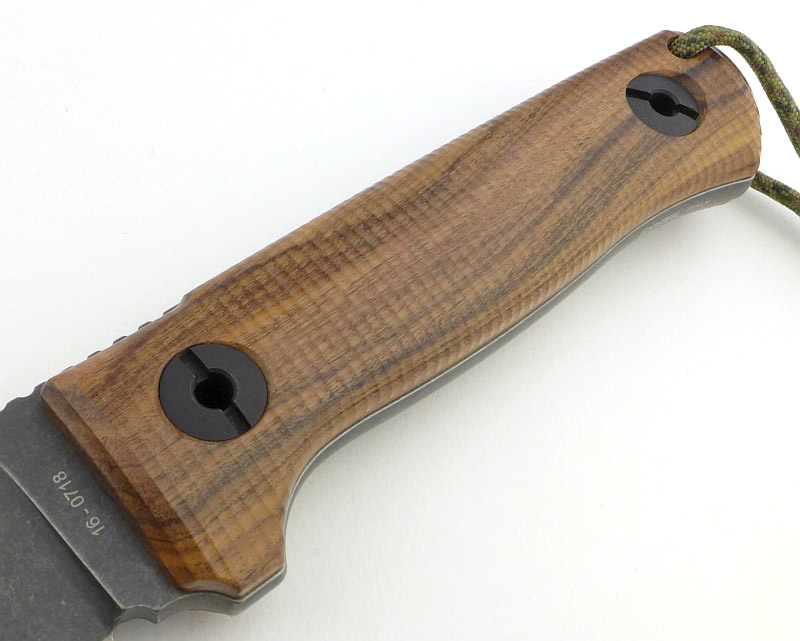
Working our way round - the knife blade.
A longer than average blade for a multi-tool.
A liner-lock keeps the blade open.
This blade arrived with burrs left on. A quick strop and this was fixed.
A long and thin opening hole needs to be used with care.
With the pliers retracted the locking button sits low.
When the pliers are open the locking button clicks into place.
The pliers are sprung so the handles open themselves.
It has multi-purpose needle-nose pliers.
Rotatable and replaceable wire cutting jaw inserts are used.
These inserts have a wire trapping notch.
Jaw alignment is very good.
Inside one handle is a single bit holder.
The tool can have one bit here and one in the main bit holder.
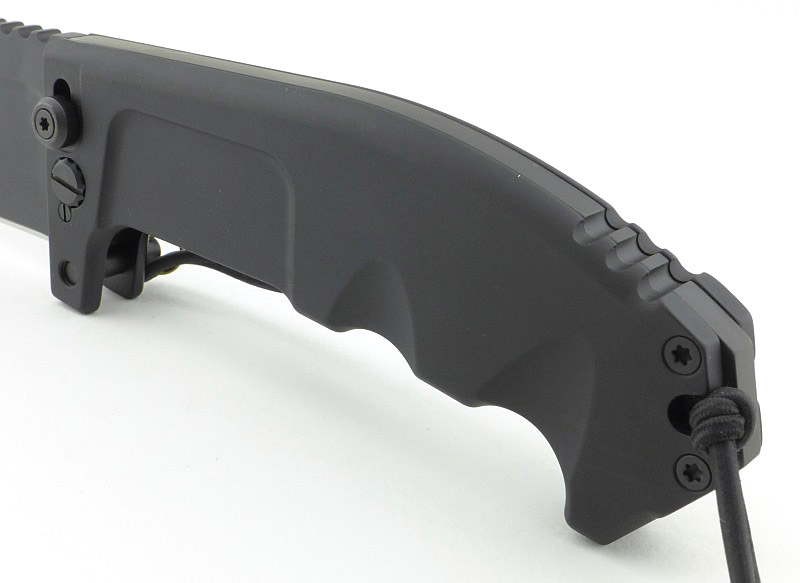
The other handle has four other folding tools.
A plastic slider locks and unlocks these tools.
As you open each tool the sliding lock is pushed back.
Once fully open the lock slides back forwards to lock the tool in place.
First is an awl.
Then a multi-purpose prying tool / bottle opener.
The other side of the prying tool.
A double sided file.
Plus a serrated blade.
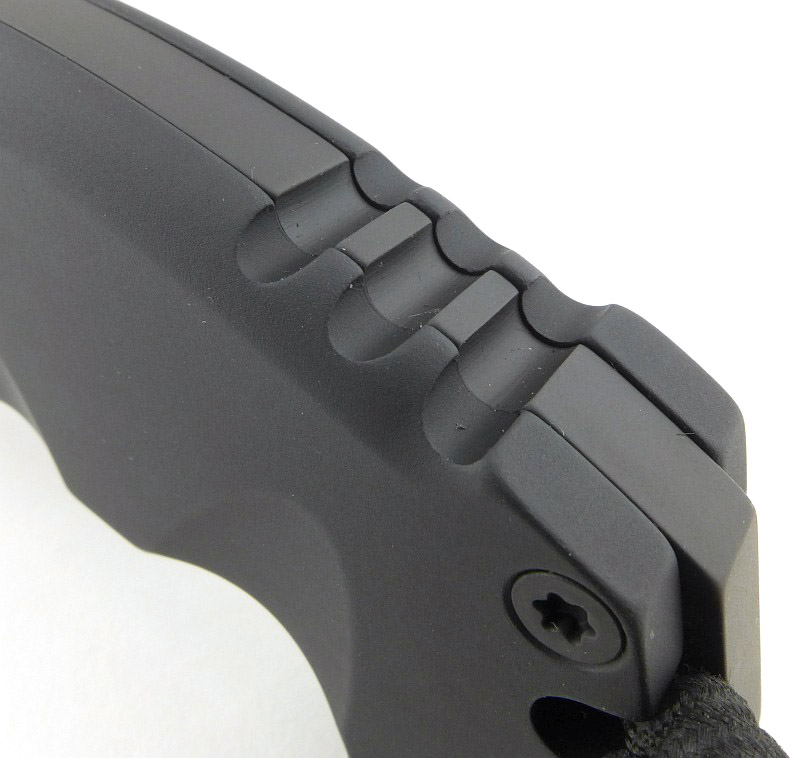
Even the edge bevels are black coated.
Here you can see the lock spring with the lock engaged.
And the lock released.
What it is like to use?
Having seen some less than positive comments about this tool, I felt the need to address these first before going into more on how I have been getting on with it. In particular I wanted to mention the often overlooked aspect that a multi-tool, by its very nature is a jack-of-all-trades and as such a-master-of-none. All tools have their limits and it is up to the user to apply appropriate force and use the tool in a reasonable way. Multi-tools will get you so far, and are a tool-kit in one package, they can’t do it all. In every job I’ve used the Center Drive for I’ve not been trying to push it to its limits; heavy jobs need dedicated tools. Use it appropriately and enjoy the benefits.
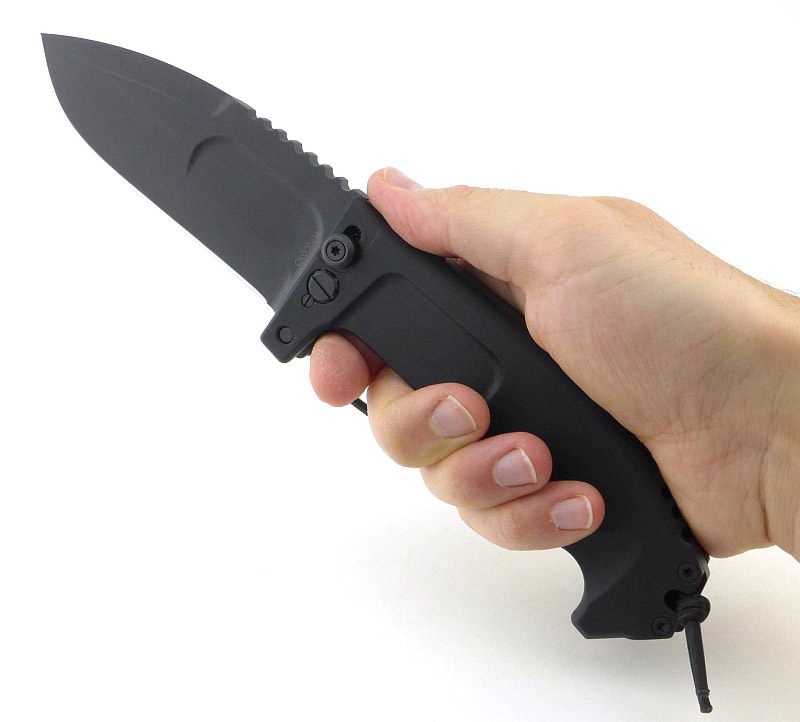
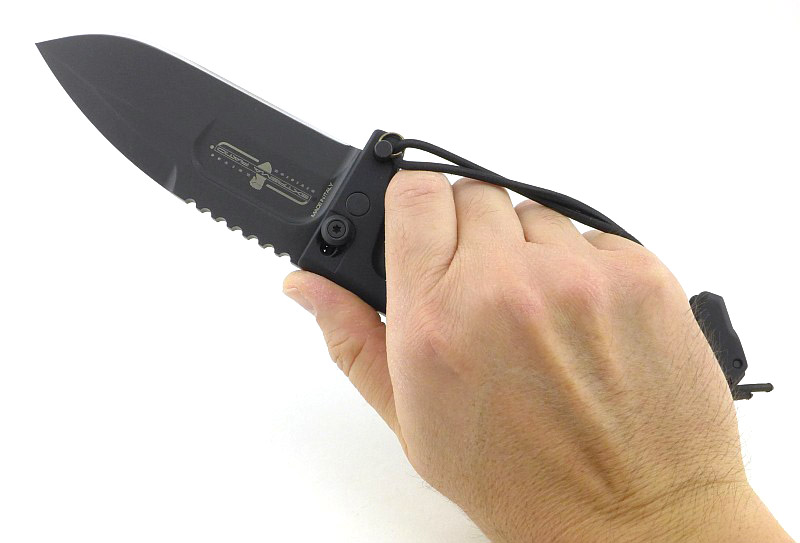
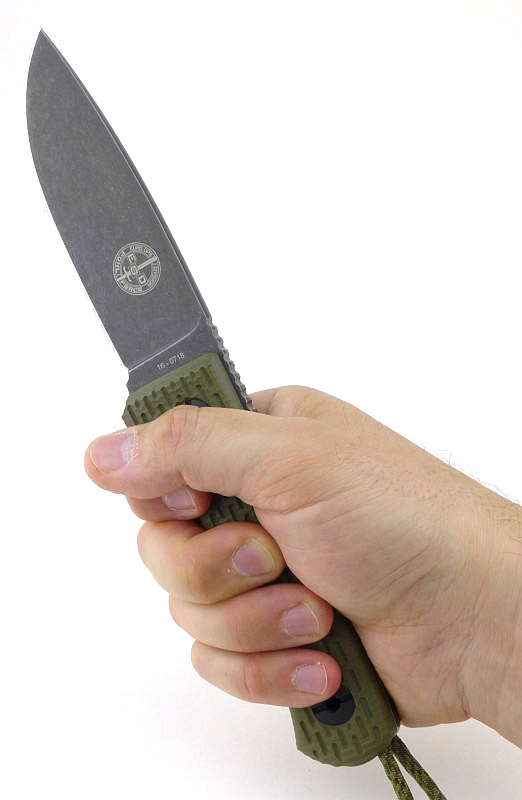
With that said, there is one design aspect you should be warned about. The knife blade has an opening hole for one-handed use, however there is a high likelihood you will cut yourself if you use it. In the sample on test, the knife blade has a good resistance to movement (which helps keep it closed) and this requires a certain amount of force to rotate the blade open. This amount of force pushes the thumb quite hard onto the side of the blade, so much so the cutting edge touches your skin. Initially I found small skin flaps forming on my thumb, then realised where they came from. Check the images I took from my Instagram posts on this in the gallery below an you will see what I mean.
Excellent reach and usability of the main bit holder.
Sprung jaws make this very easy to work with.
Watch that cutting edge when OHO!
Oh so useful to have around.
With all that out of the way we can look at what makes this tool particularly good. Personally, my main uses of a multi-tool, in order, are as a screwdriver, then the pliers, the file, pry-bar, awl, after which it depends on the tool, and as I carry a dedicated knife, using the multi-tool knife is generally only a last resort backup.
So my most frequent need will be for the screwdriver tool, and the Center Drive has an extended, centred, standard 1/4″ Hex bit-holder. That is something to take in and consider. No special bits are required, any 1/4″ Hex bits you have can be used. The first thing I did was pop a PZ2 (not supplied) into the bit holder as this is my number one bit type used. Multi-tool screwdrivers are often awkward to use as they are generally to one side or other and not that long; not so with the Center Drive. The extended bit holder make it so much easier to see the screw head, and access internal screws, or those near a corner. Clearly with a folding tool like this you can’t 100% centre the bit holder, but it is centred in relation to the widest part of the tool, and this makes it much easier to use. This is the best built-in multi-tool screwdriver I’ve used.
Onto my second most needed tool, the pliers. Since I first used sprung pliers (probably some jewellers pliers), it makes non-sprung pliers seem a pain to use, especially when manipulating the work piece. Having OTF pliers, the Center Drive is able to have sprung pliers (the unfolding type of multi-tool pliers typically have no spring), and thanks to the spring just become an extension of your hand, allowing you to focus completely on the work.
As you might expect from a multi-tool file, it is not that sharp, but it lets you take off those rough edges from softer materials and non-ferrous metals well enough.
One disappointment is the serrated knife blade, which, in this example, is blunt. The cutting edge has the same black coating as the blade, making it appear as if it never got a final sharpen.
The awl has no sharp cutting edge, so is really just a metal spike, useful for all sorts of little jobs. Next to this is one of the best prying tools I’ve seen on a multi-tool and will get into narrow gaps as well as being able to lift small nails.
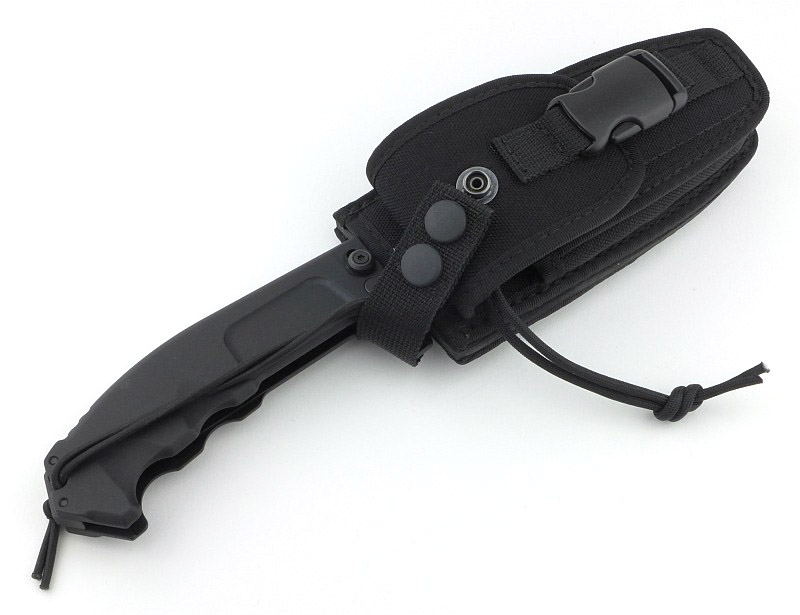
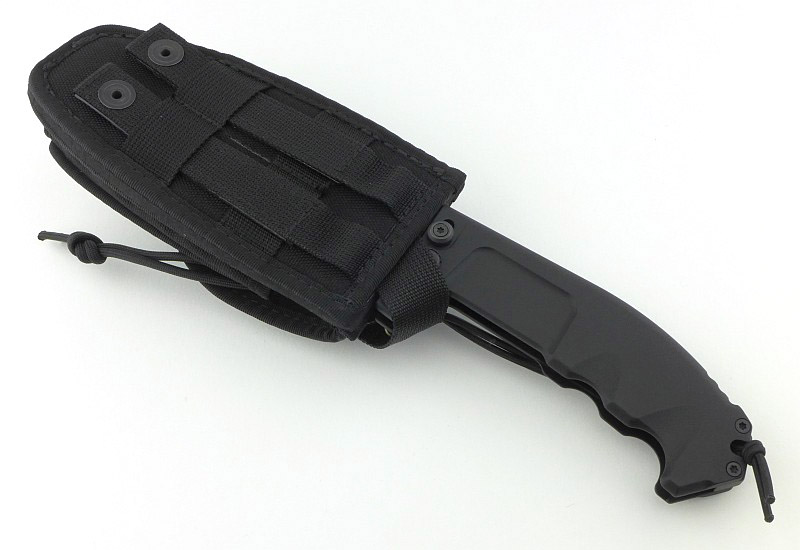
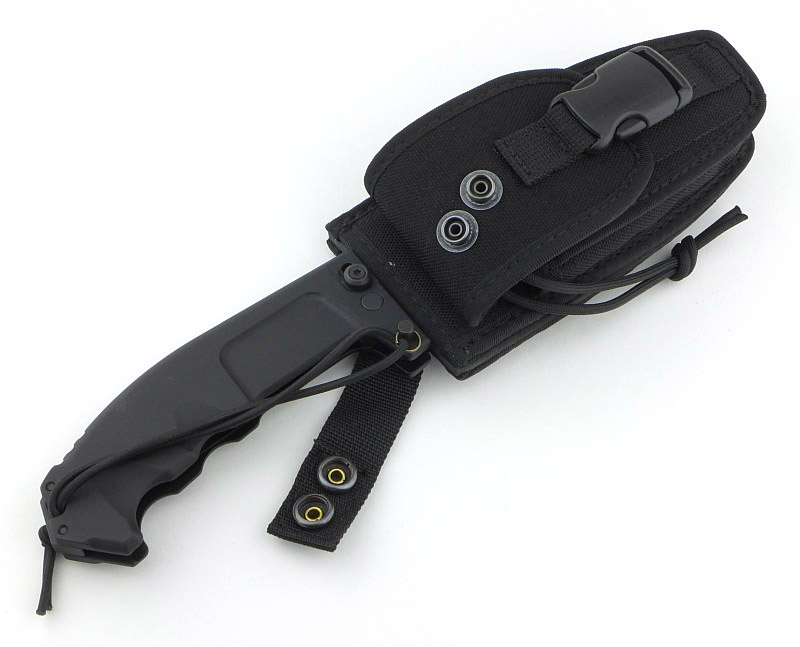
All of this is no good if you don’t have it with you. The included pouch has two compartments, one for the set of bits, and one for the tool. Should you want to go lower profile, you can leave the full set of bits out (still having two in the tool itself) and the pouch slims down – belt or MOLLE mounted you’ll have it with you.
Review Summary
The views expressed in this summary table are from the point of view of the reviewer’s personal use. I am not a member of the armed forces and cannot comment on its use beyond a cutting tool or field/hunting knife.
Something that might be a ‘pro’ for one user can be a ‘con’ for another, so the comments are categorised based on my requirements. You should consider all points and if they could be beneficial to you.
_______________________________________________
Things I like
_______________________________________________
Centred, extended, 1/4″ standard Hex bit holder.
Spring loaded Out-The-Front pliers.
Versatile prying tool.
Quality carry pouch.
Replaceable wire cutter.
_______________________________________________
What doesn’t work so well for me
_______________________________________________
One-Handed-Opening the main knife blade can cut you.
Serrated blade was blunt.
Discussing the Review:
The ideal place to discuss this reviews is on a forum. If you started reading the shorter forum version of the review, but followed the link this full exclusive review, please return to that forum to discuss the review there.
If you read the review entirely on Tactical Reviews, please consider one of the following to join in, or start, a discussion.
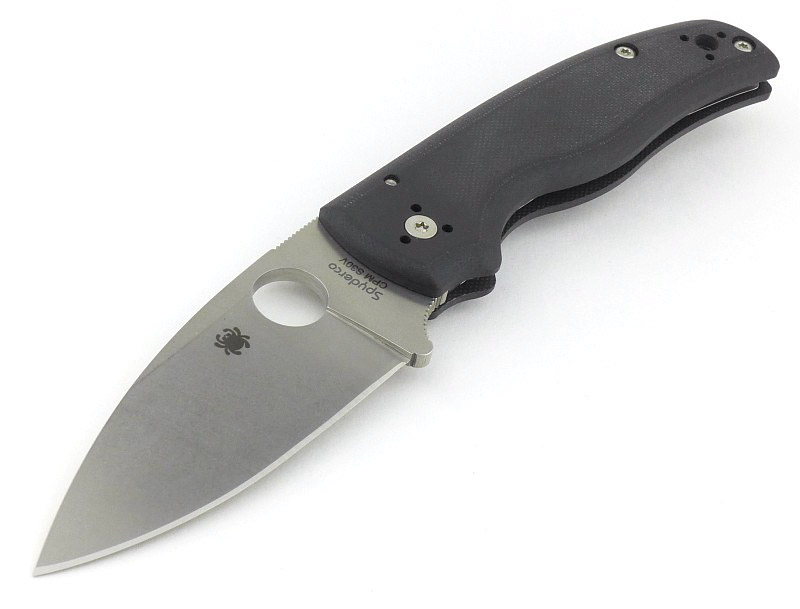
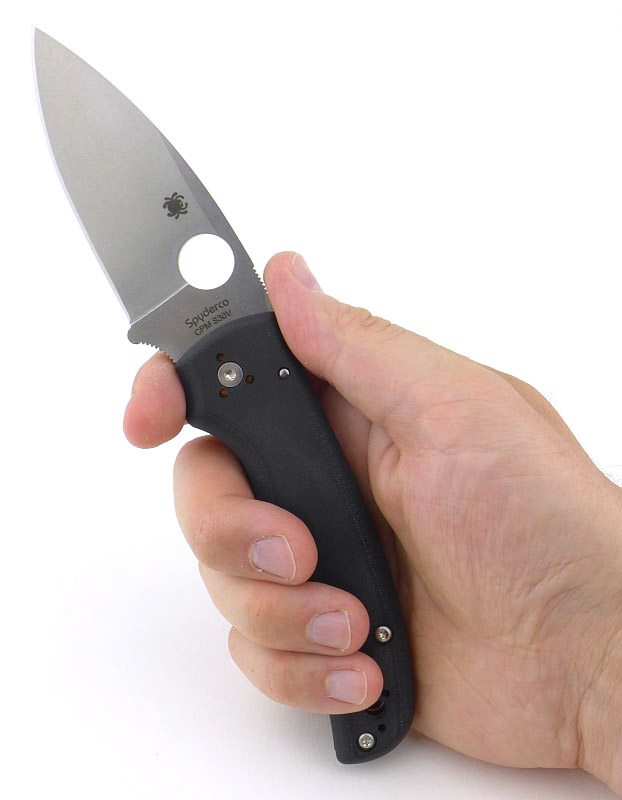
The Spyderco Sliverax is a design by automotive engineer and knife enthusiast Paul Alexander. It is the first production folding knife to combine a flipper opener with Spyderco’s Compression Lock mechanism, and is Paul’s second collaboration with Spyderco. Sleek lines and a pronounced positive rake to the blade give the Sliverax a distinctive and purposeful look.
New Review Format 2018!
Tactical Reviews is known for very detailed reviews using many high quality images. This has meant quite a lot of scrolling to read most reviews. In the new format, the review contains ‘responsive image galleries’ to better display these images as a slide show with captions.
NOTE: On a PC it is best to use the arrow keys to move through the images. Captions can be hidden by clicking the small ‘x’ in the caption box. To enable them again, close the gallery and reopen it.
A good look round the Sliverax:
Things to look out for here are included in the image captions.
The Sliverax is an extremely sleek design.
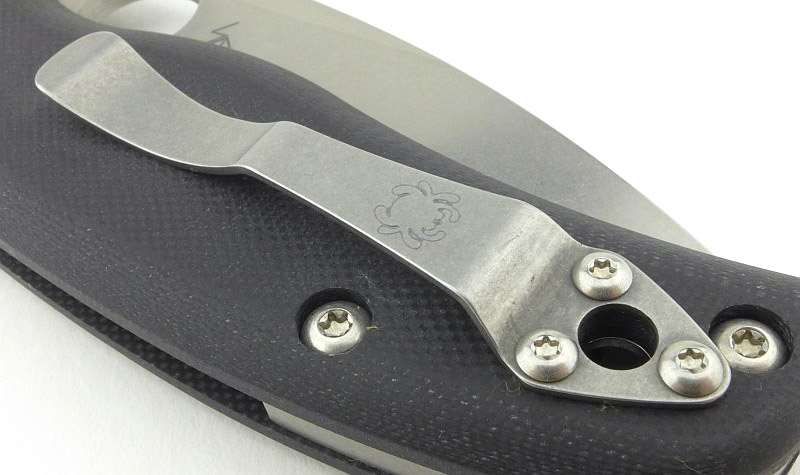
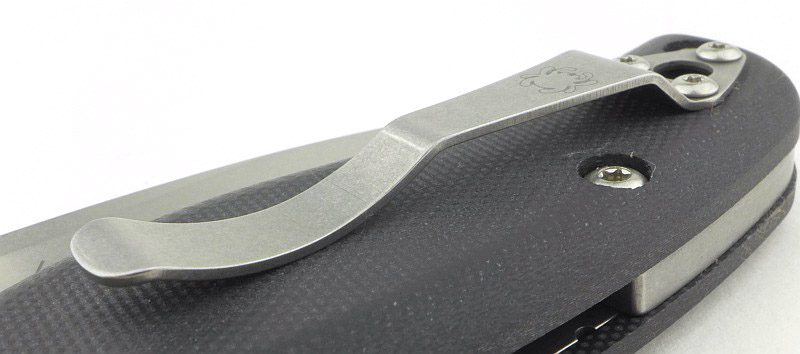
No surprise to see a Spyderco wire pocket clip.
The clip can be mounted for right or left-handed users.
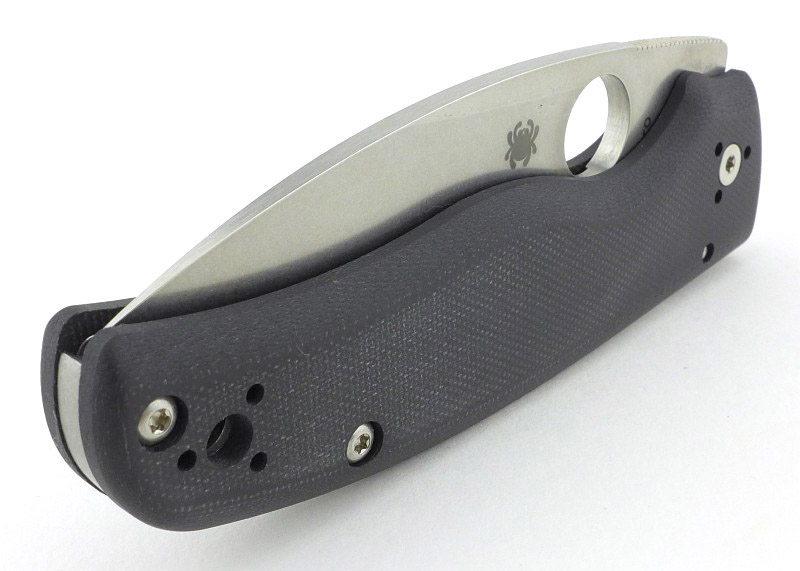
The large opening hole is fully accessible from both sides when the blade is closed.
With the blade part open you can see the stop-pin cut-out at the base of the flipper tab.
Spyderco's compression lock is used.
Captive ball bearings make the blade movement super slick.
A closer look at the handle Carbon Fibre / G-10 Laminate texture, here shown with the pivot bolt.
The Sliverax is an open back design with waisted spacers.
The liners and lock bar are nested into the handles.
A close-up of the lock engagement.
A well back-swept plunge line makes the cutting edge longer than the blade length.
Explained by the Maker:
The reasons for certain design choices may not be clear when simply looking at an object, so this section is intended to give an insight into the thinking behind a design by speaking to the designer themselves.
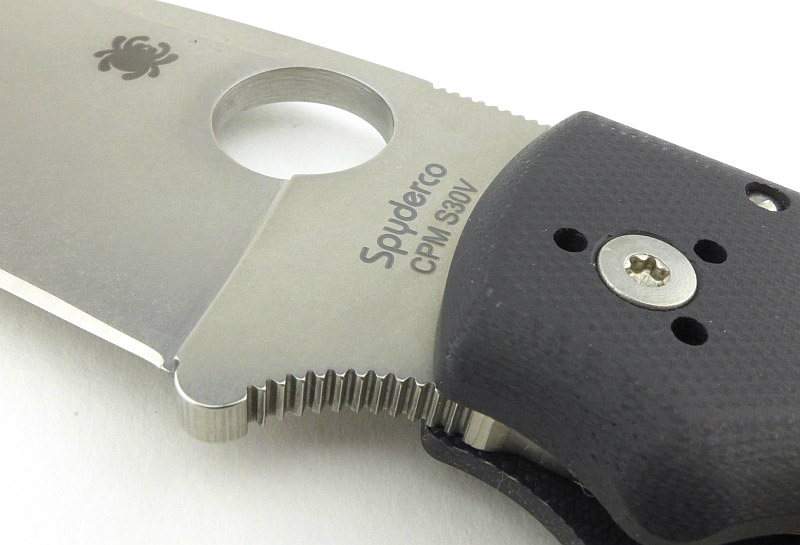
From Spyderco’s product description “Designed by automotive engineer and knife enthusiast Paul Alexander, the Sliverax is the first factory-made folding knife to combine Spyderco’s Compression Lock™ mechanism with a flipper-style opener. Its sleek drop-point blade is crafted from CPM® S30V® stainless steel and proudly includes both a fully accessible Trademark Round Hole™ and an index-finger flipper to support a full spectrum of one-handed opening options with either hand. A full-flat grind gives it outstanding edge geometry and its slightly negative blade-to-handle angle enhances its cutting leverage and shortens its opening arc for swift, positive deployment.
The Sliverax’s blade is supported by Spyderco’s patented Compression Lock mechanism—a high-strength lock located in the spine of the handle to greatly reduce the risk of unintentional release during use. Its lightweight, open-backed handle design features stunning carbon fiber/G-10 laminate scales and nested stainless steel liners. This advanced construction style provides impressive structural strength, keeps the knife slim and pocket friendly, and offers a solid foundation for the knife’s lock mechanism. To allow convenient carry and keep the Sliverax instantly accessible, its handle includes a reversible deep-pocket wire clip that can be configured for right or left-side tip-up carry.”
The Blade and Handle Geometry:
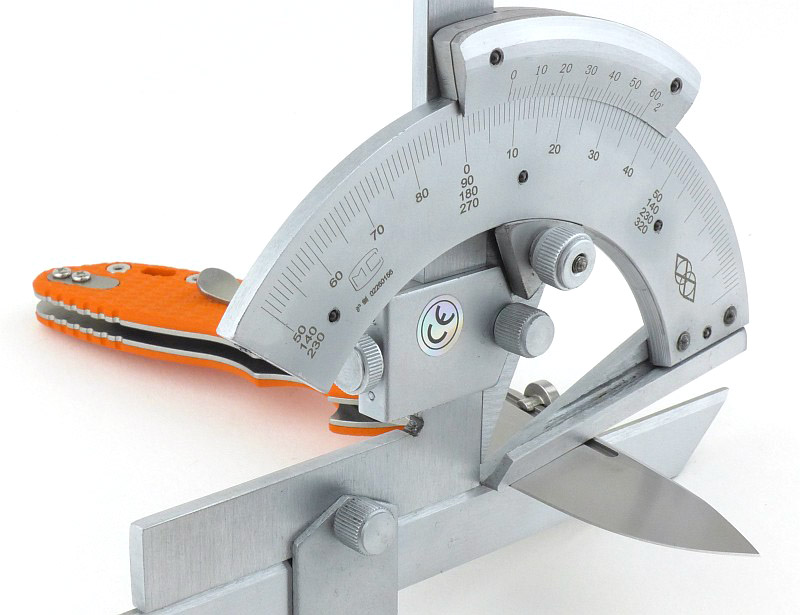
Most knife specifications have a basic description of the blade geometry, but in this section I will be taking a more detailed look at geometry and balance.
Using a set of gauges and precision measuring equipment including a Vernier protractor, callipers, fixed radius gauges and the unique Arc Master adjustable radius gauge (the one that looks like a crossbow).
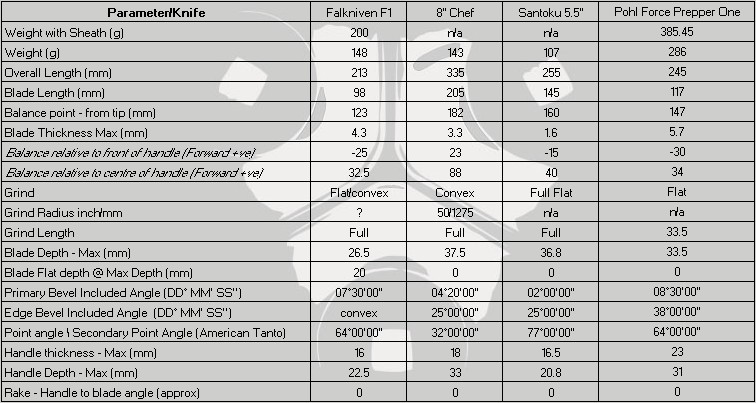
These measurements have been tabulated and are presented along with a few reference blades (8″ Chef’s Knife, 5.5″ Santoku and the popular Fällkniven F1).
Key aspects such as the primary bevel angle, grind type, blade depth, blade thickness, length, weight are detailed, along with balance information.
The ‘Balance relative to the front of the handle’ tells you if the knife will feel front heavy, or if the weight is in your hand (a positive value means the weight is forward of the front of the handle). The ‘Balance relative to the centre of the handle’ indicates how close to a ‘neutral balance’ the knife has in the hand.
In the case of full convex grinds the approximate centre of the grind is used for the primary bevel angle estimate.
The blade is made from CPM S30V steel.
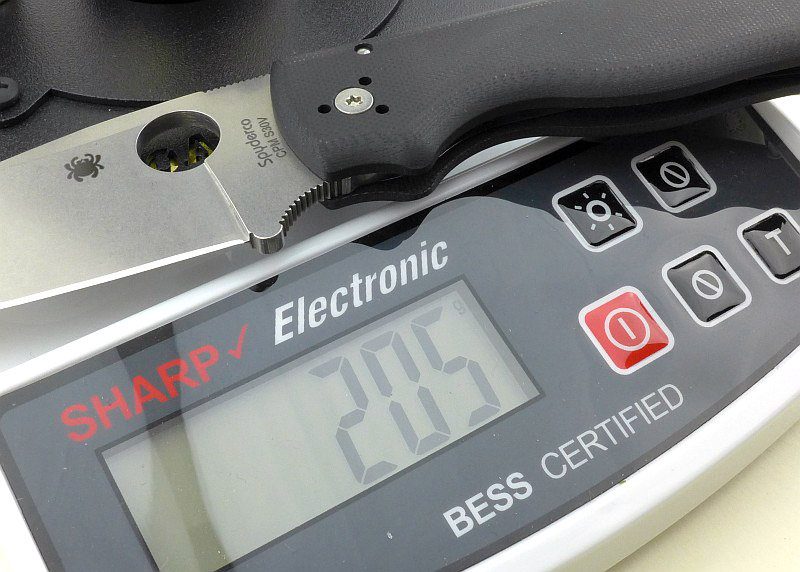
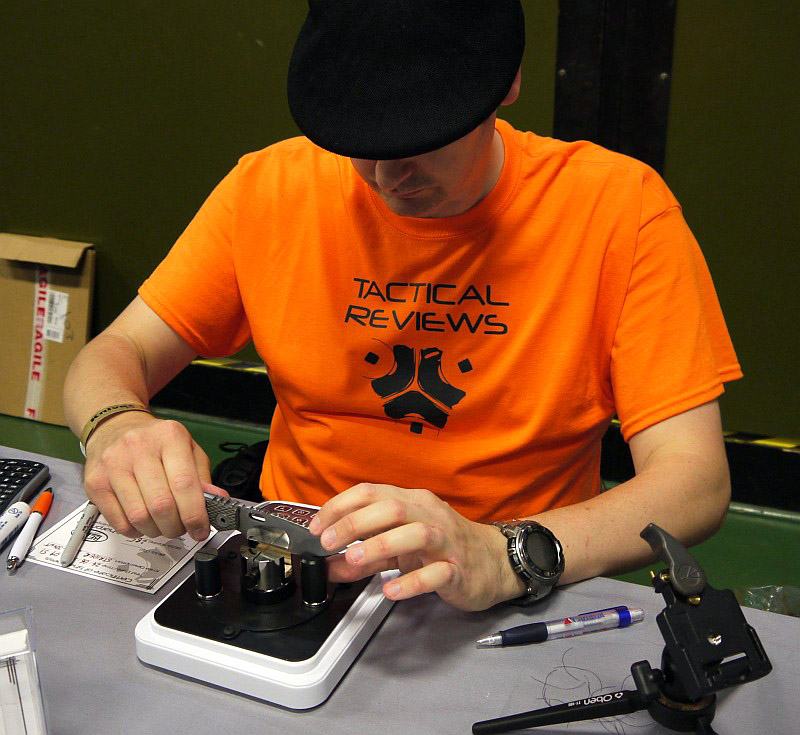
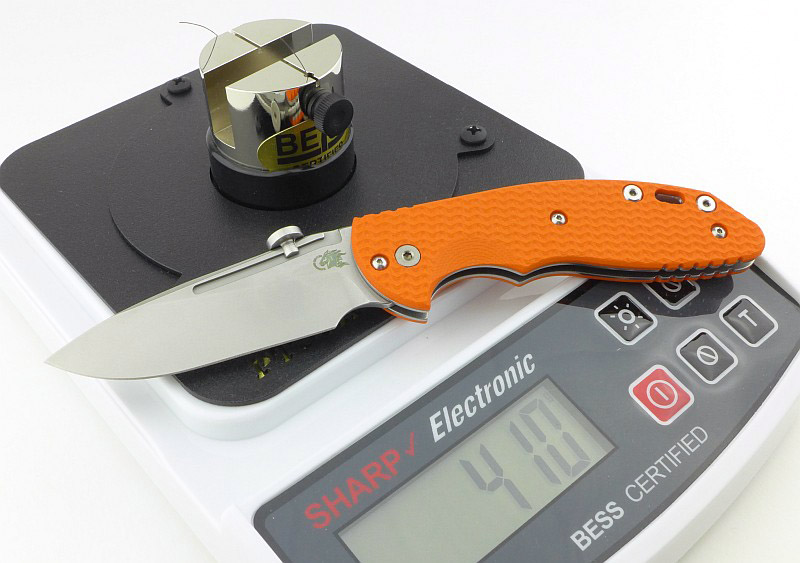
New for 2018! BESS Certified sharpness testing:
The BESS ‘C’ scale of sharpness, developed by Mike Brubacher (Brubacher Edge Sharpness Scale) will now become part of Tactical Reviews’ knife testing process. Initially this will be used to verify the sharpness of the factory edge and allow the knife to be brought to a minimum standard sharpness before testing a blade’s cutting performance.
A chart showing where on the BESS scale a blade is.
The Sliverax’s factory edge has an average BESS ‘C’ sharpness of 186. This is yet another super sharp factory edge from Spyderco. A figure less than 200 is really good and easily shaves arm hairs and falls through 80gsm paper.
What it is like to use?
What struck me on initially handling this knife is how the Sliverax differs from conventional folders with its organic lines and purposeful downward angled blade (positive rake).
When folded it is almost like a worry stone in its pleasing feel and curvy shape. Opening is lightning fast with the flipper, and this speed is in part due to the blade’s positive rake, meaning the blade only has to rotate 160 degrees to open, instead of 180 degrees. Of course the pivot’s captive ball bearings also guide the blade with virtually no resistance at all.
Having a fully exposed opening hole from both sides makes it very comfortable and easy to thumb-open with either hand. The clip can be fitted to either side, so the Sliverax is truly ambidextrous. The only aspect that is slightly handed is a one-handed close. I certainly found it easier to unlock the compression lock one handed using my right hand.
For the opening hole to be fully exposed, and to not have a Spyderco ‘hump’, a lot of the handle has been cut away making the handle at the first and second fingers very thin. As well as accentuating the rake of the blade further, it also makes a full hand grip a little awkward as the fingers don’t have much to hold. However it does provide a deep finger guard so the chance your hand might slip forward is very low.
I tend to prefer thumb-opening blades for several reasons. In fact, in the UK where I am based, flippers are too close to switchblades for comfort, so a nicely controlled thumb-open goes down much better. This leads me to make an observation about the compression lock which I also noted on the Sharman. As I open the blade, my first finger tends to lie over the lock itself, and the lock bar often gives me a little nip as it snaps into place. A minor complaint and easily avoided (if you remember) but mentioned here as an observation.
Despite being a smooth finish, the Carbon Fibre/G-10 Laminate handle has enough texture to provide positive grip even when wet.
The Sliverax is an excellent size for a general purpose blade.
A full fist grip is a little awkward with the large cut-out of the handle making it very narrow.
Overall feel is excellent with the edges all finished to a very refined level.
Opening via the flipper is lightning fast.
Open in a flash.
Thumbing it open is exceptionally smooth.
And locked. I did get a few nips from the compression lock snapping into place.
Even without the ‘issue’ of appearances in the UK, I am personally a bit tired of the flipper. A mechanism where you have to compromise your grip on the knife to be able to press on a flipper tab to literally flick the blade open. Flippers can and do fail to fully open or lock, so much like the fixed blade is your most reliable partner, the two-handed open or the properly thumbed-open blade that is positively taken all the way to the locked position, means you know 100% it is there. If safety and security are your primary aims, then open the blade by manually rotating it all the way.
This leads me nicely into a couple of modifications I have made to the Sliverax I’ve been testing. Firstly the removal of the flipper tab. This makes the Sliverax a no-question thumb operated OHO, and has the benefit of removing the protruding flipper tab so it is even more pocket friendly.
The second modification is one of those things that for me is the sign of a finished knife blade, a sharpening choil. Others will have different opinions, and I’m not saying I’m right, but it is my preference. The end of the cutting edge at the sharpening choil also provide another ‘point’ for fine accurate cuts, so is not purely an aesthetic addition, but is functional too.
These images are of the modification I made and posted on Instagram, hence the branding on the images.
Modifications:
No longer a 'flipper', now just a OHO.
One of my finishing touches.
In the modified state (allowing me to carry it more), this knife has proven itself over and over and has become a firm favourite. The positive rake makes the blade attack each cut eagerly, with the full flat grind slicing smoothly and efficiently. Its, lightness and pocket friendly finish and shape allow you to forget it is there until you need it. This is a knife I’ve gone from being uncertain of, to positively wanting to carry and use.
Review Summary
The views expressed in this summary table are from the point of view of the reviewer’s personal use. I am not a member of the armed forces and cannot comment on its use beyond a cutting tool or field/hunting knife.
Something that might be a ‘pro’ for one user can be a ‘con’ for another, so the comments are categorised based on my requirements. You should consider all points and if they could be beneficial to you.
_______________________________________________
Things I like
_______________________________________________
Organic ergonomic flowing lines.
Full Flat Grind S30V blade.
Easy to access opening hole.
Super slick flipping action.
Lightweight and easy to carry.
Blade rake makes for a positive cutting action.
Ambidextrous.
_______________________________________________
What doesn’t work so well for me
_______________________________________________
Handle very thin where the first two fingers grip.
The Compression lock can ‘nip’ you.
Discussing the Review:
The ideal place to discuss this reviews is on a forum. If you started reading the shorter forum version of the review, but followed the link this full exclusive review, please return to that forum to discuss the review there.
If you read the review entirely on Tactical Reviews, please consider one of the following to join in any discussion.
Chris Reeve Knives have been creating superbly built classic knives for decades. Once you have made the commitment to this level of quality, the next logical step is to really put your stamp on it by adding embellishments and customisations. This showcase details the upgrades and customisations I have added to the standard Inkosi I reviewed early last year, and have been made possible only thanks to Tim Reeve’s (and the team at CRK’s) amazing attention to detail.
The Four Upgrades/Customisations/Options:
This knife is no drawer queen, and although I use without abusing I realise this is the best it is going to look, so for this showcase I have pulled out all the stops to capture it at its finest. Once old and showing its age I can look back at how it looked in its youth.
This Inkosi has been given four embellishments, any of which could be done on its own or combined with any of the others, and these are by no means the only options as the joy of customisation is that you can find what works for you.
Hawk Clip:
The first of the four updates has got to be the easiest and possibly most functional. CRK’s Hawk clip is a pocket clip that allows me like pocket clips. It has a ‘pinch-to-open’ design making fitting it to your pocket as easy as it gets and, as you can release it with a pinch, you get no pocket wear at all. Why can’t all pocket clips be like this? In this case it is a limited edition Hawk clip in a tumbled finish; typically they are bead blasted.
CRK's Hawk clip in a tumbled finish.
Comparing the clips' sizes.
The easiest of upgrades with just one screw.
With the Hawk being shorter, you can see where the original clip was resting against the handle.
The Hawk clip is a 'pinch to open' clip making its action simple and positive.
Adding a Wicked Edge:
Edges can be functional and sharp without being beautiful. Wicked Edge knife edges are beautiful and functional, and of course stunningly sharp. There is an investment in time to put a precise, even, polished edge on a blade, and an edge which in itself won’t last any longer, so the decision to have a Wicked Edge is more about the looks than ultimate performance. They just look so good.
Using a set of 0.6/1.4 micron Wicked Edge Ceramic stones to get the final polish.
I always tape up the blade just in case any grit on the clamp jaws might mark it.
Presentation quality edge.
Wicked Edge!
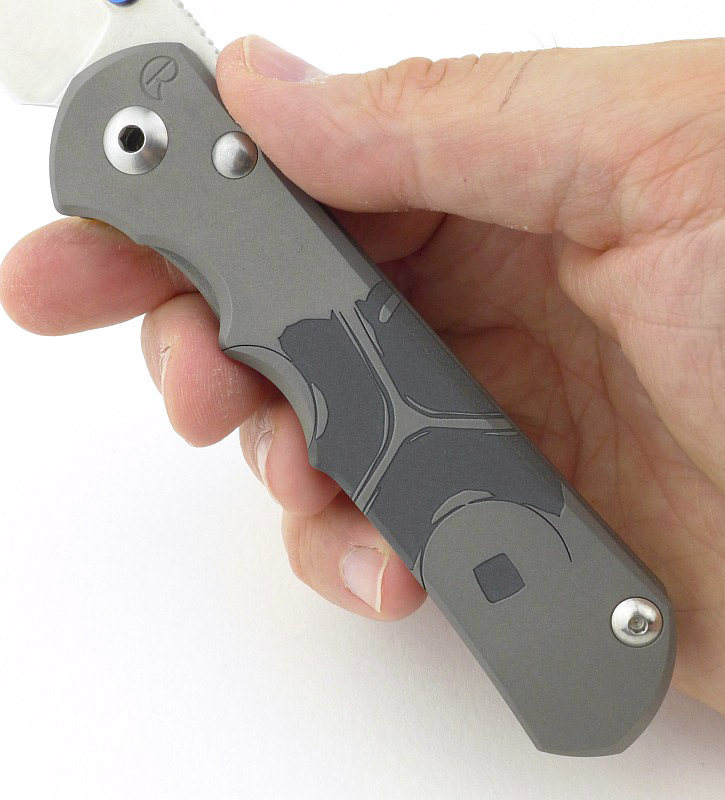
Custom Engraved Handle:
And now the jewel in the crown. Tim Reeve has been designing and making limited run custom engraved handle designs, adding another level of interest to the CRK lineup. That said, in this case it is a special one-off engraved handle designed and executed by an artist. You’ll also notice this is not an engraving made on the original handle scale, but instead is a replacement which is able to simply swap out the original handle thanks to the super precision of all CRK knife parts.
A package from CRK is always exciting.
Especially so when you find a custom handle inside! (and a belt pouch)
Oh yes!
Oh YES!
Just the right amount of depth and texture.
CRK's precision allows for this to be a drop-in replacement with no adjustments or fitting.
Using a CRK care kit for the job with thread lock and lubricant.
Fully disassembled.
A bit of lubricant on the new handle ready for the washer to move over.
Putting it back together.
Video Edited with – Cyberlink Director Suite 5 (PowerDirector 16 and AudioDirector 7)
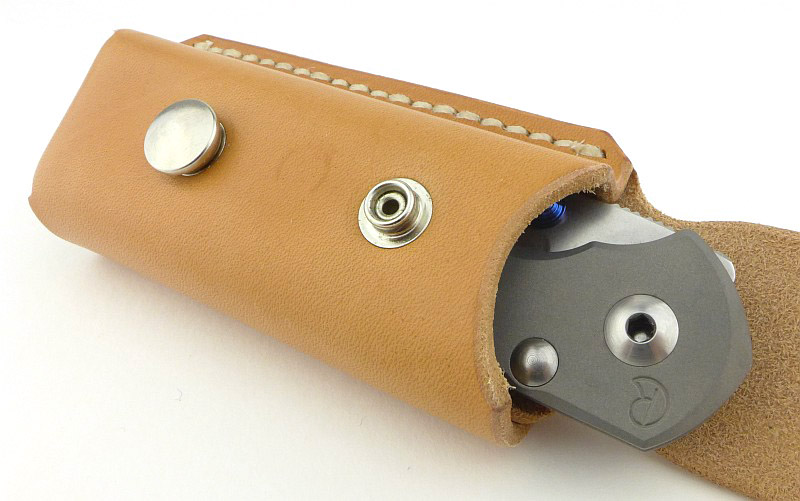
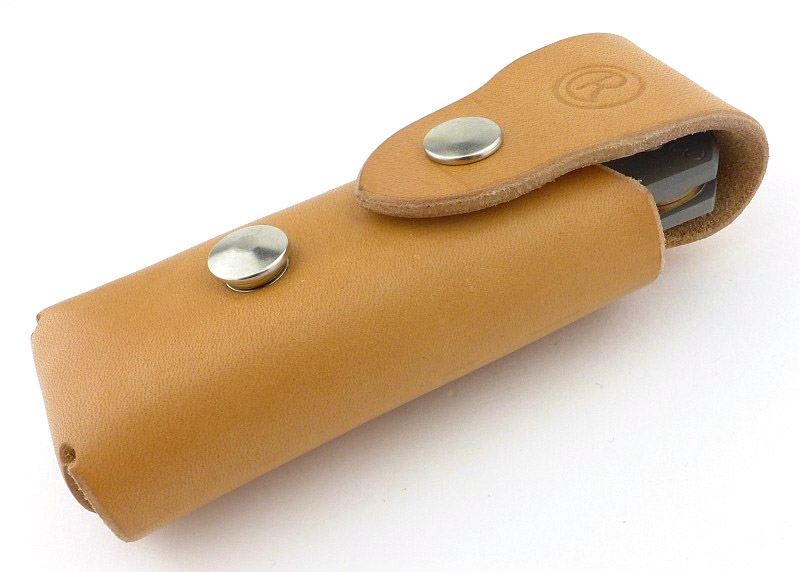
Belt Pouch:
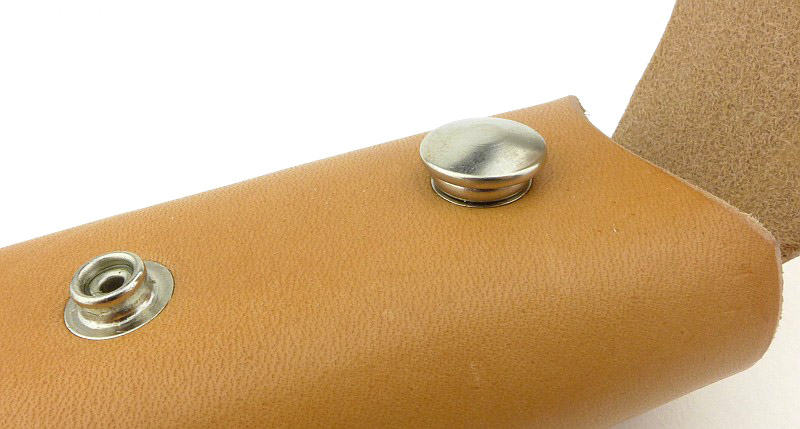
Once you have taken the care to make your CRK knife your own, do you want to let it roll around with your pocket change, or hang onto the edge of your pocket, or would you rather provide it with a secure carry option? In fitting with the quality of CRK, the belt pouch offered to house and carry it is of equivalent quality but in leather. If you are a specialist in crafting metal, then instead of changing focus for the leatherwork, CRK have their pouches made by Gfeller, a well respected maker, and one that can live up to the CRK logo it bears.
A minor note is that the Hawk clip does make the fit into this pouch a bit tighter, but it does fit OK and the leather will accommodate it more over time. The knife with original clip slips into the pouch more easily.
It is immediately clear this is a quality belt pouch. (But is it the wrong size?)
Nice thick leather is used.
Strong stitching through three thick layers.
This is made by Gfeller for CRK.
The belt loop is integral.
A clever folded and layered structure makes this very strong.
There is another press stud hiding under the flap.
As delivered it is configured for the smaller size of knife, so does look too small.
To reconfigure for the large Inkosi, just move the press stud cover.
Now it is the right size for this Inkosi.
The press studs are covered inside with leather, so won't be scratching your handle.
The complete Upgrade:
The best it will ever look, and captured for posterity, this is the Inkosi wearing all it finery. It’s going to be carried, it’s going to be used, and it will bear the signs of wear, so perhaps it will look even better in time.
The result is thanks to Tim Reeve's stunning work and attention to detail.
If you didn't know, you wouldn't know, but customisations can be understated and meaningful.
The Wicked Edge is just the cherry on top.
The subtle and clever design has the logo the right way up when using the Inkosi.
Not forgetting the Hawk clip.
Plus the Inkosi's 'safe place'.
Looking forward to seeing the Impinda with custom scales. What will you choose for your CRK?
While the latest ‘stand-out’ designs compete for our attention, often it is the quiet ones you need to look out for, and for me, this is what the Spyderco Shaman is. I very nearly passed this by while at IWA 2018 as it is a plain looking knife with stonewashed blade and matt handle – nothing exciting. Well thanks to Joyce at Spyderco, I didn’t miss out on this fantastic knife that nearly flew under the radar. This is not just a bigger ‘Native’, it is much more than that.
Gallery:
A quick note before you dive into the gallery; look out for the excellent ergonomics – with the Shaman, Spyderco have rounded all the handle edges of the matt finish G-10 handles, and this makes for a completely different feel for the knife, almost getting on for the feeling of a fixed blade. The compression lock keeps the lock out of the way of the grip nicely, and the finger choil and thumb jimping give a super secure grip. This one just feels right in the hand and pocket.
The lanyard hole also has the clip fixing holes around it.
There are also clip fixing holes around the pivot bolt.
The clip has a hole to provide access to the pivot screw or lanyard hole depending on where you fit it.
Spyderco's compression lock is used.
There is a generous section of jimping.
Phosphor-bronze washers are used.
A feature that makes the Shaman stand out are the curves and comfortable rounded edges.
Looking down into the compression lock. Check Spyderco's website for more information on this lock.
The Shaman between a Manix 2 XL and Native 5 Lightweight.
BESS Certified sharpness testing:
Before we get to the photos, also included in this showcase are the results of the factory edge sharpness testing. These are impressive results; see the gallery for the certificates.
The BESS ‘C’ scale of sharpness, was developed by Mike Brubacher (Brubacher Edge Sharpness Scale).
A chart showing where on the BESS scale a blade is.
The Shaman’s factory edge has an average BESS ‘C’ sharpness of 211. At this sharpness it easily and cleanly slices 80gsm copier paper, and will shave hair from your arm. Spyderco reliably supply very sharp factory edges, and this, though not the best, is at the sharpness I would aim to re-sharpen a knife to, so more than adequate.
Don’t let the Spyderco Shaman pass you by, it is much more knife than its unassuming looks might indicate.
Discussing the Showcase:
The ideal place to freely discuss these reviews is on a forum. If you started reading the shorter forum version of the review, but followed the link this full exclusive review, please return to that forum to discuss the review there.
If you read the review entirely on Tactical Reviews, please consider one of the following to join in, or start, a discussion.
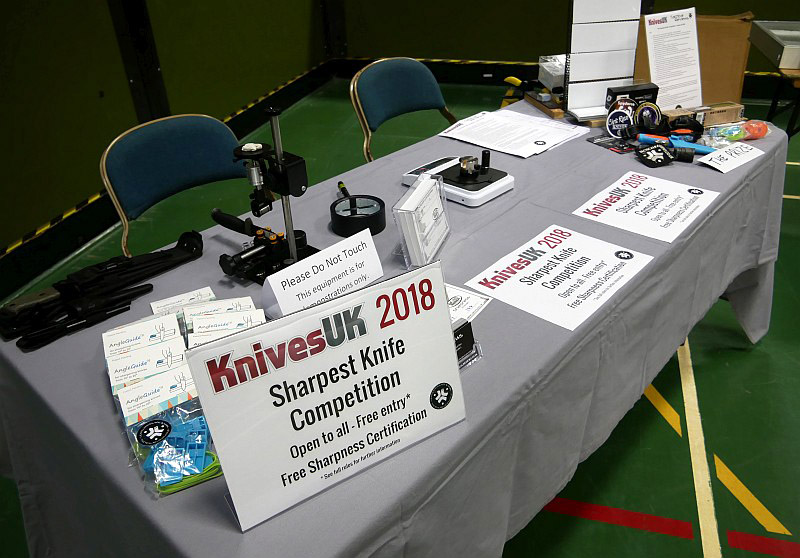
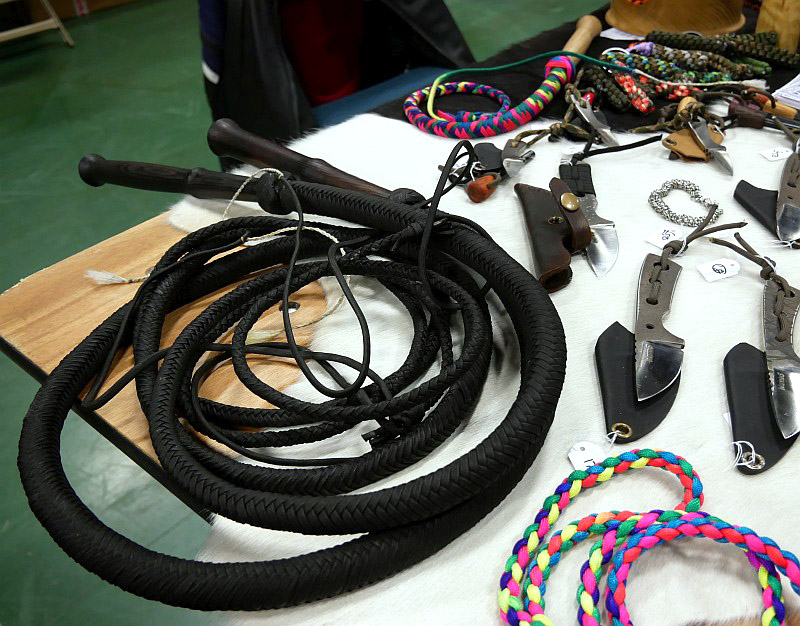
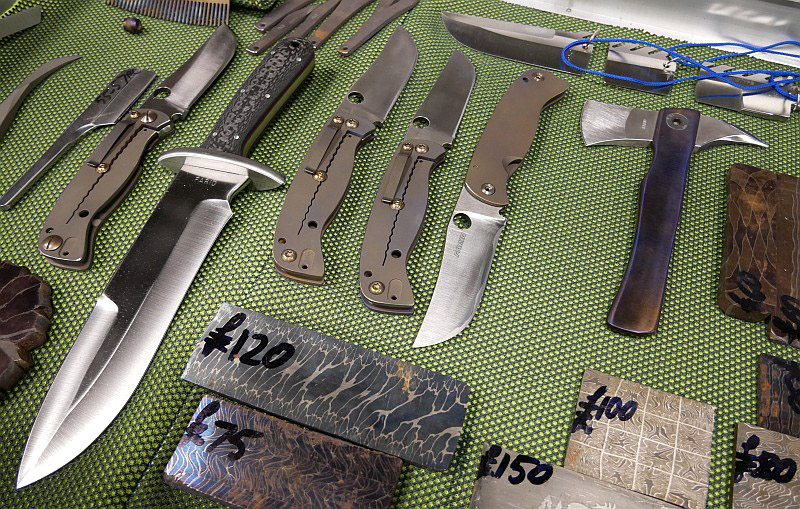
It Happened! The first ‘Sharpest Knife’ competition of its kind in a public access show in the Northern Hemisphere. Eyes were opened, hopes dashed, legends toppled, shock results revealed, and a winner who could not believe it! Drama and enlightenment added to a day of excitement at Knives UK 2018, with the vast array of beautifully hand crafted knives and tools, what more could you ask for?
Let the contest begin:
Before it all started.
The testing equipment, a CATRA Hobbigoni, Edge On Up PT50A, and SET.
The runner up.
A Rockstead - didn't expect that.
The deserved Winner. Hand sharpened on stones, then stropped on demin and Autosol.
The leader board at the end of the day.
The Winner.
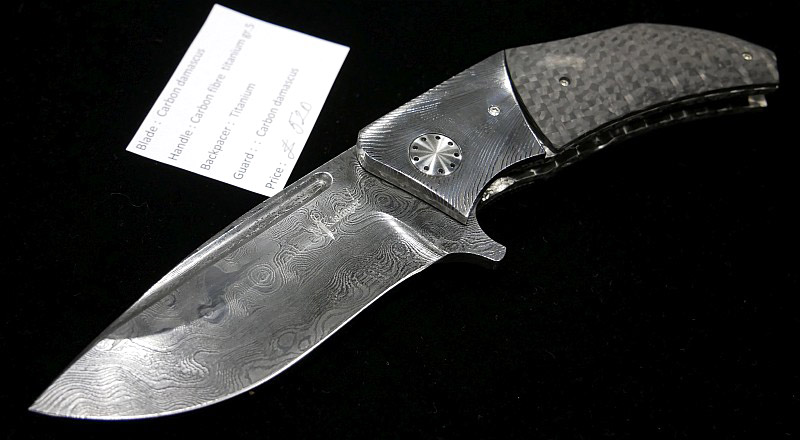
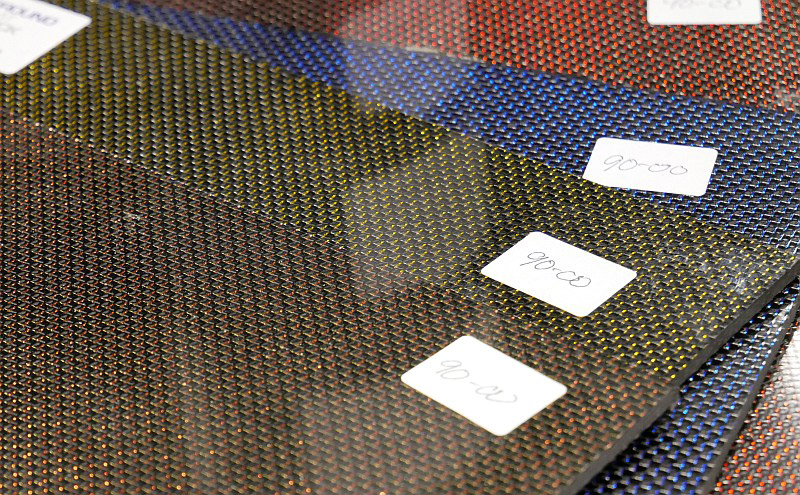
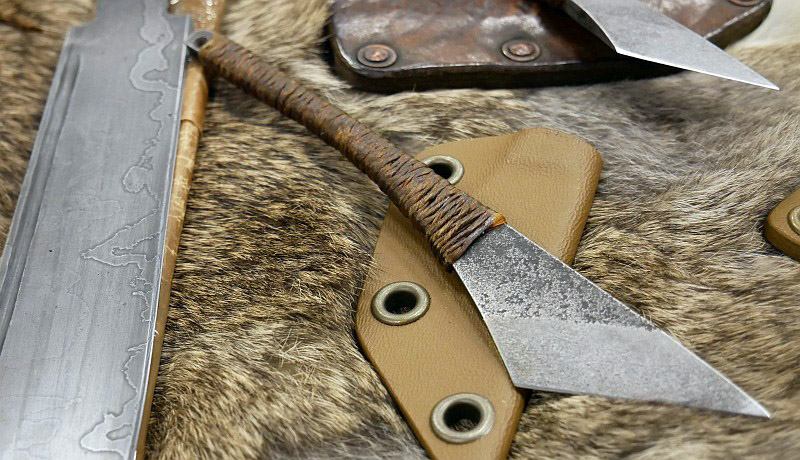
I was so busy I didn’t have time to get round all the Knives UK exhibitors, so this is a whistle-stop tour that does not do the show justice, merely giving a brief glimpse of it.
Hinderer Knives’ XM-Slippy was designed to answer the high demand from the European market for a Rick Hinderer knife that could be carried in areas with more restrictive knife carry laws; as its name suggests, it is a slip-joint knife. The knife was debuted at IWA 2017 and is currently entering into its second production run. The XM-Slippy shown in this review is a first run knife and externally there is no visible change when compared to the second run. Designed to be as universally EDC legal as possible, the thumb disc can easily be removed for two-handed opening if required.
New Review Format 2018!
Tactical Reviews is known for very detailed reviews using many high quality images. This has meant quite a lot of scrolling to read most reviews. In the new format, the review contains ‘responsive image galleries’ to better display these images as a slide show with captions.
NOTE: On a PC it is best to use the arrow keys to move through the images. Captions can be hidden by clicking the small ‘x’ in the caption box. To enable them again, close the gallery and reopen it.
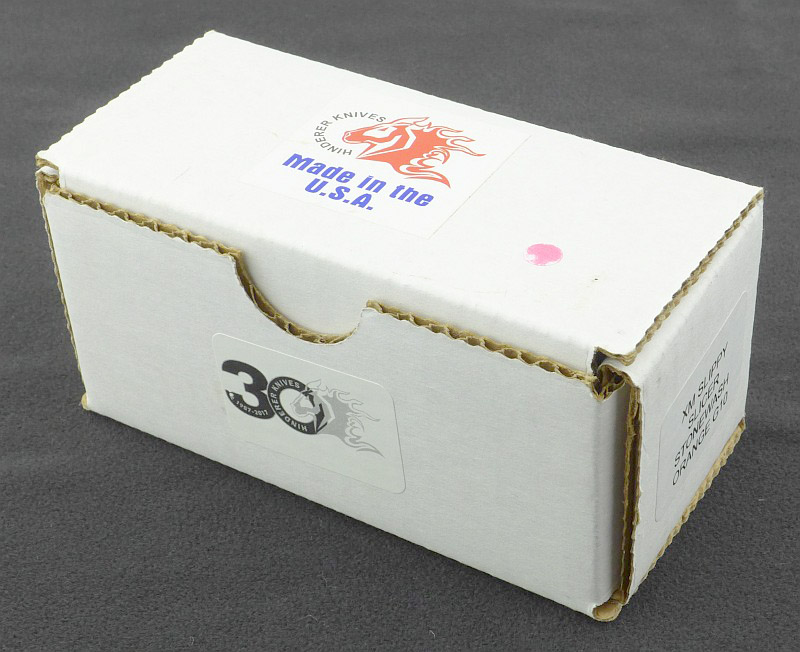
A few more details:
What’s in the box?:
In the box is the XM-Slippy in a plastic bag, along with a small Allen key and instruction sheet for the re/movable thumb stud.
A good look round the XM-Slippy – Things to look out for here are:
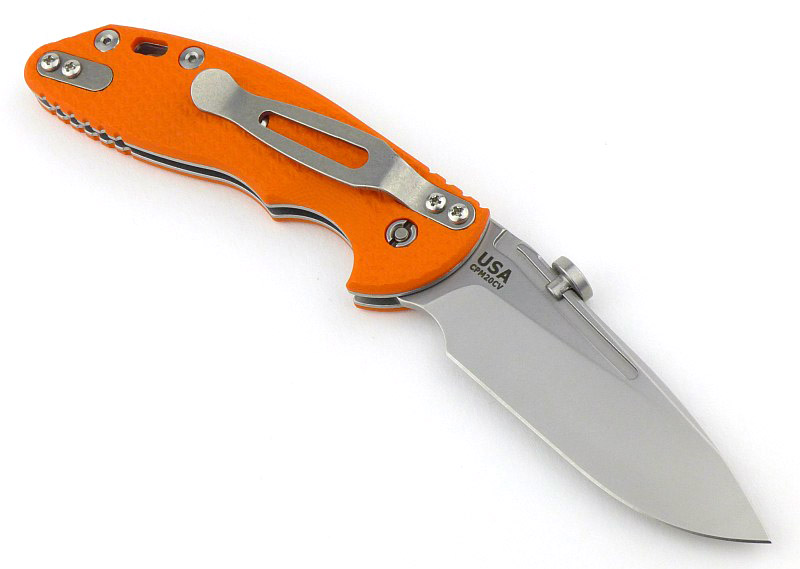
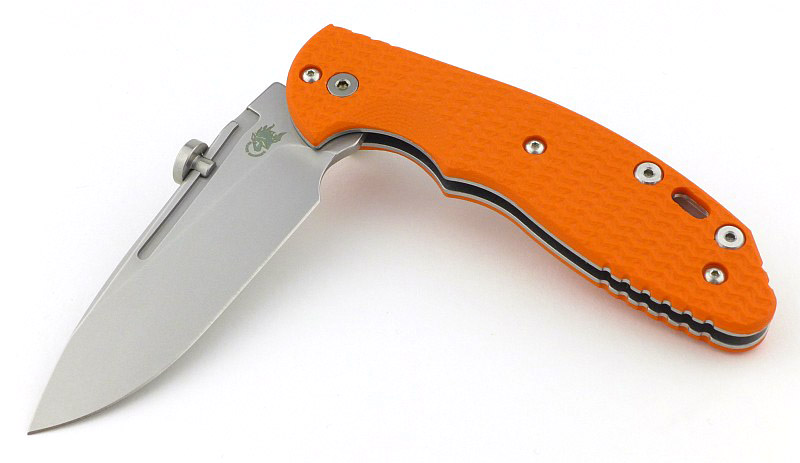
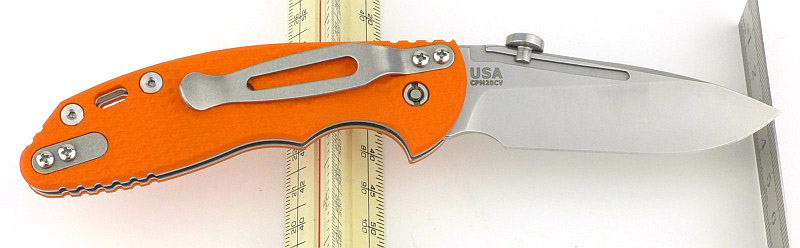
This example has the VERY orange G10 handles, but the XM-Slippy is also available in much more neutral colours. The stonewashed steel pocket clip is fitted by default in the tip down position and is pretty thick and sturdy (also read ‘stiff’).
One design aspect needs a little more attention; the smoothing/easing of all edges. A very obvious example of this are the edges of the back-spring, and the bevelled edges provide shadow lines along the back of the handle. The fact all edges are eased/rounded gives it a distinct look and feel and a great comfort in the hand and pocket. Some might criticise the fact that the H doesn’t look as tight as they would expect, but this is as it should be; the combination of the easing and the fact there is an internal stop-pin results in this appearance, the blade itself is spot on and perfectly positioned.
Peering into the liners, you can see the very end of the clip screws just coming through the liner, but there is no contact with the blade; it does mean the screws are as stable as they possibly could be as they fill the threaded hole completely.
The Hinderer logo - always a good thing.
This example has the very orange G10 handles.
A stonewashed steel pocket clip is fitted by default in the tip-down position.
The tip-up clip position has a blanking plate fitted.
On the clip side of the pivot bolt, the nut is flush and uses a 'security' style two-slot design.
The pivot uses an Allen head bolt.
All edges of the back-spring are eased/bevelled providing shadow lines along the back of the handle.
A closer look at the back-spring and the jimping for a reverse grip.
Jimping on the handle goes through the liners and G10.
Blade centring was spot-on.
Peering into the pivot, you can see the phosphor-bronze washers and the very end of the clip screws just coming through the liner.
The clip is made from thick steel and is very sturdy.
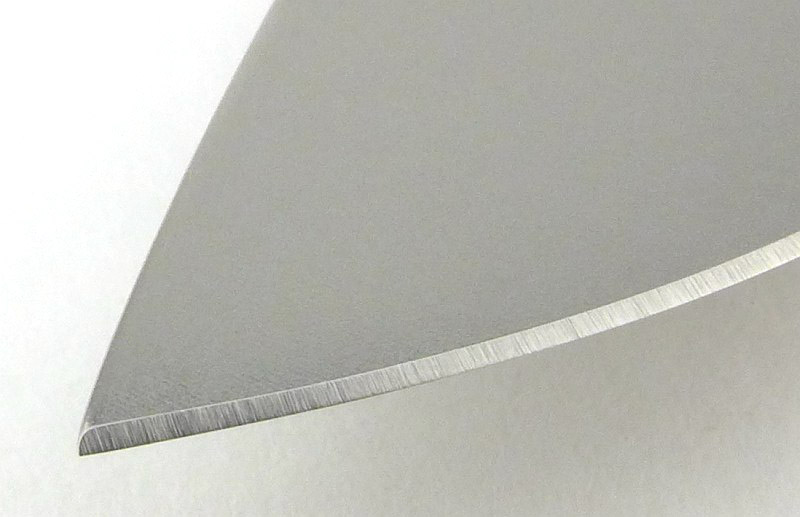
A wide finger/sharpening/safety choil spans the smooth plunge line.
By intent, all edges are eased/rounded giving it a distinct look and feel.
The combination of the easing and the fact there is an internal stop-pin means the H doesn't look as tight as some would expect, but it is as it should be.
Exploded view.
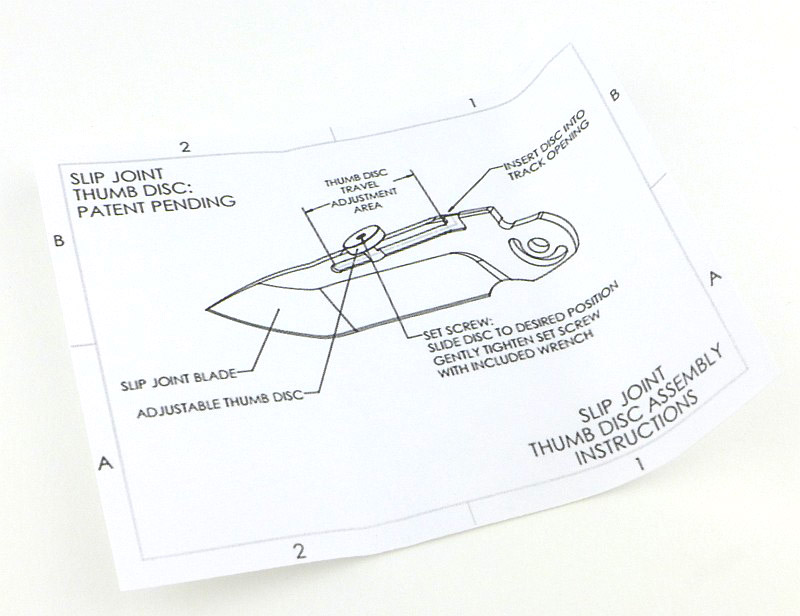
Rick Hinderer’s Thumb Disc:
The Hinderer adjustable thumb disc uses a small grub screw (0.035″ Allen key) to secure it in place. The Thumb Disc channel is the same on both sides of the CPM20CV blade, forming a T-shaped section that the thumb disc slides onto. The thumb disc can be positioned anywhere along the channel, or removed, allowing the user to find the best location for them.
The Hinderer adjustable thumb disc.
The Thumb Disc channel is the same on both sides of the CPM20CV blade.
Looking at the top of the disc you can see the small grub screw used to secure it in place.
The Thumb Disc can be positioned anywhere along the channel, or removed.
This allows the user to find the best location for them.
The channel on each side of the blade forms a T-shaped section that the thumb disc slides onto.
Using the 0.035" Allen key provided, the thumb disc position can be adjusted.
A close look at the thumb disc when taken off the knife.
With the shape of the channel, this is realistically one extreme position the disc can be located.
Moving to the other extreme position.
The XM-Slippy with Thumb Disc removed:
If you need to disable OHO or prefer the look without the thumb disc you have the choice as the thumb disc can be completely removed.
The thumb disc slot also acts like a large nail-nick giving you something to grip to open the blade.
Using the 0.035" Allen key the thumb disc can be completely removed.
If you need to disable OHO or prefer the look without thumb disc you have the choice.
The thumb disc groove also acts like a large nail-nick giving you something to grip to open the blade.
Explained by the Maker:
The reasons for certain design choices may not be clear when simply looking at an object, so this section is intended to give an insight into the thinking behind a design by speaking to the designer themselves.
While at IWA 2018 I had the good fortune to be able to talk to Rick Hinderer about this knife.
Video Edited with – Cyberlink Director Suite 5 (PowerDirector 16 and AudioDirector 7)
Camera – Panasonic HC-V770 Microphone – Tonor TN120308BL
The Blade and Handle Geometry:
Most knife specifications have a basic description of the blade geometry, but in this section I will be taking a more detailed look at geometry and balance.
Using a set of gauges and precision measuring equipment including a Vernier protractor, callipers, fixed radius gauges and the unique Arc Master adjustable radius gauge (the one that looks like a crossbow).
These measurements have been tabulated and are presented along with a few reference blades (8″ Chef’s Knife, 5.5″ Santoku and the popular Fällkniven F1).
Key aspects such as the primary bevel angle, grind type, blade depth, blade thickness, length, weight are detailed, along with balance information.
The ‘Balance relative to the front of the handle’ tells you if the knife will feel front heavy, or if the weight is in your hand (a positive value means the weight is forward of the front of the handle). The ‘Balance relative to the centre of the handle’ indicates how close to a ‘neutral balance’ the knife has in the hand.
In the case of full convex grinds the approximate centre of the grind is used for the primary bevel angle estimate.
The blade is made from CPM20CV steel.
New for 2018! BESS Certified sharpness testing:
The BESS ‘C’ scale of sharpness, developed by Mike Brubacher (Brubacher Edge Sharpness Scale) will now become part of Tactical Reviews’ knife testing process. Initially this will be used to verify the sharpness of the factory edge and allow the knife to be brought to a minimum standard sharpness before testing a blade’s cutting performance.
A chart showing where on the BESS scale a blade is.
The XM-Slippy’s factory edge has an average BESS ‘C’ sharpness of 399. This was a show exhibit knife, so I would not comment on the absolute sharpness after all the handling and trying out it has had. As it was, the edge didn’t appear to have any rolling or damage, and with this edge would slice 80gsm well enough although not the cleanest of cut.
For testing I have taken the edge to a 30 degree inclusive angle and a BESS score of 200, at which point it is shaving arm hair with ease.
What it is like to use?
Colour is a matter of taste, and for me the Orange is perfect. I like to see where I’ve put down important tools, or worst case dropped/lost, but moving beyond the Oranginess…
There is a finesse to the overall finish which starts to sink in the more you use it. The XM-SLippy, has only one sharp edge, exactly where it should be. All the other corners are smoothed so that nothing catches on your hands, gloves or pockets. I cannot stress enough how much this adds to the quality feel as nothing ‘jars’ while you handle or use it. Some knives have an unrelenting crispness to their finish and this can mean that edges are sharp, the corners of liners, blade stop, back-spring etc, all of which can become fatiguing to your hands and pockets – not so with the XM-Slippy.
Many slip-joints use a half-stop position for the blade, and in a two handed opener I don’t object to this, but for a one-handed-opener, I find this a big no-no. The XM-Slippy has no half-stop, so the blade swings out smoothly all the way to snap into the open position without interruption. In my view this is exactly as it should be for a OHO, slip-joint or not. There are some that argue that the half-stop add to the safety in case of accidental closing, so the blade doesn’t close on your fingers. I’d counter that by saying that if your slip-joint is closing on you, you are not using it correctly, and if you have sufficient force to start closing the blade onto your fingers it is quite likely to keep going through a half-stop anyway. Rick has definitely got this right.
A design feature shown in the gallery is the relatively large choil. This is not really a finger choil, though can be used as such carefully, and it is too large for a sharpening choil. Instead its design purpose is so that if the blade is closed onto your fingers, it is the choil that actually hits your finger (see gallery) giving you some protection from injury.
Being based on the XM platform, the look is of course familiar, but it also includes some jimping which might be a little overkill for a slip-joint. The forward thumb grip is useful, but clearly when applying a lot of force with a slip-joint you need to be careful. There is jimping for a reverse grip and I’d say it is wholly unsuitable to use a slip-joint with a reverse grip, so don’t take its presence as a suggestion to use the XM-Slippy like this.
Rick has designed in easy user customisation for the XM-Slippy; starting with the pocket clip, which has two options, tip-up or tip-down. Keeping the refined finish complete, there is a blanking plate to fill in the alternate clip position, and swapping the pocket clip position is nice and easy. Using a standard Phillips screwdriver, simply undo the two screws holding the pocket clip and the two holding the blanking plate. Swap round and replace the screws…but wait, there is the next part. With the pocket clip off the knife, there is only a single screw holding the handle scale on. Take out that last screw and the G10 scale can be lifted off. Its fit is beautifully precise. A nice feature when swapping the handle scales is that with the scale removed, the knife is still fully functional, as the liners are held together with other fixings.
This example is fitted with the Hinderer ‘slicer’ blade which is an excellent general purpose blade shape for an EDC knife.
Is the adjustable thumb disc a gimmick? Maybe, maybe not. Though I can never see the extreme positions you could put the disc being used by anyone, the length of the thumb disc slot looks right for the proportions of the blade. Even small adjustments can make a big difference for your experience of using the knife, so don’t be afraid to move it about and try. I’ve settled on a position that is different to all my other knives with thumb stud /disc. Then of course you can take it off, if you are visiting an area where the law does not permit one-handed-opening. I have found the thumb disc slot does collect a bit of pocket dust, but nothing compared to a pivot or the handles, so not to worry, and anything other than a perfectly plain blade will fail the ‘peanut butter’ test anyway.
The factory/show edge needed attention before I started to really use it, and the CPM20CV proved to be very easy to sharpen and took a razor edge with very little work. My current sharpening method is to use a small belt sander (120 grit with a light touch) with bevel angle guide to reprofile to 15 degrees per side followed by a good stropping with a polishing compound, the edge on this blade simply wanted to be super sharp.
The large choil provides a degree of safety if the blade closes by mistake. It brings the cutting edge away from the finger as shown in the half-open position.
Using the thumb ramp.
You can move slightly further forward to utilise the choil.
Not really suitable use for a slip-joint, but the reverse grip has jimping for the thumb.
Swapping the pocket clip position is nice and easy.
With the blanking plate removed the clip fits in perfectly.
Like this, the handle scale can be removed.
With both the clip and blanking plate removed, there is only a single screw holding the handle scale on.
The handle scale is beautifully precise in its fit.
With the scale removed, the knife is still fully functional.
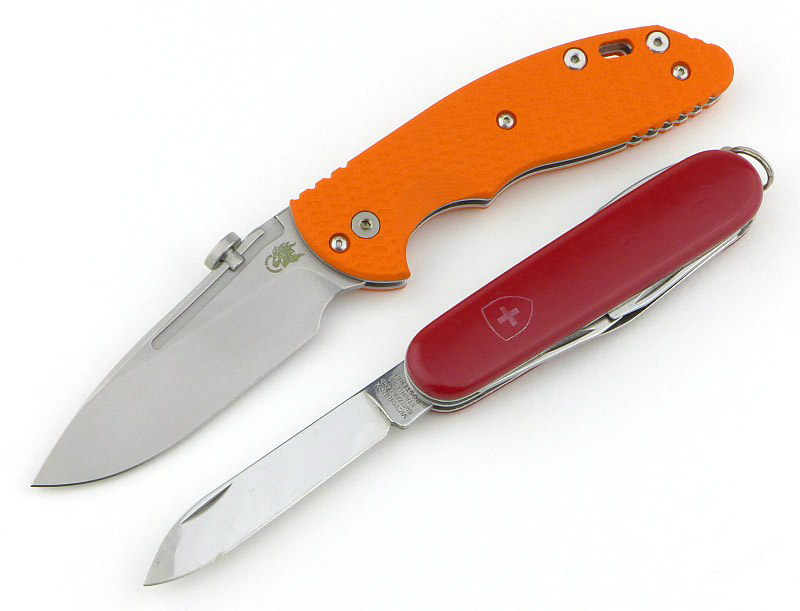
To give an idea of scale, here it is next to a standard Victorinox.
Review Summary
The views expressed in this summary table are from the point of view of the reviewer’s personal use. I am not a member of the armed forces and cannot comment on its use beyond a cutting tool or field/hunting knife.
Something that might be a ‘pro’ for one user can be a ‘con’ for another, so the comments are categorised based on my requirements. You should consider all points and if they could be beneficial to you.
_______________________________________________
_______________________________________________
Things I like
What doesn’t work so well for me
_______________________________________________
_______________________________________________
High quality fit and finish.
Expensive when compared to most slip-joint knives.
Adjustable / removable thumb disc.
Pocket clip a bit tight for my taste.
All edges smoothed making it especially hand and pocket friendly.
CPM20CV steel takes a super sharp edge (with ease – depending on your sharpener).
Pocket clip can be positioned for tip-up or tip-down use.
Simple to replace/change handle scales.
Discussing the Review:
The ideal place to discuss this reviews is on a forum. If you started reading the shorter forum version of the review, but followed the link this full exclusive review, please return to that forum to discuss the review there.
If you read the review entirely on Tactical Reviews, please consider one of the following to join in any discussion.
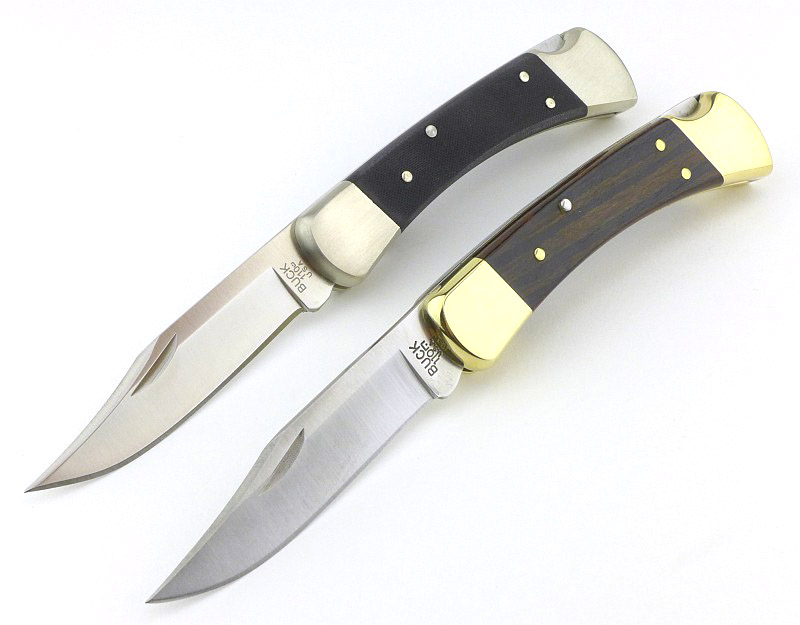
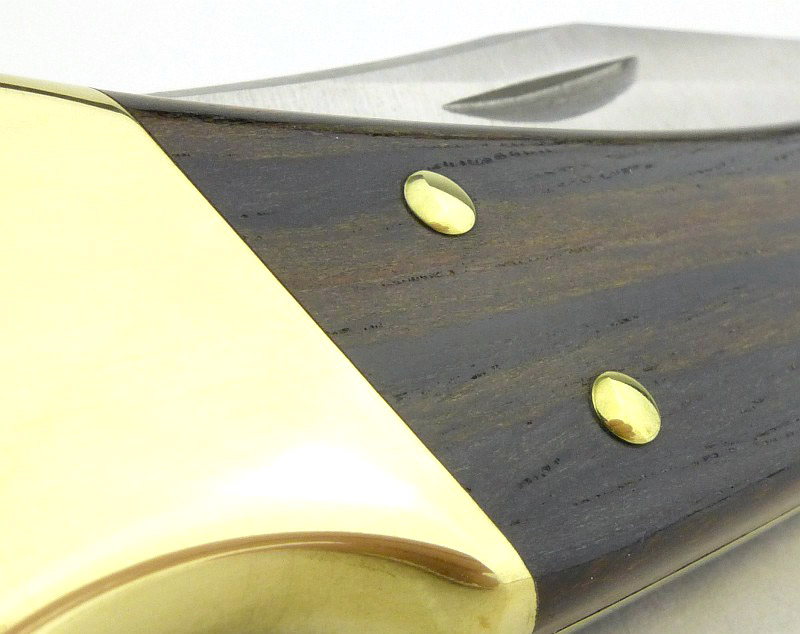
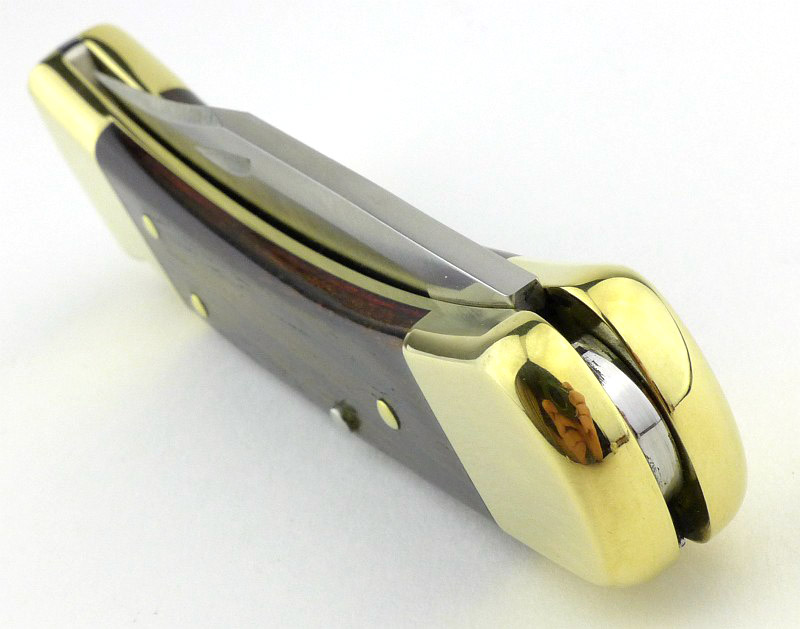
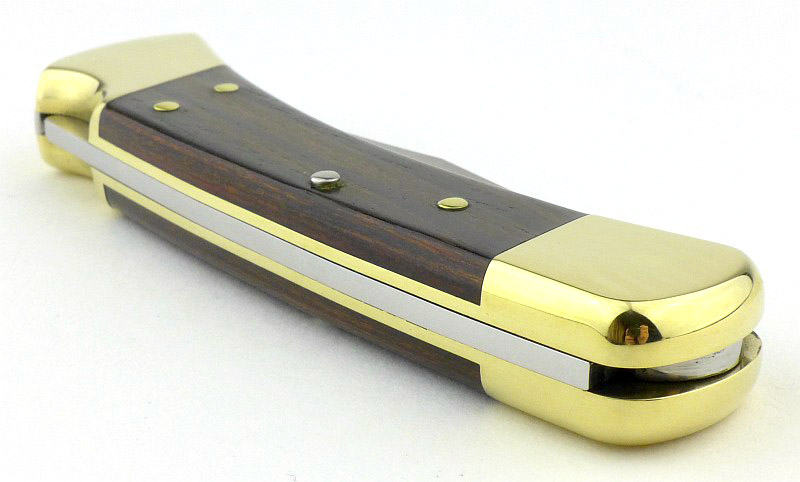
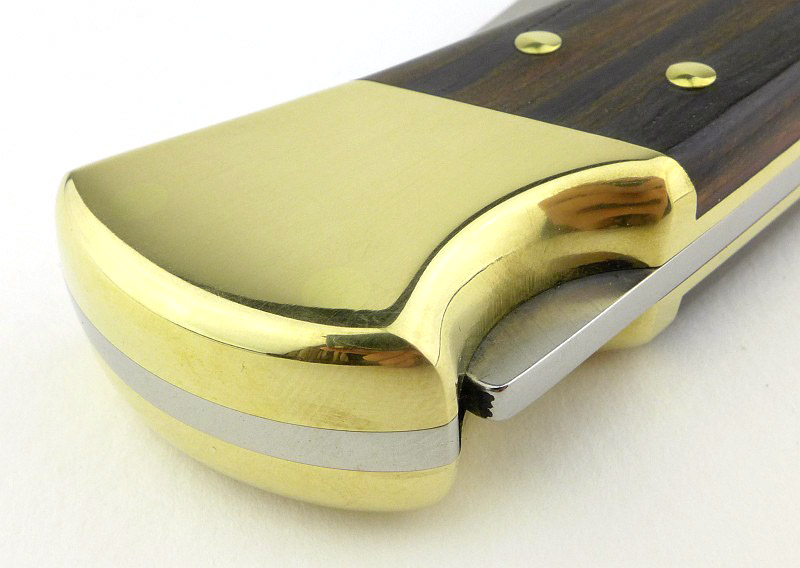
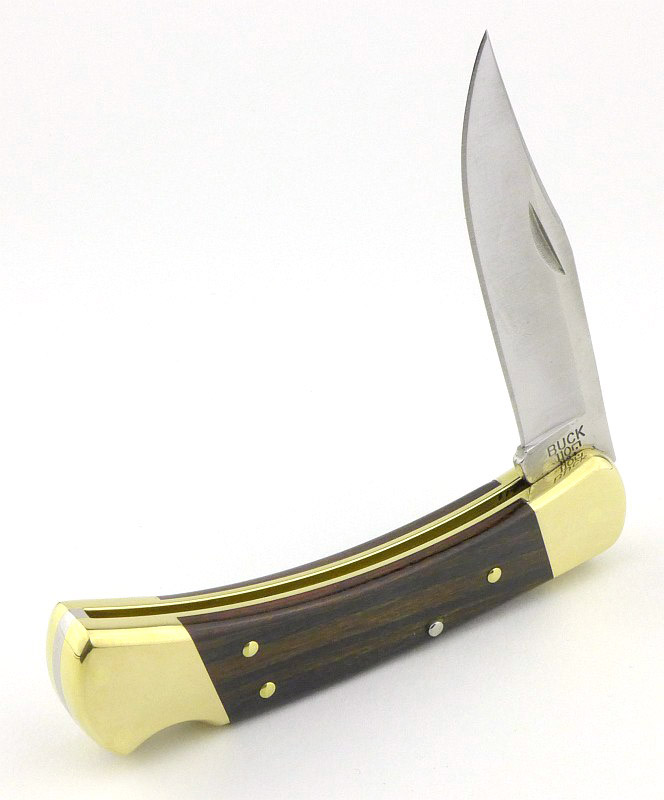
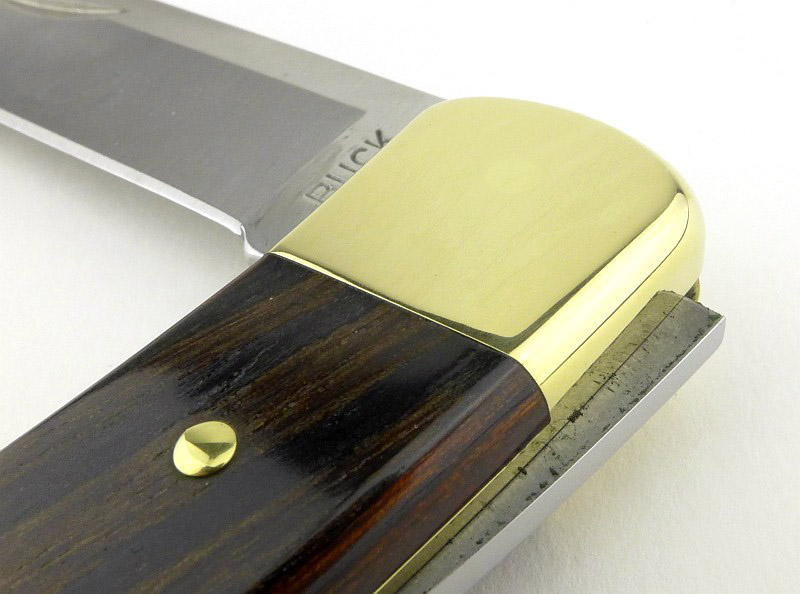
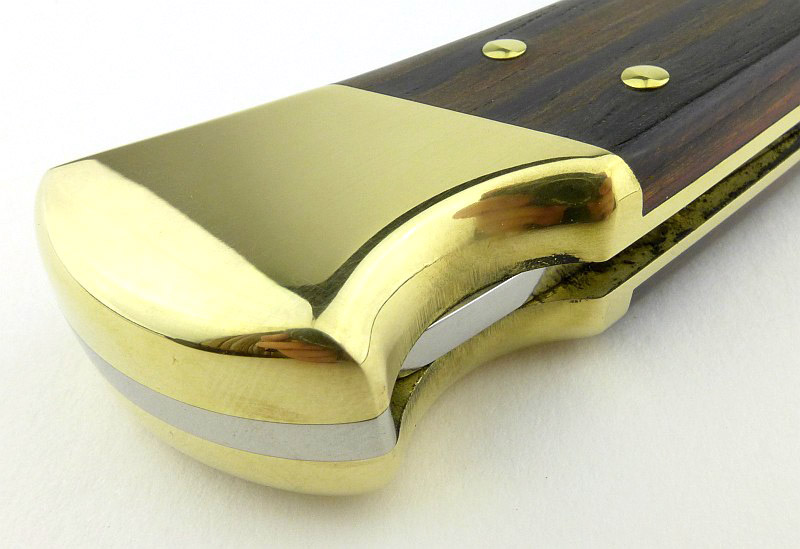
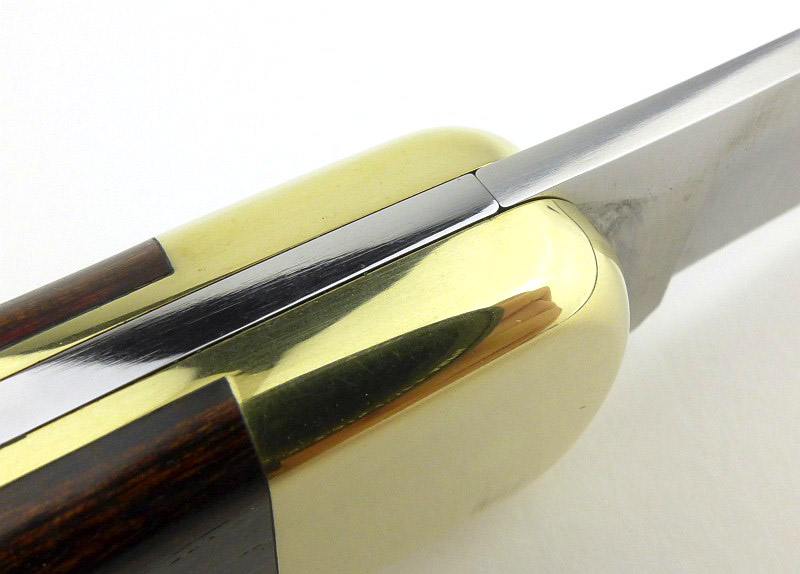
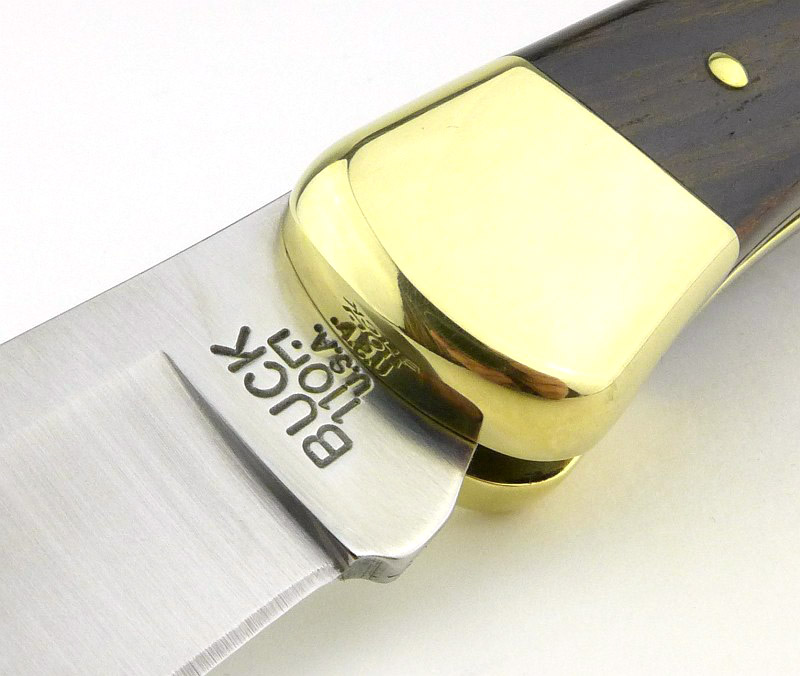
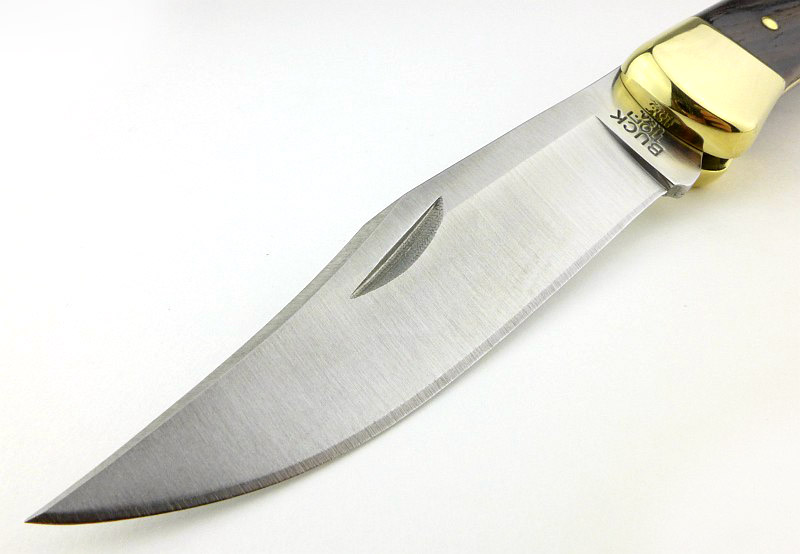
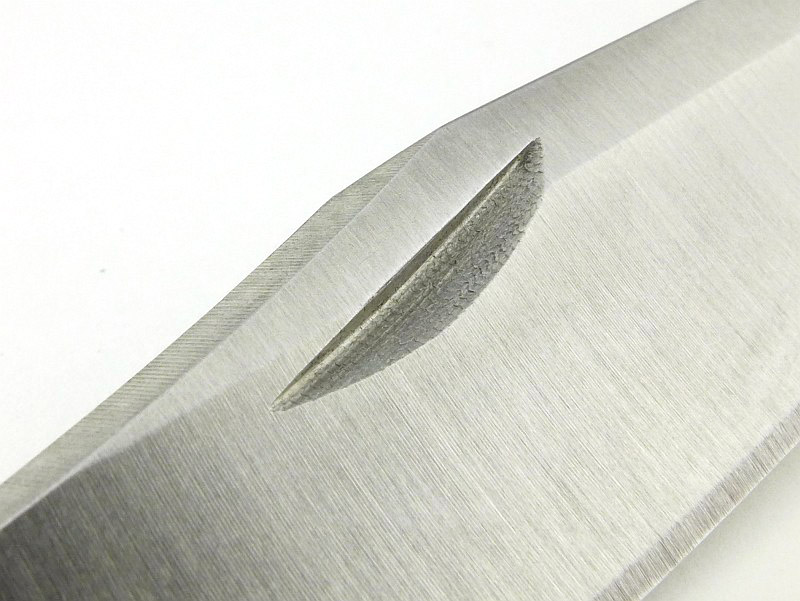
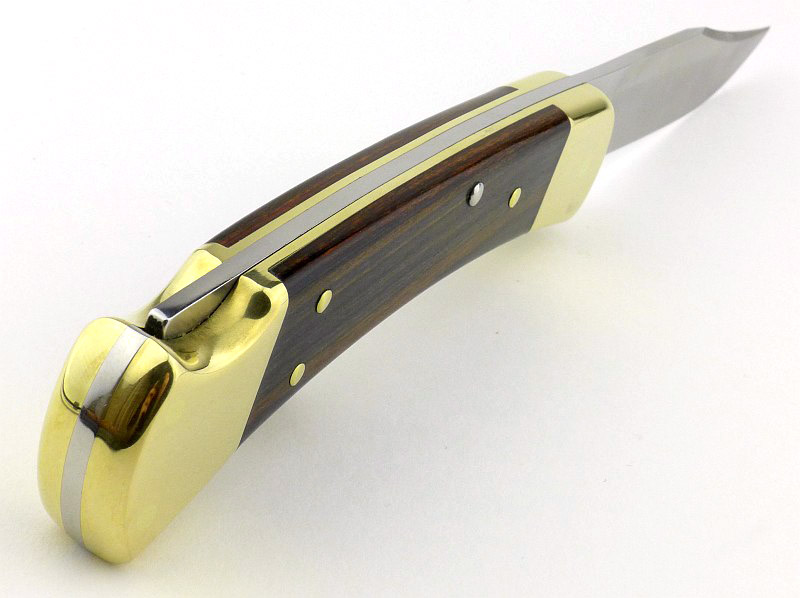
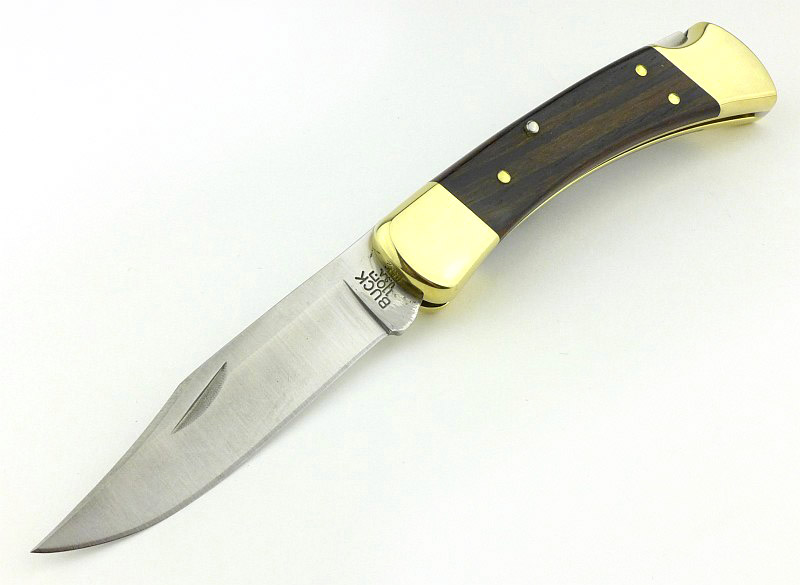
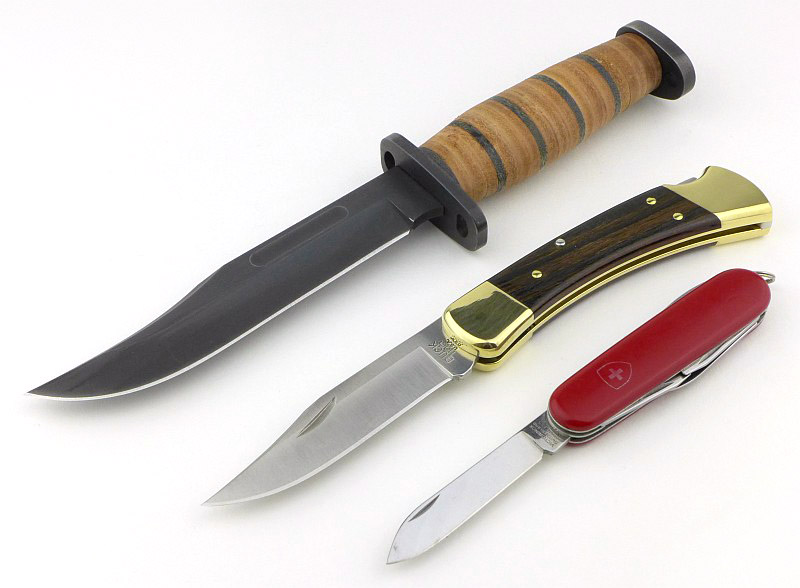
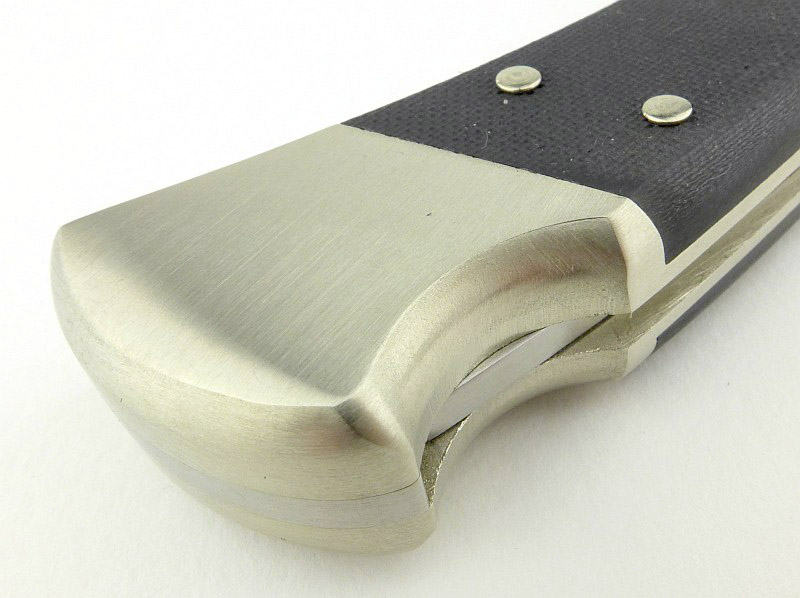
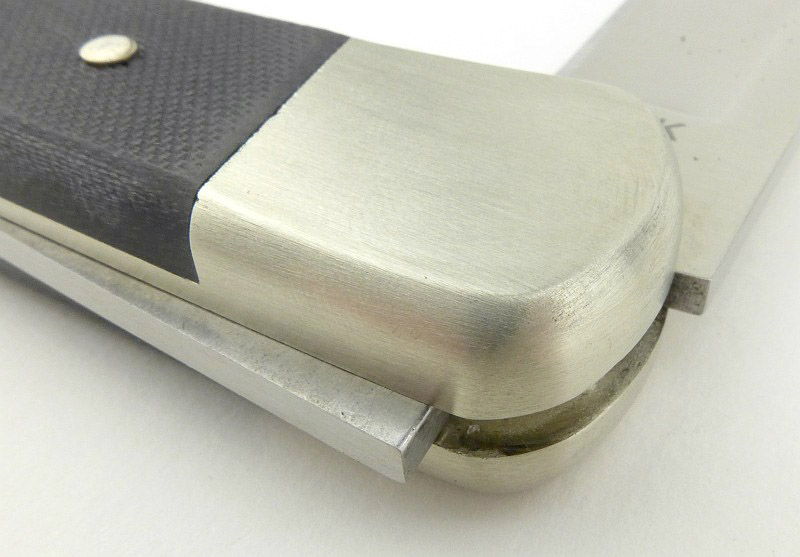
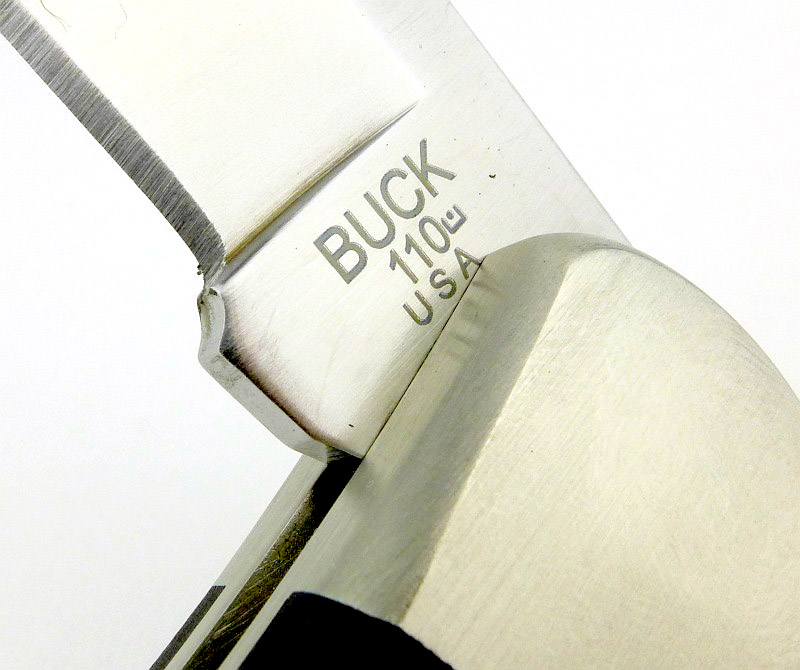
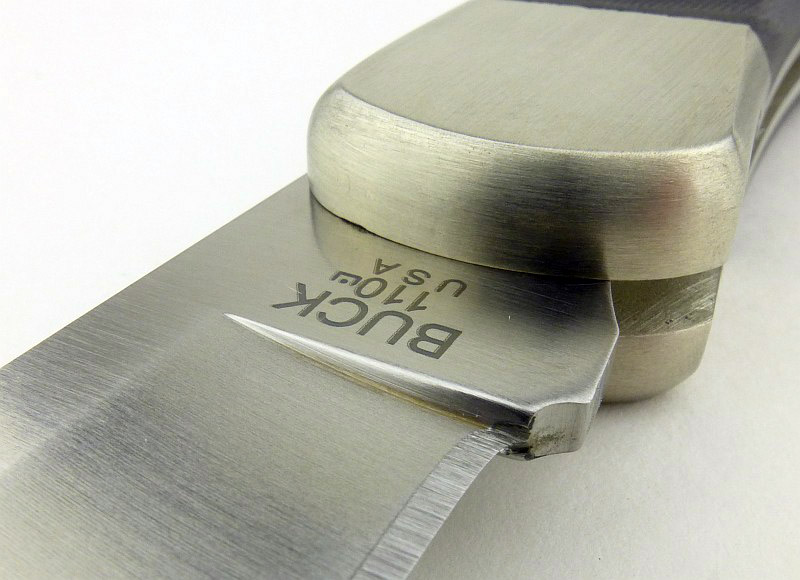
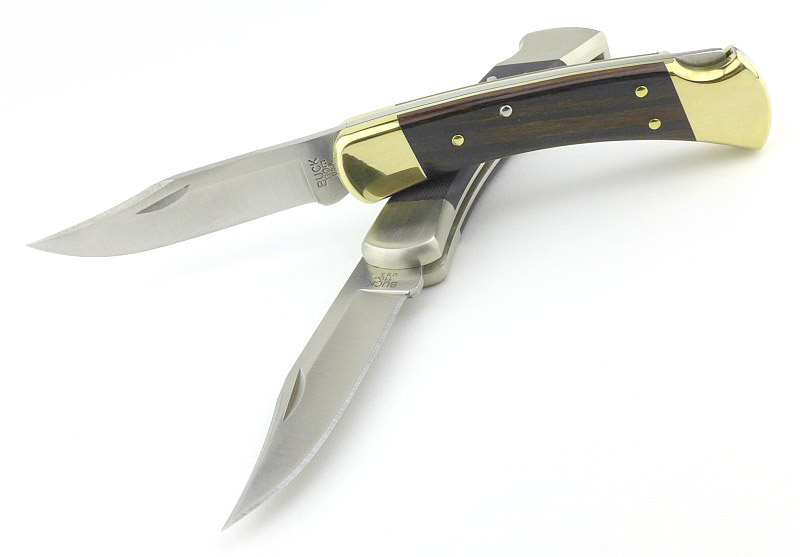
Buck’s 110 Folding Hunter has been a firm favourite since its release in 1963, and is probably the most copied folding knife design in existence. Its traditional mixture of brass and wood (Macassar Ebony Dymondwood), along with the elegant lines and simple lock-back mechanism, has made it a classic with enduring appeal. Now brought up to date in terms of materials with the 110 Folding Hunter Pro using S30V blade steel and Nickel Silver with G10 handle inserts, you can now keep the traditional style but not compromise on blade performance if you need the extra edge retention the S30V will give you.
BESS Certified sharpness testing:
Before we get to the photos, also included in this showcase are the results of the factory edge sharpness testing. These are impressive results; see the gallery for the certificates.
The BESS ‘C’ scale of sharpness, was developed by Mike Brubacher (Brubacher Edge Sharpness Scale).
A chart showing where on the BESS scale a blade is.
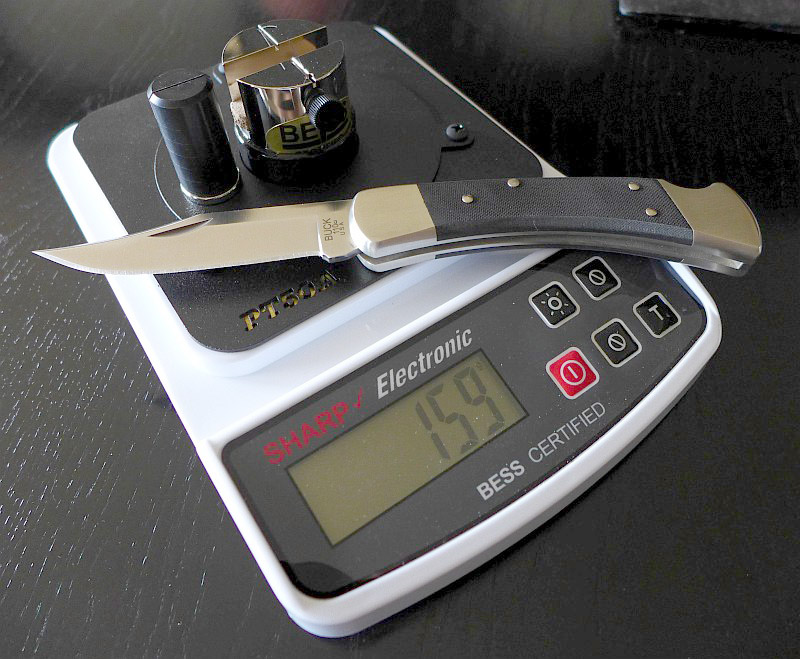
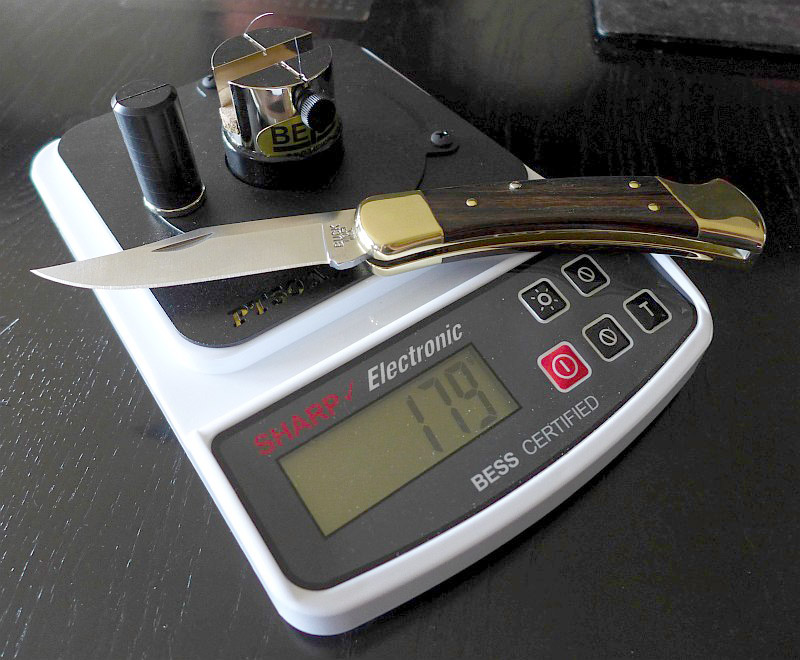
The 110 Folding Hunter’s factory edge has an average BESS ‘C’ sharpness of 206. At this sharpness it easily and cleanly slices 80gsm copier paper, and will shave the hair from your arm. The 110 Folding Hunter Pro’s factory edge has an even more impressive average BESS ‘C’ sharpness of 195.
Gallery:
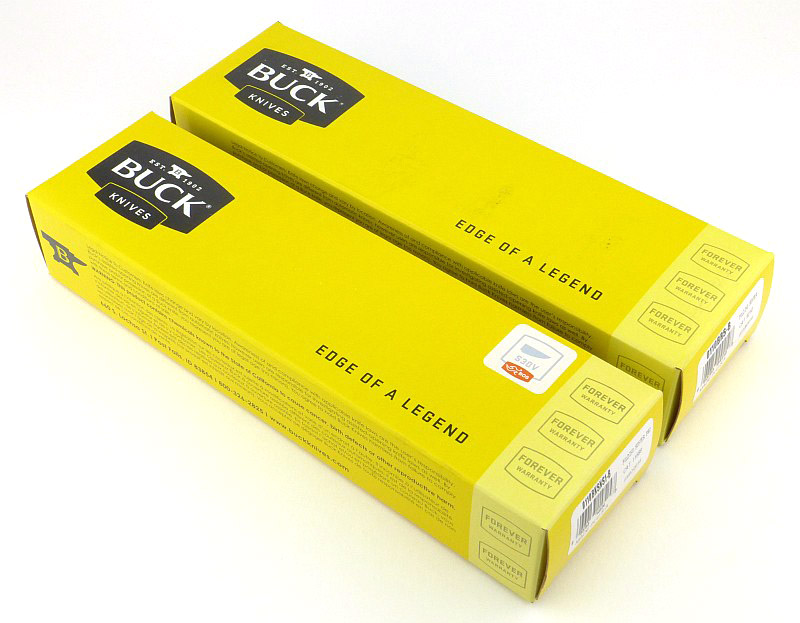
Now for the tour around the two versions of this classic knife design; enjoy! (Click on any image to enter the gallery viewer)
Discussing the Showcase:
The ideal place to freely discuss these reviews is on a forum. If you started reading the shorter forum version of the review, but followed the link this full exclusive review, please return to that forum to discuss the review there.
If you read the review entirely on Tactical Reviews, please consider one of the following to join in any discussion.
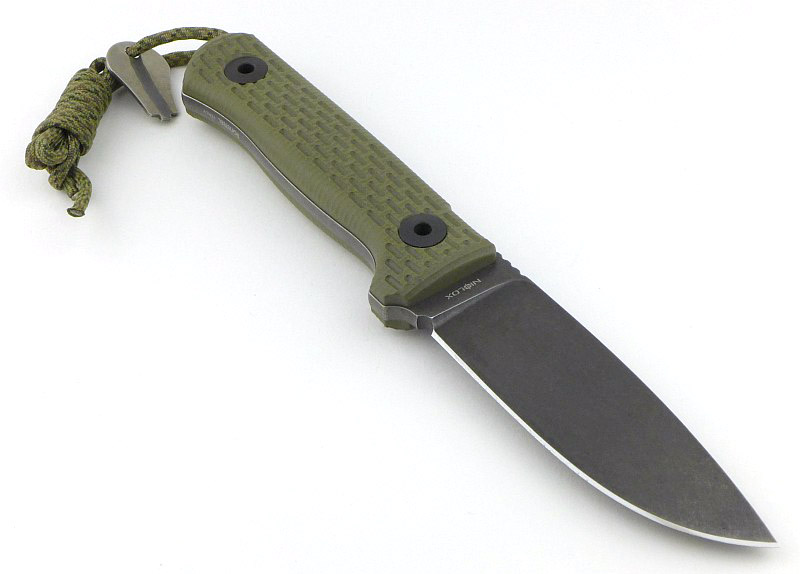
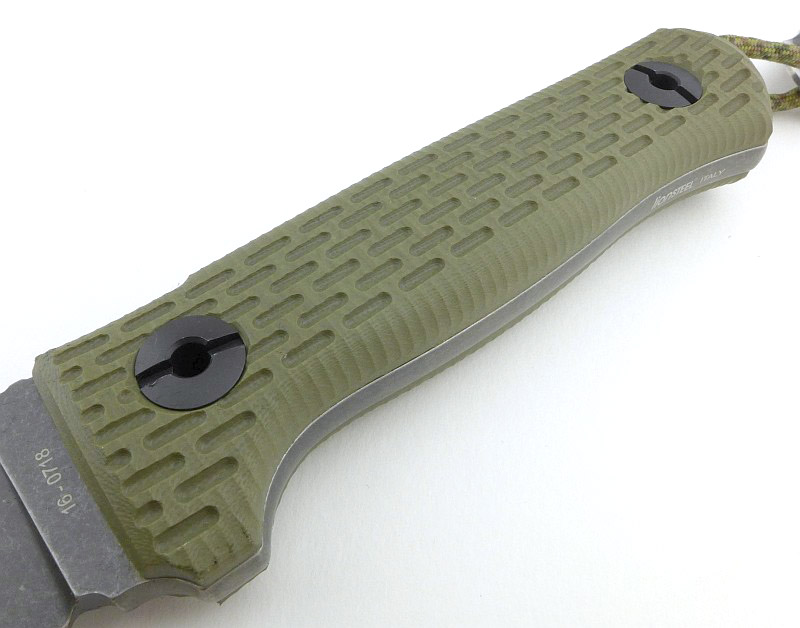
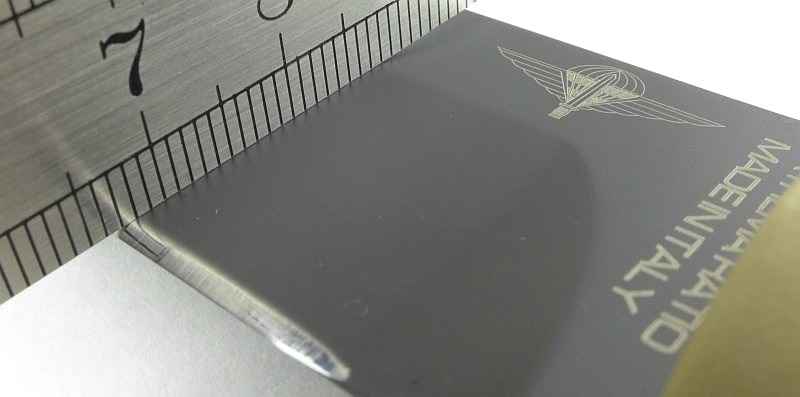
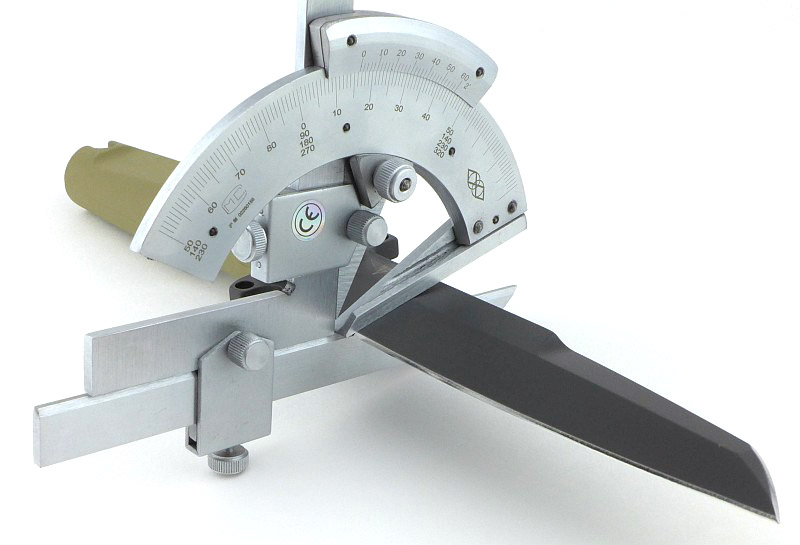
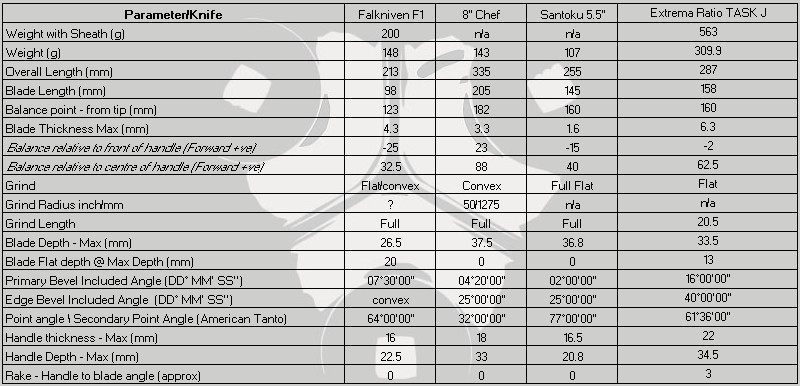
Extrema Ratio’s RAO II is an update of the original RAO which was developed back in 2006. Designed as a super tough, compact, survival and field knife, the brutish RAO was an immediate modern classic. In 2014, with improved ergonomics and a new drop-point blade, the RAO II widens the appeal of the RAO to those that found the original tanto blade a bit too specialised. On a personal note, this is one of those knives I knew had to be in my life, and it has not disappointed.
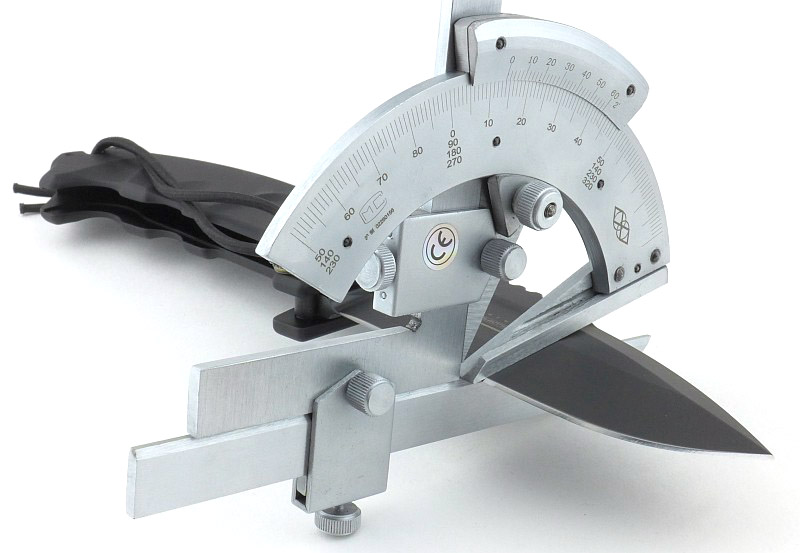
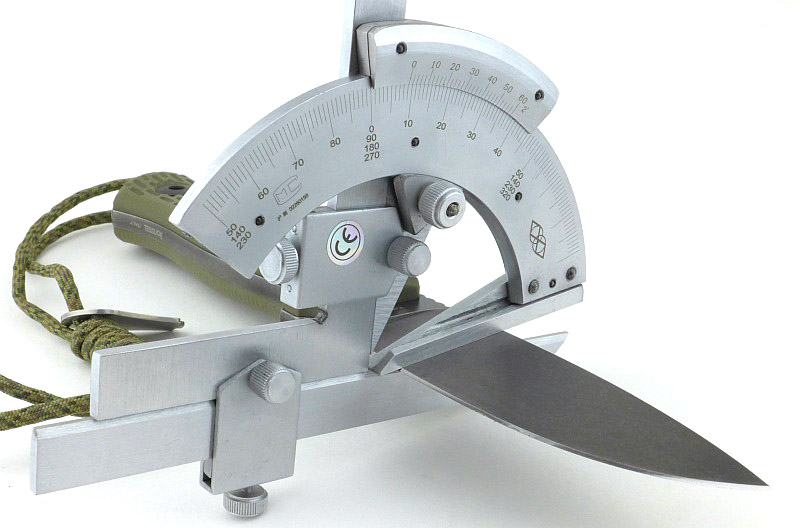
The Blade and Handle Geometry:
Most knife specifications have a basic description of the blade geometry, but in this section I will be taking a more detailed look at geometry and balance.
Using a set of gauges and precision measuring equipment including a Vernier protractor, callipers, fixed radius gauges and the unique Arc Master adjustable radius gauge (the one that looks like a crossbow).
These measurements have been tabulated and are presented along with a few reference blades (8″ Chef’s Knife, 5.5″ Santoku and the popular Fällkniven F1).
Key aspects such as the primary bevel angle, grind type, blade depth, blade thickness, length, weight are detailed, along with balance information.
The ‘Balance relative to the front of the handle’ tells you if the knife will feel front heavy, or if the weight is in your hand (a positive value means the weight is forward of the front of the handle). The ‘Balance relative to the centre of the handle’ indicates how close to a ‘neutral balance’ the knife has in the hand.
In the case of full convex grinds the approximate centre of the grind is used for the primary bevel angle estimate.
The blade is made from Böhler N690Co steel.
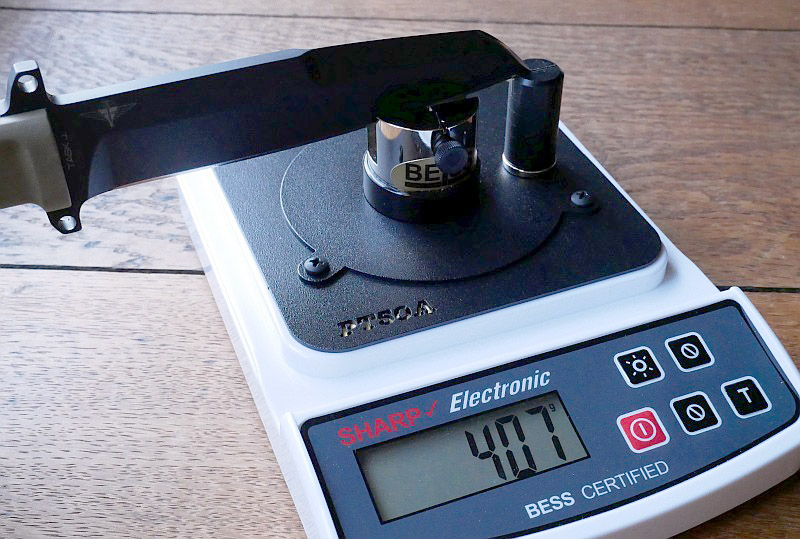
New for 2018! BESS Certified sharpness testing:
The BESS ‘C’ scale of sharpness, developed by Mike Brubacher (Brubacher Edge Sharpness Scale) will now become part of Tactical Reviews’ knife testing process. Initially this will be used to verify the sharpness of the factory edge and allow the knife to be brought to a minimum standard sharpness before testing a blade’s cutting performance.
A chart showing where on the BESS scale a blade is.
The RAO II’s factory edge has an average BESS ‘C’ sharpness of 279. A score below 300 for a factory edge is good and it will slice 80gsm paper nicely and slices into the rounded edge of a doubled over sheet of the same 80gsm paper. Unfortunately a small nick in the original edge catches in some cuts causing some tearing. It is quite common for factory edges to have some flaws, and these can easily be sharpened out, so this is just an observation.
Explained by the Maker:
The reasons for certain design choices may not be clear when simply looking at an object, so this section is intended to give an insight into the thinking behind a design by speaking to the designer themselves.
Unfortunately I can’t always get time with the designer so will use this section to include relevant information about the knife and its designer.
From Extrema Ratio’s product information:
“In June 2006, the “185° Rgt. Ricognizione e Acquisizione Obiettivi” (Target Acquisition Regiment) airborne “FOLGORE” (185° RAO) entrusted to Extrema Ratio the development of a unique knife fitting the unit’s specific operational duties. This resulted in the RAO: not an oversized folder as much as a compact survival & field knife, with a heavy and dependable blade. Its very reliable locking system, assisted by an extra safety device, effectively turns this folder into a fixed blade knife. The opening and closing is to be performed with both hands in order to minimize the risk of self-inflicted injuries, as the blade, because of its weight, is a veritable guillotine. The extra safe device is a steel pin to be hand-screwed through two holes by the guard section of the massive Anticorodal aluminum handle – its presence between blade and hand also acting as a great psychological boon. The sheath is an essential part of this weapon system: it holds a diamond-plate sharpener and enables user to carry the knife either in open position, held in place by a cord and two clips, or closed, inside the front pocket. The sheath can be attached to tactical vests or common belts, being MOLLE system-compliant.
RAO II is the new version of the celebrated Extrema Ratio RAO knife; it comes with a new drop-point blade and an improved handle, rounded at the upper corners for a more ergonomic grip. The extra safety lock effectively turns it into a fixed blade knife enabling great chopping performance with no risk of injury. The sheath can hold the knife in open position for frequent use, or in closed position inside the front pocket. It comes with a diamond-plate sharpener to always keep a perfect edge. ”
A few more details:
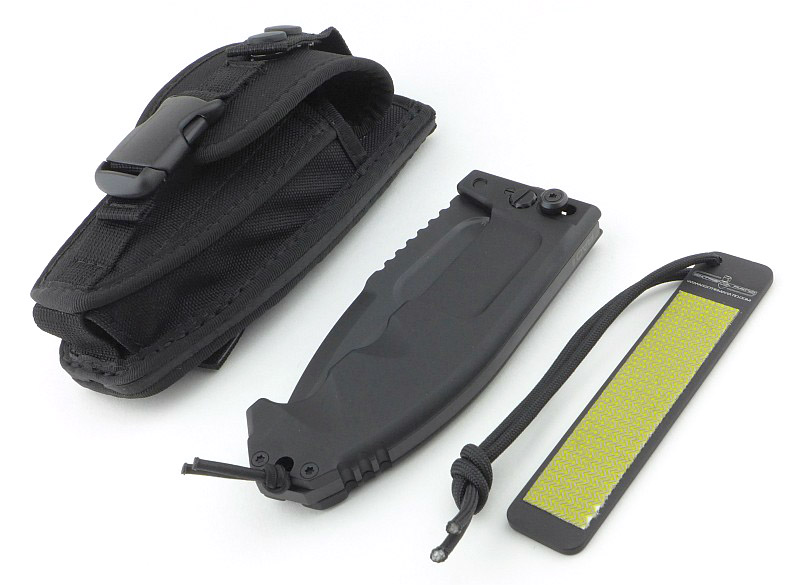
Extrema Ratio’s knives are always well presented; the RAO II comes in a quality cardboard box.
Sliding the lid off, shows the RAO II (in a plastic bag) fills the box.
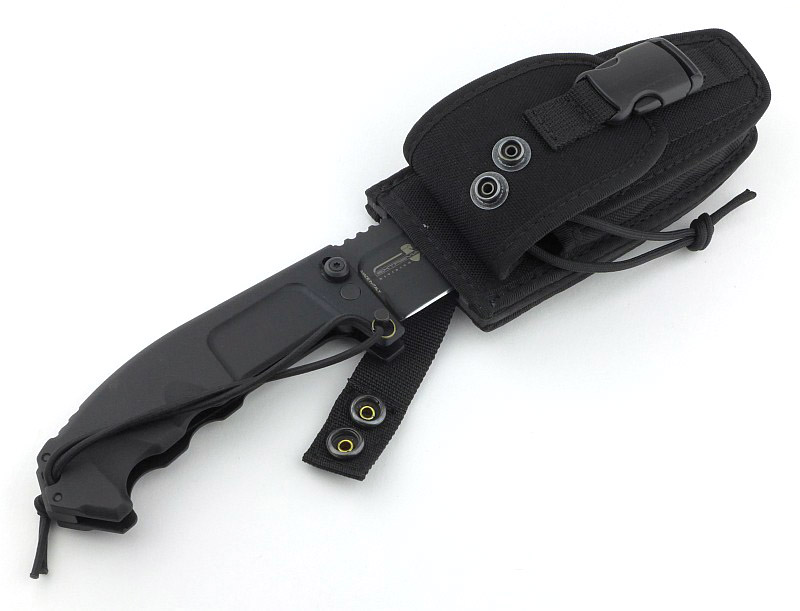
The RAO II arrives in its dual purpose sheath. We need to have a closer look at this sheath before we move onto that amazing knife.
On the back are the MOLLE fitting straps. As supplied they are not woven into the webbing but just held with the press studs.
As with most MOLLE mounts, the fit is pretty tight.
If just using the webbing next to the press studs, the MOLLE straps form a belt loop, which is how I’ll be using this for the most part during testing.
This dual purpose sheath has a large front pocket with plastic buckle fastener holding down the flap.
The flap has another strap attached to it with two press studs. This is the retaining strap for when the sheath is used to carry to opened RAO II.
Releasing the strap from the two press studs and now you can see where the blade of the opened knife is inserted.
Flipping open the flap covering the front pocket and you find the diamond sharpener slipped into a small pocket in front of the main compartment.
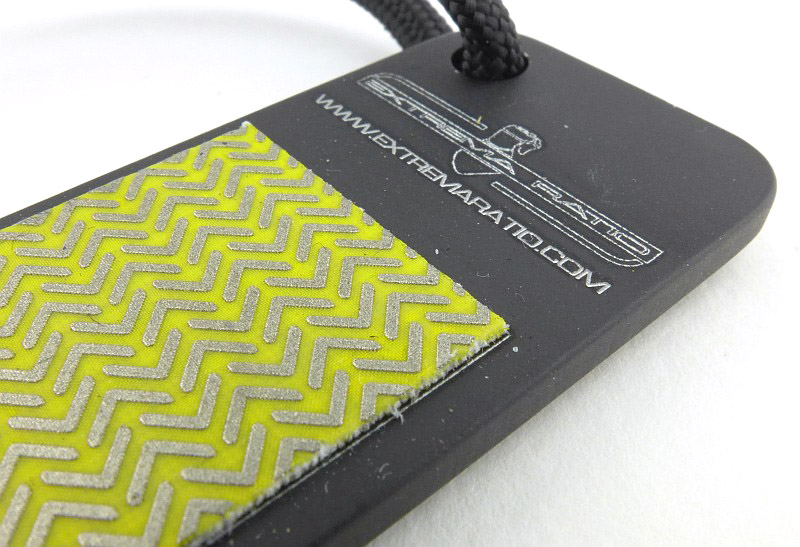
This sharpener is a steel plate with a diamond pad on it.
The diamond pad appears to be a special fabric adhesive tape with a diamond abrasive.
There are the three major components, the sheath, the knife, and the sharpener.
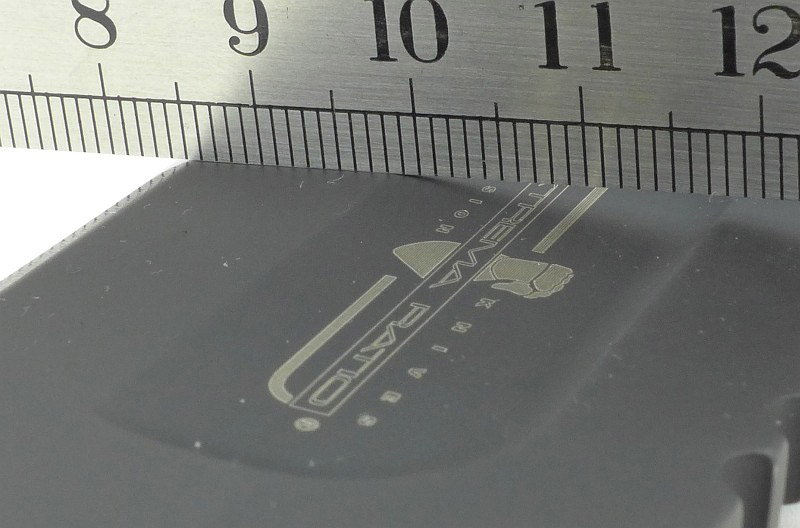
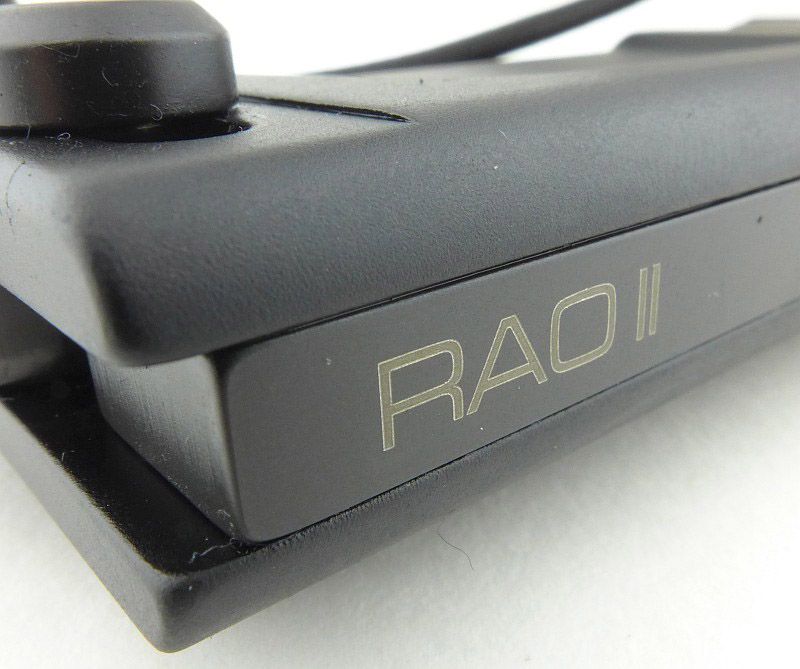
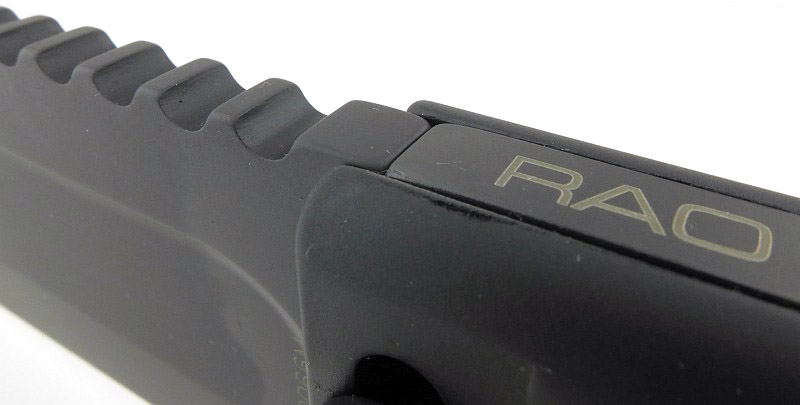
‘RAO II’ is engraved on the back-spacer.
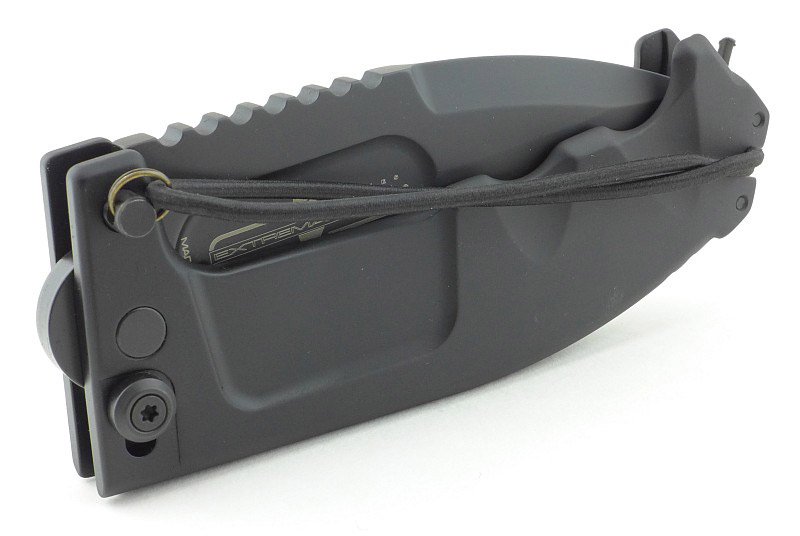
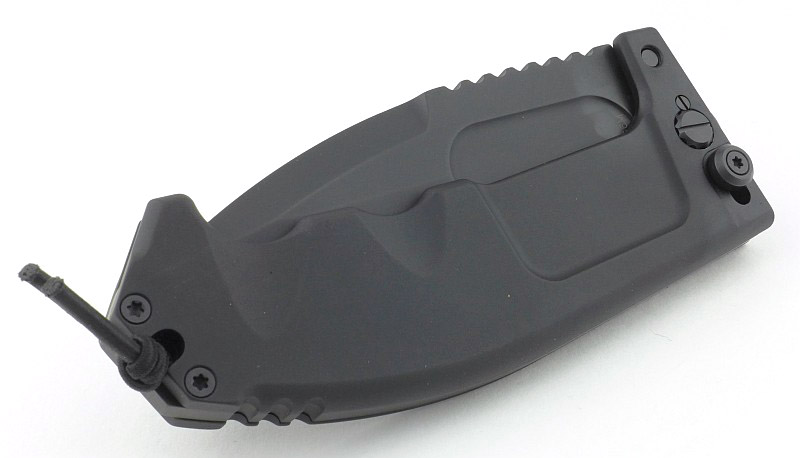
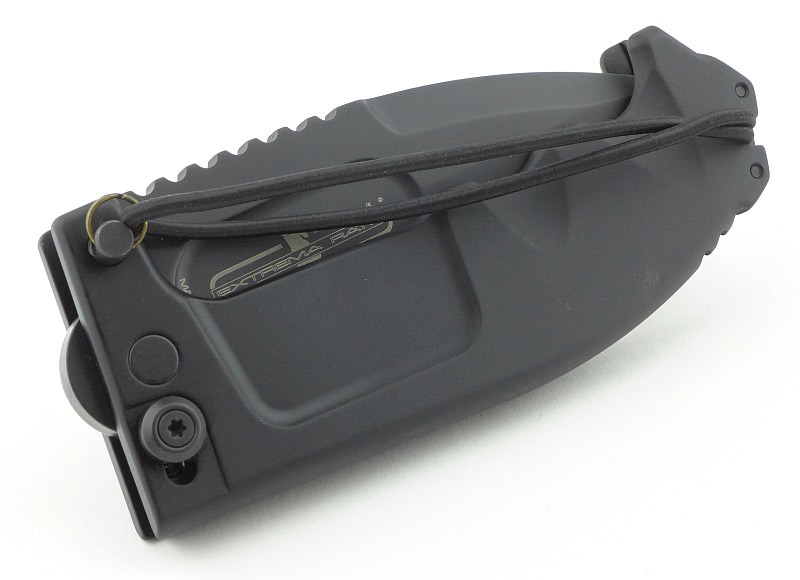
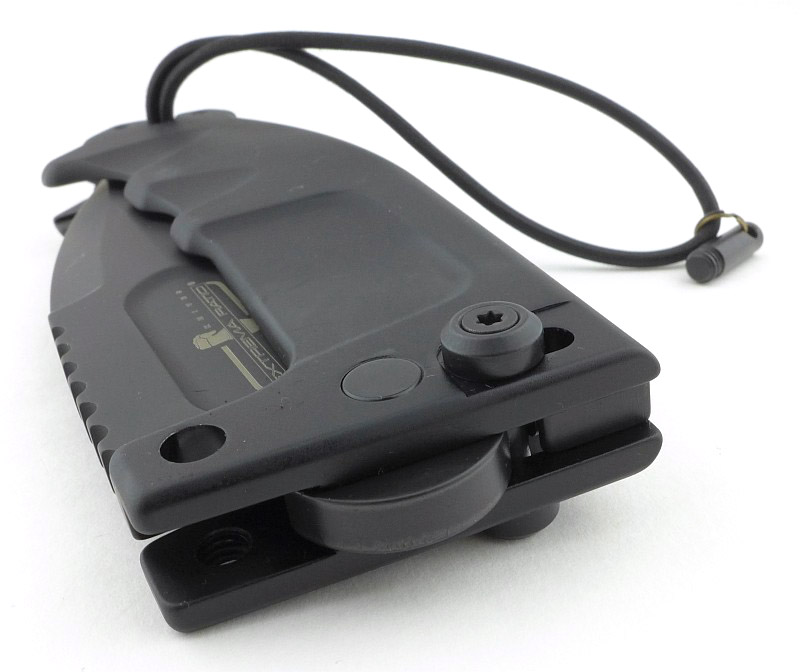
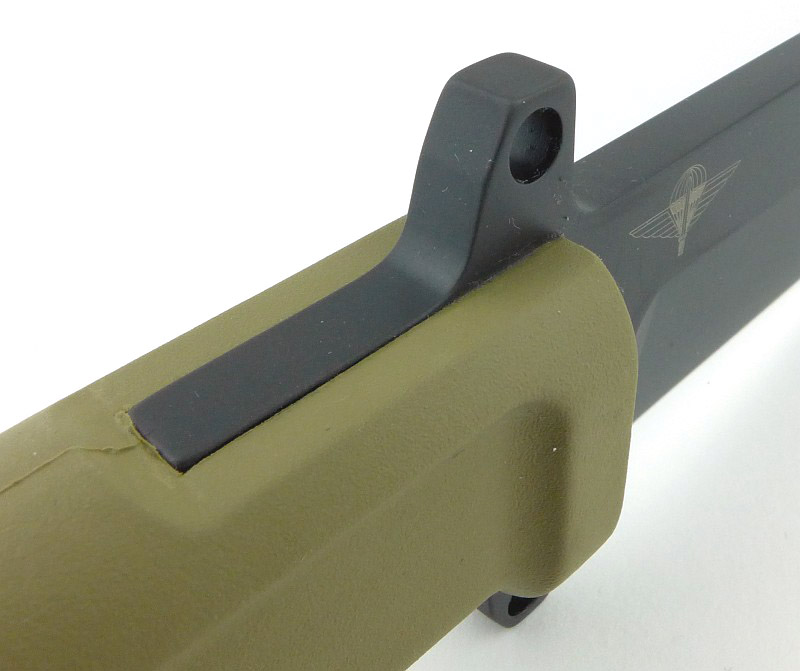
There is no mistaking the presence of this knife. Even when folded it is a beast.
Out of the box, the RAO II is actually locked shut. We’ll look at the special locking/safety pin next.
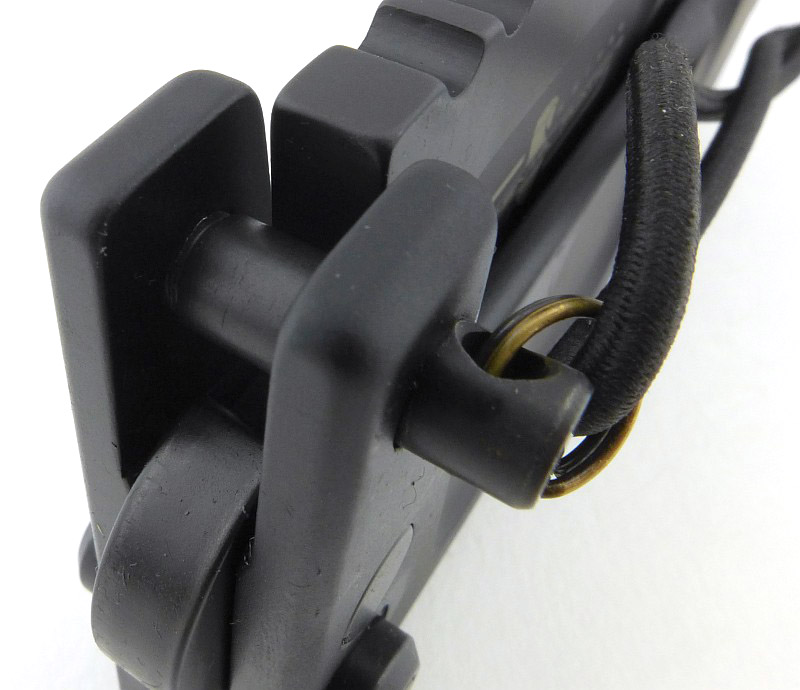
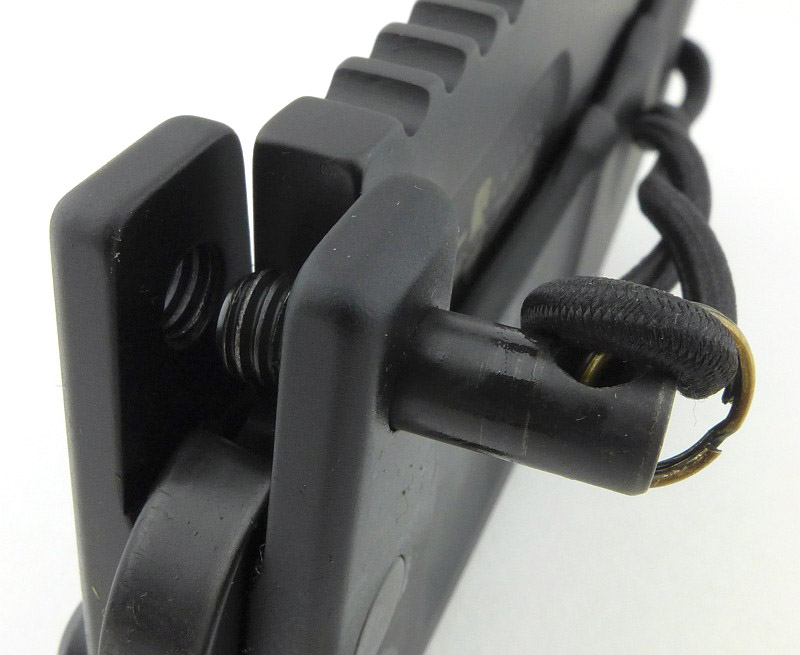
So, one of the RAO II’s special features is its safety locking pin which effectively makes it into a fixed blade knife. This fits through the finger guard and can be fitted with the blade open or folded.
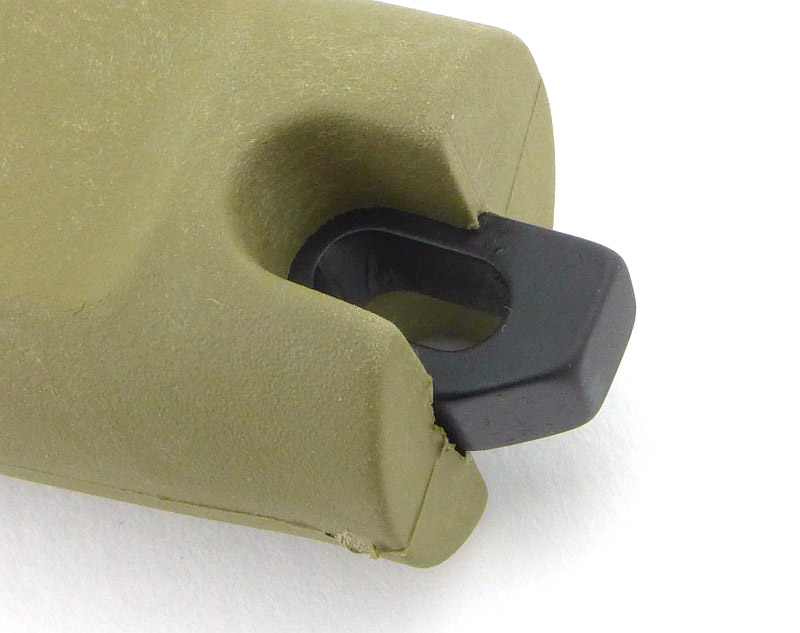
One end of the pin is threaded, so it screws into place.
The pin is on a loop of elastic, so once removed it cannot be dropped or lost (unless the elastic cord is cut).
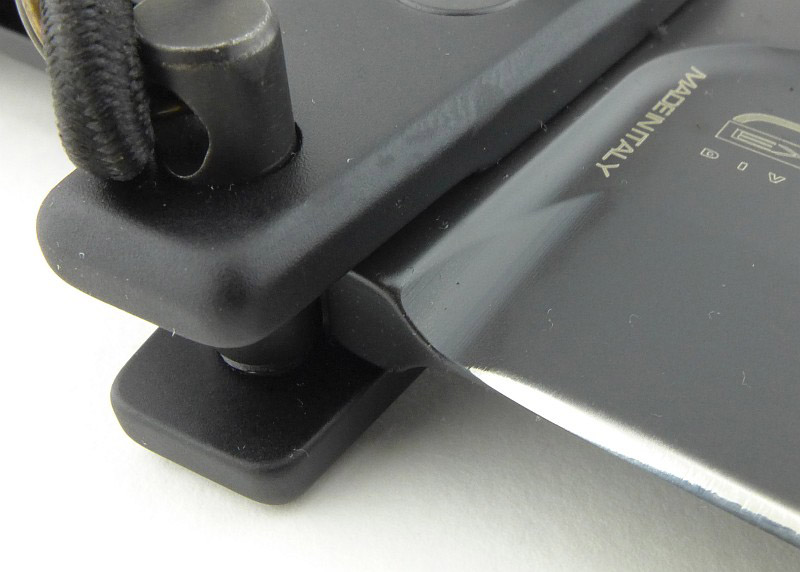
With the safety pin out of the way, the blade can pass between the two parts of the finger guard.
A sliding bolt-lock is used, and this also acts as the back-spring that keeps the blade in the folded position.
Now the blade is opened, we can put the safety pin back in place to secure the blade in the open position. There is no getting past that pin.
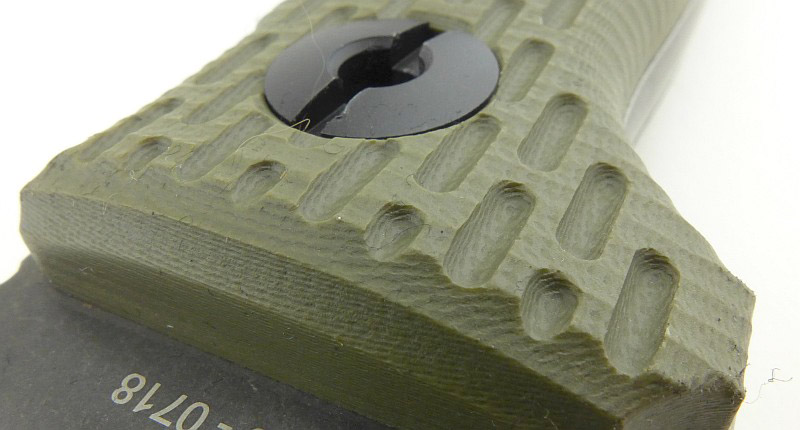
Pivot tension is set using a single sided pivot bolt (the other side is a blank plate). The pivot bolt head has a notched edge which allows it to be securely locked in place using the small screw that fits into one of the twelve notches. With the pivot locking screw in place, the pivot bolt cannot turn at all. You can beat on this knife as hard as you like and that pivot bolt won’t come loose.
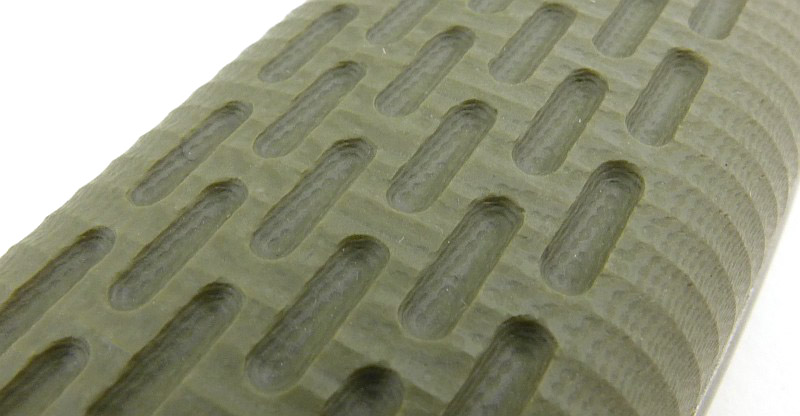
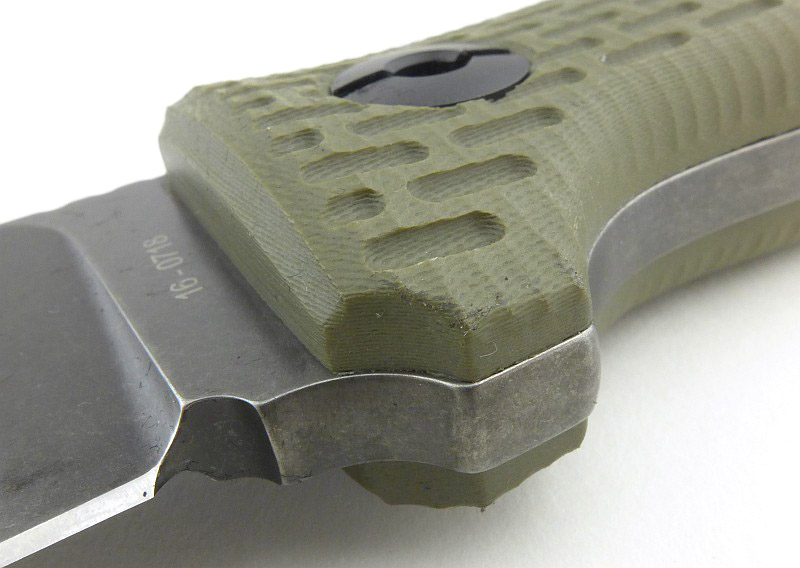
The improved ergonomics are obvious with well rounded edges all round the handle. Extrema Ratio’s handle style is recognisable with the first two fingers grip. The RAO II also includes a third and fourth finger grip.
There is jimping at the base of the handle for the thumb, when using a reverse grip.
The H is tight and precise, fit and finish is excellent all over.
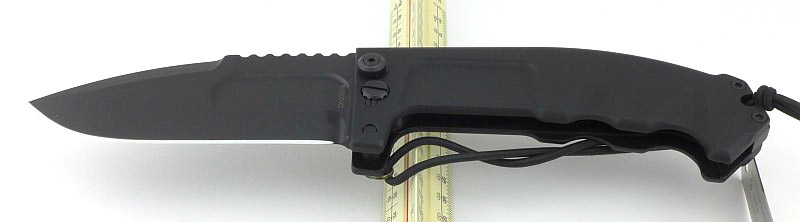
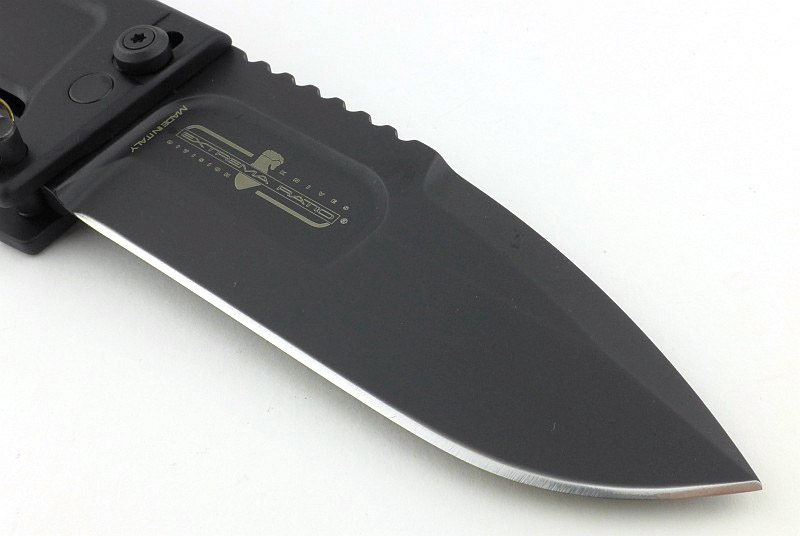
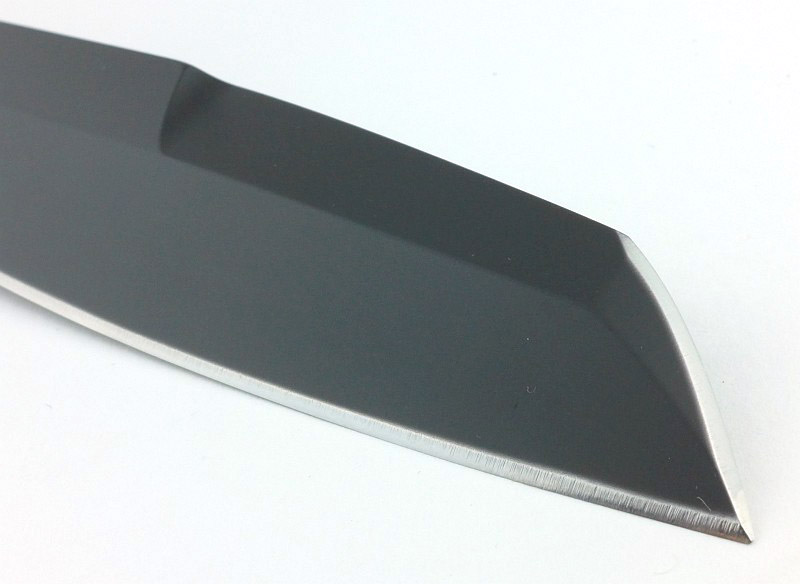
And now onto that purposeful blade. A drop-point with bayonet grind, the RAO II’s blade is very deep. The area where the logo is printed is thinned slightly from the full thickness to provide a grip for opening the blade with.
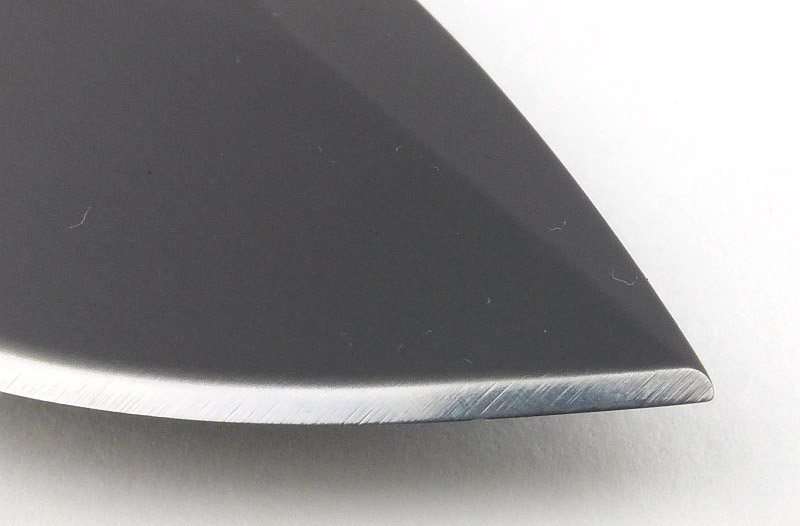
A close look at the blade tip and edge bevel.
The plunge line is well rounded to maximise strength. The slight double-plunge effect here is caused by the primary bevel meeting the blade opening grip and its different radiusing.
With the blade halfway open, you can get a clear view of the locking notch in the tang. The bolt lock drops into this notch when the blade is fully open.
So we’ve taken the folded knife out of the sheath front pocket, opened it and fitted the safety lock pin. Instead of taking the pin out again to fold it, we can simply fit it into the sheath to carry it like a fixed blade. Note one of the press studs is uncovered as the retaining strap now only reaches the top press stud.
A view from the back with the opened knife sheathed.
The retaining strap sits over the deep finger guard, giving it a very secure hold.
What it is like to use?
If you ignore the pivot bolt and bolt lock button, the impression of this knife is not of a folder, but of a chunky fixed utility knife. In a bare hand (I take XL gloves) the finger grips are not quite in the right place. With gloves on they are a better match, but are definitely a better fit for large gloved hands.
It’s big, but somehow seems perfectly reasonable once you pick it up. However, that handle is a significant size and the blade very deep, just look at the next photo.
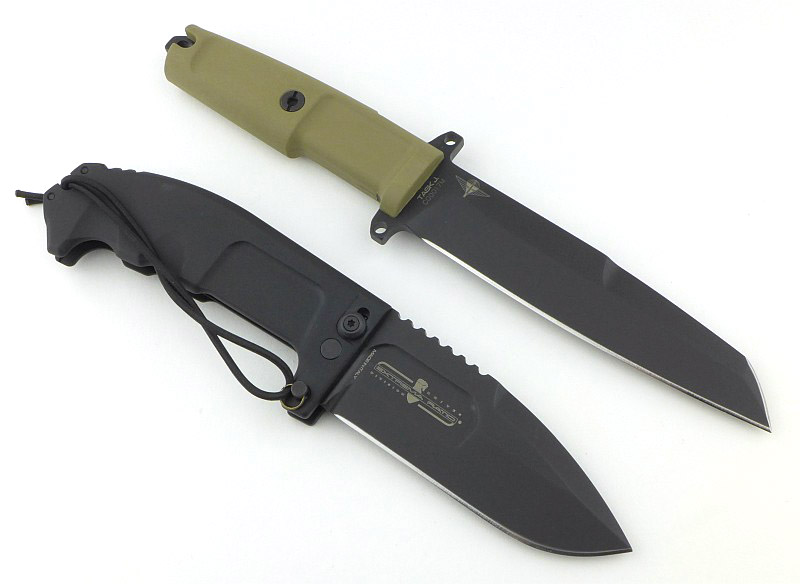
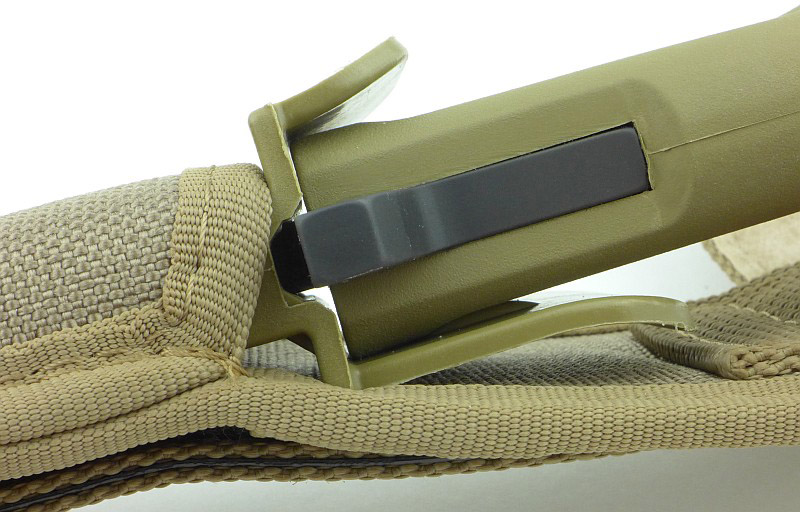
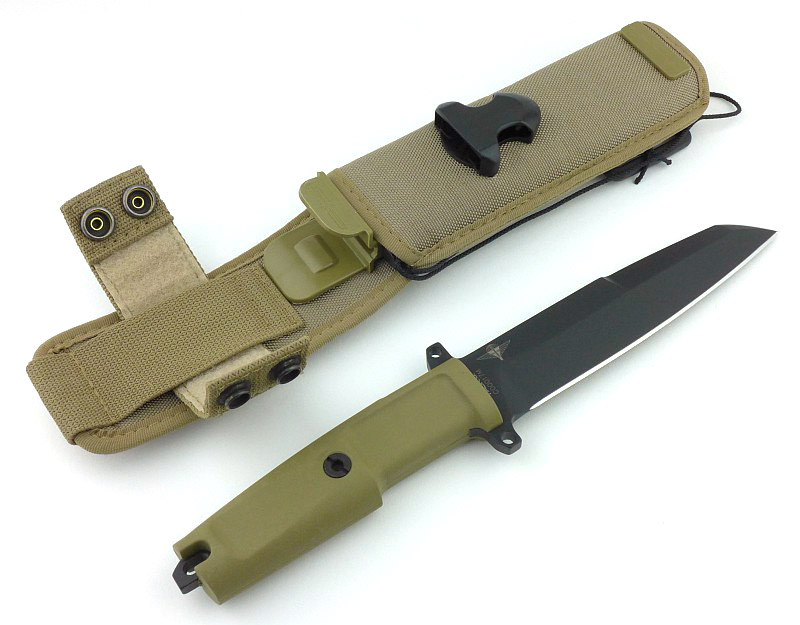
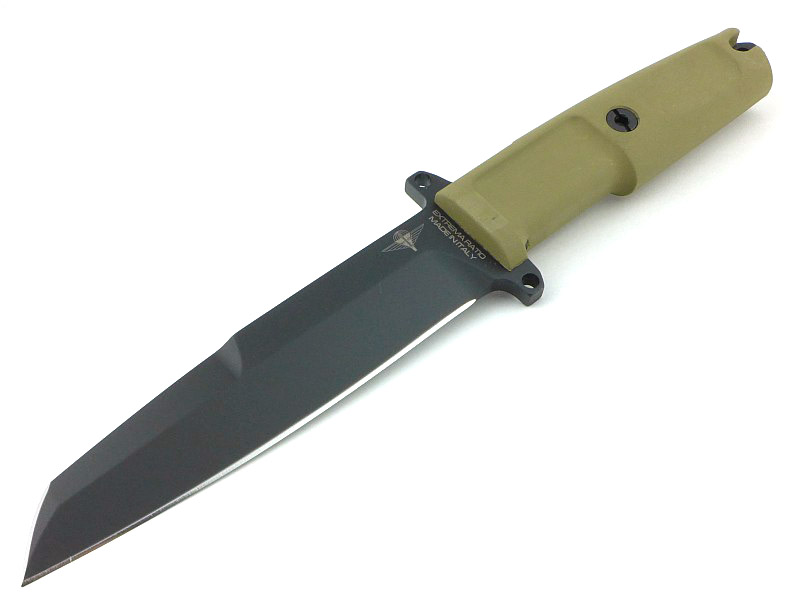
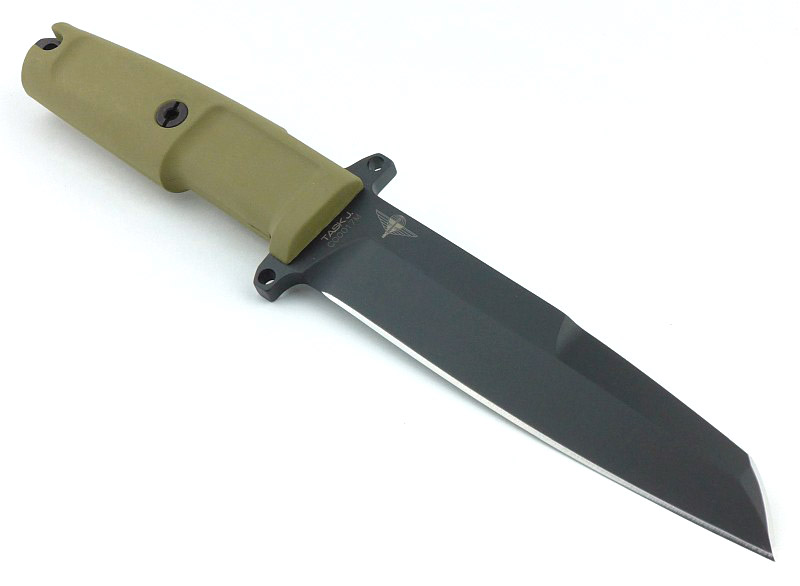
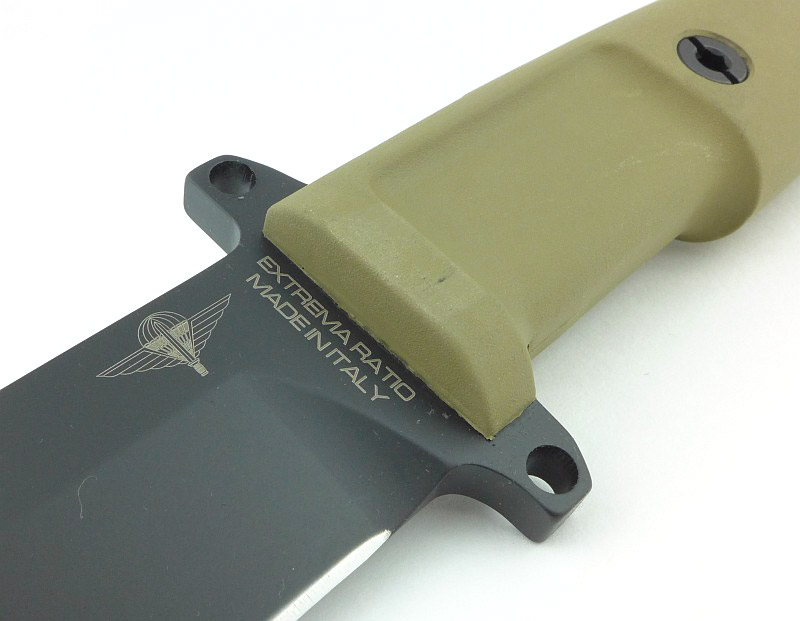
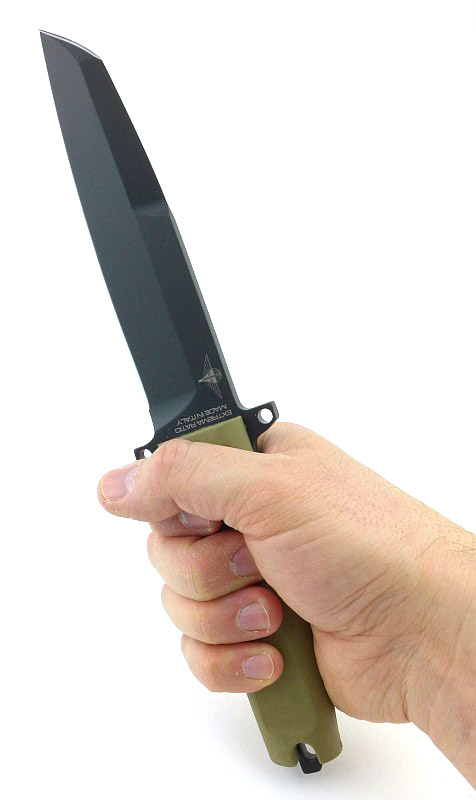
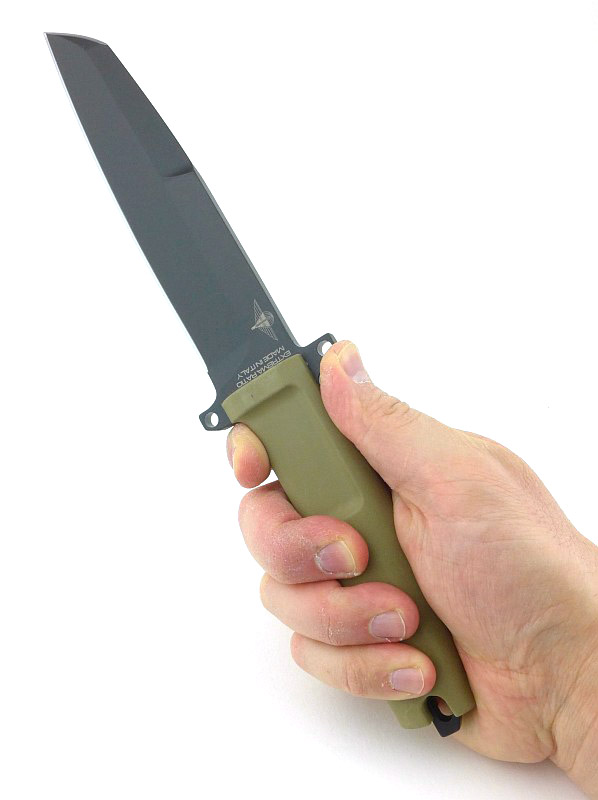
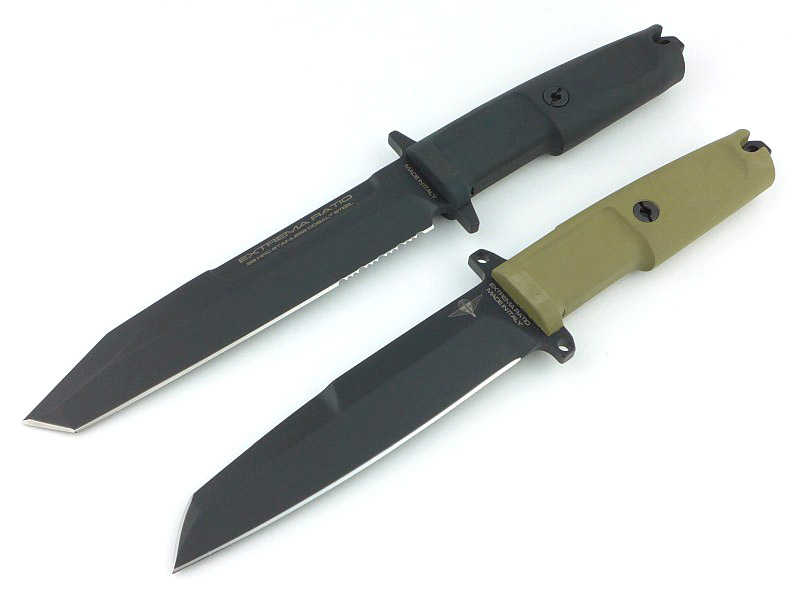
Putting the RAO II next to a full size fixed blade (using the Extrema Ratio TASK J in this case), its blade is not as long, but it is larger in every other way – and this is a folder!
Extrema Ratio have proven time and again that they put real effort into all the details, including the sheaths. Their sheaths are strong, great quality, and highly functional. For the RAO II, this is taken even further, as the dual function sheath is a carry pouch for the folded knife (plus sharpener) as well as a sheath for the RAO II as a fixed blade.
Due to the dual design, the RAO II does carry high on the belt if used as a fixed blade sheath. This is because there is no hanger for the belt loop which would normally drop the carry height (like it does on most fixed blade sheaths).
The included sharpener, I’d class as one of those emergency options which is great because you have it with you, but not for regular use. I’m glad it is included, but won’t be rushing to use it.
This is a short video taking a look over the RAO II and a technique to make the refitting of the safety lock pin easier.
Video Edited with – Cyberlink Director Suite 5 (PowerDirector 16 and AudioDirector 7)
Camera – Panasonic HC-V770 Microphone – Tonor TN120308BL
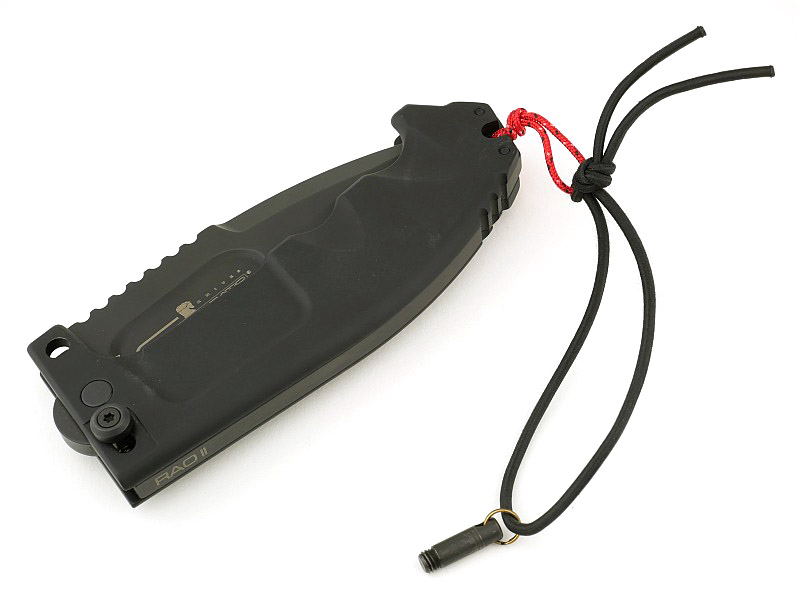
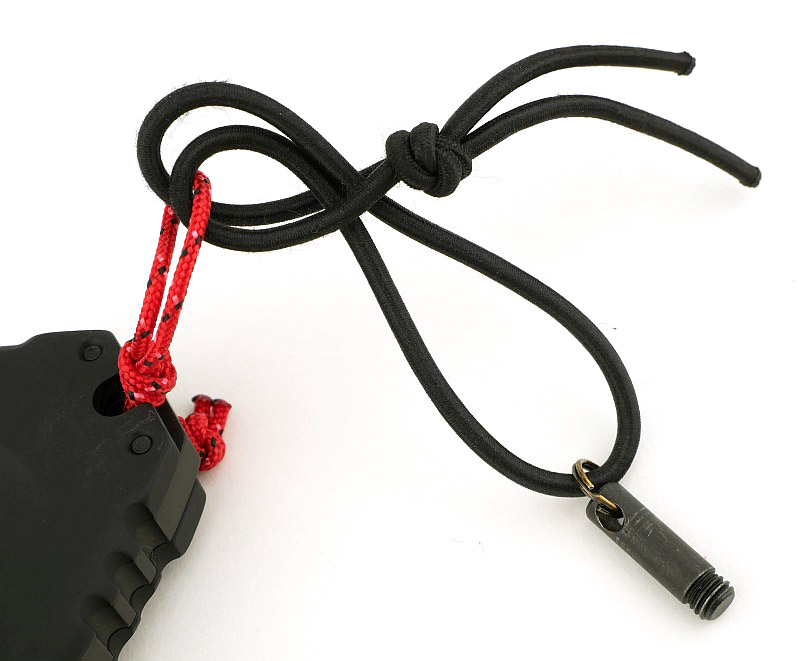
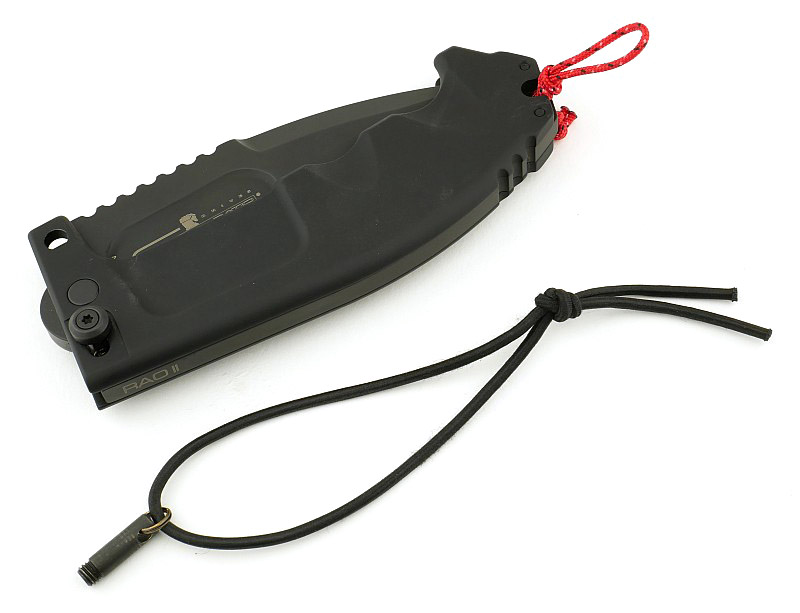
Now you’ve seen the video, and the safety lock pin coming in and out, you might come to the same conclusion I have. This is a great feature, and one I use, but there are many times I want to use the RAO II as a large folder and be able to open and close it quickly. In this case the pin is not being used, and if left attached, as it comes with the knife, it then flaps around and hits your hand, the knife and anything else in range. I got sick of this, so decided to alter things slightly and make it easy to remove the pin entirely.
This is my set-up. I’ve taken the original black elastic out of the lanyard hole and added my own loop using 2mm sailing cord.
The original elastic cord with the pin on it is then looped through the sailing cord in a larks head knot.
This larks head knot can easily be loosened and slipped off the sailing cord.
Two overhand knots keep the sailing cord set in the position I wanted.
With this easy modification, that excellent safety lock pin can be set aside for when you want to use the RAO II in more extreme ways, but for general use and really making the most of this knife as a folder, it becomes more of a hindrance. Without that hindrance the RAO II becomes fun to use and revels in its stature and super heavy build.
The bolt lock works so intuitively; as you grasp the knife to fold it, your fingers naturally pull on the bolt as you press the blade into the handle. Unlocking and folding in one motion, as shown in the video.
Talking of super heavy build, this folder is exceptional in the trust you can put in it. That simple idea of the safety lock pin, makes it a folder you can treat just like a fixed blade and not have any concern it might fold on you. Described by Extrema Ratio as a ‘compact’ survival knife, the knife in its sheath is not particularly compact; the dual functions of the carry pouch and fixed blade sheath bulk it up somewhat. The knife on its own however, for the size and strength of knife you get to use, is nicely compact thanks to being a folder.
I’m not going to suggest that this is the most practical knife for general use, but it will make you grin when you bring it out – every time.
Review Summary
The views expressed in this summary table are from the point of view of the reviewer’s personal use. I am not a member of the armed forces and cannot comment on its use beyond a cutting tool or field/hunting knife.
Something that might be a ‘pro’ for one user can be a ‘con’ for another, so the comments are categorised based on my requirements. You should consider all points and if they could be beneficial to you.
_______________________________________________
_______________________________________________
Things I like
What doesn’t work so well for me
_______________________________________________
_______________________________________________
Safety lock pin fixes the blade open with complete reliability.
If not fitted the safety lock pin flaps around on the elastic cord.
Superb dual function sheath (pouch/fixed blade).
Supplied sharpener gets in the way.
MOLLE compatible sheath.
Combined pouch / sheath is a little bulky.
Super strong build.
Sheath is right-handed only when the blade is open.
Distinctive Extrema Ratio style.
RAO II blade shape more useful to most users.
Basically just awesome.
Discussing the Review:
The ideal place to discuss this reviews is on a forum. If you started reading the shorter forum version of the review, but followed the link this full exclusive review, please return to that forum to discuss the review there.
If you read the review entirely on Tactical Reviews, please consider one of the following to join in any discussion.
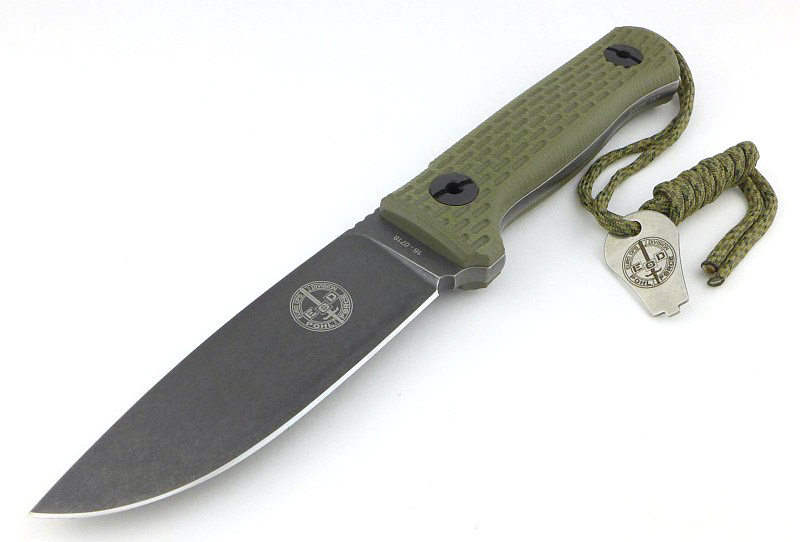
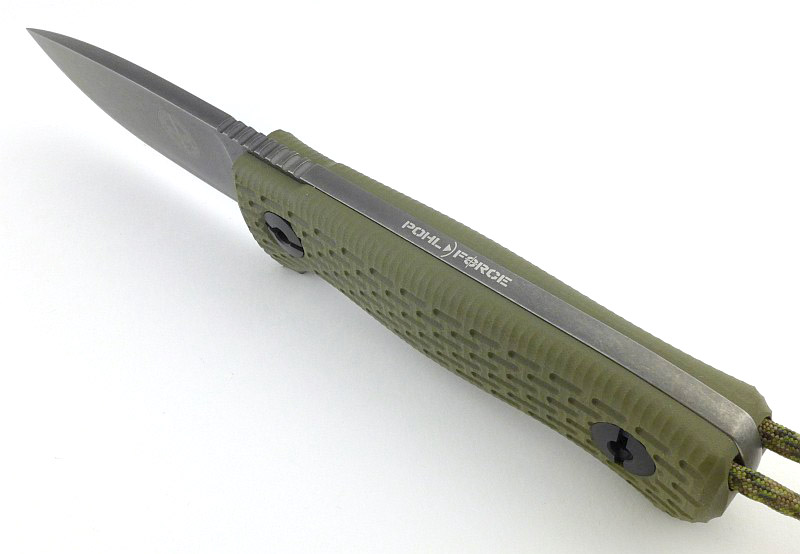
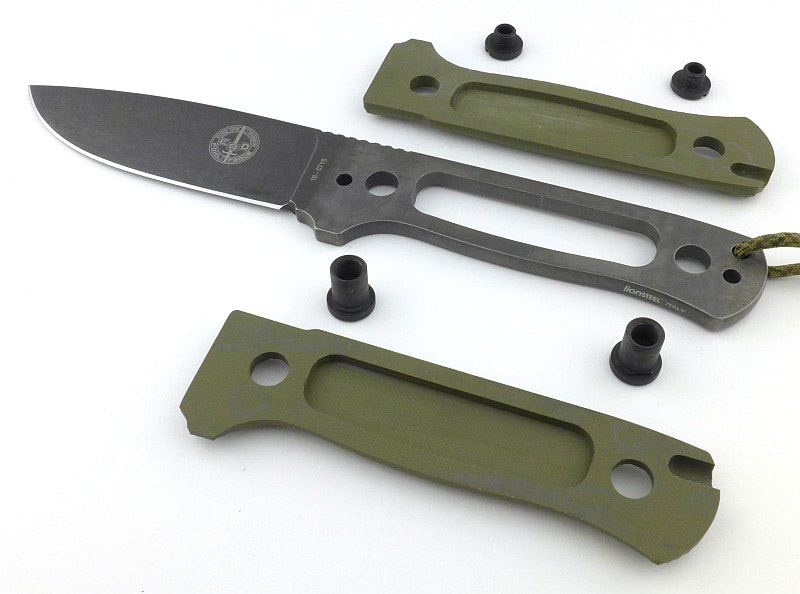
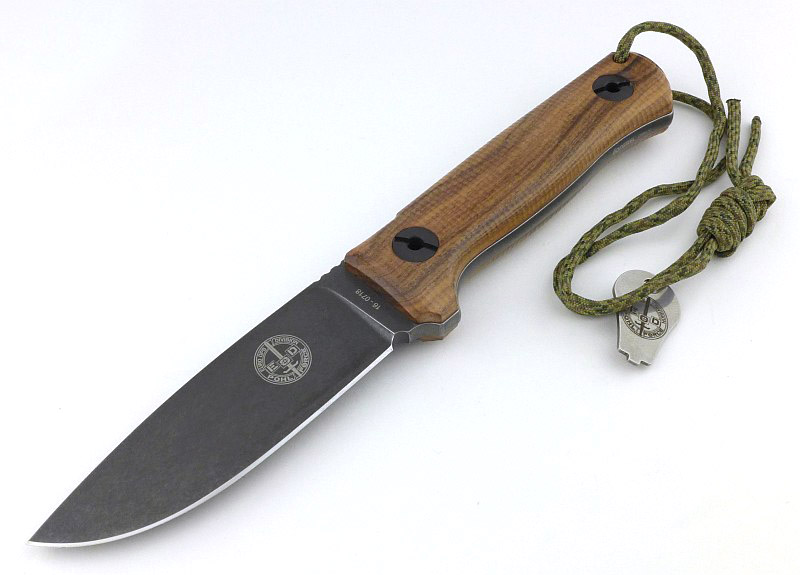
Born from key influences in Dietmar Pohl’s lifelong passion for knives, the Prepper One combines the hollow handle survival knife concept with a traditional style ‘straight’ utility knife. By using modern materials and manufacturing techniques, Dietmar Pohl has avoided all the typical weaknesses of hollow handle knives and produced a super strong design that won’t let you down. This review features the Prepper One Tactical (G10 and wood handle), but the range also includes the Prepper One Survival, and Prepper One Outdoor (plus wood handle options for these).
The Blade and Handle Geometry:
Most knife specifications have a basic description of the blade geometry, but in this section I will be taking a more detailed look at geometry and balance.
Using a set of gauges and precision measuring equipment including a Vernier protractor, callipers, fixed radius gauges and the unique Arc Master adjustable radius gauge (the one that looks like a crossbow).
These measurements have been tabulated and are presented along with a few reference blades (8″ Chef’s Knife, 5.5″ Santoku and the popular Fällkniven F1).
Key aspects such as the primary bevel angle, grind type, blade depth, blade thickness, length, weight are detailed, along with balance information.
The ‘Balance relative to the front of the handle’ tells you if the knife will feel front heavy, or if the weight is in your hand (a positive value means the weight is forward of the front of the handle). The ‘Balance relative to the centre of the handle’ indicates how close to a ‘neutral balance’ the knife has in the hand.
In the case of full convex grinds the approximate centre of the grind is used for the primary bevel angle estimate.
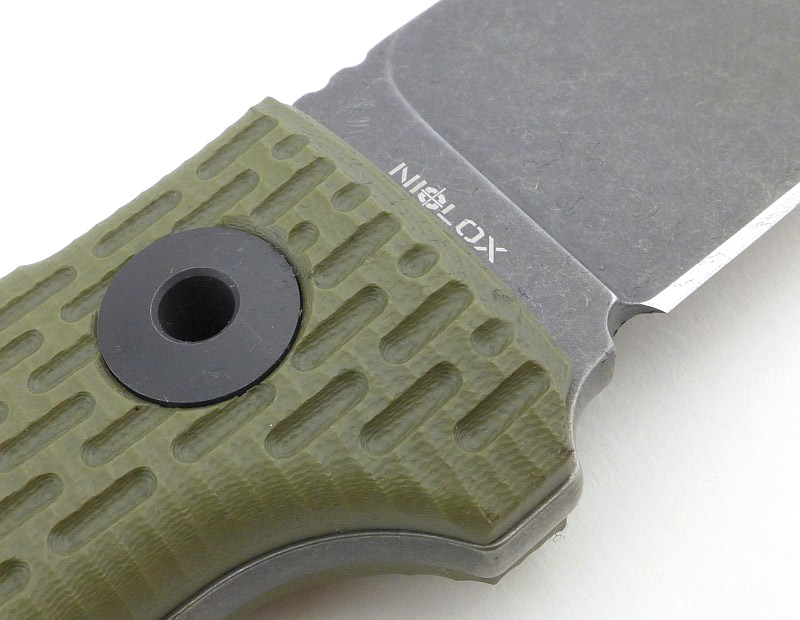
The blade is made from Niolox steel.
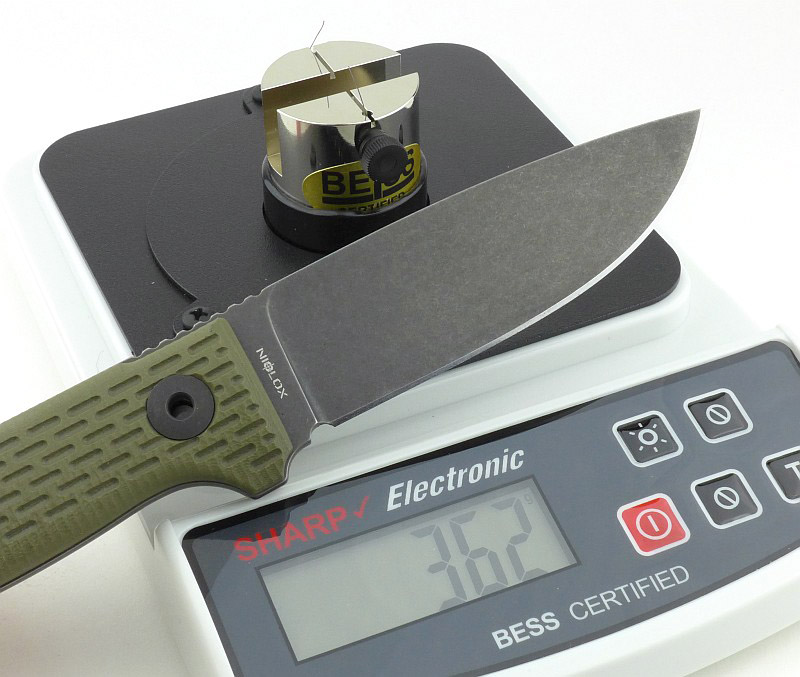
New for 2018! BESS Certified sharpness testing:
The BESS ‘C’ scale of sharpness, developed by Mike Brubacher (Brubacher Edge Sharpness Scale) will now become part of Tactical Reviews’ knife testing process. Initially this will be used to verify the sharpness of the factory edge and allow the knife to be brought to a minimum standard sharpness before testing a blade’s cutting performance.
A chart showing where on the BESS scale a blade is.
The Prepper One’s factory edge has an average BESS ‘C’ sharpness of 345. At this sharpness it easily and cleanly slices 80gsm copier paper. It doesn’t quite want to catch a rolled edge of the same paper, but will 50% of the time.
Explained by the Maker:
The reasons for certain design choices may not be clear when simply looking at an object, so this section is intended to give an insight into the thinking behind a design by speaking to the designer themselves.
Dietmar was kind enough to give me some time during IWA 2018 to discuss the Prepper One and where it came from.
Video Edited with – Cyberlink Director Suite 5 (PowerDirector 16 and AudioDirector 7)
Camera – Panasonic HC-V770 Microphone – Tonor TN120308BL
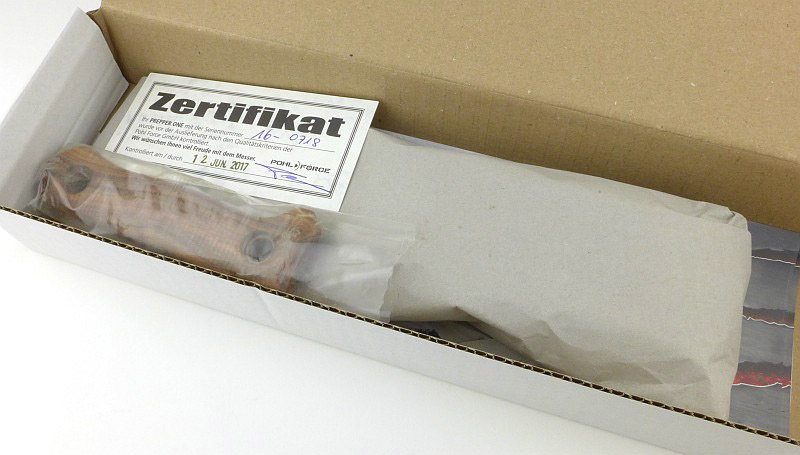
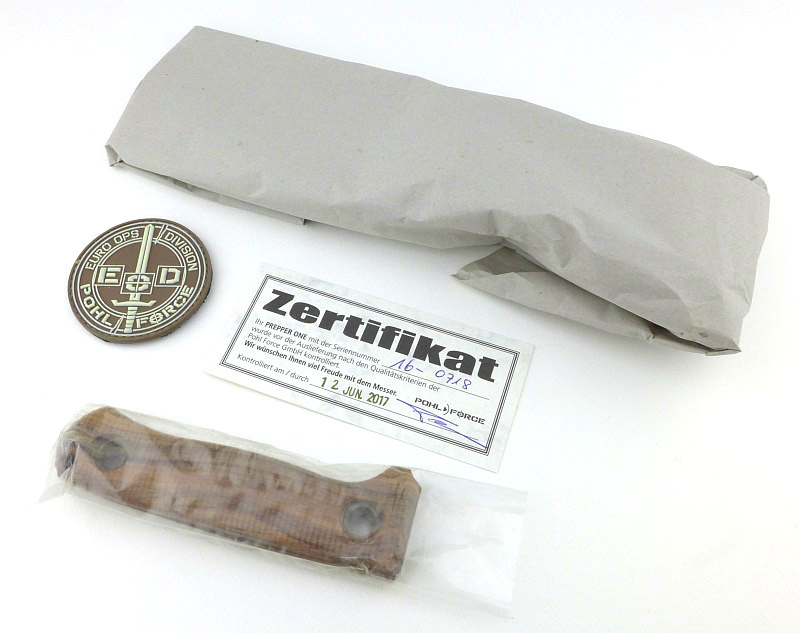
A few more details:
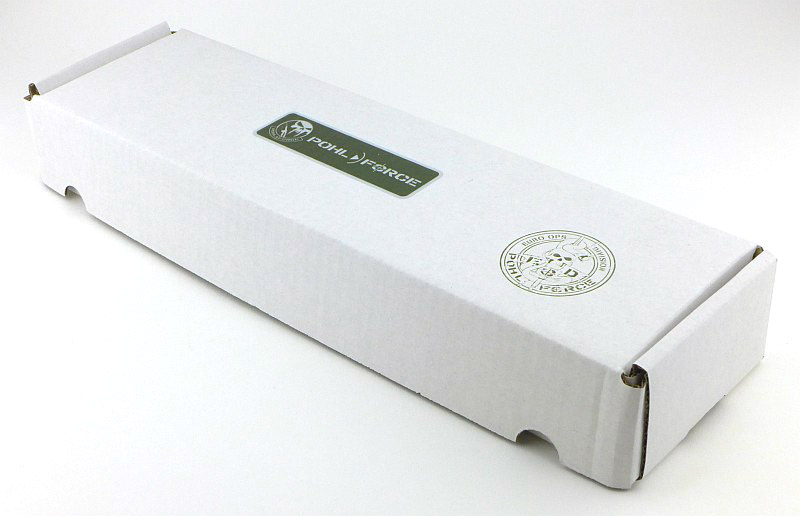
The Prepper One Tactical arrived in a cardboard box.
Inside, the Prepper One was wrapped in paper (so much better than plastic).
In this case the wooden handles have also been included, but these are an optional extra. There was also a Pohl Force Patch and a certificate card.
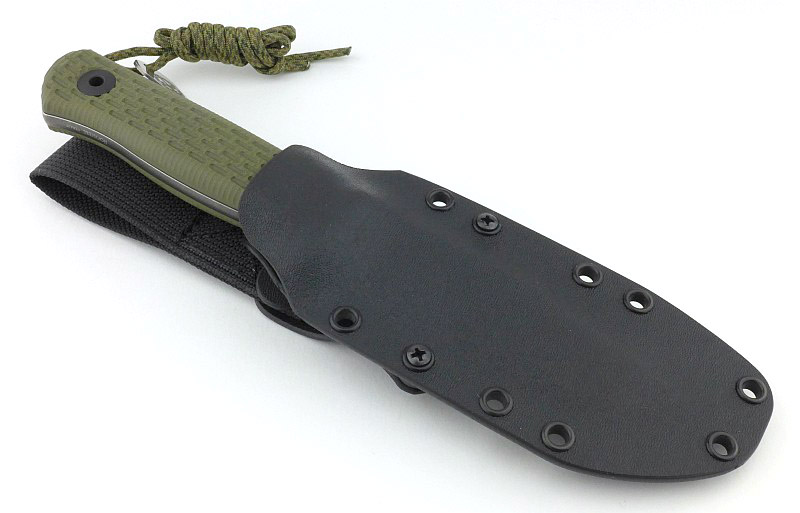
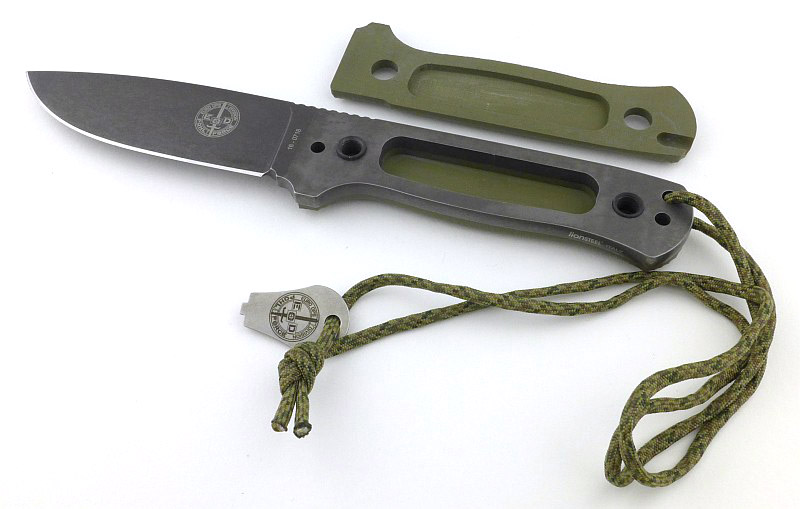
Whipping off the paper wrap, the Prepper One arrives in its Kydex Sheath.
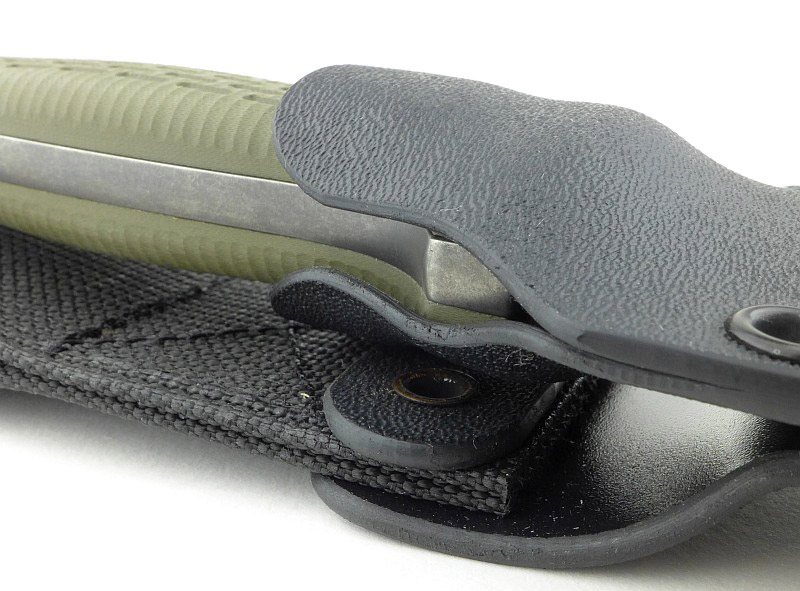
Let’s start off with a look round the sheath. The belt loop looks like normal nylon webbing, however, the loop is actually very stiff and holds its shape.
The Kydex lips have been shaped and finished well, so unlike many Kydex sheaths there is no additional finishing required to ensure a smooth operation.
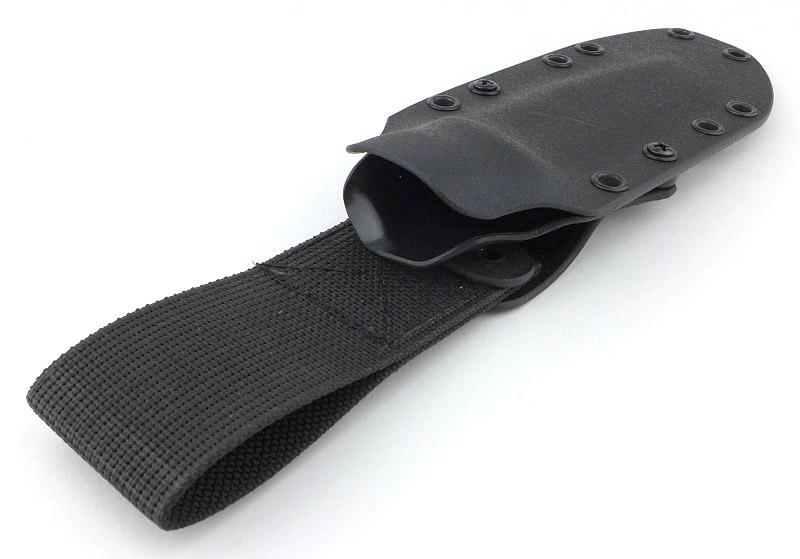
That stiff webbing belt loop is not fitted directly to the sheath, but instead to a hanger which is then bolted onto the sheath.
Looking from the side you can see the hanger. This allows the user to adjust or remove the belt loop and use another mount system.
A drainage hole on the back of the sheath just shows the blade tip.
Kydex wraps the first quarter of the handle and keeps the Prepper One securely in place without making it too hard to remove.
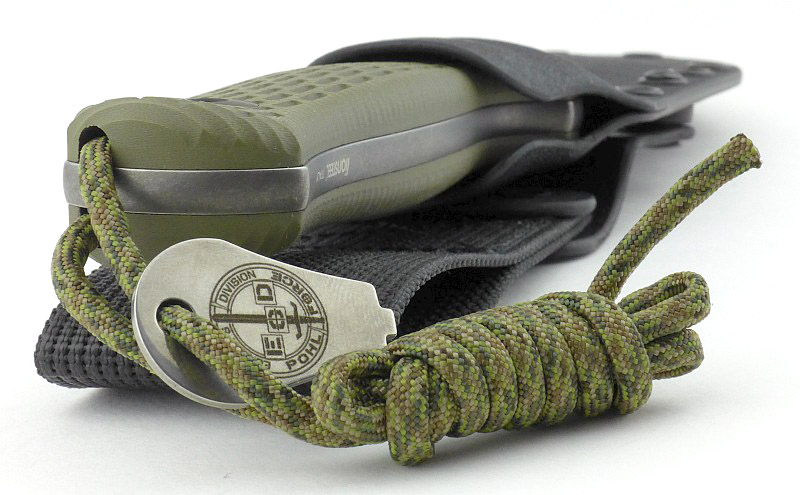
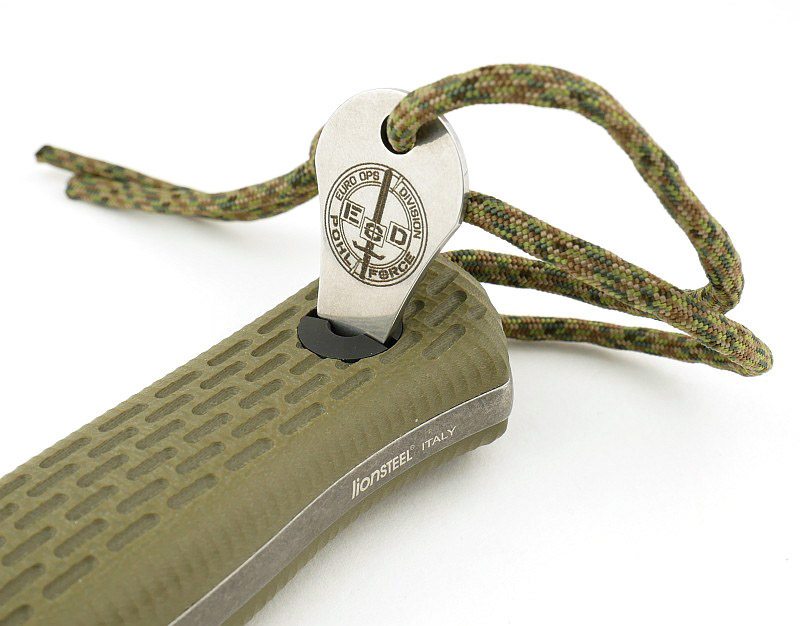
Ah, now, here is something we didn’t see earlier. There is a flat ‘key’ fitted to the lanyard
This is going to give us access to the hollow handle.
Before moving on, taking a torch and peering into the sheath we can see why the Prepper One has no hint of sheath rattle, there is a flocked velvet liner which keeps the sheath nice and quiet.
And onto the knife itself…
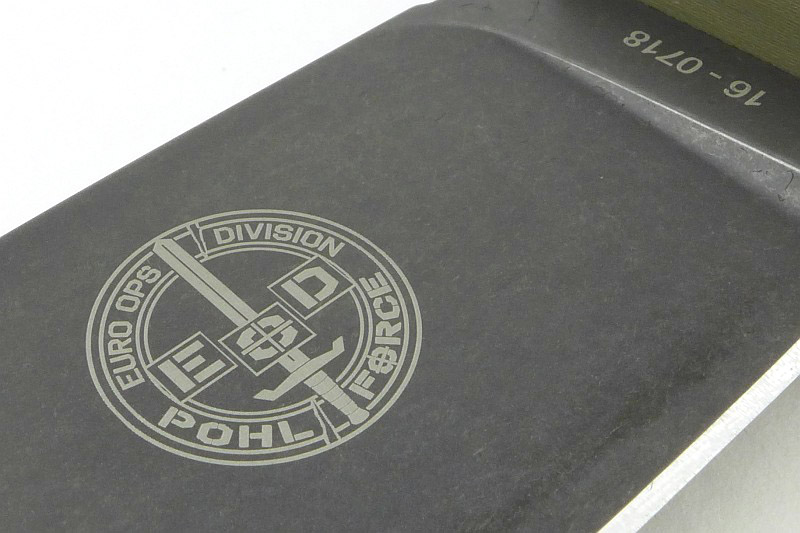
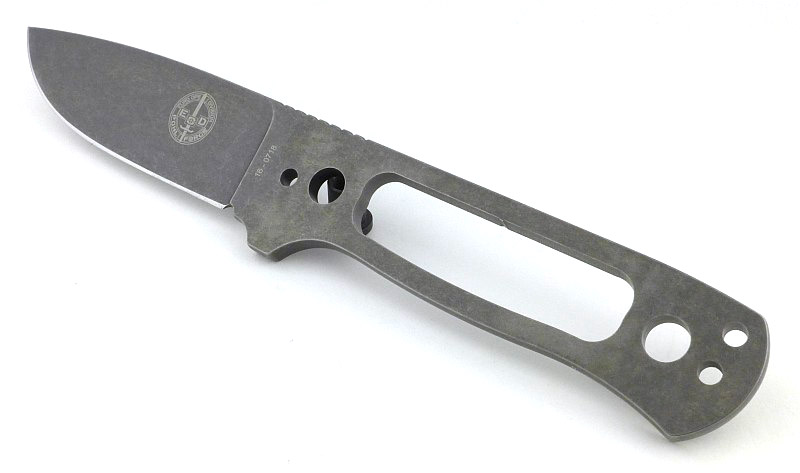
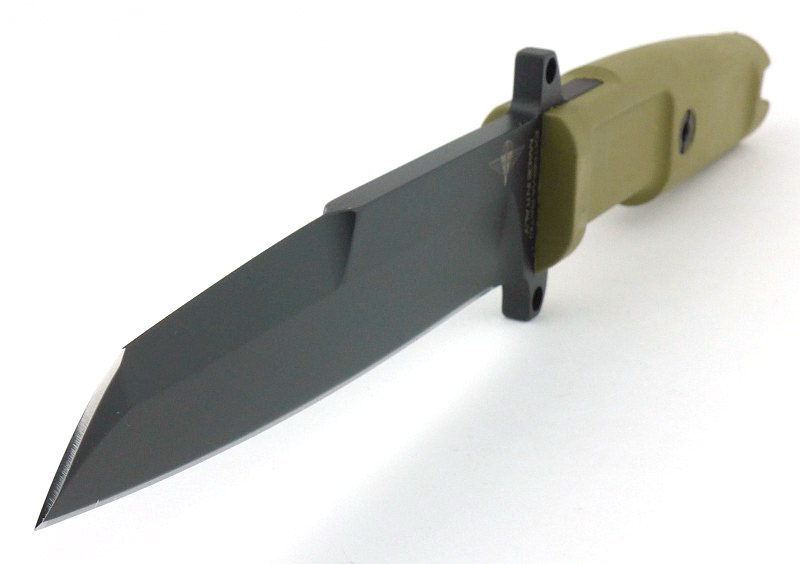
Pohl Force’s logo is cleanly engraved on the blade and the serial number on the ricasso.
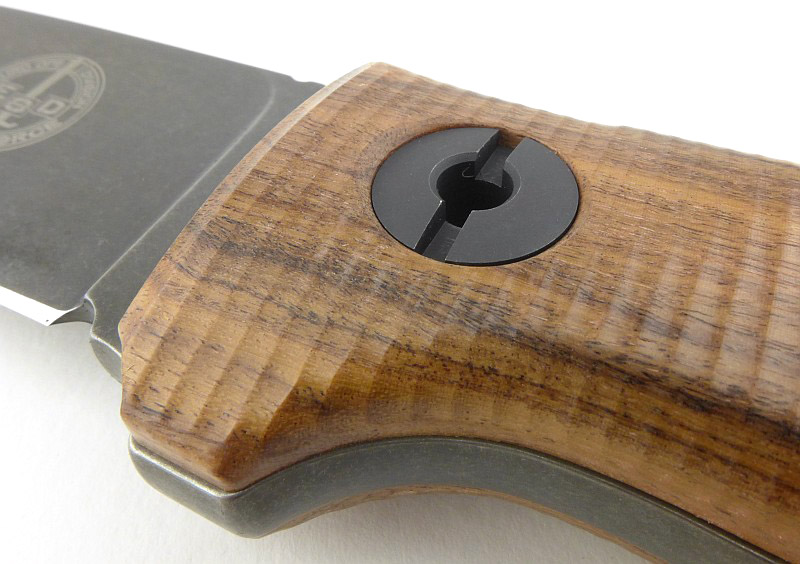
A small sharpening choil sits at the end of the radiused plunge line.
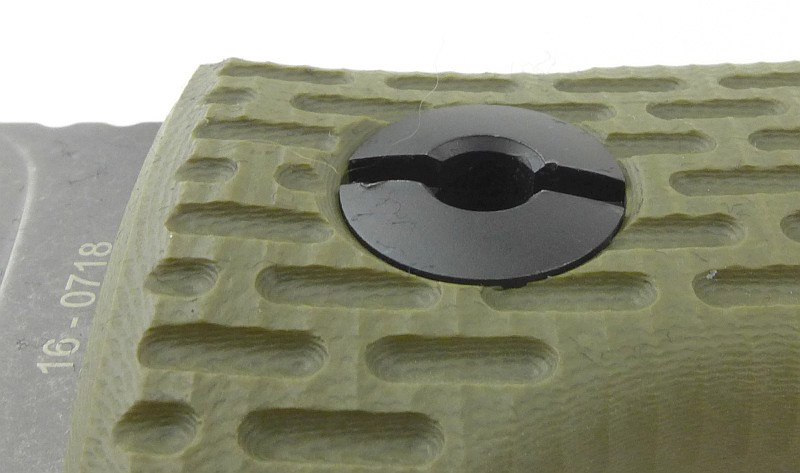
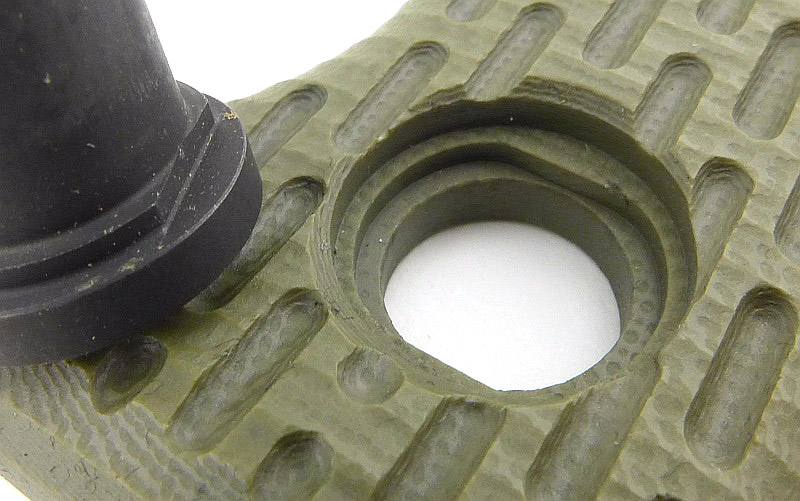
One of the large handle bolts. On this side, there is a large slot.
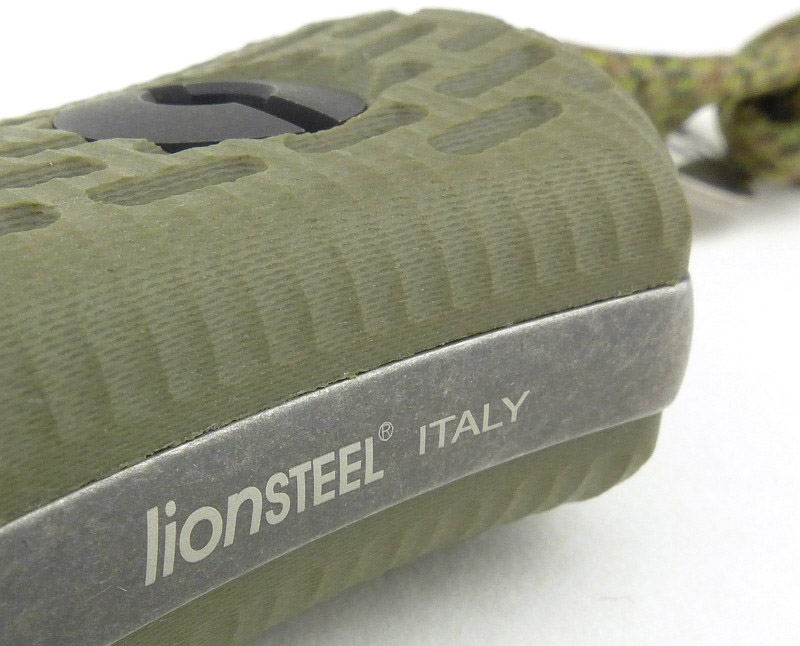
Pohl Force’s partner in the production of the Prepper One (amongst others) is Lionsteel, well known for their quality of manufacture.
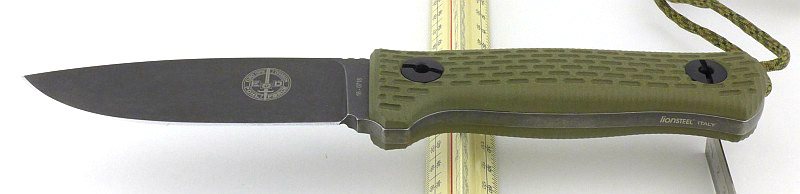
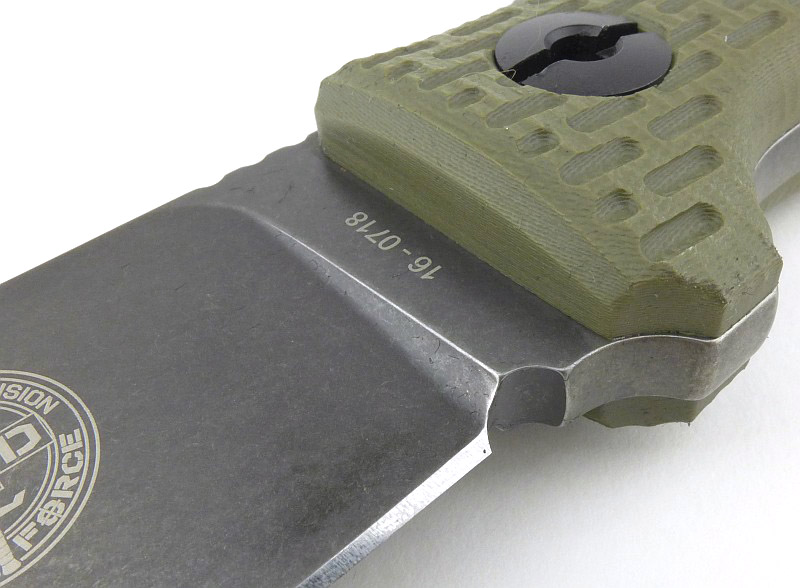
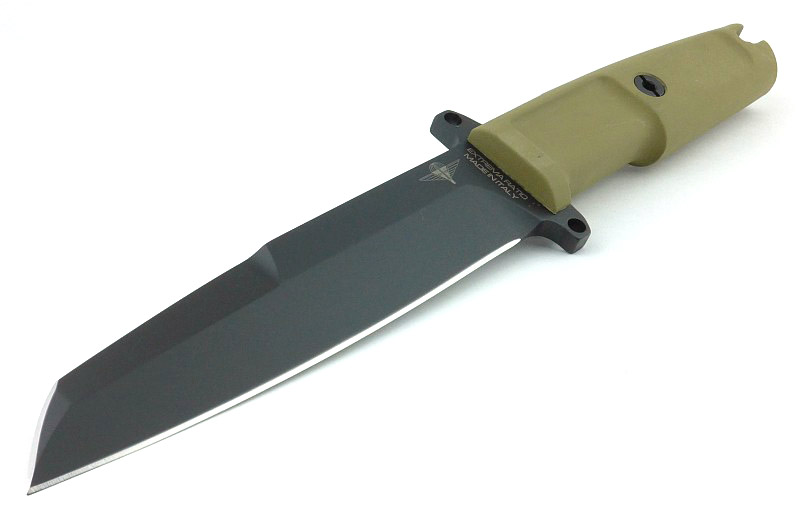
Fitted with the original G10 handle scales, the Prepper One Tactical uses a OD Green colour.
A series of offset longitudinal grooves machined into the surface makes for a very secure grip, even in slippery conditions.
Another look at the grip texturing at the guard.
Both the tang, and handles make up the Prepper One’s guard.
Made possible by the G10 handle material, and the fact both the inner and outer surfaces need to be machined anyway, the lanyard (which passes through the full tang) is directed backwards by a groove cut into the inner surface of each handle slab. This keeps the lanyard completely away from your hand preventing any lanyard hotspots while working with the knife. A small but very useful feature.
On the back of the tang there is one more engraving.
This is a hollow handle knife, but it is also a true full-tang blade as well.
A deep section of jimping gives your thumb a comfortable and secure surface to press onto.
Niolox was chosen for its fine grain structure and super stain-resistant properties.
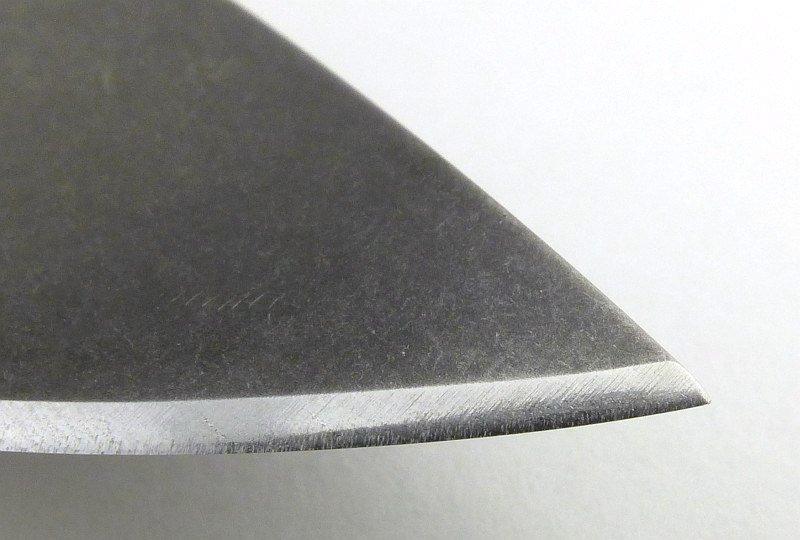
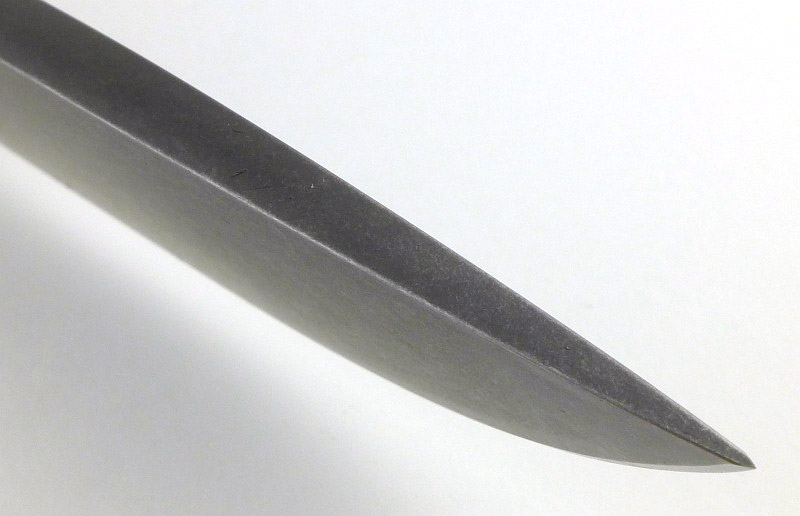
Taking a close look at the factory edge next to the blade tip.
With such a substantial blade stock (6mm) there is a taper to the front section of the blade to prevent the tip from ending up with a massive edge bevel.
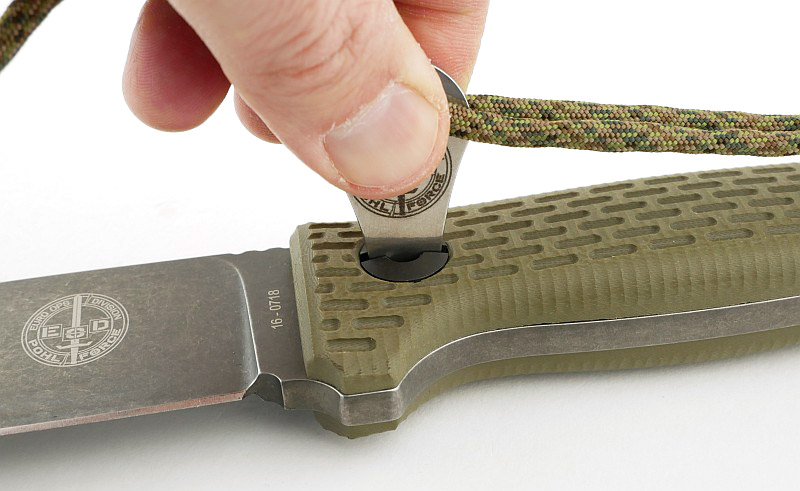
The Key, The Secret:
No, not a nineties hit by the Urban Cookie Collective, but the Prepper One’s key to its concealed hollow handle.
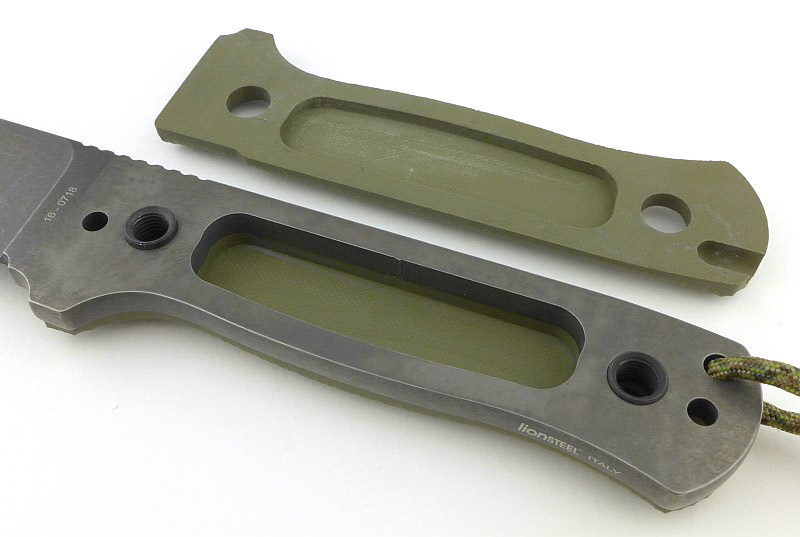
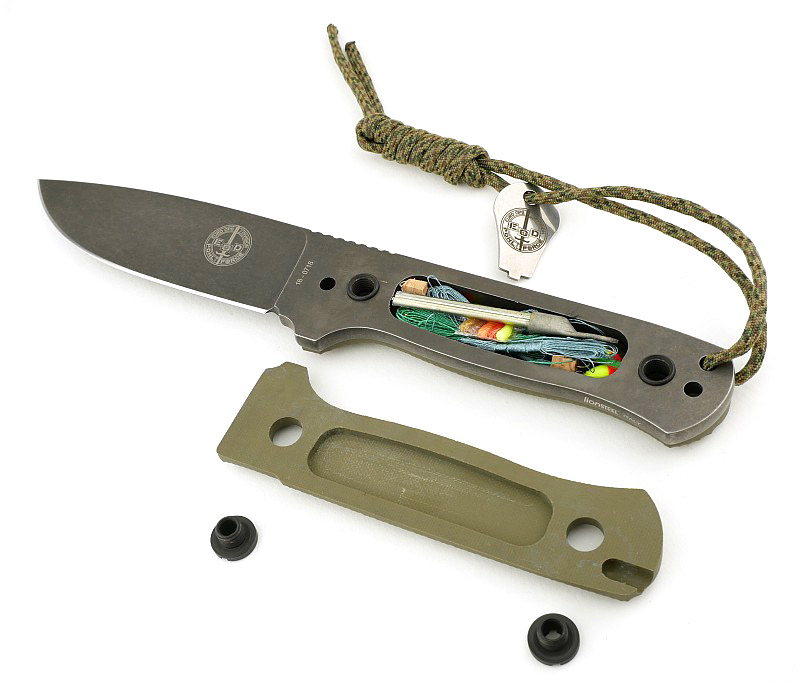
Using the key to unscrew the handle bolts, and lifting off one handle reveals the hidden compartment.
This skeletonised tang, much like many full tang knives have to change the balance, provides part of the hollow compartment. The handles themselves are also milled out to make the space inside the handle larger.
Fully disassembled, we have the two G10 handles, the two parts of both handle bolts, and the full tang knife blade.
Should you wish to, perhaps if the handle scales were lost, you could use the bare knife as it is, or adding a cord wrap.
The handles with a steel ruler to show the size of the hollow compartment.
There is more.
For an even more traditional look, Pohl Force now offer a Santos wood option for the handles.
As removal and fitting of the handle scales is so easy (exactly as this is something you should be doing to access the hollow handle), swapping between the G10 and wood scales is just as easy.
The only slight complication is that the wood is not quite stable enough to use the same lanyard layout as the G10, so the cord needs to be removed and threaded through the more traditional lanyard holes used for the wood scales.
A different grip texture is also used, as the fine pattern milled into the G10 would not work in wood.
It does look good with those wooden handles.
What it is like to use?
I was fortunate enough to have the choice of testing either the Prepper One or Prepper Two. I chose the Prepper One purely for its much more general purpose size, with the Two being a much bigger camp knife. Clearly as the first of the Prepper designs to be released it needed to be versatile and easy to carry (with the added bonus relating to German knife carry law described by Dietmar in the video interview).
However much I was drawn to the Prepper Two, the Prepper One was so ‘just right’ I knew it was the right choice. Even better would be the pair.
My hands take XL Gloves, and though my fingers wrap the grip fully, it still feels a generous size for excellent stability without ending up too big for smaller hands.
You can see here I have the G10 handles fitted. For hard work they are my favourite over the wood grips, however, I love the way the wooden grips look, and really fit that traditional feel of the knife. The G10s will be the workhorse grips for me, but the wooden ones will come out when I want a different feel.
The jimping is perfectly positioned for your thumb when using a sabre grip. With its 6mm blade stock, this thumb position is very comfortable and allows you to exert high pressures without the spine cutting into your thumb.
Of course the flip-side to this is that you can never really forget about that 6mm blade stock, as the Prepper One does feel a relatively heavy knife due to this, despite the hollow handle taking a big chuck out of the weight of the tang.
We must dwell on that 6mm blade stock a little longer. What is the purpose of the Prepper One? Its name ‘Prepper’ pretty much sums it up, a knife to ensure you are prepared for whatever you might have to face. These are the situations where a knife blade might have to be used for much more than simple cutting. Breaching, demolition, splitting and use as a spear are only a few of the many extreme tasks it may be needed for. You might balk at the mention of some of those, and many less substantial knives would just fail leaving you worse off than before, but that slight weight penalty gives you a blade that has a strength that you are not ever likely to exceed – Prepper is the word indeed.
And preparing yourself further, the hollow handle…
As it comes, the key has been put onto the lanyard, which can become a little awkward. I’ve moved this around (check out @TacticalReviews on Instagram for a photo) so the key is attached to the sheath instead, with the lanyard cord on the knife left plain.
When reassembling the handles or swapping to the wooden grips, make sure to line up the flats on the handle bolts with the corresponding shaping in the holes. Failure to do this will result in the bolts sitting too high and possibly damaging the handles.
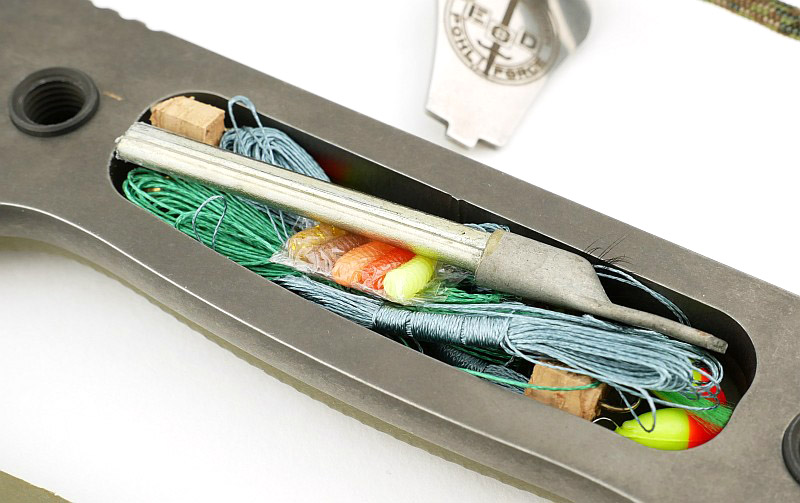
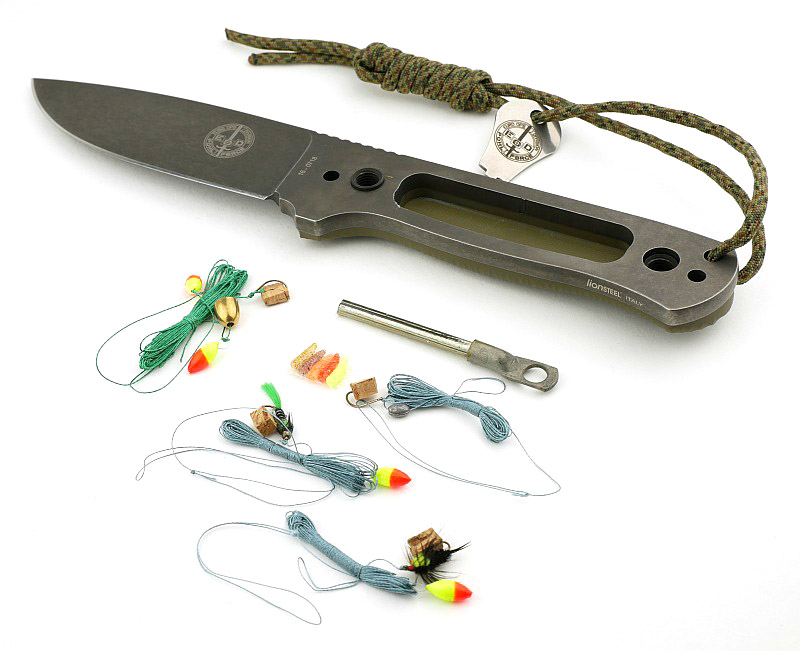
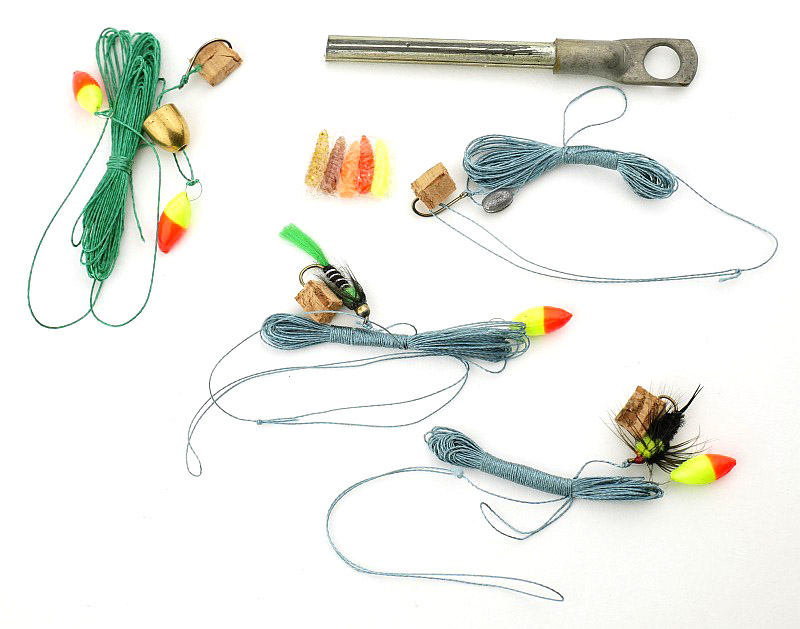
So what would you put in that hollow handle? For me it is Fire and Fish. Remember that this hollow handle is not water-tight, so whatever you put in there might get wet.
Picking a fire steel instead of matches eliminates the worry of it getting wet, and a multi-part fishing kit is going to get wet anyway.
Without even packing all the available space, I’ve got four different fishing rigs plus the firesteel.
The fishing kits are designed to cover as many options as possible and are crucially pre-tied, including loops to tether the line. Cold, wet tired hands are not the best tiers of fiddly knots. Two of the fours rigs use flies, and two have plain hooks and artificial maggots included in the kit; this way no additional bait is needed. All can be used by hand, or attached to a rudimentary rod. Note as well that each pre-tied barbed hooks has a cork protector – the last thing you need to do is hook yourself.
Braided Dyneema is used in preference to monofilament as it doesn’t take a ‘set’ in the same way, and is very abrasion resistant and strong for its diameter. Some rigs also have mini floats to either keep the line afloat or act as bite indicators.
But I digress…
The Prepper One; in reality the hollow handle is more of a fit and forget feature. The things you put in it are things you want to have and will be glad you do, but really don’t want to need. With the need to disassemble the handle it isn’t a practical every day storage solution, but is an excellent backup option.
As a knife rather than a survival tool, the Prepper One feels well balanced (if slightly heavy) and its full flat grind really helps the slicing ability of the blade, but the 6mm blade stock does make its presence known with deeper cuts in stiff materials. Though I can appreciate the benefits of Scandi-grinds, the choice of a full flat grind really suits the Prepper One, and makes it very easy to work with.
Kydex sheaths are not my favourite, mainly due to what I call ‘sheath-recoil’ where overly stiff Kydex sheaths lead to knives flying out in an uncontrolled way when unsheathing them. Not so with the Prepper One. The sheath retention is spot on, and the knife is both held securely and also perfectly easy to remove without any hint of sheath-recoil.
With its utility blade dimensions, you would not think of the Prepper One as a chopper, especially next to its bigger brother the Prepper Two, however, thanks to the 6mm blade stock it has more weight to it than most other knives this size. So you can employ this for light chopping, or just to get through smaller branches a bit quicker. Not a major feature, but helpful considering this size of knife is easy to carry.
The finger guard is not very pronounced, but it is very effective at stabilising your grip on the knife. Overall the shaping of the handle and guard make it very comfortable to use for extended periods. I have also really appreciated the way the lanyard is pushed backwards in the G10 handles, so however you hold it, you don’t end up pressing onto the lanyard cord (which can make a hotspot). Once I decided to move the hollow handle key off the lanyard (and fitted it to the sheath) the experience of using the knife became a real pleasure, and without having to carry a much bigger ‘survival’ knife, you also know you have a potential beast of a blade should you really need it. It might be named ‘Prepper’, but it is a knife you can use every day.
Review Summary
The views expressed in this summary table are from the point of view of the reviewer’s personal use. I am not a member of the armed forces and cannot comment on its use beyond a cutting tool or field/hunting knife.
Something that might be a ‘pro’ for one user can be a ‘con’ for another, so the comments are categorised based on my requirements. You should consider all points and if they could be beneficial to you.
_______________________________________________
_______________________________________________
Things I like
What doesn’t work so well for me
_______________________________________________
_______________________________________________
Hidden Hollow Handle Compartment.
Handle Key can get in the way when on the lanyard (easily moved).
Super Strong (6mm stock) Niolox Full Tang Blade
Heavy feel due to 6mm blade stock.
Easily removable/swappable handles.
Flocked sheath lining will collect dirt.
Superb Lionsteel build quality.
Makes you want to buy the Prepper Two as well.
Excellent grip and handling.
Ideal general purpose size.
Discussing the Review:
The ideal place to discuss this reviews is on a forum. If you started reading the shorter forum version of the review, but followed the link this full exclusive review, please return to that forum to discuss the review there.
If you read the review entirely on Tactical Reviews, please consider one of the following to join in any discussion.
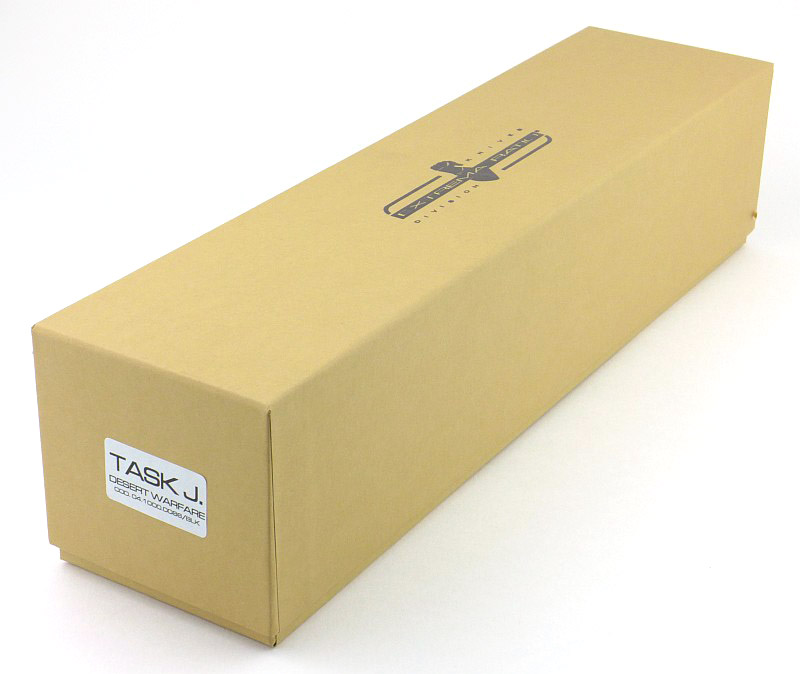
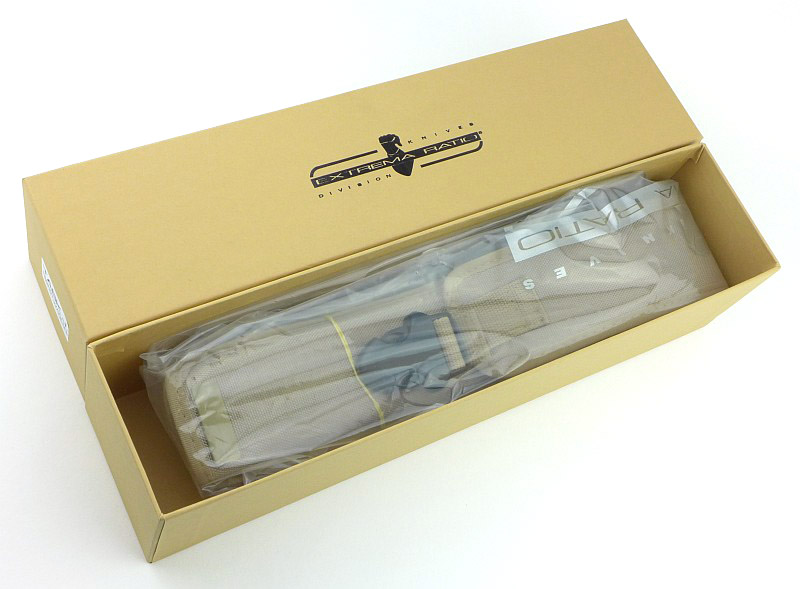
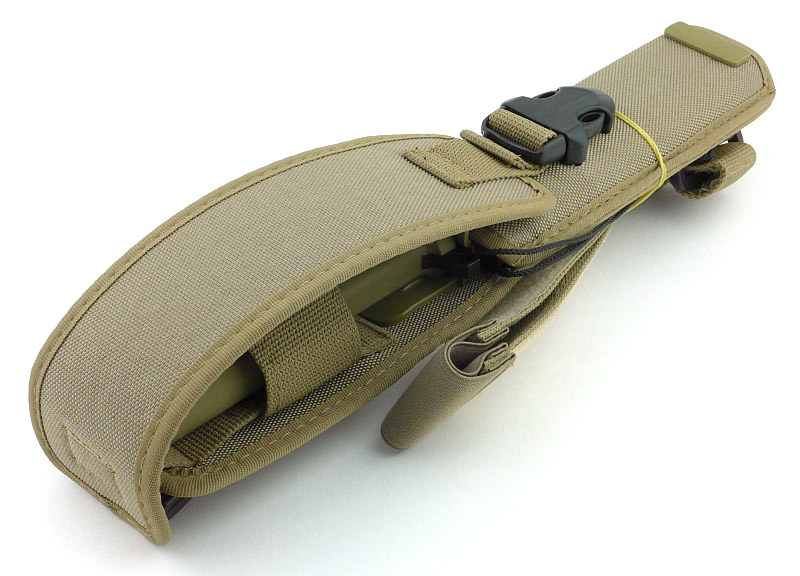
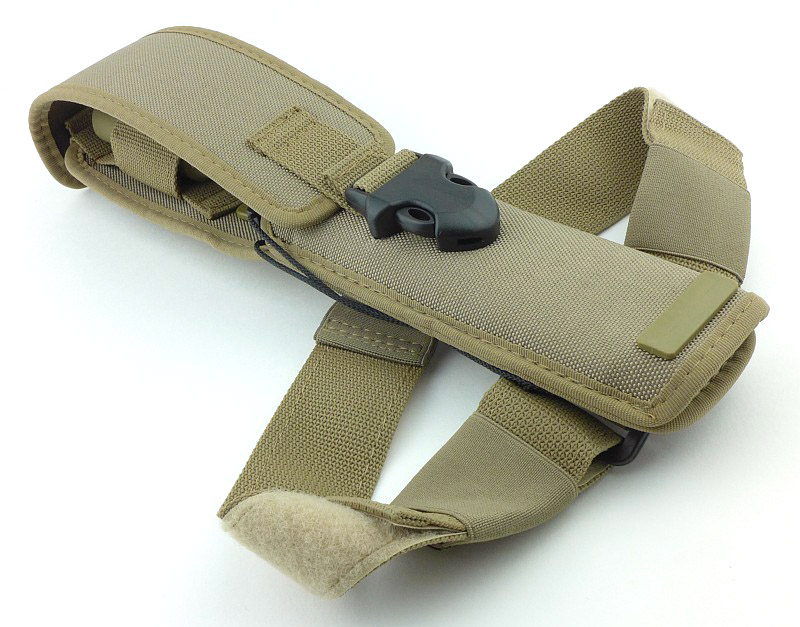
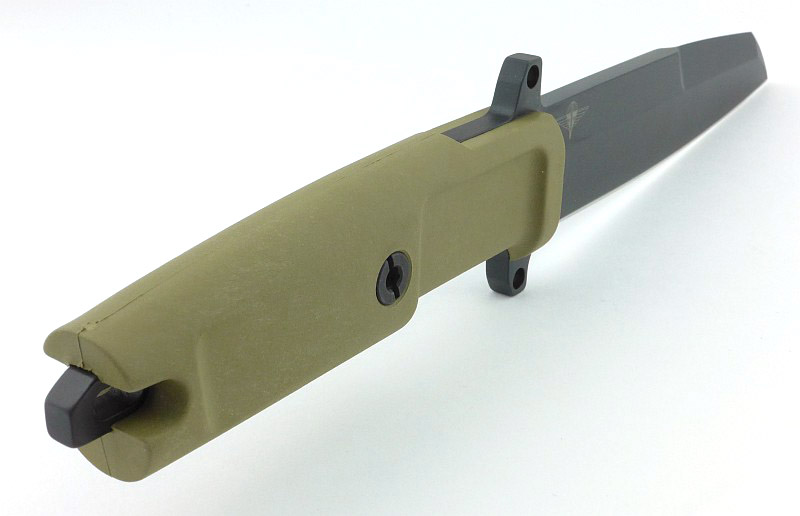
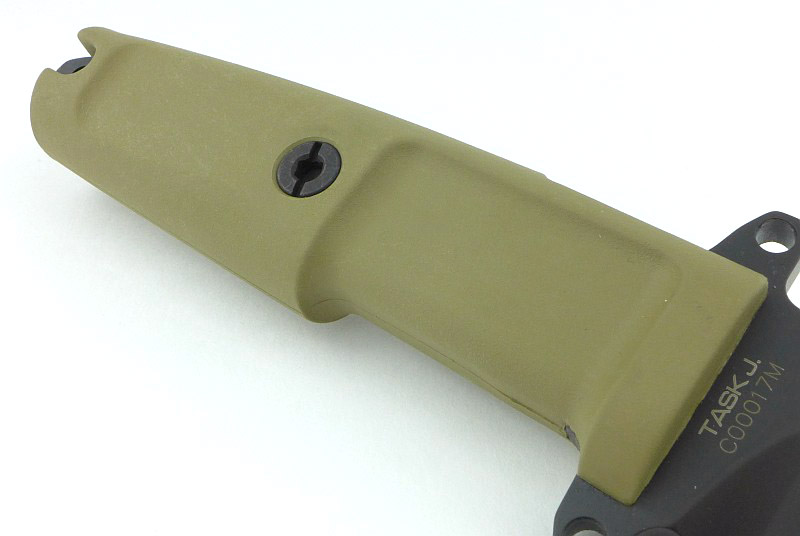
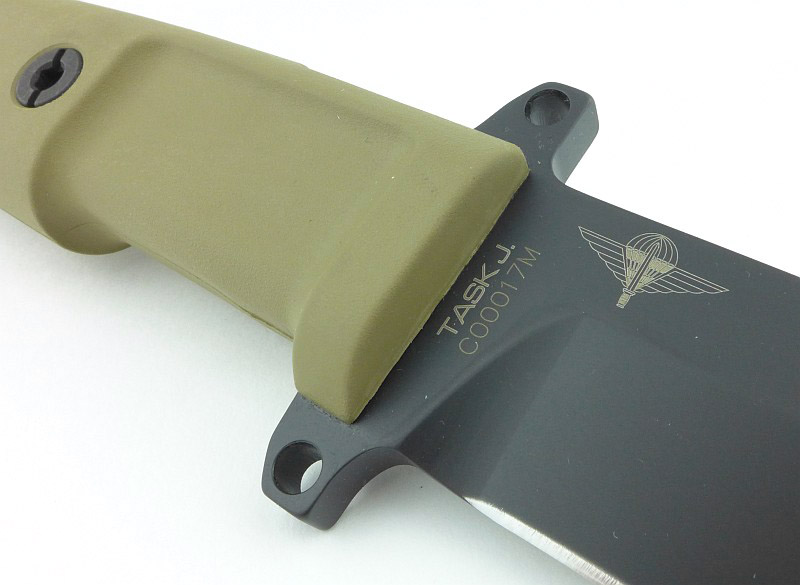
Based on the original TASK tactical knife designed by Thilo Schiller, this version of the TASK, the TASK J has been developed as a collaboration with the Jagdkommando Unit, the Austrian Army special forces. Their requirements were for a heavier duty version of the original TASK which could survive more extreme use.
The Blade and Handle Geometry:
Most knife specifications have a basic description of the blade geometry, but in this section I will be taking a more detailed look at geometry and balance.
Using a set of gauges and precision measuring equipment including a Vernier protractor, callipers, fixed radius gauges and the unique Arc Master adjustable radius gauge (the one that looks like a crossbow).
These measurements have been tabulated and are presented along with a few reference blades (8″ Chef’s Knife, 5.5″ Santoku and the popular Fällkniven F1).
Key aspects such as the primary bevel angle, grind type, blade depth, blade thickness, length, weight are detailed, along with balance information.
The ‘Balance relative to the front of the handle’ tells you if the knife will feel front heavy, or if the weight is in your hand (a positive value means the weight is forward of the front of the handle). The ‘Balance relative to the centre of the handle’ indicates how close to a ‘neutral balance’ the knife has in the hand.
In the case of full convex grinds the approximate centre of the grind is used for the primary bevel angle estimate.
The blade is made from ACCIAIO BöHLER N690 (58HRC) steel.
New for 2018! BESS Certified sharpness testing:
The BESS ‘C’ scale of sharpness, developed by Mike Brubacher (Brubacher Edge Sharpness Scale) will now become part of Tactical Reviews’ knife testing process. Initially this will be used to verify the sharpness of the factory edge and allow the knife to be brought to a minimum standard sharpness before testing a blade’s cutting performance.
A chart showing where on the BESS scale a blade is.
The TASK J’s factory edge has an average BESS ‘C’ sharpness of 533. Though this officially comes in as a ‘dull’ edge, it will just slice 80gsm paper. Because there are some areas at a BESS ‘C’ score of 407, that allows for a borderline working edge, which is the only reason it is possible to slice 80gsm paper with this factory edge.
Explained by the Maker:
The reasons for certain design choices may not be clear when simply looking at an object, so this section is intended to give an insight into the thinking behind a design by speaking to the designer themselves.
Unfortunately I can’t always get time with the designer so will use this section to include relevant information about the knife and its designer.
Direct quote from Extrema Ratio’s website.
“This tactical knife has been developed together with material experts of Jagdkommando Unit, the Austrian Army special force. It is a multi purpose tactical knife with double guards to avoid accidentally slipping of the hand on the blade. It comes with standard desert side sheath with automatic retention mechanism and protective slap. A fireball flint and striker is placed inside the sheath.”
A few more details:
A well made cardboard box is used for the TASK J.
The full package is wrapped in a plastic bag, and fills the substantial box.
Along with the bagged knife are two leaflets and a quality control card.
Slipping the TASK J out of the bag; the leg strap is kept neatly in place with a rubber band.
Taking a moment here to mention that Extrema Ratio have packed the design of the sheath with so much detail, this needs to be appreciated, so we’ll be covering this before moving onto the knife.
Being a full size knife, there is a removable leg strap to allow you to really keep it under control in vigorous situations.
The leg strap has a double elasticated section so you can fit is snugly without then finding it cuts in uncomfortably.
Both ends of the leg strap are adjustable in length using velcro. There is an elastic cover to slide over the end of the strap end to prevent it from being pulled away during use.
In exactly the same way you adjust the length (by pulling apart the velcro adjustment), you can also remove the strap fully.
For now the leg strap is off and set aside until needed.
Onto the main sheath. The most obvious atypical feature is the full knife handle cover; as shown here, the knife itself is almost fully concealed. This flap is a critical feature to help prevent a knife fitted to a pack becoming a ‘hang up’ hazard. With the flap over the knife handle it is far less likely to catch on something.
Not relying on a fabric to keep the blade from cutting through the sheath, there is a full plastic sheath liner. This is the bottom of the sheath with the special fixing (visible on the front of the sheath) and the black plastic liner plug that closes off the end of the liner, but leaves gaps for drainage.
A high quality plastic snap buckle holds the knife cover flap in place.
Rolling the sheath over and there is a full length MOLLE fixing strap.
The top of that MOLLE strap is what holds the removable knife cover flap in place.
Here the knife cover flap has been folded under the rest of the sheath. Note the thin black cord running down the side of the sheath.
That cord runs all the way down and is held by the MOLLE strap press stud.
Freeing the black cord, and now starting to draw the MOLLE strap out of the loops.
With the MOLLE strap fully released the cover flap can be removed.
Following the thin black cord to the top of the sheath liner.
Give it a tug and a thick fire-steel starts to slide out.
And it just keeps coming… the fire-steel is the full length of the sheath!
The knife retention strap is also adjustable / removable, with velcro holding it in place.
The primary knife retention is not the strap, but is a plastic tab that is part of the sheath liner.
You can see how the side of the handle hits that plastic tab as you insert the knife into the sheath.
Push a little more firmly, and the knife clicks into place. It is now held in the sheath by this plastic tab, requiring a firm pull to free it.
Having covered its feature packed sheath system, here is the TASK J.
Though similar to the TASK in that it has a double-edged, modified wharncliffe blade, the primary bevel is quite different, as well as the blade having a bayonet grind.
The blade is symmetrically ground.
Extrema Ratio’s distinctive Forprene handle is used, in this case the desert colour.
Used on several models, this recognisable handle is particularly effective. The grip design provides a secure dual finger groove and the Forprene material cushions the user from the shock of heavy blows.
Another clear design feature intended for extreme use, is the double guard which provides the greatest protection against the hand slipping forward onto the blade.
A well radiused plunge line keeps maximum strength at the transition from cutting edge to ricasso. Note the lack of a choil which in this case removes the chance of a hang-up if the blade has made a full depth cut.
There is a single bolt to keep the handle in place.
Though an upper guard does get in the way of thumb forward grip, the guard is angled forwards slightly, so you can still take this type of grip with the thumb pushing onto the guard. Note the lanyard /lashing hole in the guard.
A good sized lanyard hole makes it easy to fit a cord if you want, and the tang protrudes from the end of the handle providing a hammering surface.
As mentioned before, the TASK J has a bayonet grind and a military style double edged tip.
Taking a very close look at the tip.
To properly show the proportions of the TASK J, this side shot minimises perspective distortions.
What it is like to use?
Extrema Ratio’s TASK J is not what I would normally think of as your ‘every day’ knife. It is a specifically heavy duty knife, for conditions where you need that absolute assurance the blade is as strong as it could be and will take anything you throw at it.
The superb attention to detail in the sheath design only reinforces how the whole package is intended to work in conditions most of us will thankfully never have to endure. With comprehensive carry options you can pack this knife in all sorts of ways and know it will still be there with you through the worst.
What the TASK J does that is different to most of the other knives capable of demolition/extraction work, is to maintain the more refined feel of a general purpose knife instead of just seeming like a large slab of steel – an important distinction.
Taking the TASK J in hand, and it is a full size knife, having a blade just over 6″ long. The ultra modern looking grip is very comfortable and secure to hold (one reason it features on many of Extrema Ratio’s knives). Despite the amount of meat in the blade it does not feel overly heavy or unbalanced.
In a reverse grip, the top guard does interfere somewhat with the range of movement, and makes it more difficult to bring the blade back close to your arm.
For a thrusting grip, the thumb can sit onto the upper guard thanks to an angled rear surface and this does give the user good power and control.
Going back for a minute to the sheath, the click-retention makes for a very effective system, the knife can come in and out of the sheath repeatedly, yet despite not using the retention strap, it is held securely and won’t fall out. Details like this are not to be underestimated, as working with a knife it is far better to re-sheath it than leave it lying about between cuts, and if you have to move off in a hurry, it stays where it should be and with you. There is nothing flimsy about any aspect of the sheath. Wherever you put it is where it will stay, and it is also fully ambidextrous.
For such a heavy duty blade, the balance is extremely good. It is in front of the first finger, as the balance point sits at the guard itself. This makes it slightly blade heavy, but much less than similar knives, and certainly not fatiguing when using it for finer duties when you want a lighter feel.
Personally I have little need for the double edged tip, and of course this makes penetrating cuts that much more effective.
Extrema Ratio don’t do things by halves, and in this case I’m referring to the blade coating. It is black, properly matt black, without any reflection; only the cutting edge might glint. One consequence of this blade coating is that it does add drag to the blade, which at times can be quite noticeable. When wiping off the blade I particularly find that the blade tends to grip the material and pull it along. I suspect with more use and wearing-in, this coating will smooth out a bit. So for those who don’t need that ultimate stealth anti-reflective effect, this coating can affect the ‘speed’ of this blade. If you like black blades, this is really Black, so you won’t be disappointed.
With there being such a large fire-steel included I was surprised that there wasn’t a striker on the blade spine. Extrema Ratio said that with the fire-steel only likely to be used in very rare instances, if needed, the blade edge would be used. Definitely not something I’d want to do, so I’ll be grinding a small striker into the spine.
Putting the TASK J next to the Extrema Ratio knife that first drew me to the brand, the Fulcrum. The TASK J’s blade is a little wider and shorter than the Fulcrum. With the Fulcrum’s double guard next to the TASK J’s, also note how the TASK J has lanyard / lashing holes in its guard – more flexibility in the way you can use it. It might have been made for the special forces, but this is firmly in the territory of a tough survival /utility knife.
With the TASK being such a good general utility blade, it is no surprise that a special forces unit (the Jagdkommando Unit) were enthusiastic for a heavier version of that blade style, and they certainly got it in the TASK J.
Review Summary
The views expressed in this summary table are from the point of view of the reviewer’s personal use. I am not a member of the armed forces and cannot comment on its use beyond a cutting tool or field/hunting knife.
Something that might be a ‘pro’ for one user can be a ‘con’ for another, so the comments are categorised based on my requirements. You should consider all points and if they could be beneficial to you.
_______________________________________________
_______________________________________________
Things I like
What doesn’t work so well for me
_______________________________________________
_______________________________________________
Strong, but well balanced, blade.
Blade coating can ‘drag’ when cutting.
Super versatile and effective sheath.
Poor factory edge.
Giant fire-steel included.
No striker for the fire-steel.
Effective and comfortable grip.
Double guard with lashing points.
Discussing the Review:
The ideal place to discuss this reviews is on a forum. If you started reading the shorter forum version of the review, but followed the link this full exclusive review, please return to that forum to discuss the review there.
If you read the review entirely on Tactical Reviews, please consider one of the following to join in any discussion.
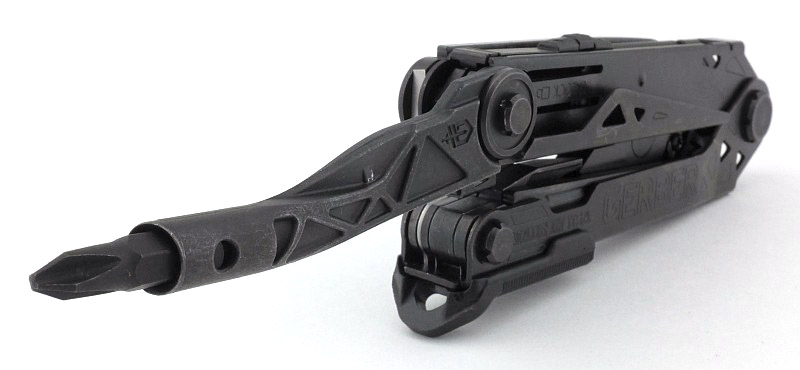


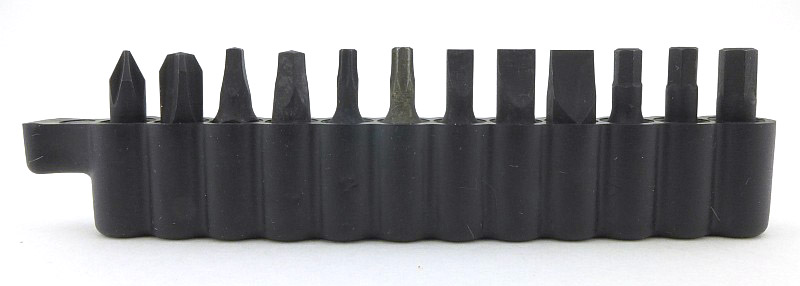
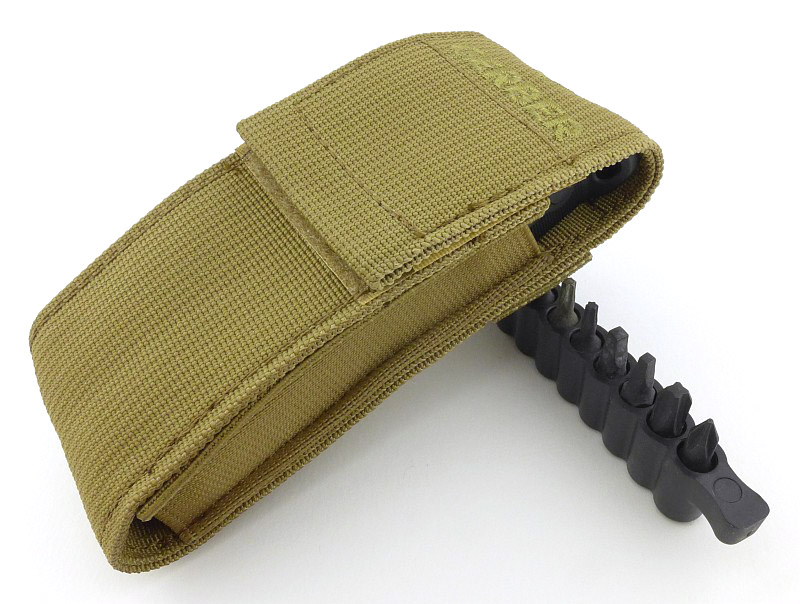


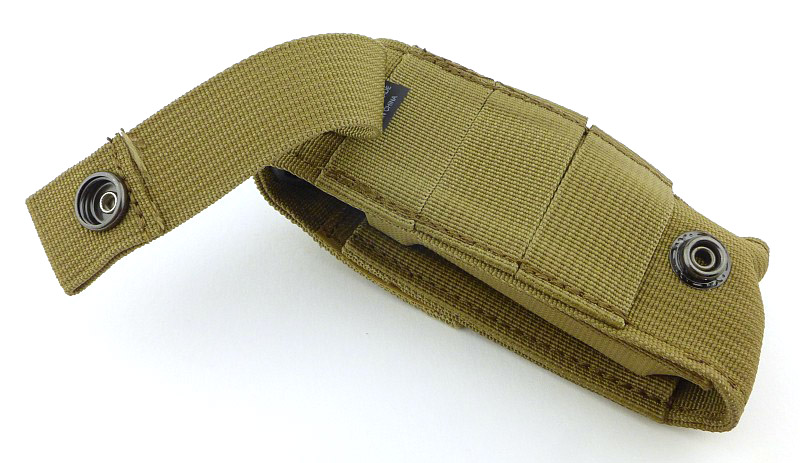

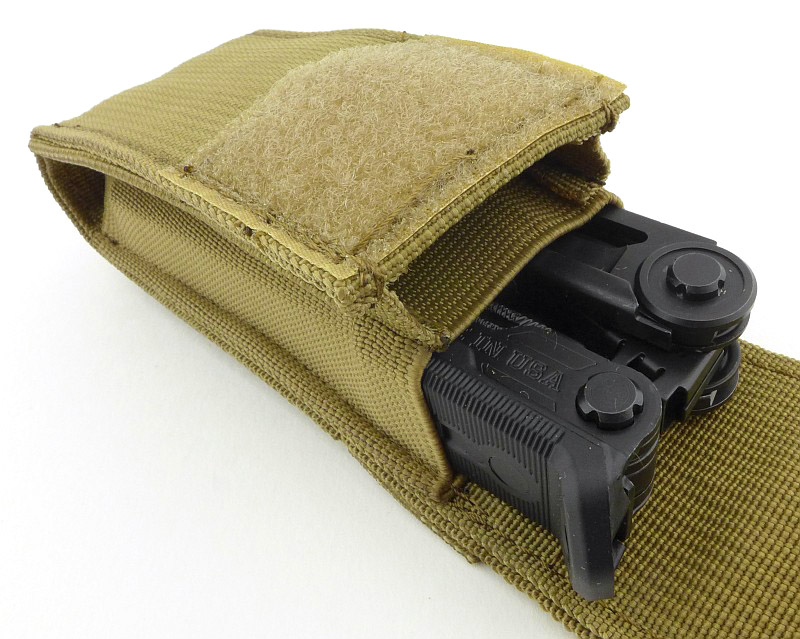
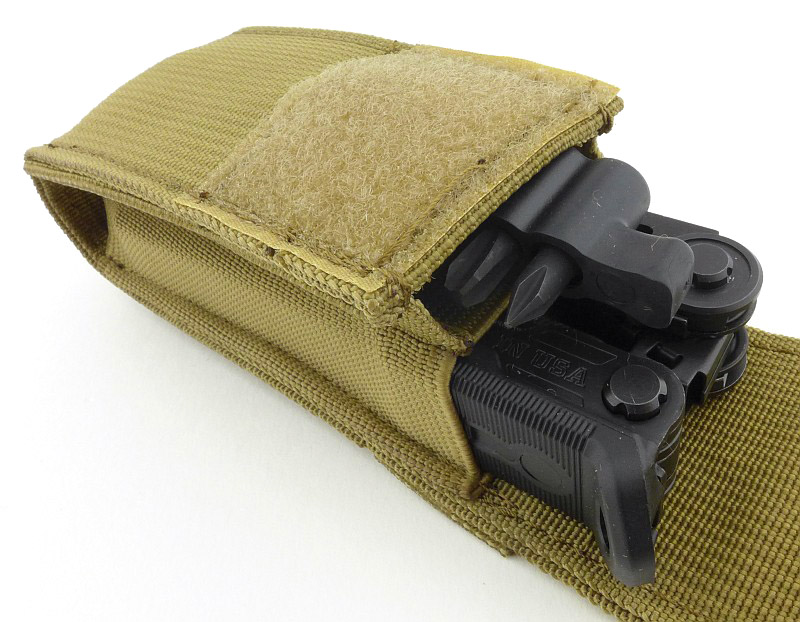

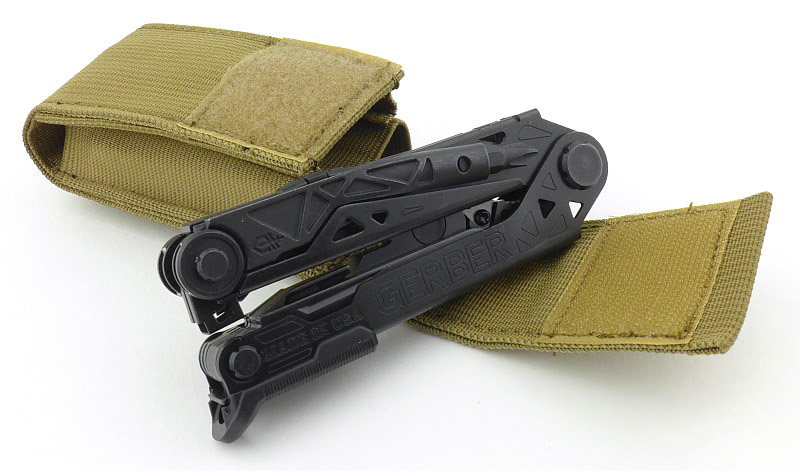
 initially comes off enough to make things dirty.")


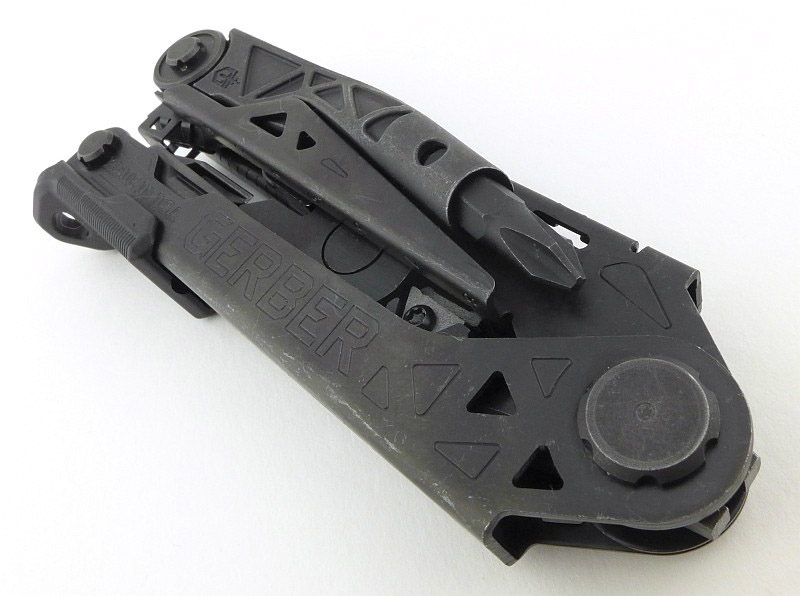


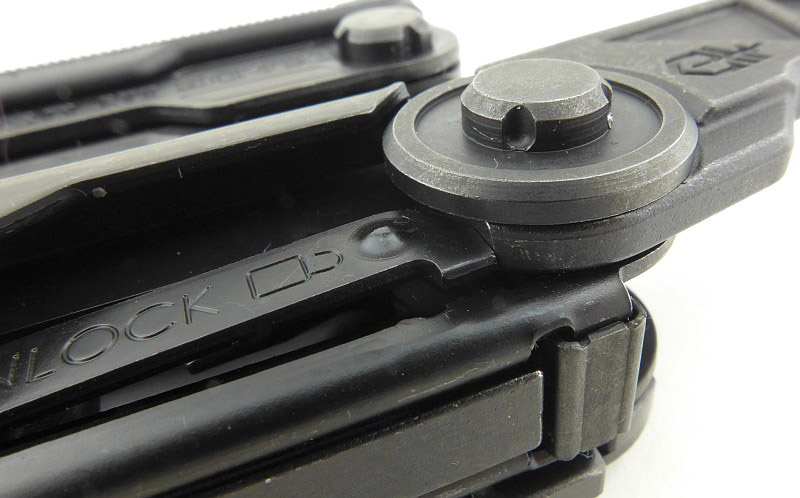


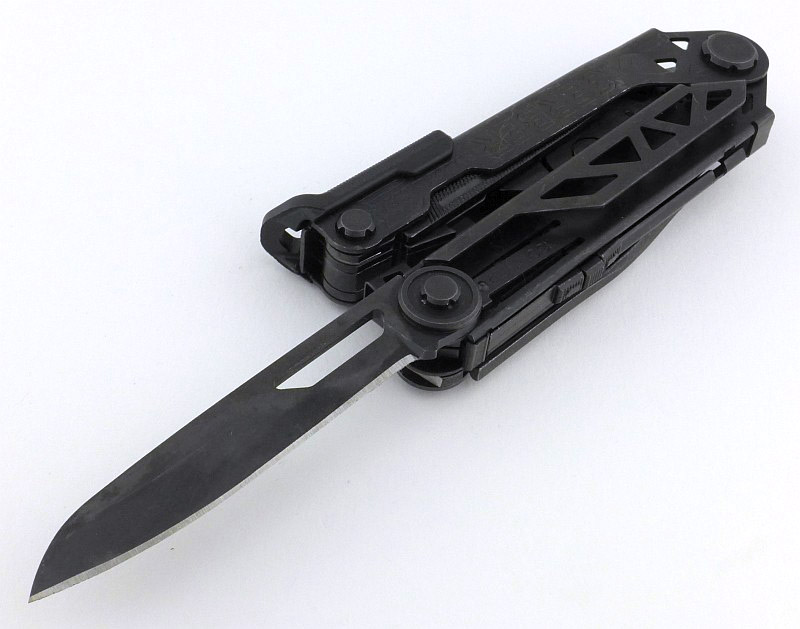


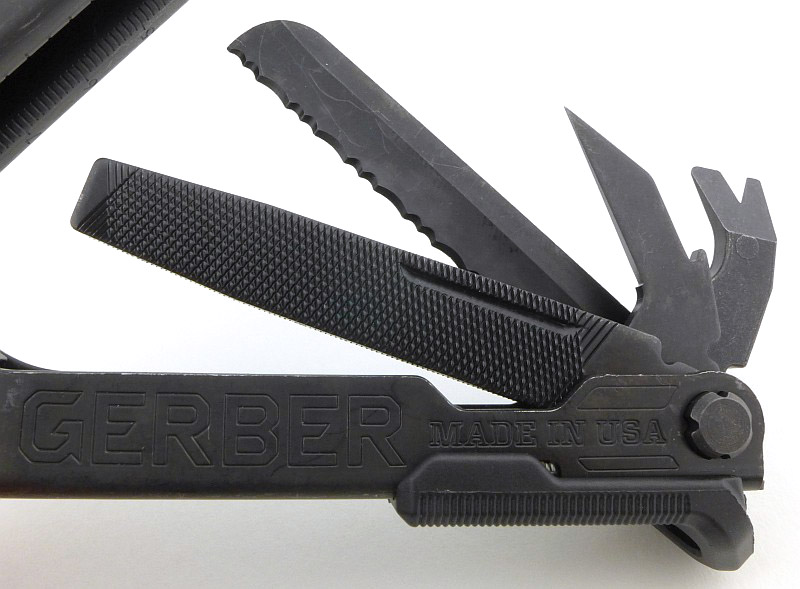


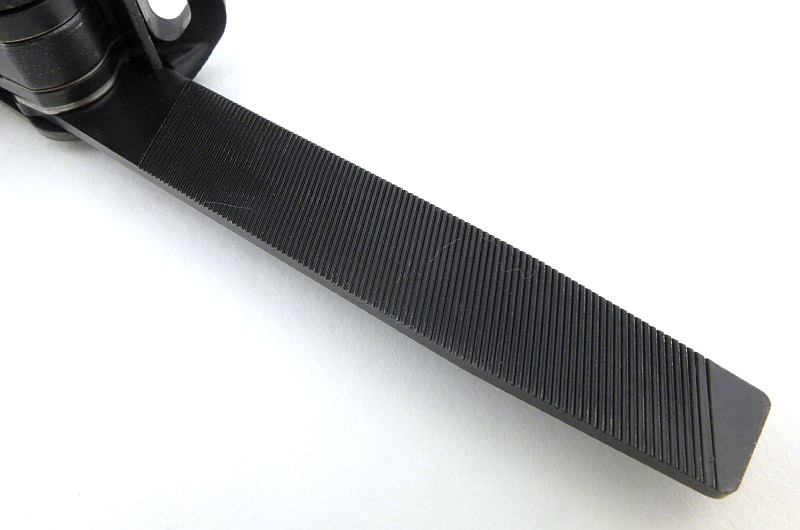

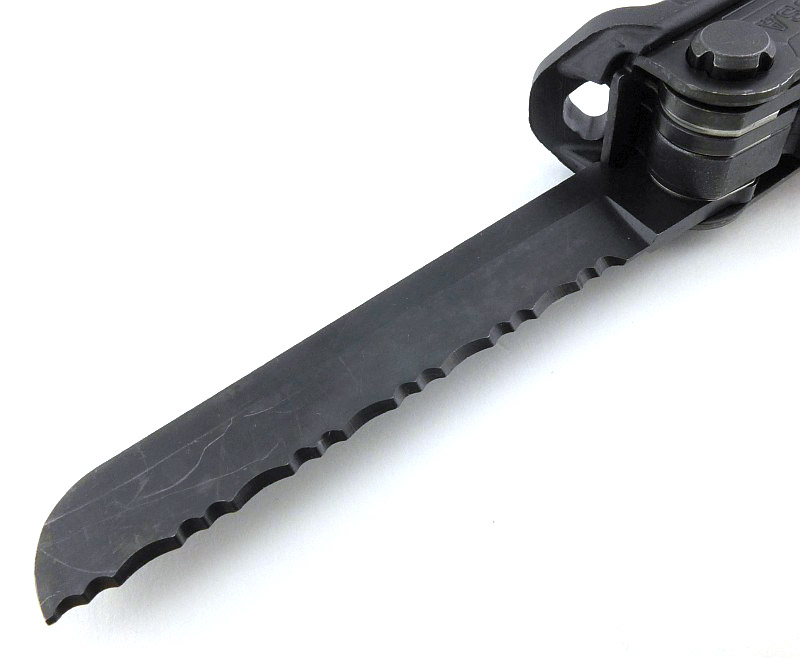


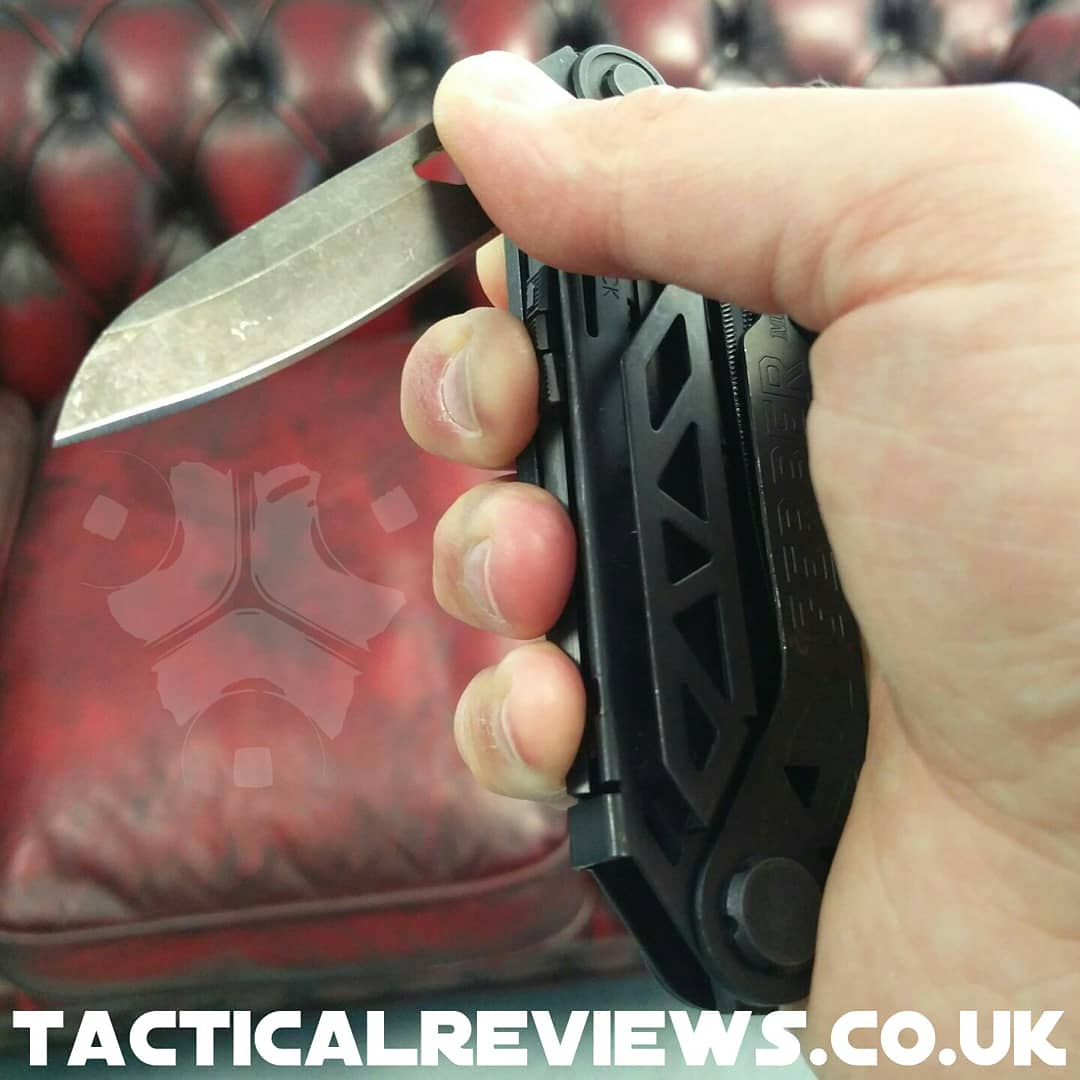


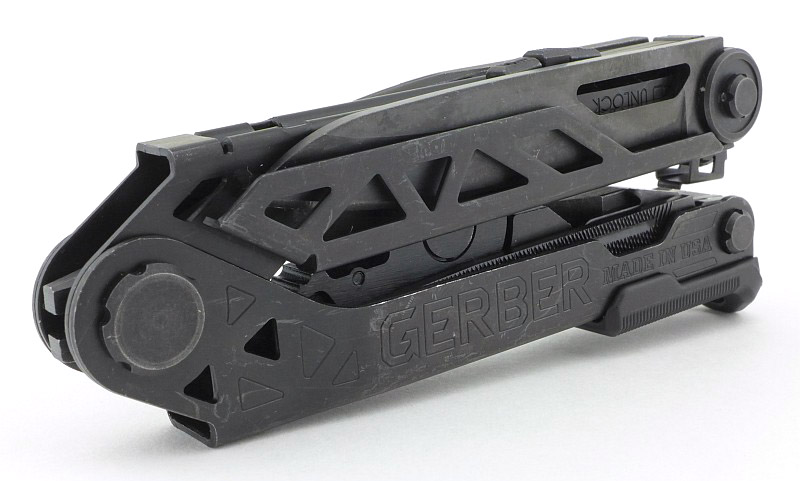

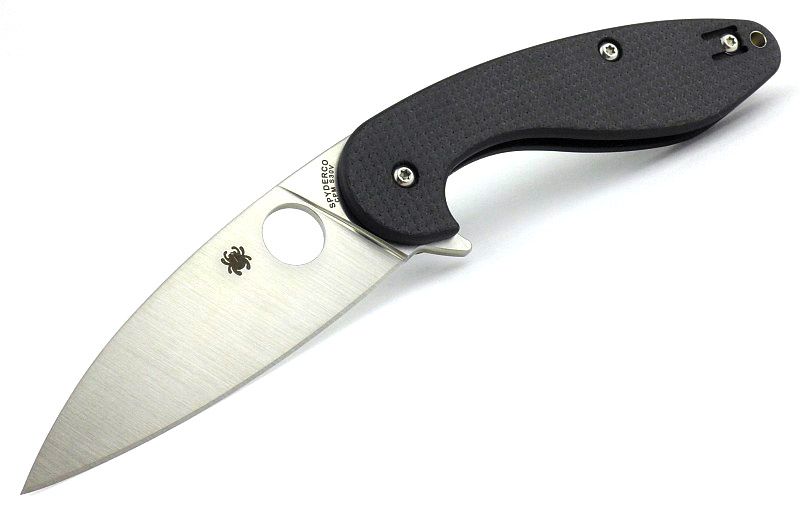

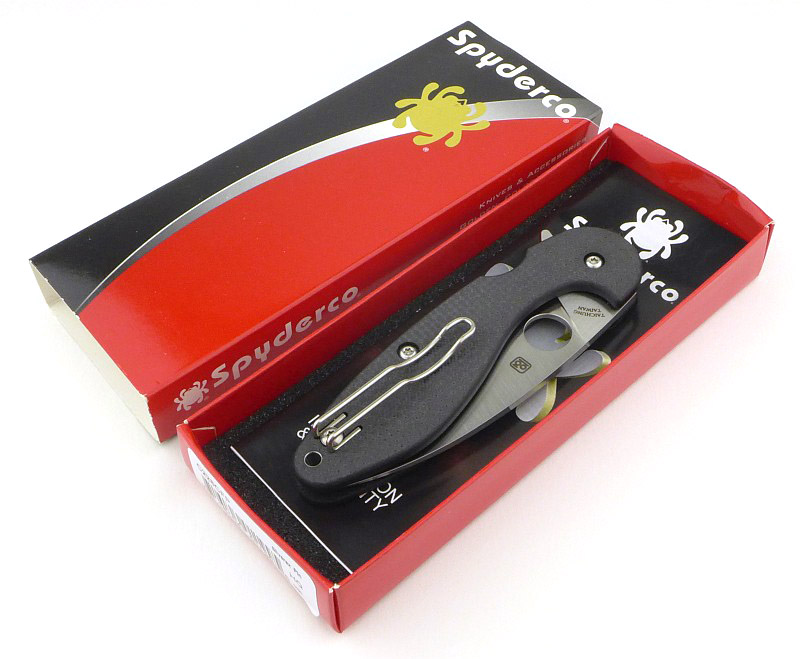
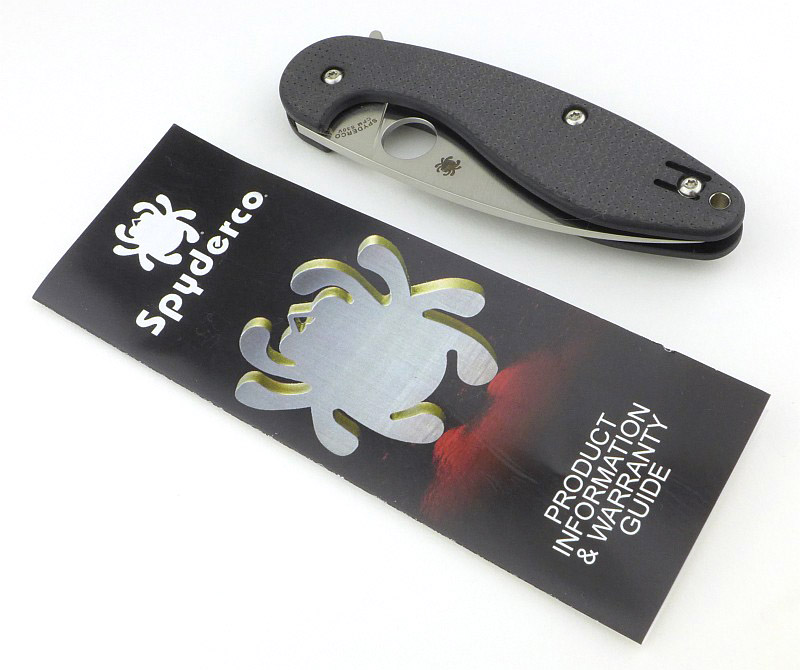

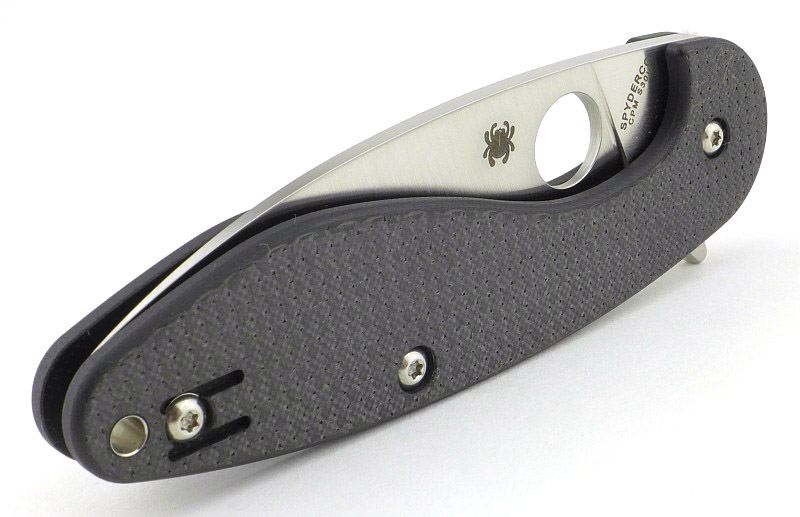


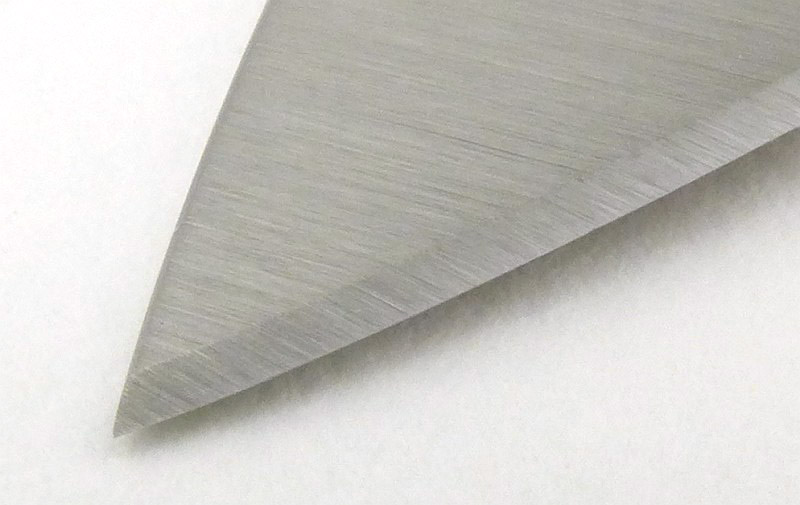
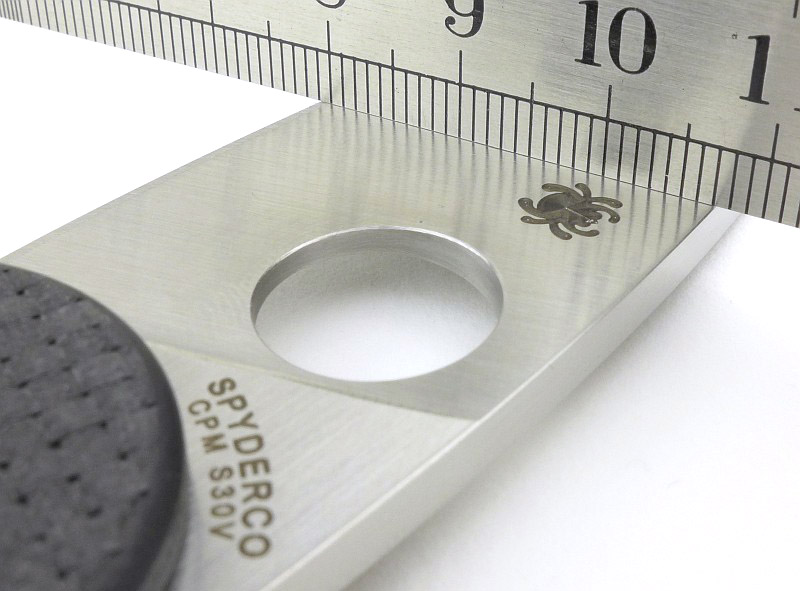
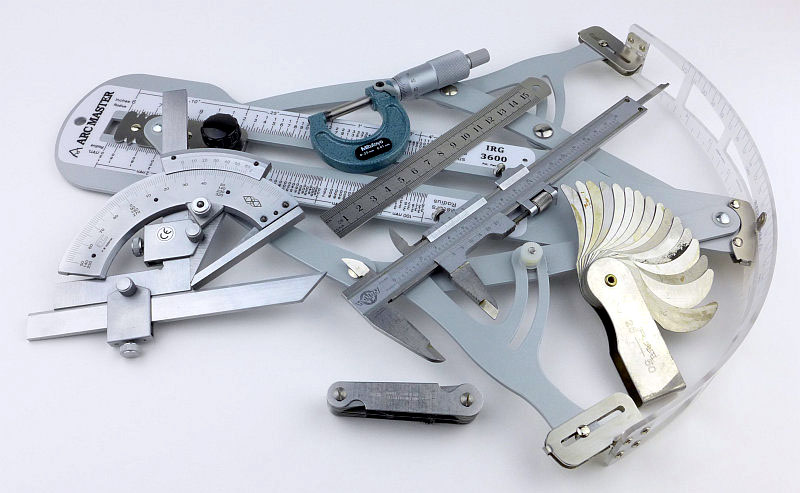
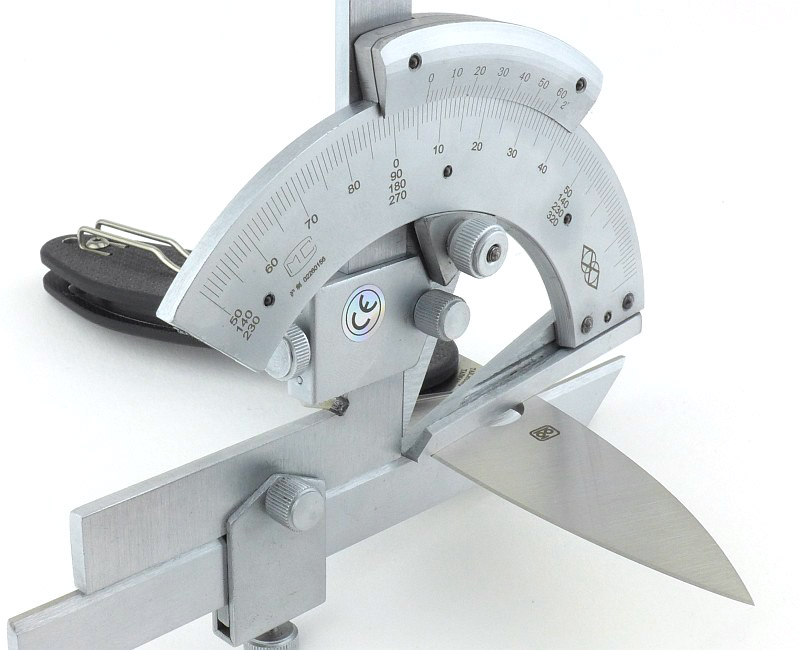


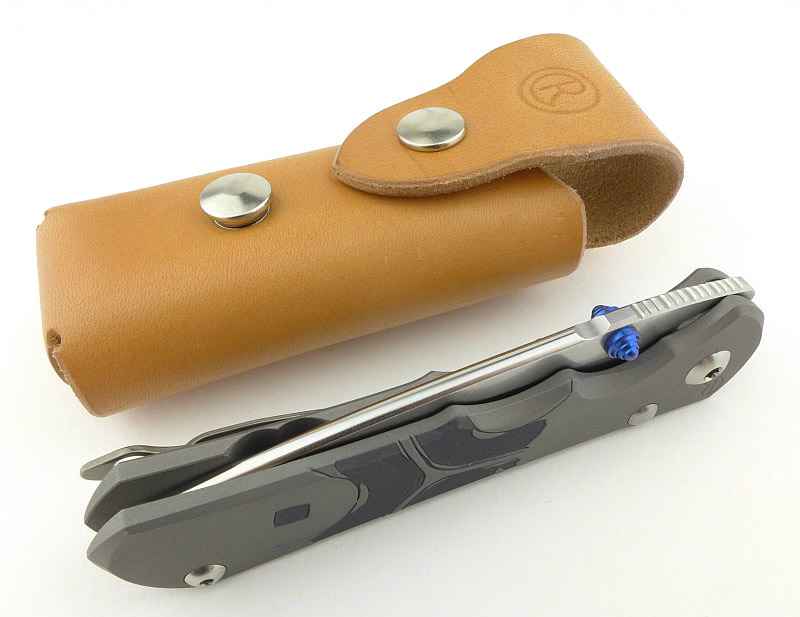

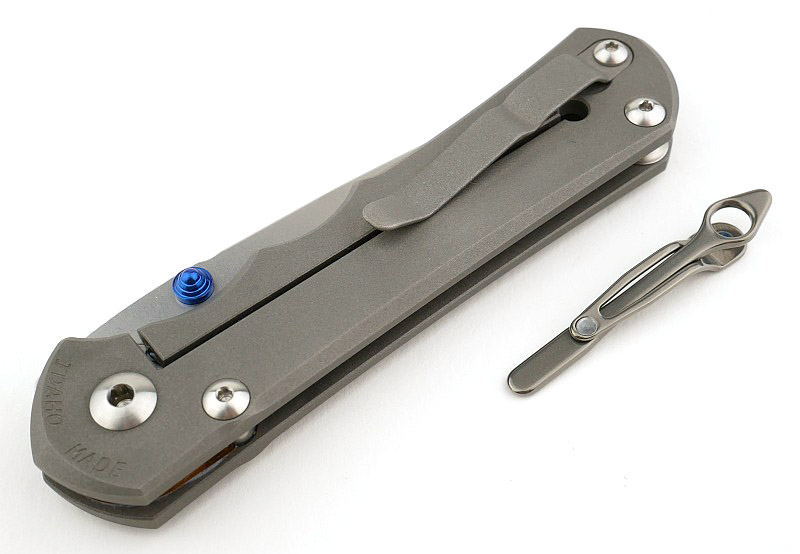


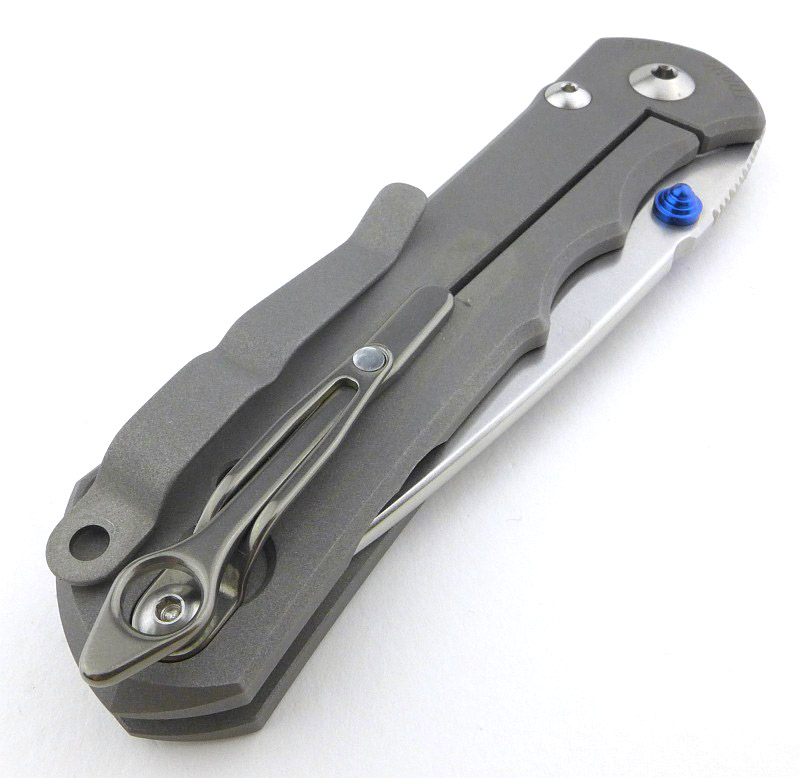
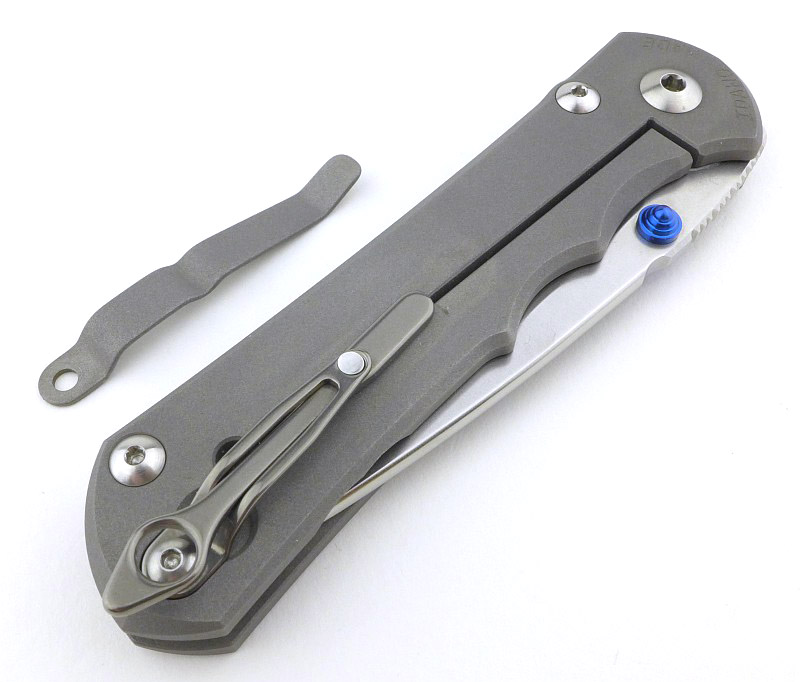


")


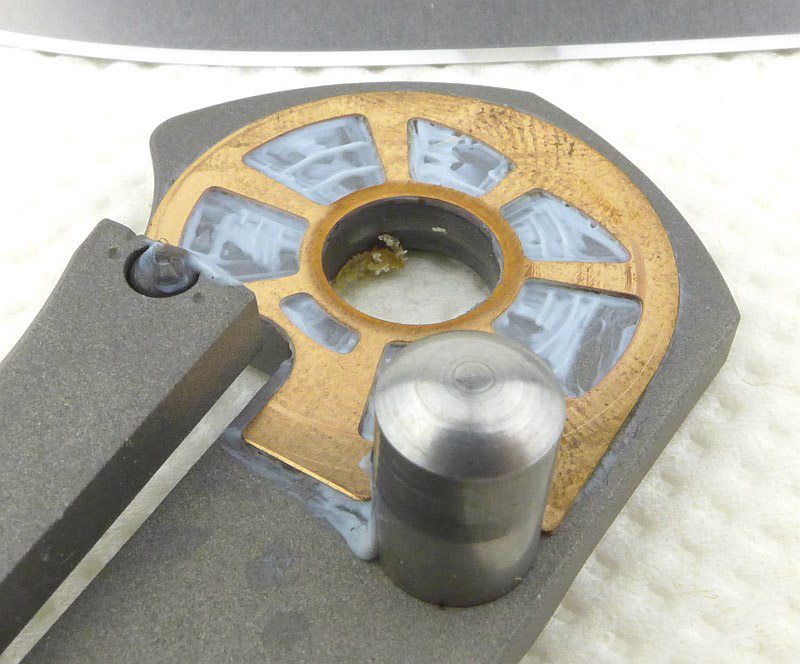


")