‘Fully Loaded’ – This is the second part of the Chiappa Firearms Little Badger Folding Survival Rifle Review, and follows on from Part 1 which introduced this handy little gun. In Part 2 I’ll be covering more details of the Little Badger accessories, how they fit and perform, and a nice modification that, for me, transformed this rifle.
The accessories in detail:
Keep an eye out for the comments on each image. Some of the key points to look out for are:
The effect add-on handles have on folding the rifle, and how easy they are to fit and remove.
A compact scope (from In Your Sights) really does make all the difference in sighting.
Subsonic .22LR plus a moderator really makes for a great combination.
The hammer extension, which seems such a great idea to improve ease of cocking the hammer, might not work as well as hoped.
This gallery will show how they all fit together.
Now onto those optional extras, and the cleaning kit grip.
Unfortunately you need a long driver to fit this handle (instead of just screwing it in).
The threaded hole is at a slight angle.
It does improve ergnomics.
But restricts folding.
A more serious handle option, the moulded pistol grip.
Slide it onto the rail and tighten the fixing screw.
Serious improvement in ergonomics.
And in looks.
But a slight issue with folding - more on that later.
Fitting a compact scope is a massive improvement on sighting.
Fitted with QR mounts.
QR to stay in line with the super compact folding setup.
Building things up with scope and grip.
Then a moderator.
Take off the thread protector.
It does give the folded package more bulk.
A bit like one of those computer games with 'upgrades'. Pistol grip, scope and moderator.
In theory the hammer extension is a good idea. It did not work out that way.
Tighten the grub screw to secure.
Nearly fully kitted out.
Bringing it all together:
So far the photos have been from an initial studio shoot, but now we are moving onto areas which are being re-visited based on using the Little Badger, plus a game changing modification of one of the accessories.
That modification is of the pistol grip – check the gallery for more.
For scale with ammunition.
Partially inserted round.
Folding the Little Badger the break action lever contacts the lower rail.
Pushing a little harder and the lever will move and allow the rifle to fold a little further.
The modified pistol grip with removed parts.
Tough it looks simple, this is a tricky modification.
A coping saw and Dremel drum sander were used for this.
Jumping back to the pistol grip, this is the customisation I made to it to allow the rifle to fold into it.
But worth it...
As the rifle now folds again - with a great handle.
As if it was always the intention to have the handle.
And it still fits in the case.
Fully loaded!
What it is like to use?
Taking the fully loaded (in terms of accessories) Little Badger for a few range sessions resulted in some unexpected troubleshooting (pun intended)!
Knowing how different guns seem to prefer different ammunition, sometimes not the ‘best’ quality ammo, I went with a selection of usually reliable options.
A Slight Issue – easily resolved:
Comfort and stability were all good, but I found myself struggling to get my test groups shot, as there were SO many misfires. Change ammunition, try again, check the firing pin and hammer, try again.
Normally after waiting for a potential hang-fire, I rotate a misfired round so the firing pin can strike a fresh part of the rim. In some cases I did this six times. With the external hammer, I could of course simply re-cock it and go again without opening the action. This turned out to be the way to get a reliable ignition on all misfires.
This second strike also led me to the misfire being due to a light-strike. Why though? After considering all the options it seemed that possibly the extra weight of the hammer extension might be slowing the hammer speed and reducing the inertia of the hammer striking the pin. OFF with that extension and ON with the shooting. Every strike was now a reliable ignition. A pity, but at least the Little Badger was not at fault.
Range:
With the open sights and their limited adjustment, the accuracy was limited too. It felt that the 25yd range would be the most I would take on a live target. With the (max 4x magnification) scope fitted, 50yd would be a comfortable rabbit range, but with the results of the paper target grouping, I would not be happy extending this out to 100yds.
Looking at the 50y target.
The reticle was good for different distances.
Spending time on the range.
Trying out different ammo.
The troublesome hammer extension.
Light strike - left - due to the hammer extension.
Off with you.
A few examples.
I did go out to 100y with this rifle.
A 50y group.
One of the 25y targets.
A nice easy gun to carry and use.
Trigger pull was very good considering the price of this gun. Not quite a glass rod breaking, but smooth, consistent and a good weight. Taking an average and carefully measuring using a force gauge and custom trigger hook, this trigger is breaking at 2.3 lb.
One of the complete joys with this rifle is how easy it is to carry. There are definitely days when I’m not really on serious vermin duty, so might not want to bother taking my usual semi-auto, but the Little Badger comes along without any stress.
Using this excellent little gun also proved to me that if that ‘prepping’ type scenario were to come about, this is the gun I would grab. It is not weighing me down much and the ammo goes a long way. Easy to carry, compact, simple and reliable (without that hammer extension).
The Transformative Modification:
Of the two options, the serious pistol grip is actually a grip made for the Chiappa MFour Semi-Auto rifle. This is the reason it gets in the way of the folding action, it was not actually designed for the Little Badger, but is simply a tried and tested grip that certainly improves the handling.
Making this existing MFour part into a grip specifically designed for use with the Little Badger and allows the full folding action is that transformative modification.
By cutting a slot into the pistol grip I have allowed the rifle to still fold fully. WHAT a DIFFERENCE that pistol grip makes to the handling of the gun. It adds so much stability and control over the bare rifle I would not think twice about having it fitted. If you can make the same modification I highly recommend doing it.
Review Summary
The views expressed in this summary table are from the point of view of the reviewer’s personal use. I am not a member of the armed forces and cannot comment on its use beyond that covered in the review.
Something that might be a ‘pro’ for one user can be a ‘con’ for another, so the comments are categorised based on my requirements. You should consider all points and if they could be beneficial to you.
_______________________________________________
Things I like
_______________________________________________
Super folding action.
Very compact.
Plenty of rails to add extras on.
Light weight.
Simple, reliable mechanism.
Good trigger pull.
Everyone on the range loved this.
_______________________________________________
What doesn’t work so well for me
_______________________________________________
The hammer extension causes light-strikes.
The two pistol grip options interfere with the folding.
Plastic ejector – I’d prefer this to be metal.
Quite literally a ‘highlight’ from IWA 2019 are these lights from Rovyvon, so I was excited to get these on test and see what they could really do. In this review I’ll be comparing the Rovyvon A5 keychain light with two of the same size A8 variants, plus the E300S ‘Angel Eyes’, a larger but still EDC sized right-angle light. There is lots to see, especially with all the extra functions crammed into the A5 and A8 models!
I got this test group from Heinnie Haynes – if you don’t know this online shop you should do.
Taking a look at the A5 and A8:
The A5, and A8 models are all presented in the same way, so this is a quick look at the first one I unpacked.
The A5/8 come with a wrist lanyard, neck chain, USB cable, clip and spare USB port cover.
With a tubular fabric strap, the lanyard is a nice quality.
For wearing round your neck there is a length of ball chain.
A small clip increases versatility.
The spare USB port cover.
More of the details of the A5 and A8 models.
First real idea of its size.
Very easy to EDC.
Tiny writing on the tail.
The clear body is not so easy to show clearly on a white background.
Looking into the TIR optic.
Close-up of the switch.
You can see the li-po battery inside.
Pulling out the USB cover.
The USB plug looks very big in comparison.
Another view of the battery.
Onto a dark background for more contrast.
With neck chain fitted.
Charging.
The A5's packing tray.
Details printed on the A5.
With the A5, the GITD body is slightly opaque.
Fitting the clip.
Side view of the clip.
The clip fixture is very neat.
The trio.
Taking a look at the E300S Angel Eyes:
Unpacking the Rovyvon Angel Eyes.
Included in the box are the instructions, a USB cable, pocket clip, and lanyard cord.
There is also a spare USB port cover.
The lanyard cord is just a small hank of cord to be tied as you want.
The pocket clip.
The details of the Rovyvon Angel Eyes.
It's an unusual rectangular block design.
The back.
Those 'Angel Eyes' a triplet TIR.
A micro-USB port is used for charging.
The port cover pulls out.
There is a switch on the top.
And one on the side.
Plugged in and charging.
Fully charged.
The clip is a very neat and close fit.
The whole family for scale.
The beam
Please be careful not to judge tint based on images you see on a computer screen. Unless properly calibrated, the screen itself will change the perceived tint.
The indoor beamshot is intended to give an idea of the beam shape/quality rather than tint. All beamshots are taken using daylight white balance. The woodwork (stairs and skirting) are painted Farrow & Ball “Off-White”, and the walls are a light sandy colour called ‘String’ again by Farrow & Ball. I don’t actually have a ‘white wall’ in the house to use for this, and my wife won’t have one!
Here they all are, the different models, and different modes. Check the image caption for the notes.
A8 (UV model)
A8 (Red Blue Model)
A5
E300S (same exposure)
E300S adjusted exposure
A8 UV output
A8 Red Output (UV Model)
A8 Flashing Red Output (UV Model)
A8 White Side Output (UV Model)
A8 Red/Blue Output (Red/Blue Model)
A8 Flashing Red Output (Red/Blue Model)
A8 Amber Output (Red/Blue Model)
A8 Flashing Amber Output (Red/Blue Model)
A5 UV output.
A5 White Side
A5 Flashing White Side
A8 Warm White
A5 Cool White
E300S
E300S showing PWM
Batteries and output:
These lights run on built-in cells.
To measure actual output, I built an integrating sphere. See here for more detail. The sensor registers visible light only (so Infra-Red and Ultra-Violet will not be measured).
Please note, all quoted lumen figures are from a DIY integrating sphere, and according to ANSI standards. Although every effort is made to give as accurate a result as possible, they should be taken as an estimate only. The results can be used to compare outputs in this review and others I have published.
First up here are the A5 and A8 models and each measurable output. The value measured for UV will be a combination of visible blue light that is output or fluorescence of the test instrument and cannot be taken as a true UV measurement. ‘Max at Turn On’ is NOT an ANSI measurement, but a maximum value when switching on. (‘Below T’ means the output was below the threshold that could be measured.)
Then the E300S Angel Eyes. ‘Turn On’ is NOT an ANSI measurement, but a maximum value when switching on. Moon mode is not really 0lm, it is just below the threshold that could be measured.
Runtime and Charging Time:
In this gallery are charging traces recorded from a USB power monitor, plus the recorded output traces from an Integrating Sphere. Take your time here there is a lot of information.
Charging the A5 from empty.
Charging the A8 Red Blue.
Charging the A8 UV.
Charging the E300S.
All models have PWM, but at different frequencies.
A closer view of the PWM.
A closer view of the start of the runtime.
The E300S on its own.
The first part of the E300S runtime.
The Rovyvon lights in use:
I’d had a good play with these lights at IWA, but there is still that frustration waiting for the first charge to complete – all blue – all good to go!
Before I go on, this photo summarises why these lights are so good, and that is their versatility. The A5 and A8 models are all multi colour, multi-function and super compact, and the E300S is very functional and powerful.
Staying on that line of thought, two of the models in this review have UV, and one is GITD. A small gallery to show these features in action.
The A5 GITD body.
Using the A8 to charge the A5's GITD.
Freshly charged GITD A5 body.
The A8 showing bank note security features.
The timing of this review means I have actually been carrying these daily for several months now. Electronic switches means there is always a chance that parasitic drain (standby circuit power) will deplete the battery, but there has been absolutely no sign of that.
One tiny light which has several functions, definitely makes itself very useful. UV is one of my favourite secondary functions for which I normally have to carry another light. Checking bank notes and looking for elusive little lost objects can be transformed with UV light. The extra colours of light available on the A5 and A8’s secondary side outputs all fit well with other needs; you being seen, marker lights, warnings, gentle night lighting or reading, the list goes on. What do you find most useful?
It is always challenging to design easy to use controls for multiple functions, especially with only a single button (or two with the E300S), and the Rovyvon lights use a variety of press-and-hold or multi-clicks. Depending on your current dexterity (which tends to vary when cold/tired/etc), you can easily get this wrong. The worst case result is getting maximum output when you didn’t want it. This is not a criticism of the Rovyvon lights, but only a consequence of the multi-function / single button interface.
However, with the A5/A8 and E300S there is a conflict in the user interface. To get the lowest level on the A5/A8 you double click, but the E300S requires a press-and-hold. So use the E300S, and when you pick up an A8, and press-and-hold expecting to moon mode, instead you get full blast. As these are both Rovyvon lights I would have hoped for some consistency in the UI across models to prevent this accidental blinding.
PWM (pulse width modulation – strobing the output to achieve lower levels) is a bugbear of mine. Any movement becomes flickery or stuttering. Unfortunately all the Rovyvon lights use this. The E300S uses a sufficiently high frequency that it does not present as a problem, but the A5 and A8, on all lower level outputs, have very obvious flickering whenever moving. If everything is static, then this isn’t visible, but if you are walking along or scanning a space you will see flickering. There are sometimes design limitations that force the use of PWM, as the circuitry needed for constant output tends to be larger, so the small size of these light might be the reason for this compromise. I hope Rovyvon find a way to get rid of the PWM (or at least increase the frequency) as these lights would be outstanding if they didn’t flicker.
Level spacing on the A5/A8 is good, but on the E300S there is much too large a step up from the lowest level to the next one, going from ~1lm to 70lm. It really needs a 5-10lm step.
With such high outputs available from a very small light, the overall runtime at these high levels is pretty low (A5/A8), so if you like using them on full blast, you’ll be recharging quite often, but if you mainly use the lower levels or side light functions, EDC use will be covered for a very reasonable time. USB recharging makes them very easy to top up.
The clear plastic bodies are light and strong with the added benefit of showing the neat internals. They have stood up to every day keychain use along with inevitable drops, bumps and rubbing against keys.
All the details are refined and functional with great clips, carry options and spares.
Review Summary
_______________________________________________
Things I like
_______________________________________________
Multiple LEDs and output options.
Compact and lightweight.
Robust construction.
USB charging.
Excellent fit and finish.
Fully fitted out with accessories.
_______________________________________________
What doesn’t work so well for me
_______________________________________________
PWM – flickering is always a problem.
IP65 rated, so not actually waterproof.
Level spacing on E300S has too large a jump between the lowest levels.
Discussing the Review:
The ideal place to discuss this reviews is on a forum. If you started reading the shorter forum version of the review, but followed the link this full exclusive review, please return to that forum to discuss the review there.
If you read the review entirely on Tactical Reviews, please consider one of the following to join in, or start, a discussion.
This is Part One of a two part review featuring the Chiappa Firearms Little Badger folding survival rifle. Ever since I first saw this rifle, it’s been in my sights for an in-depth test and review. The Little Badger has a charm and practicality in its simplicity and easy of carry, and I can’t help but be reminded of the classic 1973 film ‘The Day of the Jackal’.
In this, Part One, of the review we start with a good look round the Little Badger, then onto the official accessories from Chiappa, and finally a cracking little 1-4×20 scope from In Your Sights, that has been a great match for this excellent super-light rifle.
The details:
First view:
The folding rifle as it arrives.
Not many rifles come in a box this size.
Also included is a case for the folded rifle.
Very neatly presented.
The box contents (minus the case).
Out of the box, the carry case straps are not ready to use.
Adjustable buckles are used.
Twin straps make this case a backpack.
Assembled and ready to use.
The 'naked' Little Badger fits into a neat carry case.
A very simple rifle.
A good look round the Little Badger – Things to look out for here are:
Taking in all the details and options for add-ons. Moderator threading, open sights, rails, action and initial adjustments.
Though simple, the Little badger gives you lots of options.
Starting with the muzzle.
Threaded for a sound moderator.
It comes with basic open sights.
The Little Badger's closed action with factory fitted rear sight.
Four picatinny rails make for a lot of customisation options.
The hammer in its furthest forward position.
Here the hammer is in the safety position.
Cocked and ready to fire.
Forward of the trigger guard is the action opening lever.
Side view of the action.
With the breech open you can see the hook used by the lock.
Even this far open, the extractor has not yet moved.
And the extractor has now engaged.
Behind the trigger guard is a short section of picatinny rail.
The Little Badger has a wire stock with plastic butt plate.
The butt plate has storage for 12 rounds of .22LR
One side filled.
The stock length has some adjustment.
A screw on each side needs to be loosened.
The second screw.
With both screws loose, you can move the wire stock.
Little Badger Accessories:
Chiappa offer several accessories for the Little Badger including a cleaning kit handle, hammer extension and pistol grip.
A hammer extension is offered - check the review for further information.
The hammer extension has been laser engraved.
A grub screw in one end is used to fix it in place.
A 'proper' pistol grip handle is offered for the Little Badger.
If you think it looks familiar, it is the same as the one for the Chiappa M Four rifle.
Fitting is via a picatinny rail groove.
I take XL-sized gloves - for reference.
An allen screw is adjusted via the bottom of the grip.
The fixing screw emerging from the grip.
Another handle option, the cleaning kit grip.
In the hollow handle is a pull-through cleaning kit with brush and mop.
The end-cap is a push-fit.
A suitable scope – In Your Sights ATOM 1-4×20:
Being a small and light rifle, it needed a suitable compact scope, and in my search for an ideal match I came across the IYS (In Your Sights) ATOM 1-4×20 compact zoom rifle scope. This gallery gives you a good look round, and through, the scope.
For the review the IYS scope had a few mounting options.
A compact 1-4 x 20 was chosen to match the Little Badger.
Included are a cleaning cloth and spare battery.
The scope comes with lens covers that can be left on in good light.
A lever allows easy zooming from 1-4x.
With the protective covers removed.
Having an illuminated reticle there is a brightness / colour dial.
Illumination off.
The objective lens has a focus ring.
Getting it set up does mean checking for the ideal focus for you.
Taking off the sight adjustment tower covers.
1/2" @ 100y click adjustment.
Just in the photo studio, here is the reticle without illumination.
Green Illumination.
And the red.
Going a little closer into the green illumination.
I have gone for QR mounts for easy removal when folding the Little Badger.
A little look round these mounts.
A QR riser block was another option.
But for me with the riser block it took the scope a bit too high.
Ready to go!
And there is more in Pt 2:
It’s not over yet! There has just been too much to look at all in one go.
Please see ‘Fully Loaded!’, Part 2 of this review for, Modifications, What it is like to use?, Test Results and the Review Summary.
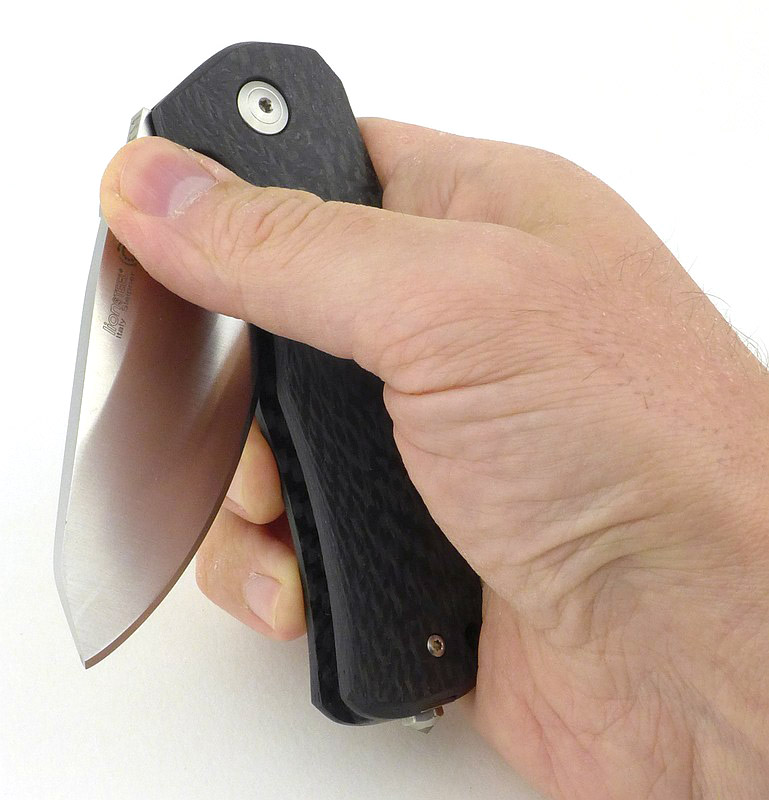
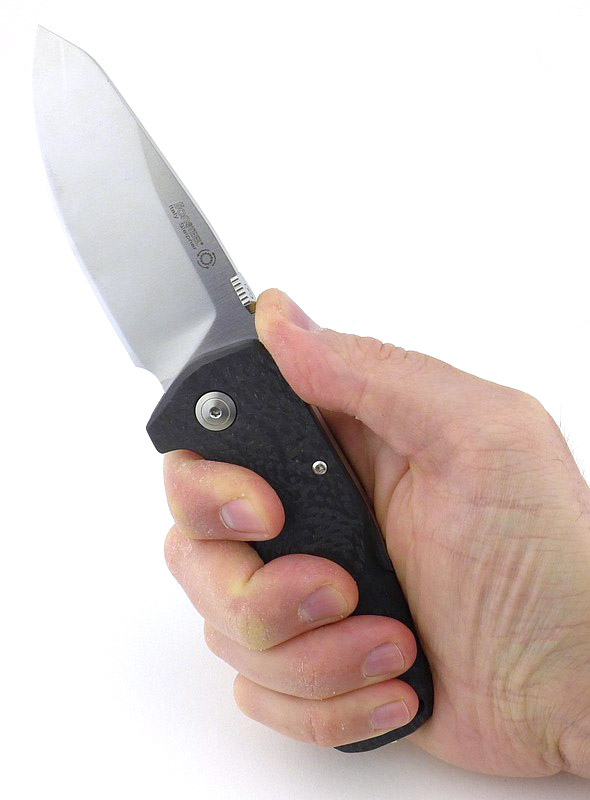
Extrema Ratio have built a reputation for making super strong knives; in this review of the Fulcrum II D ‘Heavy Folder’, we are taking that detailed ‘Tactical Reviews look’ at this re-launched folding knife. ‘Overbuilt’ is often used to describe knives with heavy construction, but is not how I would describe Extrema Ratio’s Fulcrum II. ‘Overbuilt’ suggests excessive design, but behind every Extrema Ratio design is a purpose and intent to give the owner confidence in a tool that won’t let them down. Initially I was sceptical – would the build of the Fulcrum II hamper its usefulness? But it has surprised me; read on to find out more.
A few more details:
What’s in the box?:
Extrema Ratio's nice presentation box.
Included are the warranty information and two Allen keys.
A good look round the Fulcrum II – Things to look out for here are:
As you look round the Fulcrum II you will see how the design has been kept simple yet functional and how solid every part is.
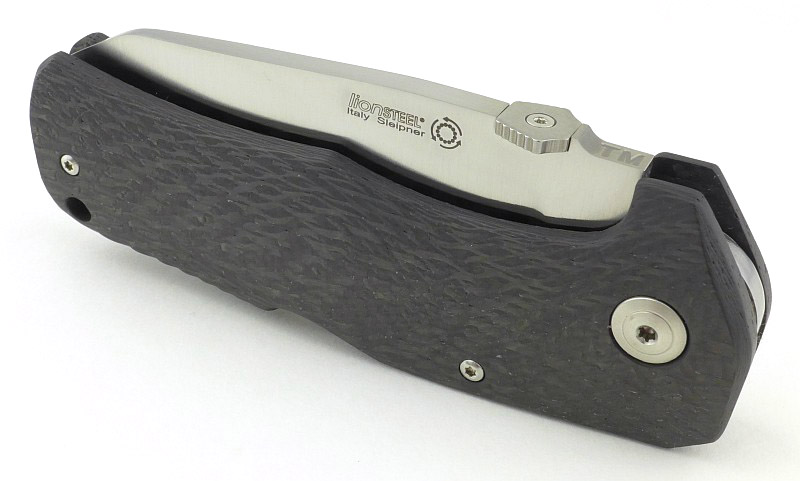
A serious looking folder.
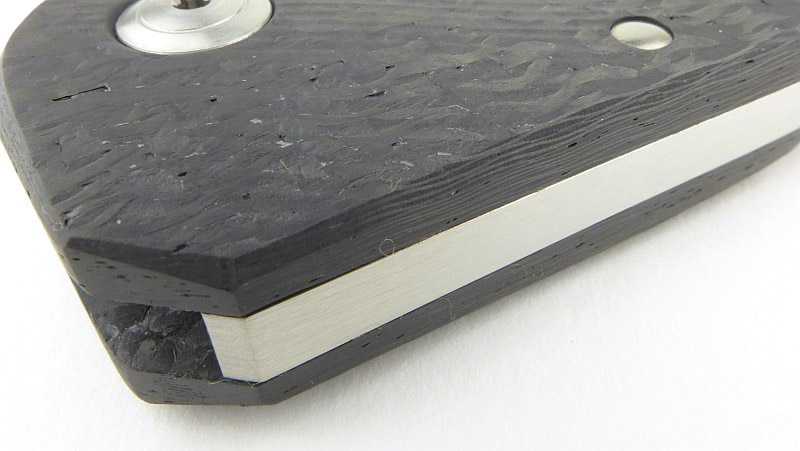
With a seriously thick blade.
The pocket clip can be fitted to either side.
The spacer extends to form a striker.
One of the Fulcrum II's distinguishing features is a locking-lock. More on this later.
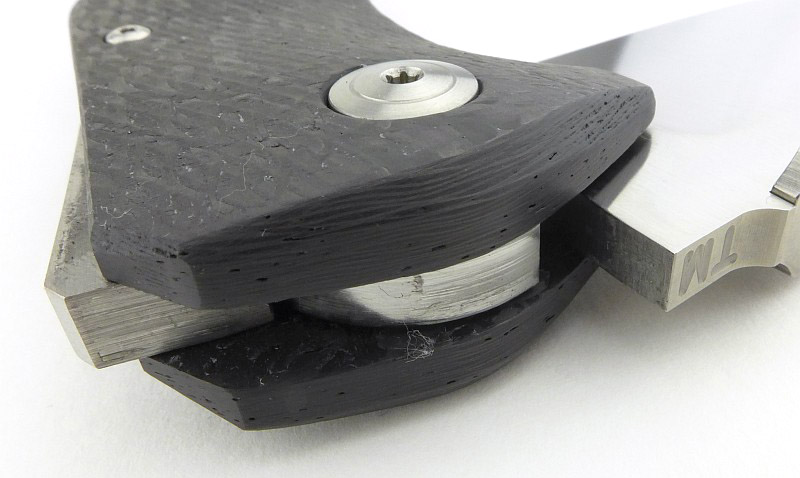
An Allen bolt is used for the pivot adjustment.
The handles have a large finger guard incorporated into the design.
The other side of the pivot bolt is a blind nut.
Showing the pocket clip shaping.
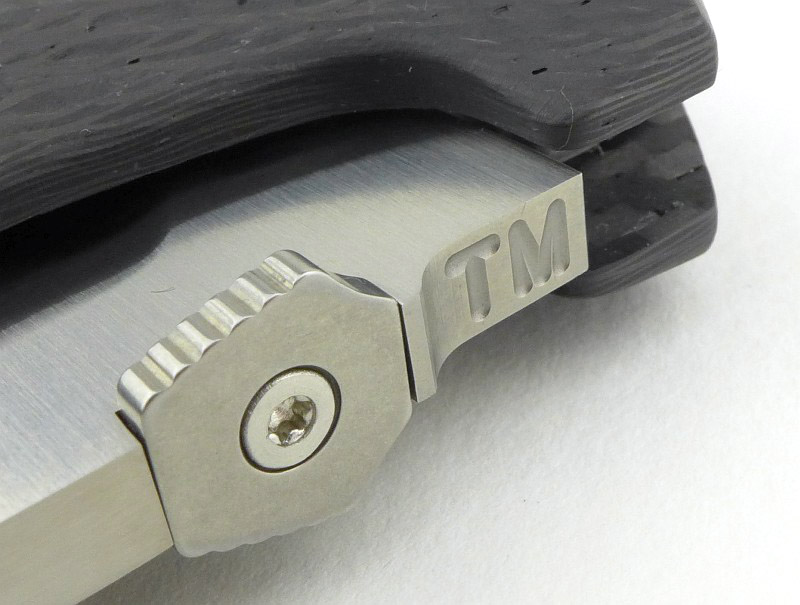
Instead of a blade-stop, the thumb stud rests directly onto the handle.
Deep thumb jimping provides extra grip.
Looking through the lanyard hole.
Here the blade is half open and the tang hook is visible.
Blade open and locked.
The 'H'.
One side of the thumb-stud is plain.
The other has a (crucial) Allen bolt.
The plunge line is well radiused.
It has a seriously strong blade.
On the back of the blade is a swedge.
Close-up of the factory edge at the tip.
Factory fitted pocket clip side view.
The other side.
The Locking-Lock:
There are other knives that have a secondary lock to secure the main lock of an open folder, and there are assisted-openers that have a safety lock to prevent the blade springing open in your pocket, but I have yet to come across another folding knife with a secondary lock quite like the one on the Fulcrum II.
A back-lock mechanism uses the lock-bar’s spring to hold the blade in the folded position and then to keep the lock engaged when the blade is open. The lock-bar needs to move to allow the blade to open and close.
In the Fulcrum II, there is a secondary manual lock that locks the lock-bar itself, preventing from moving at all. This means if the blade is closed, it cannot be opened, and if opened the lock cannot be released to allow it to fold. This single secondary lock can secure the blade in either the opened or closed position.
As this is not something that would be obvious to everyone, one use-case for this is to prevent someone taking the folded knife off you and then using it against you (unless they know). The more likely use being to effectively make the folding knife a fixed blade knife ensuring that it cannot be accidentally closed.
What is this on the back-lock bar?
A small sliding lock (unlocked).
Now in the locked position.
Like this the lock-bar cannot move.
Locked - view from the other side.
Now unlocked.
The lock-bar can now move to allow the blade to open or close.
Explained by the Maker:
The following text is from Extrema Ratio’s own product description.
This model is the evolution of the FULCRUM Folder (out of production since 2005), the first folding knife produced by Extrema Ratio according to the specifics of an Italian counter-terrorism unit. The FULCRUM II is basically identical to its predecessor, the only variations being the addition of a reversible clip and a partially lowered surface on the handle which improves the ergonomics and makes operating the opening pin easier. A manual security lock holds the BACK-LOCK mechanism lever, preventing accidental unlocking of the blade block during heavy-duty use. It can also be used to lock the knife closed in the event it’s taken away from the user: then the FULCRUM cannot be opened, even if the mechanism is often irrevocably damaged. The back of the flat-ground blade offers a comfortable resting point for the thumb. The tempered steel tang can be used as glass breaker and is provided with a hole to affix a security cord. Available versions: FULCRUM II D BLACK, FULCRUM II D DESERT WARFARE, FULCRUM II D BLACK RUVIDO, FULCRUM II T BLACK, FULCRUM II T DESERT WARFARE, FULCRUM II T BLACK RUVIDO.
The Blade and Handle – Detailed Measurements:
Now even more detailed!
Taking things far beyond most knife specifications, in this section I will be carrying out a detailed examination of geometry, balance, edge bevels, factory sharpness and structural edge testing using the industry leading measuring tools.
These measuring tools include a Vernier protractor, callipers, fixed radius gauges, the unique Arc Master adjustable radius gauge, Edge On Up’s BESS Certified PT50A and SET tester along with CATRA’s Hobbigoni LASER Edge Protractor. The BESS ‘C’ scale of sharpness (Brubacher Edge Sharpness Scale) will be used to verify the sharpness of the factory edge and allow the knife to be brought to a minimum standard sharpness before testing a blade’s cutting performance.
A set of gauges and precision measuring equipment including a Vernier protractor, callipers, fixed radius gauges and the Arc Master adjustable radius gauge.
One critical parameter is the primary grind angle.
Using a straight-edge to confirm the primary bevel type.
The balance point is found using a pivot.
Sharpness is checked using an Edge On Up PT50A 'BESS Certified' tester.
A chart showing where on the BESS scale a blade is.
The CATRA Hobbigoni measures blade and bevel angles with a LASER.
The Hobbigoni provides a lot of information about the blade and cutting edge.
A CRK Inkosi with polished Wicked Edge bevel.
A fully convexed edge on the Fällkniven F1.
Movakniv's Bushcraft showing the Scandi-edge and micro-bevel.
Spyderco's Sliverax showing the effect of surface finish.
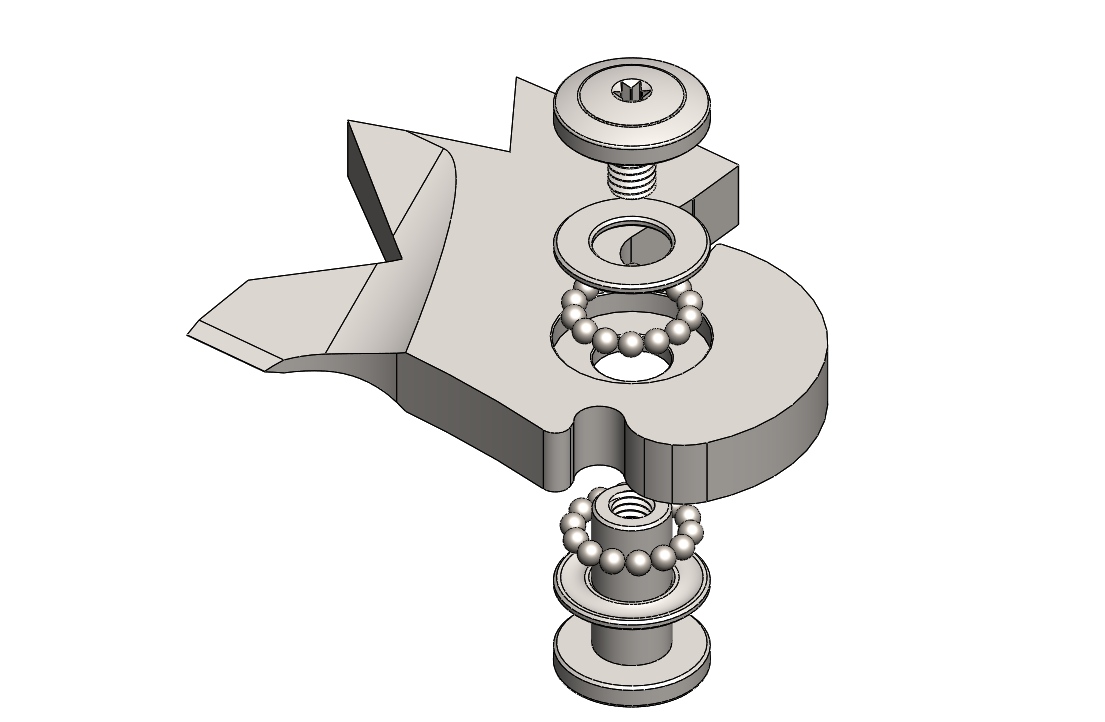
This is the Edge On Up SET (Structural Edge Tester). A precise load (the white tac on the platform is used to adjust the load) applies pressure to an 'impactor'.
The 'impactor' roller is at a 12 degree angle.
The impactor is moved along the edge to roll the edge apex. The amount of roll can then be measured.
After testing the blade is stropped to recover the edge.
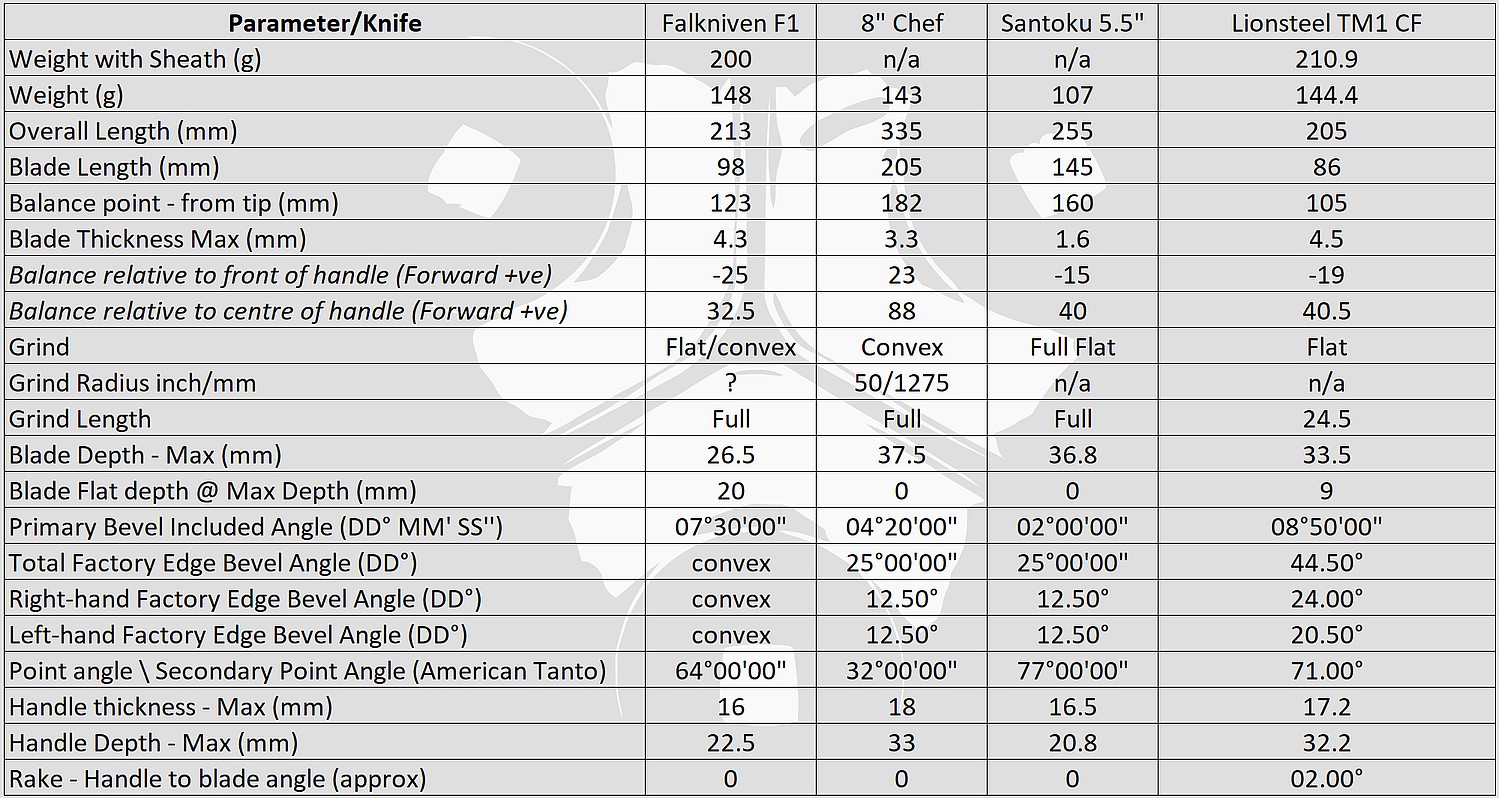
The measurements have been tabulated and are presented along with a few reference blades. The ‘Balance relative to the front of the handle’ tells you if the knife will feel front heavy, or if the weight is in your hand (a positive value means the weight is forward of the front of the handle). The ‘Balance relative to the centre of the handle’ indicates how close to a ‘neutral balance’ the knife has in the hand.
The first table in this gallery shows the standard review measurements, however, this is one of the first reviews on Tactical Reviews to feature a new measurement. Using the Edge On Up Structural Edge Tester (SET) to measure the resistance of a knife’s edge to rolling.
This is to be expanded upon in future articles, but for now, in the SET results the key factors are:
Series 1 Degradation – how much damage the edge suffers from one edge rolling cycle. The damage is represented by an increase in the BESS ‘C’ score. (Averages also shown for A and B)
Series 2 Degradation – how much damage the edge suffers from one further edge rolling cycle. (Averages also shown for A and B)
Degradation after strop – has the edge been permanently damaged/chipped or can it be recovered with stropping? A negative number means it actually improved from the starting figure, suggesting there may have already been some rolling of the edge before testing. (Averages also shown for A and B)
Factory edge BESS score.
Measuring the edge bevel.
In the SET tester.
The blade is made from BöHLER N690 STEEL (58HRC).
What it is like to use?
Before I could really appreciate the Fulcrum II, the edge needed reworking. Embarking upon this revealed a few things you should be aware of.
The factory edge was very steep, a total inclusive angle of 64 degrees. Taking the BESS sharpness measurements with an average score of 409,and a small thick blade, you have a less than eager cutter. Should you wish to use it as an extraction tool and cut through metal sheeting and pry with it, this edge will quite likely serve you well, but I wanted to know if this knife would also serve for daily tasks.
With such a thick blade and a primary blade grind at 21 degrees my intention was to take the edge angle to 40 degrees inclusive. I’d generally take a pocket knife to 30 degrees inc, but this is not a normal pocket knife and the edge bevel would be getting a bit too wide.
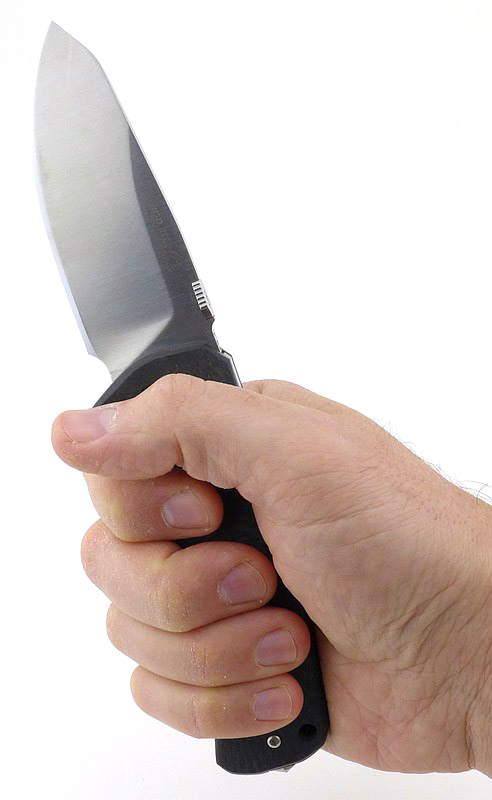
So, check this first photo in the gallery and you will see that the thumb stud creates an angle of about 53 degrees in relation to the edge bevel, making sharpening to anything less than this difficult. The only option is to remove it. Thankfully Extrema Ratio have made the thumb-stud removable and provided the Allen key for it, so no problem there. However, remember that the blade-stop in the closed position IS the thumb-stud, so once you take it off, don’t go closing the blade or you will undo all your hard work.
The major edge bevel angle change was carried out with a small belt grinder. It was taken to a burr and stropped to remove the burr, but I could never quite get it as sharp as I wanted. This might be that the belt needs changing, but before confirming that, I just moved onto a DMT Aligner kit and got the edge shaving sharp. The new edge bevel is significantly wider than the factory edge bevel, especially at the tip (about 4mm wide), so it does change the look somewhat.
The thumb studs push the edge angle to over 50 degrees.
For a better edge angle the studs need to come off.
Blade without studs - do NOT close it.
The thumb studs did have thread-lock.
The initial reprofile to 20dps.
Looking better.
However, I needed to switch to DMT to get the result I wanted.
A respectable score.
In all honesty, on first starting to use the Fulcrum II with the factory edge, I was underwhelmed and thinking I now had an overly heavy folder that was not much use to me; despite having a very satisfying presence. However, the 20dps (degrees per side) edge has totally transformed the Fulcrum II. I cannot recommend enough just putting this edge angle on it straight out of the box.
Changing the edge angle to an inclusive 40 degrees makes this a properly usable knife. You can now appreciate its substantial feel and operation along with its, now useful, cutting performance.
Despite this new edge bevel angle transforming it, the Fulcrum II does still have a very thick blade. It is never going to slice like a thin blade – but who cares?! That clunk of the lock as you open it, the handle size and ergonomics – you know you are holding heavy duty metal.
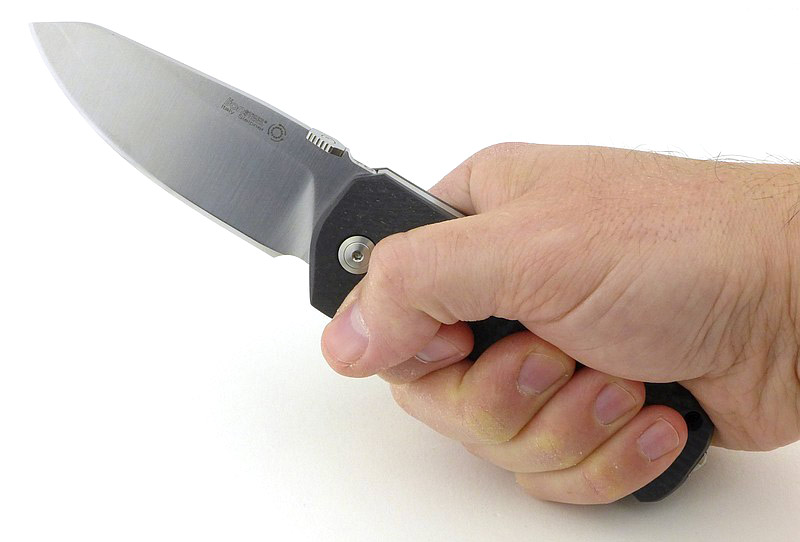
Ergonomics are good and functional even with the angular look. Thumb-stud opening is firm but not stiff. If anything is over stiff, it is the back-lock spring. Unlocking the blade is quite tough, and I need to change grip specifically to one where I can apply maximum force to the lock – I can’t see this ever releasing accidentally due to a firm grip.
I do find the secondary lock very satisfying. Perhaps oddly, I like locking it closed, keeping the blade safely folded and stopping curious people opening it. Then the secondary lock on the open knife making it close to a fixed blade. This extra level of certainty adding an extra dimension to the Fulcrum II. If I were to express a minor doubt, it is the amount of engagement of this secondary lock. The secondary locking button overlaps the handle slab (to create the block) and does so with less than 1mm of overlap. Enough to function, but not quite in fitting with the solidity of everything else.
Putting it to woodworking duty, the Fulcrum II was a pleasure to use. I didn’t want to stop carving. The new edge bevel, being quite wide, gives it a semi-scandi effect and it was just eating up stick after stick. I did remove the pocket clip as, for me, this significantly improved the ability to work with it for extended periods.
This knife demands attention. Attention simply due to its build and presence, and the attention you need to give it to get it set up right, as you will need to put that proper working edge on it to be able to appreciate it. I like big and heavy folders as long as they can be put to real work – exactly what I’ve been doing with the Fulcrum II.
An exceptional grip for thrusting.
Glove size - XL.
Thumbing it open.
The Fulcrum II surprised me.
Shavings galore!
Review Summary
The views expressed in this summary table are from the point of view of the reviewer’s personal use. I am not a member of the armed forces and cannot comment on its use beyond a cutting tool or field/hunting knife.
Something that might be a ‘pro’ for one user can be a ‘con’ for another, so the comments are categorised based on my requirements. You should consider all points and if they could be beneficial to you.
_______________________________________________
Things I like
_______________________________________________
Proper ‘Heavy Folder’ with respected pedigree.
Secondary lock, completely locking the blade open or closed.
Excellent fit and finish.
Very satisfying action.
Large finger guard.
Ambidextrous pocket clip.
Not that heavy despite solid build.
_______________________________________________
What doesn’t work so well for me
_______________________________________________
Factory edge far too steep at 64 degrees.
Thumb-stud needs to be removed for sharpening.
Relatively shallow blade for its thickness.
For hard use it is much easier on the hands without the pocket clip.
The primary lock is a bit too stiff.
No pouch supplied.
Discussing the Review:
The ideal place to discuss this reviews is on a forum. If you started reading the shorter forum version of the review, but followed the link this full exclusive review, please return to that forum to discuss the review there.
If you read the review entirely on Tactical Reviews, please consider one of the following to join in any discussion.
Finding Oberland Arms’ knives was an outstanding highlight of IWA 2018, and it became a mission of mine to review them. A happy coincidence that one other IWA 2018 highlight happened to be another knife designed by Tommaso Rumici who is the designer of the Jager Sepp on review here.
Everything came together nicely at IWA 2019, meetings with Tommaso, Viper Tecnocut and Matthias Hainich of Oberland Arms, and here is the first of two reviews for Oberland Arms knives (the Wuiderer Sepp is currently in testing).
A few more details:
No unnecessary frills with packaging that will just be discarded, the Jager Sepp and Wuiderer Sepp arrive in a plastic bag.
Starting with the sheath:
This is the one part not designed by Tommaso Rumici, but instead by the team at Oberland Arms. It has a lot of interesting features shown in the gallery.
An unusual looking sheath.
A single screw is positioned at the tip of the sheath.
A Kydex liner holds the Jager Sepp firmly in place.
A closer look at the shaping of the kydex opening.
Though MOLLE compatible, the sheath is a minimalist design.
Flipping it over to look at the MOLLE straps.
The other side of that single screw fixing.
The MOLLE straps are very streamlined.
A very unusual design as there are no press studs or velcro.
Instead there are fabric tabs.
The original Oberland Arms Logo.
Extra stitching where it is needed.
The tabs are a tight fit.
Working its way through.
The tab in place.
The MOLLE straps in a belt loop configuration.
A good look round the Jager Sepp – Things to look out for here are:
Overall there is a real sense of purpose and lack of unnecessary frills on the Jager Sepp.
The Jager Sepp is a well rounded package.
As important as the blade, the handle is a generous size.
Two large hollow bolts hold the handle together.
Jimping for a reverse grip sits along one edge of the crusher pommel.
A single finger groove makes for a secure grip and excellent indexing.
The handle is fully 3D milled and includes a large grip pattern.
The plunge line is rounded and finishes in a sharpening choil.
Tip detail with factory edge.
Plenty of thumb grip jimping.
The blade is almost a full flat grind and has a long swedge.
Explained by the Maker:
The reasons for certain design choices may not be clear when simply looking at an object, so this section is intended to give an insight into the thinking behind a design by speaking to the designer themselves.
Tommaso Rumici has been kind enough to talk to me about this knife and the design process. I am also reviewing the larger Oberland Arms ‘Wuiderer Sepp’. The interview with Tommaso is in two parts, with this review containing Part 1:
This image of the first sketch of the final design of the Jager Sepp has been kindly provided to me by Tommaso Rumici.
How did you get involved with Oberland Arms to design these knives?
“Me and Matthias Hainich, CEO of Oberland Arms, met during an IWA Show. I was helping at Viper’s booth, and he was looking for someone to produce knives for his brand. At the beginning, we started with a lightly modified version of the Viper David, then we continued with exclusive designs, made for Oberland following his specifications and requests.”
Can you talk me through the design brief, and how far developed it was when given to you? “During September 2016, Mr. Hainich sent me a list of specifications for the new knife, with some indications about the tasks it would have been able to accomplish, and a few examples of existing knives with the same characteristics.
The new knife was going to be a fixed blade, with green or coyote G10 handle, 11,9cm blade with 5mm thickness, flat grind, with stonewashed finish, and a Kydex/Nylon sheath.
I started working, exchanging emails with Matthias, and before October we arrived to the final design of the smaller one.
Since Mr. Hainich is a fan of my Carnera, we also tried a bigger blade with a similar Bowie design (but smaller than Carnera’s one, which is too big for a military knife). This blade became the bigger one.(The Wuiderer Sepp.)
At the end, we had a meeting with Mr. Miniutti (Viper), and checked everything before production. During that meeting, we decided for the Black Stonewashed PVD, and to work on three different handles: OD green, coyote and wolf grey G10.”
There was a repeated question I got when talking to others about these knives – why D2? AISI D2 is a good steel for hard working tools. It holds a good edge, it’s tougher than a lot of “inox”, and more stainless than high carbon steels, like 1095. It isn’t the latest alloy invented but, in my opinion, it’s a great choice for a military knife, that can be abused or lost in the field, because it gives you great performances, it’s difficult to break, while keeping a great price/performances balance.
Speaking of the real life, I tested several D2 knives made by Viper, and I’m really satisfied about how they work. Especially the Viper Tank, designed to be an heavy outdoor tool.
Part 2 of this interview will be in the Oberland Arms Wuiderer Sepp Review.
In the Lab – Technical Testing!:
Now even more detailed!
Taking things far beyond most knife specifications, in this section I will be carrying out a detailed examination of geometry, balance, edge bevels, factory sharpness and structural edge testing using the industry leading measuring tools.
These measuring tools include a Vernier protractor, callipers, fixed radius gauges, the unique Arc Master adjustable radius gauge, Edge On Up’s BESS Certified PT50A and SET tester along with CATRA’s Hobbigoni LASER Edge Protractor. The BESS ‘C’ scale of sharpness (Brubacher Edge Sharpness Scale) will be used to verify the sharpness of the factory edge and allow the knife to be brought to a minimum standard sharpness before testing a blade’s cutting performance.
A set of gauges and precision measuring equipment including a Vernier protractor, callipers, fixed radius gauges and the Arc Master adjustable radius gauge.
One critical parameter is the primary grind angle.
Using a straight-edge to confirm the primary bevel type.
The balance point is found using a pivot.
Sharpness is checked using an Edge On Up PT50A 'BESS Certified' tester.
A chart showing where on the BESS scale a blade is.
The CATRA Hobbigoni measures blade and bevel angles with a LASER.
The Hobbigoni provides a lot of information about the blade and cutting edge.
A CRK Inkosi with polished Wicked Edge bevel.
A fully convexed edge on the Fällkniven F1.
Movakniv's Bushcraft showing the Scandi-edge and micro-bevel.
Spyderco's Sliverax showing the effect of surface finish.
This is the Edge On Up SET (Structural Edge Tester). A precise load (the white tac on the platform is used to adjust the load) applies pressure to an 'impactor'.
The 'impactor' roller is at a 12 degree angle.
The impactor is moved along the edge to roll the edge apex. The amount of roll can then be measured.
After testing the blade is stropped to recover the edge.
The measurements have been tabulated and are presented along with a few reference blades. The ‘Balance relative to the front of the handle’ tells you if the knife will feel front heavy, or if the weight is in your hand (a positive value means the weight is forward of the front of the handle). The ‘Balance relative to the centre of the handle’ indicates how close to a ‘neutral balance’ the knife has in the hand.
The first image in this gallery shows the standard review measurements, however, this is the first review on Tactical Reviews to feature a new measurement. Using the Edge On Up Structural Edge Tester (SET) to measure the resistance of a knife’s edge to rolling.
This is to be expanded upon in future articles, but for now, in the SET results the key factors are:
Series 1 Degradation – how much damage the edge suffers from one edge rolling cycle. The damage is represented by an increase in the BESS ‘C’ score. (Averages also shown for A and B)
Series 2 Degradation – how much damage the edge suffers from one further edge rolling cycle. (Averages also shown for A and B)
Degradation after strop – has the edge been permanently damaged/chipped or can it be recovered with stropping? A negative number means it actually improved from the starting figure, suggesting there may have already been some rolling of the edge before testing. (Averages also shown for A and B)
What it is like to use?
Of Oberland Arms’ three fixed blade knives (at the time of review), the Jager Sepp would be the all-rounder in terms of size (the main reason I’m testing it first). With a 12cm blade (just under 5″) it is in that ideal general-purpose-blade length. The high, almost full, flat grind gives the blade strength combined with powerful cutting ability.
Good handle design provides immediate indexing of the blade, comfort and grip options. On picking up the Jager Sepp, this is what strikes you straight away. It just sits in your hand, balanced nicely on your first finger, nimble and ready to work; a natural extension of your hand. The grip is a generous size without being overly large, and its size and shape have not presented me with any hotspots when working it hard. Grip indexing works almost as well in a reverse grip, considering the forward grip has that first finger groove, this is impressive.
For a working knife, three elements are as important as each other. The blade, the handle and the sheath. In some cases the sheath can become the most important element, as a knife is no good to you if it is lost, or you can’t get to it when you need to. The Oberland Arms sheath is a great mix of clever design ideas and hits a lot of sweet spots.
The nylon outer shell holds a kydex liner, meaning no additional knife retention is needed, the kydex lips hold the Jager Sepp firmly in place even when mounted handle-down. A thumb ramp is incorporated into the kydex so you can easily unsheathe the knife quietly and in full control.
Ambidextrous use is catered for in the simplest way; the kydex liner is held in the outer sheath with a single bolt. This allows you to remove the kydex liner and flip it round for left-handed use – an excellent solution. I’ll cover more on the sheath in a dedicated gallery following this one.
On its first venture into the outdoors, I went with the factory edge, but found this a little too steep an angle (52 degrees), so took this to a total inclusive of 35 degrees. I find this a good compromise when I don’t want to go all the way to 30 degrees, but want a finer edge than a typical 40 degree.
Hand size - I take XL gloves for scale
Very comfortable grip.
Strong reverse grip.
A thumb shelf makes sheath removal easy and controlled.
Now for the reason for the screw in the sheath.
The Kydex liner can be fitted for right-handed use.
Or for left handed use.
Out in the wilds.
Changing the edge bevel angle to a 35 degree inclusive.
OK, perhaps the elephant in the room – D2 steel. Once the wonder steel of legend, then becoming more mainstream, before being mostly discarded in favour of steels designed specifically for the knife industry. Is it too hard to sharpen, does it chip, does it rust, does that edge last well?
The SET testing results, included for the first time ever in a knife review, have been shown in isolation, as at the time of writing this test is still not fully proven. What I can say is that the results were in line with what I expected of D2. Those figures are a strong performance and the ability to recover means that there was no chipping. I’d say the heat treat on this by Viper Tecnocut has got it just right.
D2 by its very nature is going to be a bit harder to sharpen. Although I use a belt grinder, it is easy to feel how hard the steel is to sharpen, and the Jager’s blade was firm but not excessive. The only chipping I have experienced was when I dropped the knife onto a stone!
I’ve given the blade no special treatment, but also no abuse, and I was keen to get a patina to add to the stonewashed PVD (being stonewashed a lot of the PVD has been polished off), but so far neither the bare edge bevel not any other part of the knife have shown any corrosion.
The Oberland Arms nylon sheath has MOLLE compatible straps that are unlike any others I’ve seen so warrant a more detailed look. In this gallery I’m fitting it to a drop leg platform.
Before getting onto this is does lead me to mention why I chose to fit it to a drop-leg. With MOLLE straps, I typically arrange them so as to form a belt loop for the majority of my testing. The strap fixing design on the Oberland Arms sheath is not strong enough to do this with confidence. Unlike a press-stud fixing the fabric tabs were becoming deformed when making a simple belt loop and I had to use some auxiliary MOLLE strap I have (for pouches without any straps).
Going onto PALS webbing, the strap design is perfectly strong enough, and the effect is for the cross webbing to take the load. For a full weave, you will need to remove the kydex liner. In this gallery I did not do that, so the last weave is left undone.
Fitting the sheath to a drop leg platform.
Weaving in the normal way.
The lack of press studs makes this easier.
Access starts to become tighter.
Not much strap to work with now.
I find forceps make the last bit much easier/possible.
And through.
Now the tabs are also in place.
Ready to go on its own or...
...with a pistol holster.
Review Summary
The views expressed in this summary table are from the point of view of the reviewer’s personal use. I am not a member of the armed forces and cannot comment on its use beyond a cutting tool or field/hunting knife.
Something that might be a ‘pro’ for one user can be a ‘con’ for another, so the comments are categorised based on my requirements. You should consider all points and if they could be beneficial to you.
_______________________________________________
Things I like
_______________________________________________
Superb ergonomics / indexing / comfort.
High flat grind.
D2 with very good heat treat.
Great all-rounder size.
Versatile, ambidextrous sheath.
_______________________________________________
What doesn’t work so well for me
_______________________________________________
Sheath MOLLE straps – question over durability.
Sheath MOLLE straps – not strong enough for a simple belt loop configuration.
D2 – some would question using this steel in a premium knife.
Discussing the Review:
The ideal place to discuss this reviews is on a forum. If you started reading the shorter forum version of the review, but followed the link this full exclusive review, please return to that forum to discuss the review there.
If you read the review entirely on Tactical Reviews, please consider one of the following to join in any discussion.
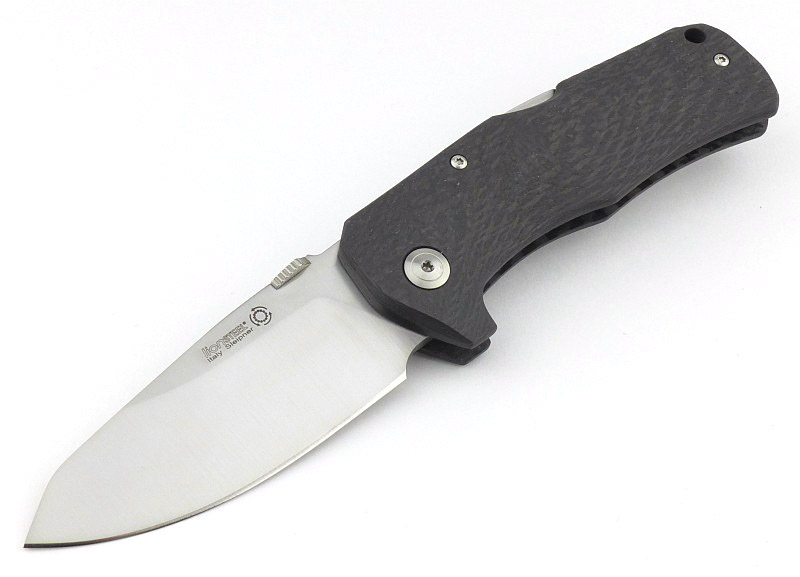
If the Lionsteel M4 is not on your list of candidates for a utility / bushcraft / general purpose fixed blade knife, it should be. It is not a new model at the time of this review, now entering its third year of production, and the Mik Molletta designed M4 from Lionsteel seemingly finds that perfect – just right – size, weight and balance. Once you pick a M4 up, it feels like it was made for you, and simply belongs in your hand.
A few more details:
The M4 featured in this review is the Olive wood handled version. Given a choice, I thought what better handle material for a knife that is Italian designed and made (and grown).
What’s in the box?:
A good look round the M4 – Things to look out for here are:
Starting with the sheath, it is clear as you look through the photos how well made this sheath is.
A beautifully designed and made sheath is included with the M4.
Double stitching for durability.
The belt loop is formed from the same piece of leather as the sheath back.
The folded over belt loop is stitched onto the back of the sheath.
The belt loop is semi-formed round the knife handle.
The front and back of the sheath (and the belt loop) are all a single piece of leather with a couple of folds.
Great attention to details, with a rivet cover inside to protect the knife.
The retention strap sits tightly round the handle and the finger guard cannot get past it.
A fantastic pairing.
Then the M4 itself. Lionsteel’s premium quality of manufacture shines through in every detail. The faithful reproduction of Mik Molletta’s design, including the sculpted handle, makes this a pleasure to handle and use.
A great looking utility knife.
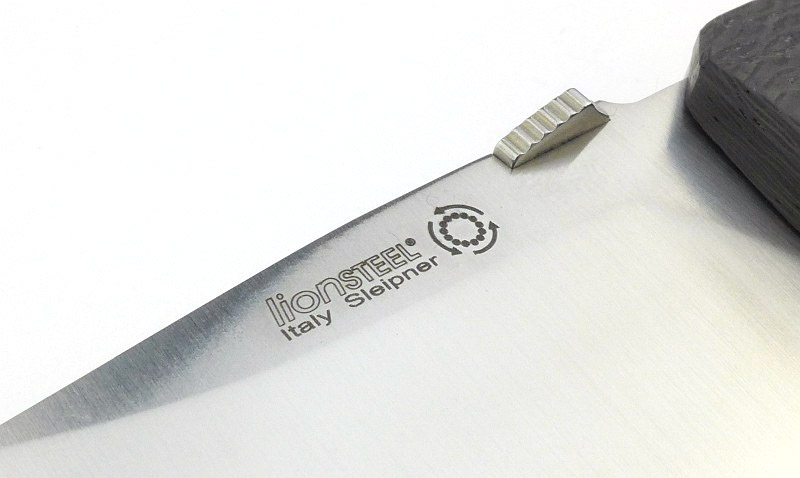
Lionsteel's logo and the type of steel is neatly engraved.
For this version it has Olive wood handles. Particularly appropriate for an Italian knife.
Torx bolts hold the handles in place.
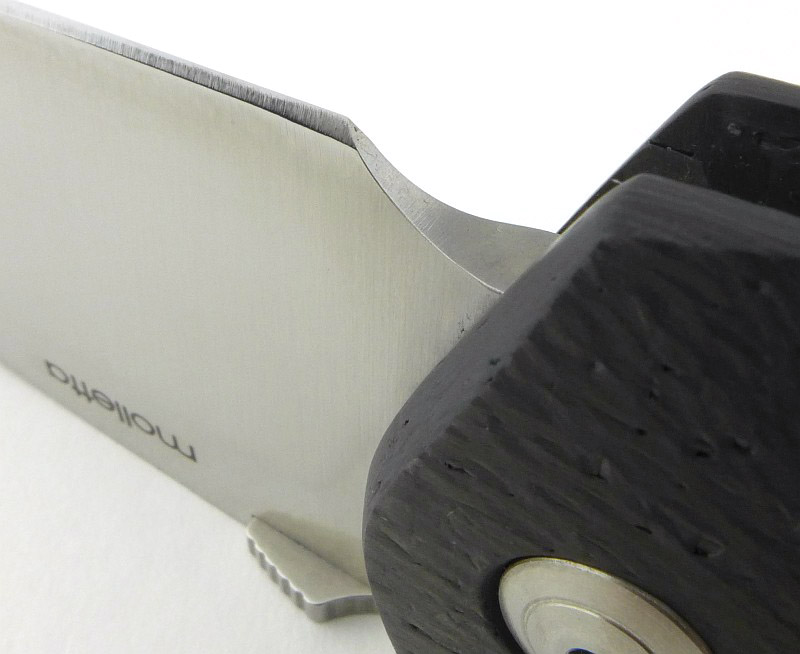
The full tang extends beyond the handles to form a striker surface.
The lanyard hole.
Mik Molletta is so good at shaping handles, and Lionsteel reproduce them so well.
Looking along the back of the handle.
The plunge line is well rounded.
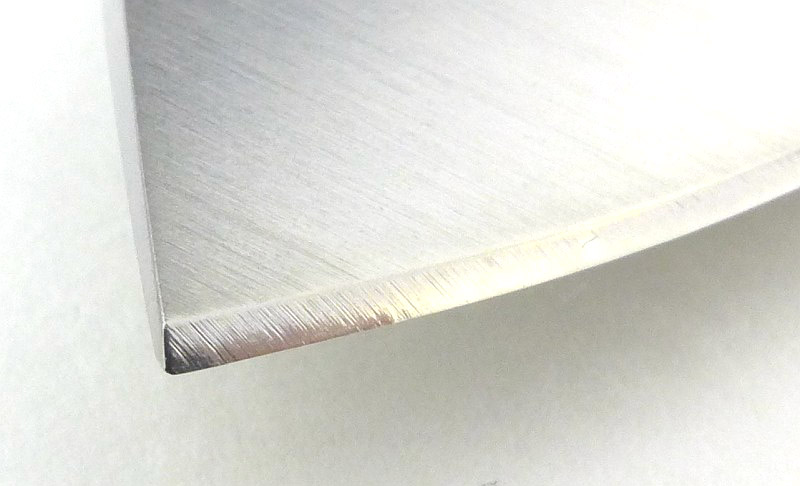
The cutting edge is finished with a sharpening choil.
Closeup view of the blade tip and factory edge.
Explained by the Maker:
The reasons for certain design choices may not be clear when simply looking at an object, so this section is intended to give an insight into the thinking behind a design by speaking to the designer themselves.
Mik Molletta has generously given his time to explain design choices, and give some background to the M4. The descriptions in this section come from our discussion.
The M4 was actually designed some time ago and because the project was so satisfying, Mik decided to propose it to Lionsteel.
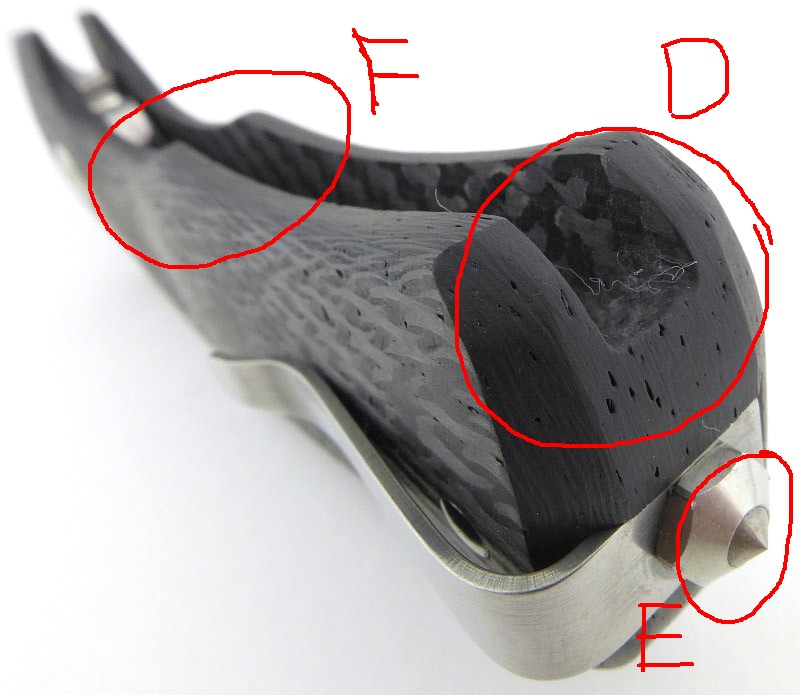
Intended as a little multipurpose knife, the size and shape of the blade (A) allows excellent versatility in all aspects of outdoor life. The finger guard (B) has been sized in order to stop it being cumbersome but still protect the hand, and it also provides an easy reference for the index finger.
A spear point (C) was chosen as it is versatile and robust, and allows you to do hard work. For its size the M4 has quite a thick blade, this thickness (D) was chosen because the knife is still a tool that can be called upon to perform even heavy work like batoning.
M390 (D) is one of few stainless steels that with specific heat treating can have secondary hardening. It is Mik’s opinion that tempering this steel in the ordinary way, as most of the cutlery does, does not fully exploit the potential of this steel.
The flat grind (E) is ‘high’ but not ‘full’. Having a full thickness part of the blade reinforces it and makes it suitable for heavier work.
Mik’s designs tend to include a sharpening choil (F). This is because during the subsequent sharpening, if there were not the choil, that part of the edge would be rounded up because it would not be able to contact the stones properly. This would result in having a long piece of edge that cannot be sharpened which ends up growing over time.
The handle is bolted (G) on instead of riveted. In Mik’s opinion, bolts are a better fastener for more durable tools. Rivets can yield or loosen and cannot be tightened.
Handle shaping (H) is a careful process of sculpting the form while looking at the fit into Mik’s own hand.
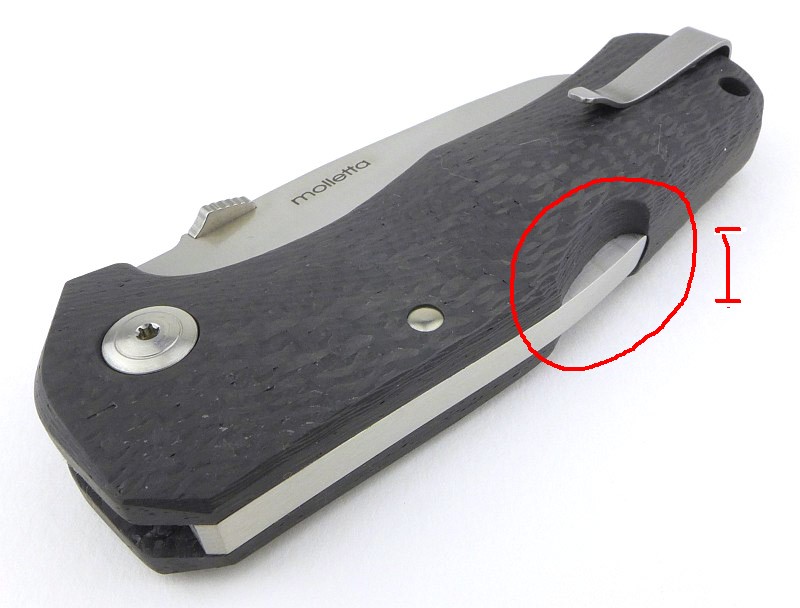
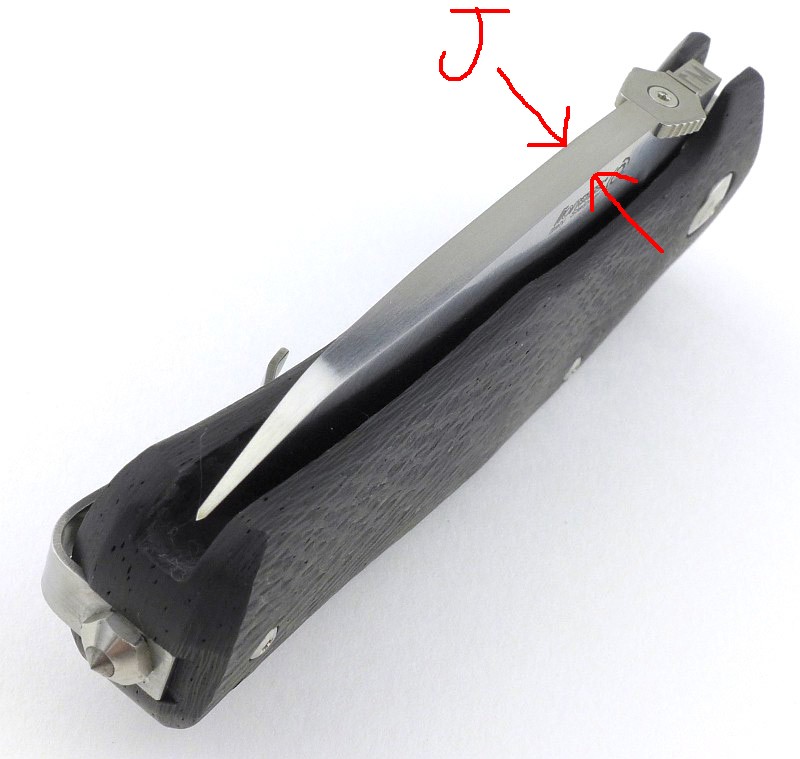
When it came to the sheath design (I), this was collaboration between Mik and Gianni. The double stitching (J) guarantees greater durability at the cost of a small increase in size.
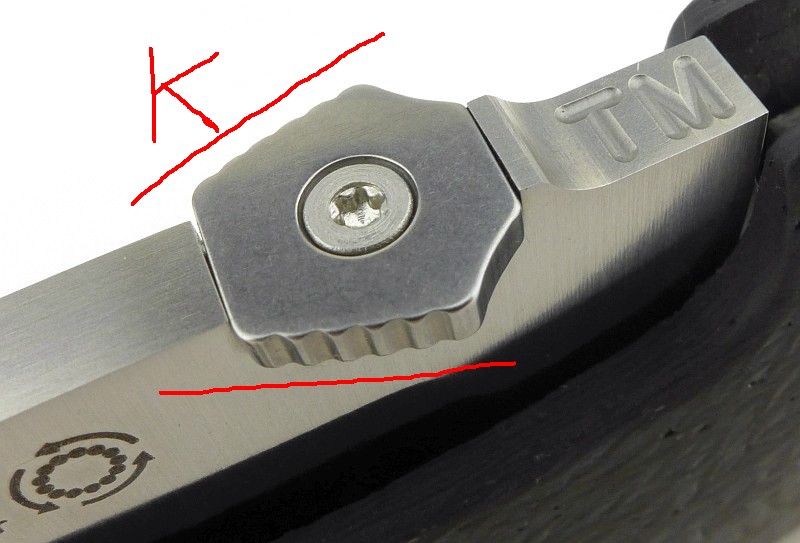
For left-handed users (K), Mik and Lionsteel are thinking of making some specific sheath or modular sheath like the one on M7, that can also be used by left-handed users.
The butt of the knife has an exposed tang (M), and can be used to strike or press.
When asked about the palm swell (N) Mik commented – during use of the knife, the hand tends to move on the handle to look for the most comfortable grip. It happens naturally. A pronounced palm swell limits this possibility. On the big knives, like the M7, the bigger palm swell helps to hold the knife firmly.
The Blade and Handle – Detailed Measurements:
Now even more detailed!
Taking things far beyond most knife specifications, in this section I will be carrying out a detailed examination of geometry, balance, edge bevels, factory sharpness and structural edge testing using the industry leading measuring tools.
These measuring tools include a Vernier protractor, callipers, fixed radius gauges, the unique Arc Master adjustable radius gauge, Edge On Up’s BESS Certified PT50A and SET tester along with CATRA’s Hobbigoni LASER Edge Protractor. The BESS ‘C’ scale of sharpness (Brubacher Edge Sharpness Scale) will be used to verify the sharpness of the factory edge and allow the knife to be brought to a minimum standard sharpness before testing a blade’s cutting performance.
A set of gauges and precision measuring equipment including a Vernier protractor, callipers, fixed radius gauges and the Arc Master adjustable radius gauge.
One critical parameter is the primary grind angle.
Using a straight-edge to confirm the primary bevel type.
The balance point is found using a pivot.
Sharpness is checked using an Edge On Up PT50A 'BESS Certified' tester.
A chart showing where on the BESS scale a blade is.
The CATRA Hobbigoni measures blade and bevel angles with a LASER.
The Hobbigoni provides a lot of information about the blade and cutting edge.
A CRK Inkosi with polished Wicked Edge bevel.
A fully convexed edge on the Fällkniven F1.
Movakniv's Bushcraft showing the Scandi-edge and micro-bevel.
Spyderco's Sliverax showing the effect of surface finish.
This is the Edge On Up SET (Structural Edge Tester). A precise load (the white tac on the platform is used to adjust the load) applies pressure to an 'impactor'.
The 'impactor' roller is at a 12 degree angle.
The impactor is moved along the edge to roll the edge apex. The amount of roll can then be measured.
After testing the blade is stropped to recover the edge.
The measurements have been tabulated and are presented along with a few reference blades. The ‘Balance relative to the front of the handle’ tells you if the knife will feel front heavy, or if the weight is in your hand (a positive value means the weight is forward of the front of the handle). The ‘Balance relative to the centre of the handle’ indicates how close to a ‘neutral balance’ the knife has in the hand.
The factory edge was pretty uneven.
The blade is made from M390 steel.
What it is like to use?
Big knives; who doesn’t love them?! But the reality is that most of your normal ‘utility’ tasks are far better served with a smaller, lighter and more agile knife.
I have a confession – I very nearly passed over this knife. It doesn’t shout for attention amongst many other fine blades, and your every-day working knife is easily overshadowed by the glamorous show knives. Please don’t make the same mistake – it has been one of those small revelations as to how good this knife is.
Reflecting a little more on why I nearly overlooked this, I think it may stem from the general attitude the UK has towards knives and knife carry. If you have ‘good reason’ to carry something more than a SAK, the appeal is to take that big camp knife out rather than the more useful and sensible sized utility knife.
Before you even get onto using the M4, it really shows its quality of manufacture which marks it out as something special.
For reference I wear XL sized gloves, so even with reasonably large hands this knife doesn’t feel too small. It is very comfortable and nimble in the hand. The blade length lends itself to those controlled power cuts without any excess blade waving around. You only make a power cut with the first inch or two of blade next to the handle anyway. With only a sharpening choil (instead of a finger choil) you have that optimum power with all fingers on the wooden handle.
Power where you need it.
If the blade had a slightly thinner blade, it would make slicing cuts through thicker materials easier and the knife a bit lighter. However Mik Molletta’s designs tend to err on the side of strength, and so the blade stock used is just that bit thicker than many knives this size. This adds a reassuring solidity to the design without really impacting on its cutting ability. I can only really see an issue if cutting a lot of thick cardboard or similar stiff sheet material – not really a concern here as the M4 is described as a ‘bushcraft’ knife.
In its role as a bushcraft knife, the thickness of the blade means that you won’t have any worries batoning with it, and also being a full tang knife, it is just not going to let you down by breaking. Also importantly here, the comfort of the handle means you can carry out a lot of wood preparation without it causing fatiguing or creating hot-spots. Just going back to the blade thickness again, combined with the rounded spine, it is very comfortable to place your thumb on the spine for extra pressure or control.
As you will see in the summary section, I’ve been struggling to find things I don’t like about the M4. There are a couple of minor negatives. The first does not affect me, but is just to say that the sheath is right-handed only. The second has not yet fully become a problem, and might not, but I have found that when inserting the M4 into the sheath the blade tip has caught on the internal stitching of the belt loop. My worry is that if the threads get cut through they might unravel, and the belt loop then fail. I’ve started to be very careful and deliberate when sheathing the M4 to avoid this – not something I really want to think about.
The M4 is a superbly practical knife and in so many ways it is ‘just right’. Small and light enough for all-day carry without being weighed down. Large enough to be put to serious work. High performance steel without being impossible to sharpen. Strong enough to take everything in its stride. Manufacturing quality to make you smile without being ‘too good to use’.
Review Summary
The views expressed in this summary table are from the point of view of the reviewer’s personal use. I am not a member of the armed forces and cannot comment on its use beyond a cutting tool or field/hunting knife.
Something that might be a ‘pro’ for one user can be a ‘con’ for another, so the comments are categorised based on my requirements. You should consider all points and if they could be beneficial to you.
_______________________________________________
Things I like
_______________________________________________
Super practical size.
Extremely well made.
Strong blade / full tang.
High performance steel.
Quality leather sheath.
Comfortable grip even for extended periods.
Beautiful Olive wood handle.
_______________________________________________
What doesn’t work so well for me
_______________________________________________
Sheath is only right handed.
Blade tip catches internal belt loop stitching when sheathed.
Discussing the Review:
The ideal place to discuss this reviews is on a forum. If you started reading the shorter forum version of the review, but followed the link this full exclusive review, please return to that forum to discuss the review there.
If you read the review entirely on Tactical Reviews, please consider one of the following to join in any discussion or start a new one.
What are your first impressions of the Spyderco Hundred Pacer? Well, it certainly is an unusual looking knife with an unusual name and design inspiration, and I’ll admit to being sceptical about the look of this knife.
But, whatever your first impressions are, I can say that this knife has proven itself again and again throughout the testing process to be as potent as its namesake. The Hundred Pacer is the result of a collaboration with a Taiwanese knife designer and enthusiast Jonny Liao, who manages to bring together potentially ungainly serpentine shapes into a stunningly effective cutting tool.
A few more details:
What’s in the box?:
Spyderco's standard slip-cover box.
Included with the knife is an information leaflet.
A good look round the Spyderco Hundred Pacer – Things to look out for here are:
You can’t really miss the design references to the snake the knife is named after. Even under the closest scrutiny the quality of manufacture stands out.
Looking like it's namesake.
A dramatically shaped knife even when folded.
The handles have an incredible intricately textured surface.
A Spyderco wire clip is included. It can be fitted to either side.
The liners and lock bar are precisely nested into the G-10 handles.
The large opening hole is fully accessible.
Just visible here is one of the nested liners.
Waisted spacers give the knife an open back.
A substantial blade emerges.
Good lock engagement with room to go in future.
Johnny Liao's snake logo.
Showing the steel used.
A very fine blade tip.
What a blade, full flat going into a sharp edged plunge line.
Looking in at the pivot washers.
Explained by the Maker:
The reasons for certain design choices may not be clear when simply looking at an object, so this section is intended to give an insight into the thinking behind a design by speaking to the designer themselves.
While at IWA 2018 I had the good fortune to be able to talk to Joyce Laituri from Spyderco about this knife.
Firstly here is the standard description from Spyderco: The Hundred Pacer is a truly unique folding knife design inspired by a deadly Taiwanese viper with a distinctive “horned” nose. Its venom is reputedly so toxic that a person bitten by it could only walk a hundred paces before expiring. Designed by knife enthusiast Jonny Liao, the Spyderco Hundred Pacer translates the sweeping lines of the snake’s head into a broad, dramatically curved, full-flat-ground blade. The satin-finished PlainEdge™ blade is crafted from premium CTS® XHP powder metallurgy stainless steel and features a fully accessible Trademark Round Hole™ for swift, positive, one-handed opening with either hand.
To replicate the look and feel of the snake’s skin, the knife’s stunning handle scales are meticulously machined from layered G-10 to create a non-slip texture and contrasting color pattern. Skeletonized stainless steel liners nested within the scales complement the handle’s open-backed construction to minimize the knife’s weight, while providing a solid foundation for its sturdy LinerLock mechanism. A reversible deep-pocket wire clip supports discreet, ambidextrous, tip-up carry and keeps the Hundred Pacer poised and instantly accessible.
An image from mitbbs.com of the Hundred Pacer snake.
The following are a few insights into the design courtesy of Joyce:
Jonny designed the knife to have a very wide flat ground blade, shaped to be reminiscent of the head of the Hundred Pacer snake. If you are not familiar with this snake, a quick Google of it reveals he did a very good job pulling off the form of the snake. The handle is textured G-10 with a bidirectional pattern to offer tactile resistance. The original prototype had a two tone handle that was vividly reminiscent of the snake’s colouring, but Spyderco opted for the coyote brown handle with the milled texturing.
With the Hundred Pacer, the surprising thing is once you get it in your hand; as large as it is, and as wide as the blade is, it is incredibly lightweight and incredibly comfortable to hold; add to this the upswept blade being such a powerful cutter and you have an extremely effective knife.
The CTS XHD steel used for the blade is a US made steel, and is shipped over to Taichung where Hundred Pacer is manufactured.
The Blade and Handle – Detailed Measurements:
Now even more detailed!
Taking things far beyond most knife specifications, in this section I will be carrying out a detailed examination of geometry, balance, edge bevels, factory sharpness and structural edge testing using the industry leading measuring tools.
These measuring tools include a Vernier protractor, callipers, fixed radius gauges, the unique Arc Master adjustable radius gauge, Edge On Up’s BESS Certified PT50A and SET tester along with CATRA’s Hobbigoni LASER Edge Protractor. The BESS ‘C’ scale of sharpness (Brubacher Edge Sharpness Scale) will be used to verify the sharpness of the factory edge and allow the knife to be brought to a minimum standard sharpness before testing a blade’s cutting performance.
A set of gauges and precision measuring equipment including a Vernier protractor, callipers, fixed radius gauges and the Arc Master adjustable radius gauge.
One critical parameter is the primary grind angle.
Using a straight-edge to confirm the primary bevel type.
The balance point is found using a pivot.
Sharpness is checked using an Edge On Up PT50A 'BESS Certified' tester.
A chart showing where on the BESS scale a blade is.
The CATRA Hobbigoni measures blade and bevel angles with a LASER.
The Hobbigoni provides a lot of information about the blade and cutting edge.
A CRK Inkosi with polished Wicked Edge bevel.
A fully convexed edge on the Fällkniven F1.
Movakniv's Bushcraft showing the Scandi-edge and micro-bevel.
Spyderco's Sliverax showing the effect of surface finish.
This is the Edge On Up SET (Structural Edge Tester). A precise load (the white tac on the platform is used to adjust the load) applies pressure to an 'impactor'.
The 'impactor' roller is at a 12 degree angle.
The impactor is moved along the edge to roll the edge apex. The amount of roll can then be measured.
After testing the blade is stropped to recover the edge.
The measurements have been tabulated and are presented along with a few reference blades. The ‘Balance relative to the front of the handle’ tells you if the knife will feel front heavy, or if the weight is in your hand (a positive value means the weight is forward of the front of the handle). The ‘Balance relative to the centre of the handle’ indicates how close to a ‘neutral balance’ the knife has in the hand.
Superb factory edge sharpness!
Examining the edge bevel.
The blade is made from CTS-XHP steel.
Take note of that average BESS Score of just 156. This is truly exceptional, and is the sharpest factory edge I have come across.
What it is like to use?
Once you handle this knife, it all makes sense. There are knives I do not find visually appealing, yet once in your hands they just work. The Hundred Pacer from Spyderco is one of these. In fact its abilities are making its looks more appealing, as you start to understand why it looks like it does.
When folded, the large hump of metal around the opening hole is there because this knife has such a wonderfully wide blade. This same large lump of metal makes the opening hole even more accessible, and the opening action super fast. It then provides an effective thumb ramp once the blade is open. Completely function, although making the folded knife appear a little ungainly.
The snake-head shaped butt of the handle forms a grip-hook that provides extreme stability during use, so the odd appearance really does make sense.
For reference I take XL gloves.
A good handful for a generous size blade.
For me there is only one minor change that improves the Hundred Pacer, and that is the addition of a sharpening choil. There are some cuts when this can create a ‘hang-up’, but the benefits outweigh the possible pitfalls for me. In adding a sharpening choil, it also allows the entire cutting edge bear down onto a cutting surface. Amongst other things, this knife’s slicing ability works fantastically well in the kitchen, and I use this roughly 50% of the time for food related tasks; this modification makes it significantly better for use on a cutting board.
Shown here with a small batch of knives that I added a sharpening choil to.
Amongst others I added a sharpening choil to the Hundred Pacer.
Don’t be too quick to judge this knife by its appearance. Certainly some will like the different looks, but I suspect most initially will not. The Hundred Pacer proves itself utterly worthy of your consideration thanks to its fantastic performance and handling.
Review Summary
The views expressed in this summary table are from the point of view of the reviewer’s personal use. I am not a member of the armed forces and cannot comment on its use beyond a cutting tool or field/hunting knife.
Something that might be a ‘pro’ for one user can be a ‘con’ for another, so the comments are categorised based on my requirements. You should consider all points and if they could be beneficial to you.
_______________________________________________
Things I like
_______________________________________________
Superb handling.
A real ‘Super-Slicer’.
High quality fit and finish.
Ambidextrous.
Great grip.
High performance CTS XHP Steel.
_______________________________________________
What doesn’t work so well for me
_______________________________________________
Unusual appearance.
Discussing the Review:
The ideal place to discuss this reviews is on a forum. If you started reading the shorter forum version of the review, but followed the link this full exclusive review, please return to that forum to discuss the review there.
If you read the review entirely on Tactical Reviews, please consider one of the following to join in any discussion.
Chris Reeve Knives’ Nyala fixed blade knife (first released in 2010) is a classic skinner / utility knife. Available in a drop-point, or, as featured here, the Insingo style blade (a modified Wharncliffe), and coming in a traditional leather pouch-sheath. Despite being a modern contemporary design, it achieves a timeless feel and benefits from the best manufacturing and materials you could ask for.
A few more details:
Starting with the sheath:
A good sheath is as important as the knife it carries, and CRK have gone to leatherwork specialists Gfeller for the Nyala’s pouch sheath.
This box will always be filled with wonder.
Actually a 'show' knife, so not originally presented in the full packaging.
The sheath is a quality to match the knife. Riveted for strength and for lanyard attachment.
Quality thick leather is used. The welt is as thick as the sheath leather.
The sign of quality.
The majority of the sheath is a single folded piece of leather.
A detail of how the welt is incorporated on the fold side.
The sheath-maker's mark.
The belt loop is integral to the main body of the sheath.
Stitching outlines the backing piece which prevents the knife coming through the belt loop slots.
This is the belt loop liner inside the sheath.
It speaks for itself.
A good look round the Nyala – Things to look out for here are:
Simple, elegant and purposeful, the Nyala in detail. Look for the attention to detail in the design and refinement of every part of the knife.
Beautiful in its simplicity.
Precision and quality of finish is why you buy CRK.
Proudly Idaho Made.
Milled micarta handles with 'shadow lines' grace the blade tang.
Attention to detail is fantastic with milled lines matching jimping grooves.
Gentle thumb jimping is included.
That lovely logo.
The plung line is a masterclass in elegant transitioning from bevel to ricasso.
This Nyala has the Insingo blade shape.
The lanyard hole and striker pommel.
A look at the spine.
The Blade and Handle – Detailed Measurements:
Now even more detailed!
Taking things far beyond most knife specifications, in this section I will be carrying out a detailed examination of geometry, balance, edge bevels, factory sharpness and structural edge testing using the industry leading measuring tools.
These measuring tools include a Vernier protractor, callipers, fixed radius gauges, the unique Arc Master adjustable radius gauge, Edge On Up’s BESS Certified PT50A and SET tester along with CATRA’s Hobbigoni LASER Edge Protractor. The BESS ‘C’ scale of sharpness (Brubacher Edge Sharpness Scale) will be used to verify the sharpness of the factory edge and allow the knife to be brought to a minimum standard sharpness before testing a blade’s cutting performance.
A set of gauges and precision measuring equipment including a Vernier protractor, callipers, fixed radius gauges and the Arc Master adjustable radius gauge.
One critical parameter is the primary grind angle.
Using a straight-edge to confirm the primary bevel type.
The balance point is found using a pivot.
Sharpness is checked using an Edge On Up PT50A 'BESS Certified' tester.
A chart showing where on the BESS scale a blade is.
The CATRA Hobbigoni measures blade and bevel angles with a LASER.
The Hobbigoni provides a lot of information about the blade and cutting edge.
A CRK Inkosi with polished Wicked Edge bevel.
A fully convexed edge on the Fällkniven F1.
Movakniv's Bushcraft showing the Scandi-edge and micro-bevel.
Spyderco's Sliverax showing the effect of surface finish.
This is the Edge On Up SET (Structural Edge Tester). A precise load (the white tac on the platform is used to adjust the load) applies pressure to an 'impactor'.
The 'impactor' roller is at a 12 degree angle.
The impactor is moved along the edge to roll the edge apex. The amount of roll can then be measured.
After testing the blade is stropped to recover the edge.
The measurements have been tabulated and are presented along with a few reference blades. The ‘Balance relative to the front of the handle’ tells you if the knife will feel front heavy, or if the weight is in your hand (a positive value means the weight is forward of the front of the handle). The ‘Balance relative to the centre of the handle’ indicates how close to a ‘neutral balance’ the knife has in the hand.
Balance point.
Checking the grind.
Primary bevel angle.
BESS testing the factory edge.
LASER protractor edge bevel measurements.
The blade is made from CPM S35VN steel.
What it is like to use?
Being a fan of Chris Reeve Knives’ folding knives, I also ‘needed’ a Pacific fixed blade, but in all honesty had never really hankered after the Nyala. Something I’ll come back to is the handle sizing, which has always appeared a bit on the small side to my eyes and was another reason I had not pursued it. It is also a slightly understated knife design, but that happens to be part of its charm. As you would expect from CRK, there is an elegance and minimalism in the design which keeps things simple and effective, and does so without shouting about it – quiet and efficient.
Given the opportunity to try this knife out, I had the choice of the drop-point, or CRK’s Insingo blade style. The modified Wharncliffe works for me, as I do a lot of point work and like the way the entire edge presents itself forward for the type of cuts I make, so the insingo it was.
Following on from the earlier look at the sheath, I wanted to start this gallery with one of those details that just make all the difference. See how the jimping in the centre of the grip is positioned such that a couple of grooves are visible when sheathed. This gives your first finger a better grip to withdraw the knife from the sheath; a small detail but one that counts.
You can get a good idea of the sizing looking at the Nyala ‘in-hand’, a comfortable general purpose blade with the balance point in your hand. Without thinking, you find your thumb on the jimping provided for it; the width of the spine, and gentle rounding of it, provides a comfortable surface to press on.
Note the visible jimping on the handle which gives extra grip when unsheathing the knife.
I take XL sized gloves.
Thumb jimping works well.
Next to a large Inkosi.
The Nyala begs to be carried with you.
Surprisingly, the streamlined sheath makes pocket carry pretty easy.
So my concern over the size of the grip? Firstly, I’ll say that very much like a kitchen knife, the integral guard formed by the narrowing of the grip next to the blade makes it safe and secure. This narrowed grip also makes the Nyala nimble in the hand and great for fine, controlled, cuts. When assessing a knife handle I tend to think of the heavy cutting and how comfortable it will be when really pressing into the cuts. Actually the Nyala has surprised me, being comfortable enough with high effort cutting, even if not one I’d choose for extended periods of hard work. There is never any lack of grip from the milled micarta handles, the depth of the milled grooves can start to burn a bit after heavy use with bare hands. The balance of quality of grip vs comfort does seem just right for the shape / size of the handle.
The blade stock is a little thicker than I’d really want in this size of knife, but this allows for a comfortable thumb rest directly on the spine, and that extra strength is just lying in wait for a time you might really need it, which is never a bad thing.
Overall I’ve also been appreciating the simplicity and traditional vibes of the Nyala with its leather sheath. Now I’m wondering why I overlooked it for so long. It has been working as a really good all-rounder and has fallen into my regular rotation.
Review Summary
The views expressed in this summary table are from the point of view of the reviewer’s personal use. I am not a member of the armed forces and cannot comment on its use beyond a cutting tool or field/hunting knife.
Something that might be a ‘pro’ for one user can be a ‘con’ for another, so the comments are categorised based on my requirements. You should consider all points and if they could be beneficial to you.
_______________________________________________
Things I like
_______________________________________________
Back to basics, simple, elegant, design.
Quality traditional leather pouch sheath.
Nimble in the hand.
The handle works better than expected for heavy cutting.
Plenty of grip.
Insingo or drop-point blade options.
Refined finish and attention to detail.
_______________________________________________
What doesn’t work so well for me
_______________________________________________
Slim grip can become fatiguing during extended heavy cutting.
Milled handle grooves can be a bit unkind to bare hands during heavy cutting.
Discussing the Review:
The ideal place to discuss this reviews is on a forum. If you started reading the shorter forum version of the review, but followed the link this full exclusive review, please return to that forum to discuss the review there.
If you read the review entirely on Tactical Reviews, please consider one of the following to join in any discussion.
Having been thoroughly impressed by NORDIC HEAT in previous years at IWA, at IWA 2018 I made sure to visit them to be able to talk directly about their thoughtful approach to electrically heated clothing; plus I wanted to take the opportunity try some of their products at the show. I was so impressed, I came away with some NORDIC HEAT gloves to take a more in depth look at.
In this case the I’m testing the Glove Liner (Thin) gloves which are the lightest-weight gloves in the NORDIC HEAT range. They give you the option to use them on their own as lightweight heated gloves, or are thin enough to be worn under outer gloves, adding heating to otherwise unheated gloves.
A few more details:
NORDIC HEAT Power Pack-G:
In their logically thought out approach, the whole system is modular and the power packs and charger come as a set to be combined with various items of heated clothing.
The contents are very neatly fitted into the box.
Here are the full contents of the power pack.
Each battery has two smaller battery packs joined together.
Underneath the power supply are its specifications.
The power supply output is connected to a Y-cable to feed both power-packs at once.
The power supply plug and the battery plugs are different.
The charging indicator is visible on the top.
A good look round the NORDIC HEAT Glove Liner – Thin – Things to look out for here are:
Despite being a lightweight glove, the construction is solid and attention to detail in the fit and comfort is excellent. The entire inner surface has rubber dots to really add grip, plus there is a touch screen compatible pad on the index finger.
NOTE: (Added at the request of NORDIC HEAT) – NORDIC HEAT recommend fitting the battery pack the other way up to the way shown in the photos. They intend for the power cord to go straight down into the glove rather than being looped round.
With the power packs in a separate box, here we just have the gloves and a leaflet.
Front and back of the gloves.
On the back of the wrist is the power button.
There is zig-zag stitching at the elasticated wrist.
A Velcro tab allows for adjustment.
The adjuster tab fully open.
Showing the wrist adjustment gusset.
On the under-side of the wrist is the battery compartment and its zip.
Opening the battery compartment.
Inside is the battery plug.
The entire palm/finger grip surface is covered with rubber spots.
A closer look at the grip.
The tip of the index finger has a touch-screen compatible material.
Slipping in the battery pack. (Check the review text for a recommendation from NORDIC HEAT)
Everything tucked in and ready to zip up.
What it is like to use?
On this subject of heated clothing, I am reminded of a quote from The Hitchhiker’s Guide to the Galaxy by Douglas Adams: “one of the lingering questions on NowWhat is how the boghogs manage to stay warm in their skins. It says “if anyone had wanted to learn the language of the boghogs, they would have discovered that they don’t and are just as cold and miserable as everyone else”.”
And this is simply because in the past you had only one choice in the cold, and that was to try and reduce how cold you were with more clothing – ‘try’ being the operative word. Once cold starts to set in, the body reduces blood flow to the extremities and they get even colder. So really you were just a certain level of cold, but didn’t have much choice so got used to the discomfort.
Heated clothing provides us with benefits beyond simply the comfort of feeling warmth; it keeps us functional longer in more extreme conditions.
I use it in a few different ways, all of which are subtly different. These are also based on the fact that there are batteries which will run out, so you can’t simply run them all the time.
The first of these ways of using them involves actively combating the cold to stop it setting in. This is where you start off with the gloves on, and turn them on before even going out into the cold. Keeping the hands warm with heating from the very start means you maintain the best dexterity as long as you have battery power for the heating.
Second, and for me a very important way of using them, is for recovery. There are situations where it is not practical to use the heated gloves initially, and other gloves are used. Inevitably the cold starts to creep in and your hands become colder and colder. Once you reach a certain point you really need to recover. Swapping to the heated gloves and using them to bring back the circulation gets you ready to go again. As these glove liners are not themselves thermally insulated, on their own they do not provide much protection beyond keeping some cold air off the skin, and certainly don’t help with holding very cold tools or touching cold surfaces beyond the active heating provided to the side of the fingers. This is why I frequently use other thicker gloves, most of which are not large enough to allow the use these as glove liners, mainly due to the battery pack bulk, so the ‘recovery’ approach is very helpful.
Third on the list is preparation for the cold environment. We are not always warm to start with and the other gloves you are going to use might be chilled; you can use these heated gloves to give you hands a real boost to start with. The non-heated gloves can then be warmed with body heat from this pre-warming and the circulation boost.
You may find different ways to work with them, but this is what has been good for me.
Though I’m going to move onto observations that are more specific to these gloves, there is one characteristic I need to mention which is the same for all heated gloves that have their own battery packs. Having the battery pack in the cuff gives the gloves a strange balance, bulkiness and heavy feel. In the case of these glove liners, this is even more pronounced as the gloves are lightweight, but it is the same in all heated gloves. The bulk at the cuff tends to interfere with your watch; I frequently go without a wristwatch when using heated gloves. This is something you need to accept if you want the benefits of independently powered heated gloves.
The next comments are supported by the photo gallery coming up next –
Thoughtfully, even though these are called glove liners, a touch screen compatible index finger tip has been included. Though it doesn’t look conductive, it certainly works. Be aware however that, just like every other touch screen compatible glove, the finger contact area is pretty big and imprecise. It is more of a case of being able to answer a call without taking off the gloves than being able to make a call. There is not enough precision to tap on a number or name in a list. Certainly useful if you accept the limitations.
Overall comfort is excellent and the fit is good. In this gallery the first three photos of the glove being worn are without the battery fitted. Skip forward past the photos showing the button illumination to see the bulk added by the battery pack. You get used to this bulk quickly, but it requires some consideration.
It is nice that the power button itself is directly illuminated. When first turned on (using a long press), the first of the three modes is high. To cycle through medium, low and back to high you briefly press the button. A long press is then needed to turn them off again.
Last in the gallery are some thermal camera images of the excellent design of the heating in NORDIC HEAT’s gloves. Each finger is surrounding with heating elements which are clearly visible. Frequently, heated gloves only heat the back of the hand, meaning there is only heating on one side of the fingers. NORDIC HEAT’s method applies heat to two sides of the finger getting more heat in.
The touch-screen finger works.
Here the battery packs are not fitted.
On full power the button is red.
Medium power and the button is amber.
Low power and the button glows green.
The bulk of the battery packs make quite a difference.
Thermal imaging shows the heating elements.
NORDIC HEAT's approach completely surrounds all the finger sides with warmth.
Using the FLIR Scout TK thermal camera again to shoot some video, this shows the gloves heating up from cold and those excellent heating elements.
Video Edited with – Cyberlink Director Suite 5 (PowerDirector 16 and AudioDirector 7)
Camera – FLIR Scout TK
How long do they run?:
Using a dual thermal probe to measure the ambient temperature and the temperature in the middle finger of one glove, the time/temperature graph was plotted of the difference between these two temperatures. This was carried out in a cool but sheltered area on HIGH mode.
One glove ran out of power at 1h43m and the other at 1h46m.
Recharging the batteries from completely flat takes around three and a half hours (3h33m for one and 4h07m for the other).
The charging indicator on the charger will be solid red if both batteries are connected and charging, and solid green if they are both fully charged. If the indicator light is flashing red, this means that one battery is charged and the charger is “waiting” for the second battery, or only one battery is connected for charging.
In the graph below, the line marking ‘Glove Battery Exhausted’ is the time when the power light went out.
Some Modifications:
There is only one aspect of these gloves that didn’t work for me, and that was the cuff adjustment tabs. With the batteries adding bulk to the cuff, you really need to open the cuff adjuster to put them on, and then do it up again.
For the first hand this is fine, operating the cuff adjuster with bare hands is no problem, but then we get to the second hand, and now we are using the gloved fingers to grip the tab.
Immediately, as you do up the cuff adjuster, you find the Velcro hook part grabs the fabric of the thumb doing it up. This quickly starts to ‘fluff’ up the thumb fabric and is going to wear it out much faster.
Worse than doing it up, is trying to get hold of the cuff tab to undo it. You really have to press the thumb into the edge of the tab to get hold of it, and so onto the Velcro hooks. This is when the thumb fabric sticks to the hooks and has to be ripped off them.
All it really needs is a little grip tab (which has no Velcro and extends enough to grip with the gloves on) to allow you to get hold of it, so I got out my ‘Velcro control pack’ to make one. As I find the tendency of Velcro hook material to grab things quite annoying I have a selection of hook and loop strips (my ‘Velcro control pack’) that I can cut to size to cover up excessive hook material or in some cases extend it.
The following gallery steps through what I have done for each cuff adjuster. A simple job that took five minutes to do, and has transformed the fitting and removal of these gloves.
The completed modifications made to the wrist tabs.
The modified tab opened up.
Three small pieces of Velcro are needed to make this removable modification.
The first covers the exposed 'hook' part on the glove.
Exposed hooks covered.
Then the other two pieces fitted together can be put under the tab.
This creates a small tab that is easy to grip while wearing the gloves.
Review Summary
The views expressed in this summary table are from the point of view of the reviewer’s personal use. I am not a member of the armed forces and cannot comment on its use beyond a cutting tool or field/hunting knife.
Something that might be a ‘pro’ for one user can be a ‘con’ for another, so the comments are categorised based on my requirements. You should consider all points and if they could be beneficial to you.
_______________________________________________
Things I like
_______________________________________________
All fingers heated on two sides.
Touch screen compatible index finger.
Turns onto maximum power.
Simple and reliable interface.
Adjustable cuff.
Good grip.
Dual purpose, liner or lightweight glove.
Modular design for use with other NORDIC HEAT products.
_______________________________________________
What doesn’t work so well for me
_______________________________________________
Cuff adjuster tab too short and difficult to get hold of.
Batteries can be fiddly to fit into the pocket.
Discussing the Review:
The ideal place to discuss this reviews is on a forum. If you started reading the shorter forum version of the review, but followed the link this full exclusive review, please return to that forum to discuss the review there.
If you read the review entirely on Tactical Reviews, please consider one of the following to join in, or start, a discussion.
Lionsteel are a brand that stand out year-on-year thanks to maintaining a superb level of manufacturing quality over a wide range of knife designs, both fixed and folding. This review takes a look at the Carbon Fibre version of the TM1 folding knife. Like the outstanding SR-1 (which is still going strong eight years after its launch), with its impressive construction using a one-piece handle, the TM1 also uses this single-piece handle design, but instead of an integral lock it uses a more traditional back-lock. I like an integral lock as much as anyone, but I am having just a little too much of them, and find it refreshing that the TM1 uses a back-lock. One main advantage of this is that the handle shape, grip and feel is not compromised by the lock-bar. Still a heavy folder, like the SR-1, but with a very interesting reverse-tanto blade shape, and a handle with two non-metallic material choices – Carbon-Fibre or Micarta. Finding this knife was one of my show highlights from IWA 2018.
What’s in the box?:
The TM1 comes in a familiar Lionsteel cardboard box. Inside the box, the TM1 is in a pouch / carry case which can slide onto a belt as a horizontal pouch. It will only fit over a slim 1″ belt and this might be a happy accident rather than an intended design feature.
The TM1 arrives in a belt pouch.
Though not immediately obvious there is a belt channel across the back of this horizontal belt pouch.
Fiocchi press-studs are used (I believe Fiocchi have stopped making these now).
A good look round the Lionsteel TM1 CF – Things to look out for here are:
The key images have captions; there is a lot to see on the TM1, so keep an eye out for the handle contouring, clip and glass breaker, ramped thumb opener, crisp finish and other design details.
The TM1 is an elegant folder with smooth flowing lines.
Yes, this is a back-lock, providing an alternative to plethora of integral locks.
A short pocket clip is held in place with a glass breaker tipped bolt.
The pivot bolt has a torx fitting.
No corners are cut with the handle shaping. Full 3D sculpting creates a fully organic shape with subtle grip texturing.
Surprisingly this short clip actually works really well and hasn't felt too stiff.
A ramp shaped thumb opener is bolted to the blade, so could be removed if required.
Sleipner steel is used for the blade.
Integration of the back-lock lever into the design is flawless.
A TC tip gives the glass breaker real punch.
The 'TM' series marking is engraved on the blade spine.
A deep finger guard is integrated into the handle.
Looking along the one-piece handle shows the sculpted shape of the grip.
Deep inside the handle is the lock spring consisting of two round bar springs.
Explained by the Maker:
The reasons for certain design choices may not be clear when simply looking at an object, so this section is intended to give an insight into the thinking behind a design by speaking to the designer themselves.
I had the good fortune to be able to consult Mik Molletta about this knife. The following images were discussion points that will be referred to.
Mik is a prolific designer and the TM1 was one of his own projects that wasn’t commissioned by Lionsteel, but was then given to them. The following paragraphs are a combination of Mik’s own words and me incorporating the questions into the description (while attempting to leave the meaning unchanged).
Sleipner steel (A) was chosen because it is a tool steel with good performance in cutting ability and toughness. With a specific heat treating it has a very fine grain structure. The blade thickness (J) makes the TM1 very durable for a long working life.
Intended to be a real working knife, the overall shape and deep finger guard (B) reflect this purpose in the design. The knife also has a reinforced tip (C) suitable for processing hard materials.
In lockback knives it is often observed when using them that there is play in the lock and/or pivot, sometimes pressing on the blade while working, the lever of the lock moves upwards. In the TM-1 there is no play in any axis. The particular architecture (D), made to high precision tolerances, eliminates the problems of the back-lock mechanism, and the presence of bearings facilitates the one hand opening normally difficult on these knives. The lock-back system (I) when well executed is a safe and efficient and durable system.
A glass breaker (E) is incorporated because it was designed to be suitable for military, police and rescue proposes.
The pocket clip (G) is relatively short and is made to be not cumbersome and not to become annoying in use.
The handle surface texture (H) is slightly rough to provide grip with and without gloves, but without being troublesome for bare hands.
Angled shape thump opener (K) was used on the titanium version of Lionsteel’s T.R.E. Designed by me (Mik). It’s comfortable so used also on TM-1.
In case you were wondering how they fit those IKBs bearings… (This image is from Lionsteel’s TM1 product page.)
The Blade and Handle – Detailed Measurements:
Now even more detailed!
Taking things far beyond most knife specifications, in this section I will be carrying out a detailed examination of geometry, balance, edge bevels, factory sharpness and structural edge testing using the industry leading measuring tools.
These measuring tools include a Vernier protractor, callipers, fixed radius gauges, the unique Arc Master adjustable radius gauge, Edge On Up’s BESS Certified PT50A and SET tester along with CATRA’s Hobbigoni LASER Edge Protractor. The BESS ‘C’ scale of sharpness, developed by Mike Brubacher (Brubacher Edge Sharpness Scale) will now become part of Tactical Reviews’ knife testing process. Initially this will be used to verify the sharpness of the factory edge and allow the knife to be brought to a minimum standard sharpness before testing a blade’s cutting performance.
A set of gauges and precision measuring equipment including a Vernier protractor, callipers, fixed radius gauges and the Arc Master adjustable radius gauge.
One critical parameter is the primary grind angle.
Using a straight-edge to confirm the primary bevel type.
The balance point is found using a pivot.
Sharpness is checked using an Edge On Up PT50A 'BESS Certified' tester.
A chart showing where on the BESS scale a blade is.
The CATRA Hobbigoni measures blade and bevel angles with a LASER.
The Hobbigoni provides a lot of information about the blade and cutting edge.
A CRK Inkosi with polished Wicked Edge bevel.
A fully convexed edge on the Fällkniven F1.
Movakniv's Bushcraft showing the Scandi-edge and micro-bevel.
Spyderco's Sliverax showing the effect of surface finish.
This is the Edge On Up SET (Structural Edge Tester). A precise load (the white tac on the platform is used to adjust the load) applies pressure to an 'impactor'.
The 'impactor' roller is at a 12 degree angle.
The impactor is moved along the edge to roll the edge apex. The amount of roll can then be measured.
After testing the blade is stropped to recover the edge.
The measurements have been tabulated and are presented along with a few reference blades. The ‘Balance relative to the front of the handle’ tells you if the knife will feel front heavy, or if the weight is in your hand (a positive value means the weight is forward of the front of the handle). The ‘Balance relative to the centre of the handle’ indicates how close to a ‘neutral balance’ the knife has in the hand.
One of the three BESS readings.
Balance point.
Checking the grind.
Primary bevel measurement.
Laser bevel measurement.
The blade is made from Sleipner 60-61 HRC steel.
The TM1’s factory edge has an average BESS ‘C’ sharpness of 342. This was acceptable as it would slice 80gsm paper, but not to the level I like so I brought the edge to 15 degree per-side and 200 BESS for testing the knife.
What it is like to use?
Lionsteel’s TM1 is a pleasant contradiction as it is a ‘heavy folder’ yet at the same time it is a ‘lightweight folder’ (for its size) thanks to the carbon-fibre handle. Although the blade is a substantial 4.5mm, making it massively strong, and the handle is matched to the blade perfectly, the TM1 is light and easy to carry.
Thanks to its one piece sculpted handle and back-lock, the grip is excellent for a folder. A fully integral finger guard makes the grip super stable and more than a match for that powerful blade.
Opening is silky as the blade swings out smoothly and effortlessly on those ball bearings. If you hold the handle and push the lock bar in fully, the blade actually becomes completely free to swing (without the lock bar pressing on it) and does so with no resistance at all. Not being a flipper I had wondered if it was worth using the ball bearings, but it is – the opening is just so slick. The thumb opener has been shaped into a ramp and gives a larger contact area for your thumb than studs do, and this makes it quite a bit more comfortable to use.
Then there is that snap of the lock; so crisp, precise and solid, and so satisfying. It makes you want to keep on opening it up. (Warning – you might annoy your family or work colleagues with this knife.)
An edge re-profile brought the TM1 to life.
This is the first ‘reverse-tanto’ blade I’ve used, however the principle is not far from a clip-point, just a smaller clip, keeping the tip very strong. Slightly odd looking, it has proven to be highly usable. No issues with the tip’s puncturing ability even though the point angle is 71 degrees. The tip looks extremely strong, but as yet I’ve not had a reason to really put this to the test (no car doors have jumped out at me and needed cutting into).
So ‘Sleipner’ in a folder? I was a little unsure about this choice with the reports of corrosion, and the fact it is not a stainless steel having only 7.8% Cr. I decided that during the course of the testing I would not use any oils or other blade protection, and have been using this knife for around six months for a variety of tasks, including with foods, and with one in particular that is normally very harsh – banana! Opening and fishing about in boil-in-the-bag foods so getting a good dose of heat and steam, pocket time, handling and at best a little wipe down.
It is possible that the blade has been lacquered but I can’t see any evidence this has been done, and I reground the cutting edge bevel, so I know that is bare steel. To date there has not been any sign of corrosion. I had expected to have to intervene and remove some spotting as I haven’t been caring for the blade steel. This is not the same as specifically abusing it or really trying to get it to corrode, but the testing has been normal use with little to no attempts to protect it beyond a wipe from time to time.
I’ll have to say I’m still a little wary that this might need more care than I’d like, but so far I’ve been pleasantly surprised that it has not been noticeably susceptible to corrosion. It is possible the specific heat-treat Mik mentioned may have improved the corrosion resistance of this steel.
You might have spotted the relatively small looking clip, and like me assumed it was not going to work well. I found I was eating my words though. When I pocket-carried the TM1, that clip had enough clearance to get onto the pocket edge and enough flex to slide into place, yet enough grip to stay put. I had dismissed this clip as an afterthought, but was wrong, it works. The clip can also be removed and refitted on the other side.
Review Summary
The views expressed in this summary table are from the point of view of the reviewer’s personal use. I am not a member of the armed forces and cannot comment on its use beyond a cutting tool or field/hunting knife.
Something that might be a ‘pro’ for one user can be a ‘con’ for another, so the comments are categorised based on my requirements. You should consider all points and if they could be beneficial to you.
Review Summary
_______________________________________________
Things I like
_______________________________________________
Superb fit and finish.
Single-piece handle.
Back-lock (Thank you!)
IKBS pivot bearings for super smooth action.
Rock solid lock up.
Lightweight yet ‘heavy-build’ folder.
Effective clip.
Works for right and left-handed users.
Strong blade.
Comfortable thumb opening ramp.
_______________________________________________
What doesn’t work so well for me
_______________________________________________
Sleipner steel – I don’t like the threat of corrosion hanging over a fantastic knife.
Nothing else.
Discussing the Review:
The ideal place to discuss this reviews is on a forum. If you started reading the shorter forum version of the review, but followed the link this full exclusive review, please return to that forum to discuss the review there.
If you read the review entirely on Tactical Reviews, please consider one of the following to join in any discussion.
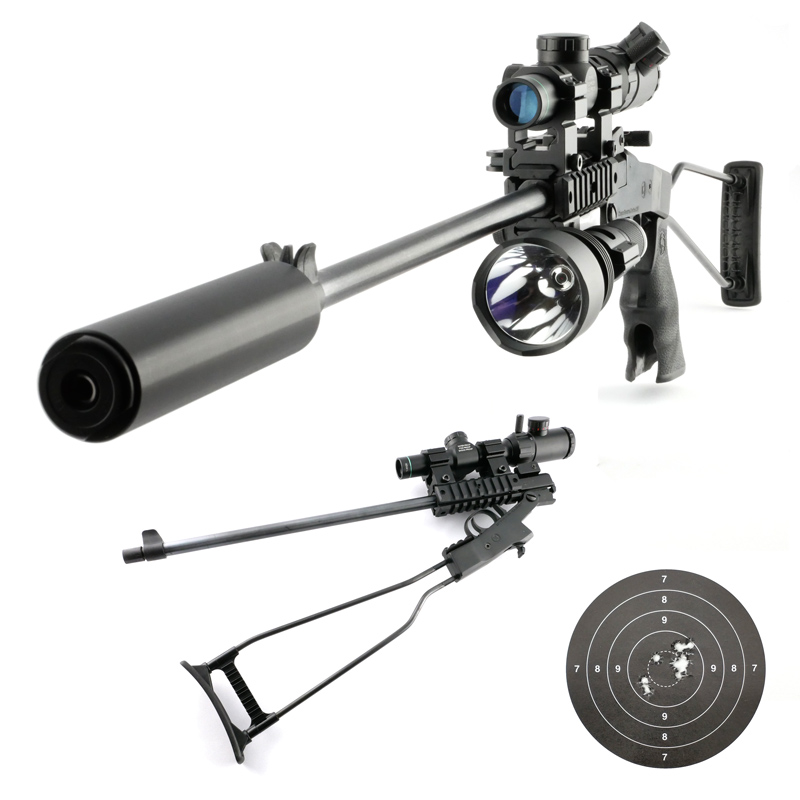
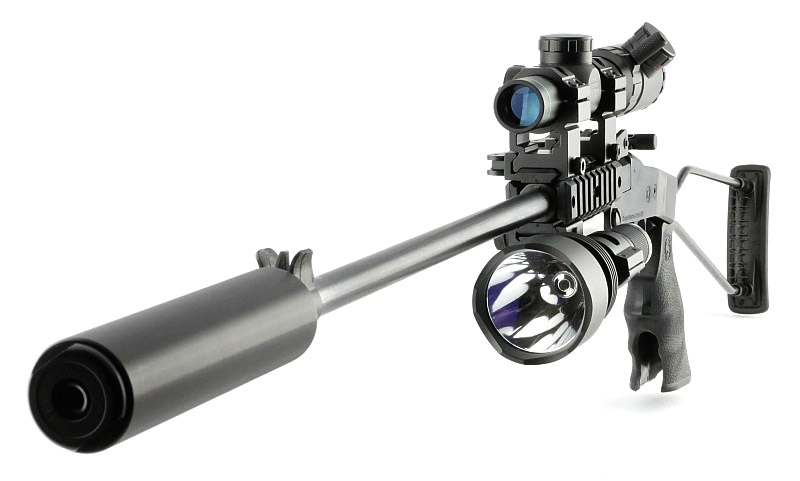

.")


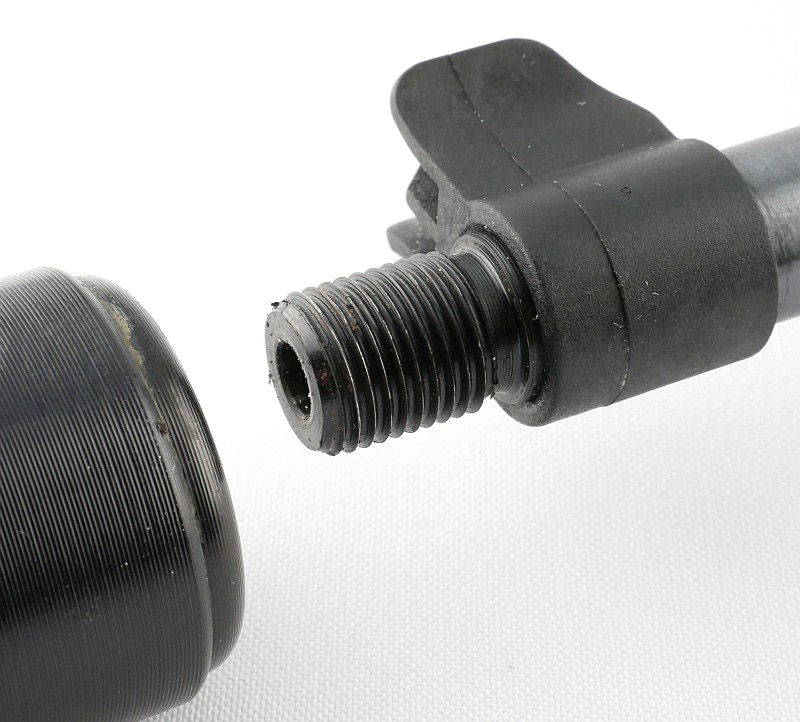
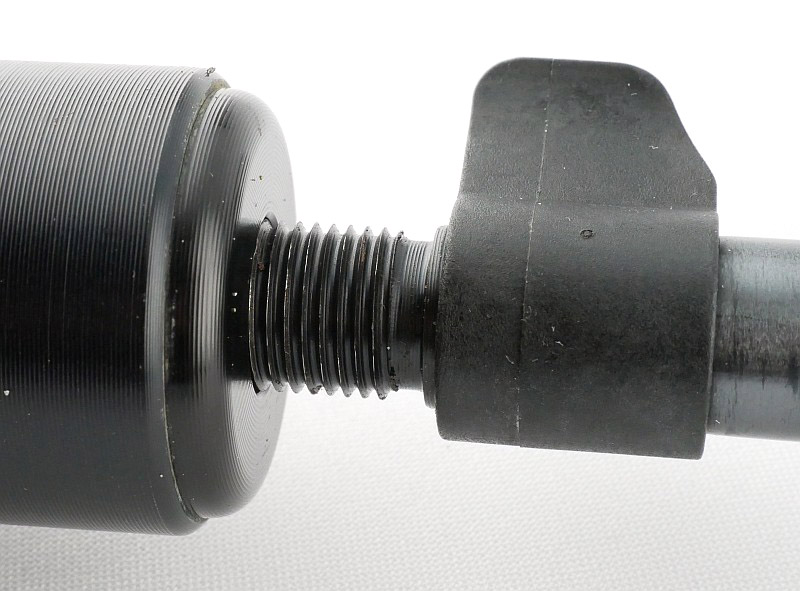


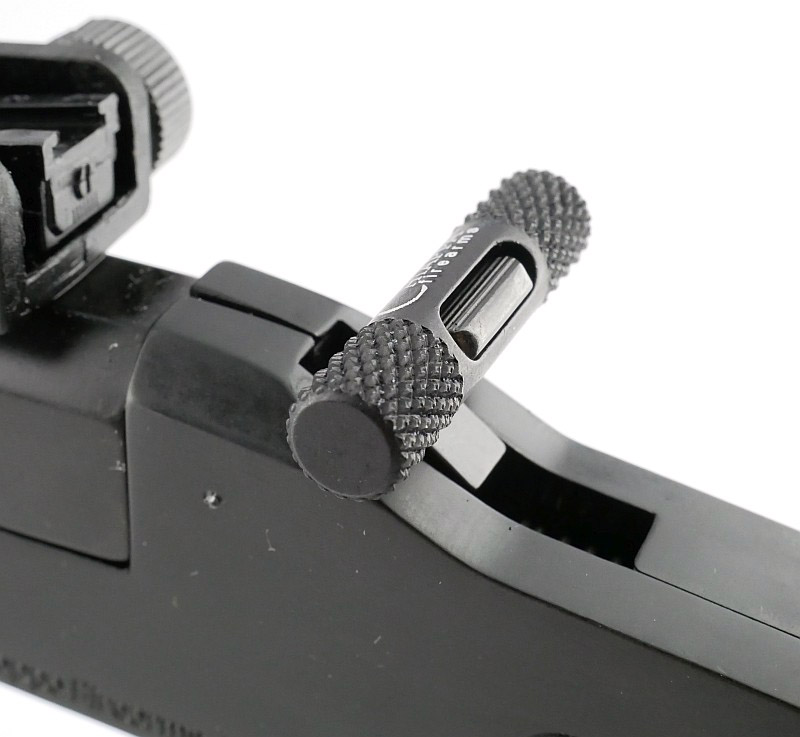
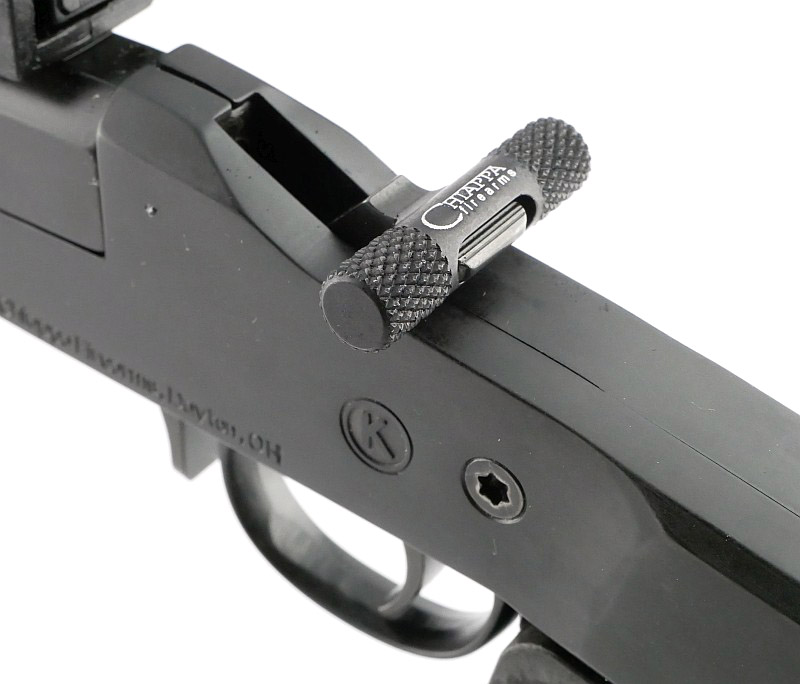


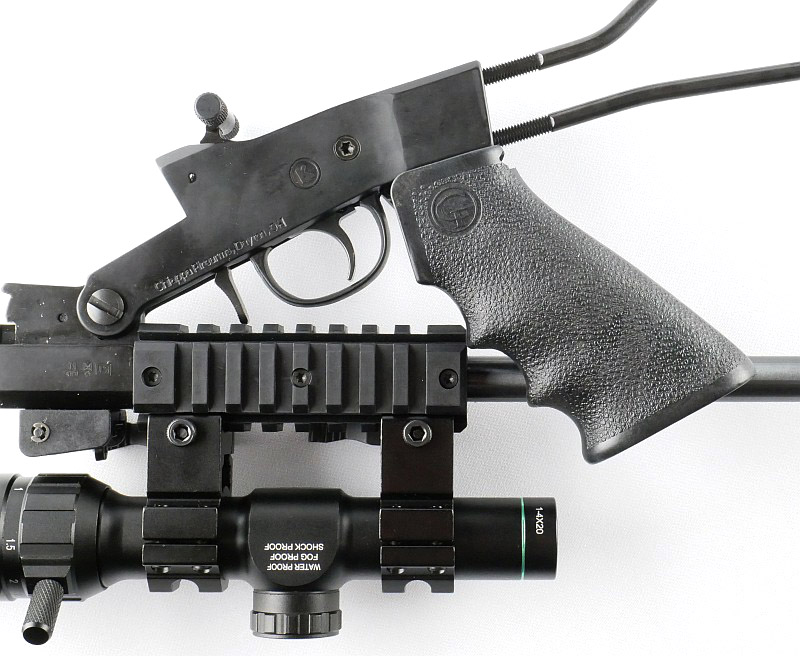


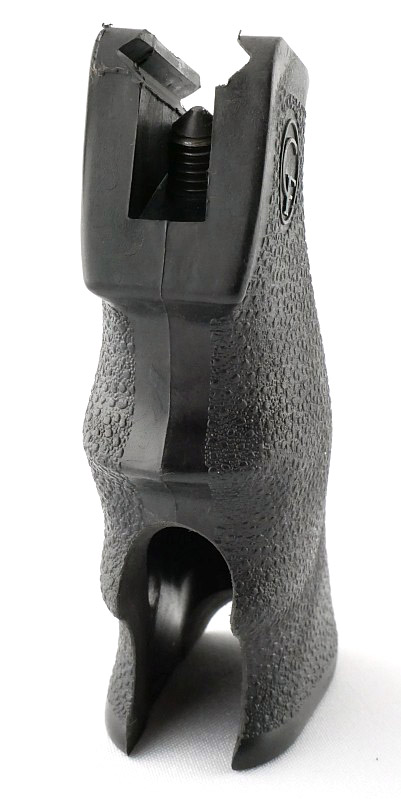


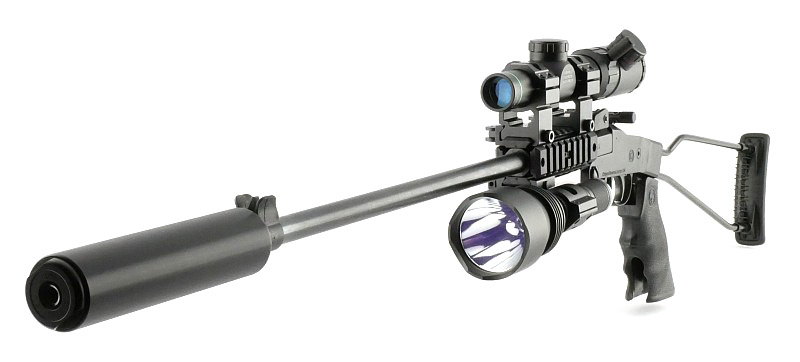
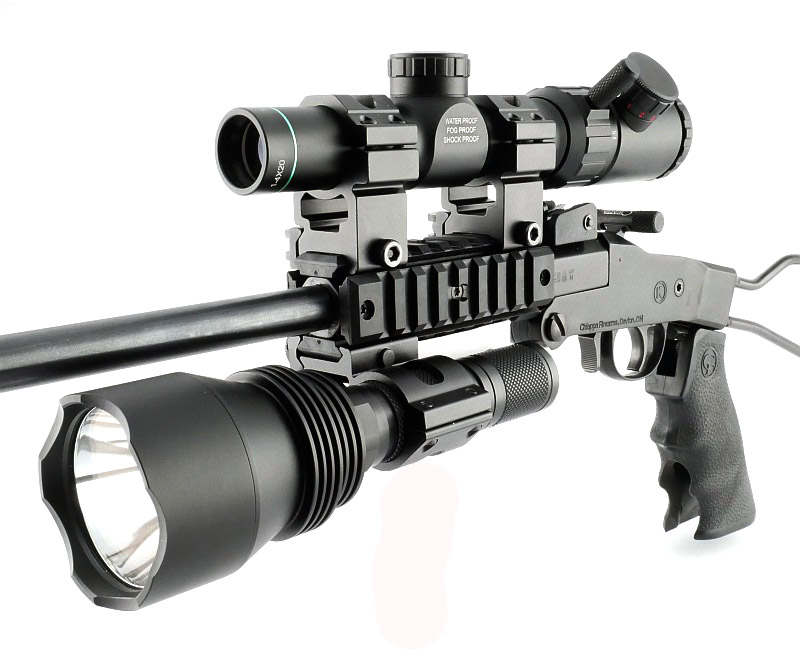


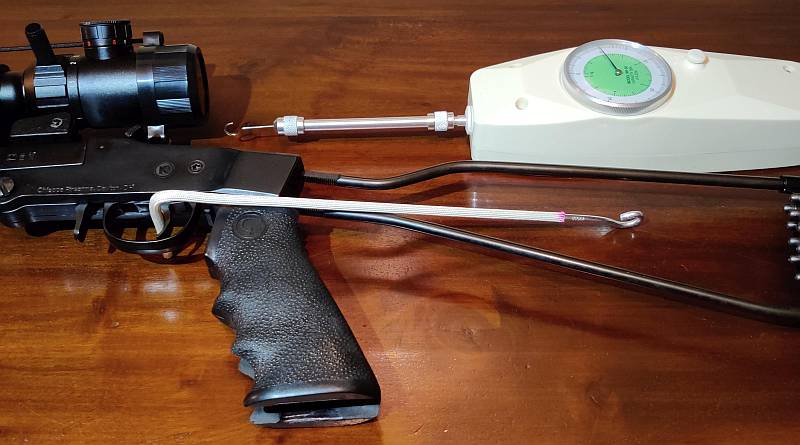


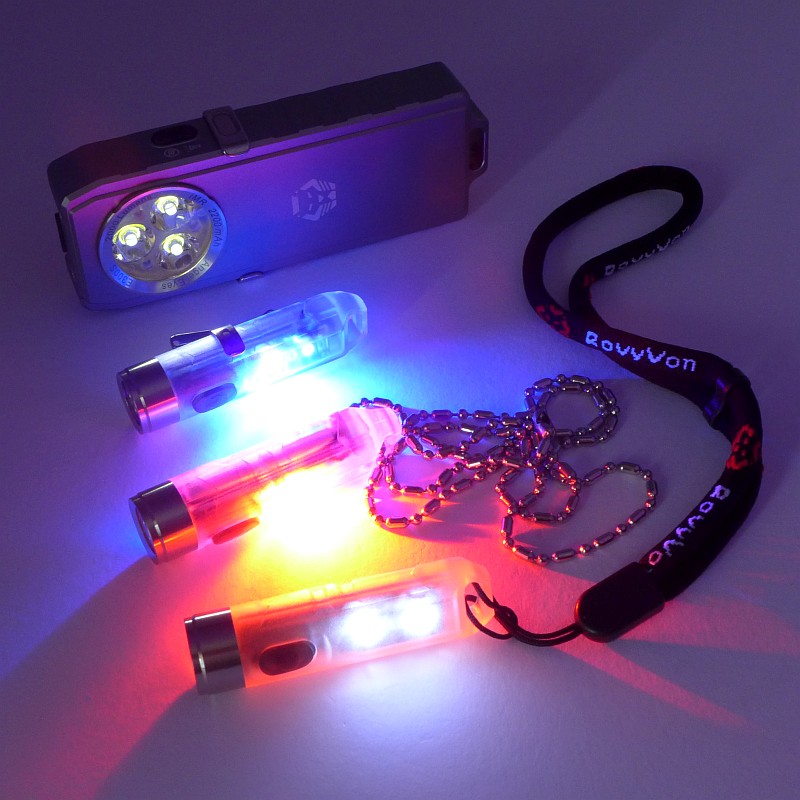
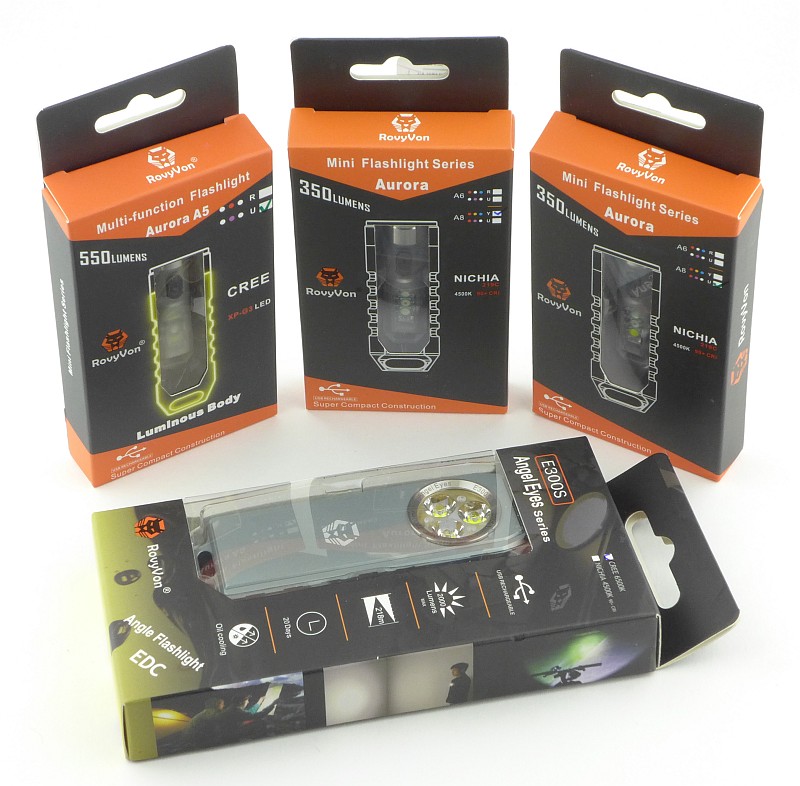

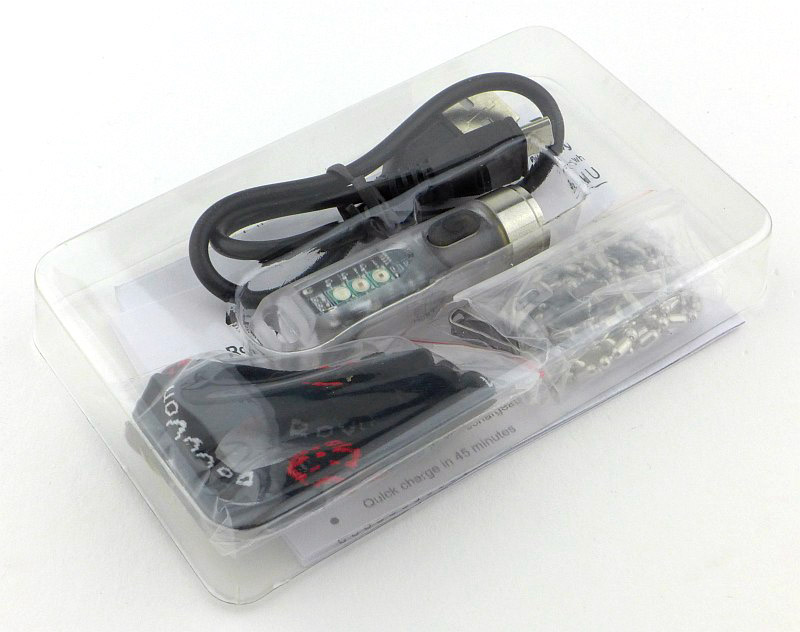


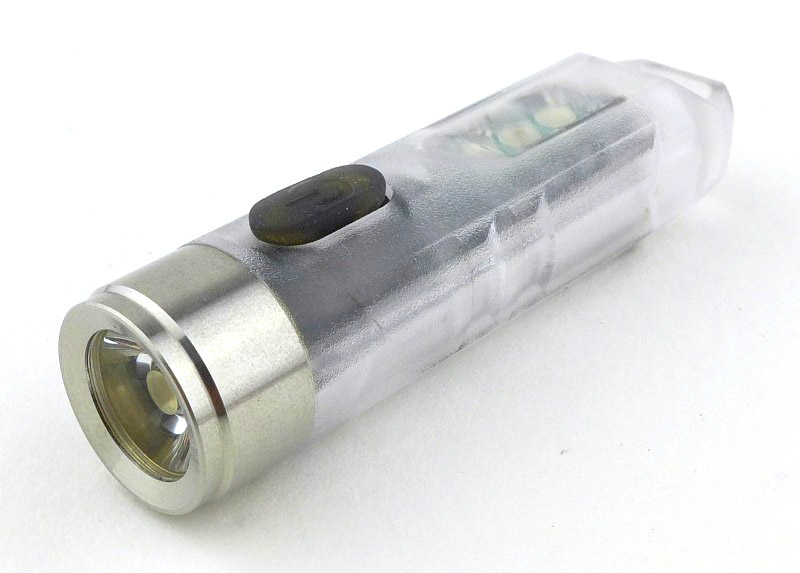


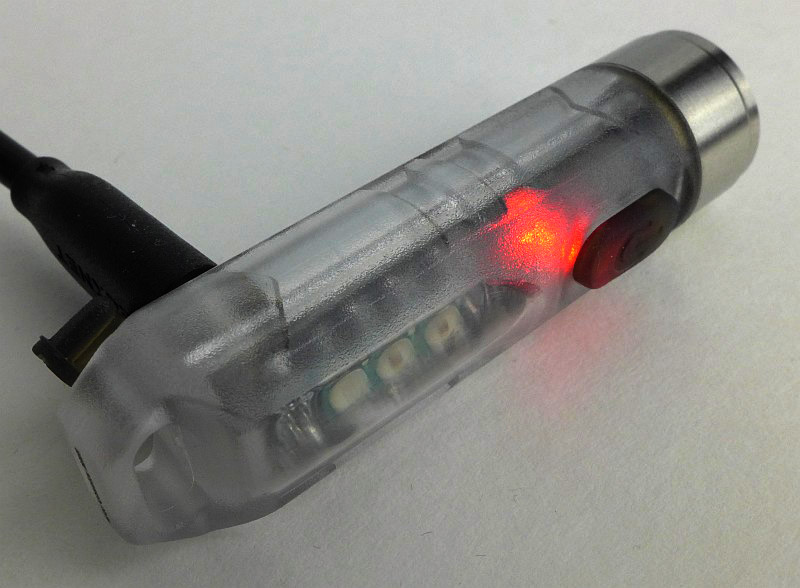

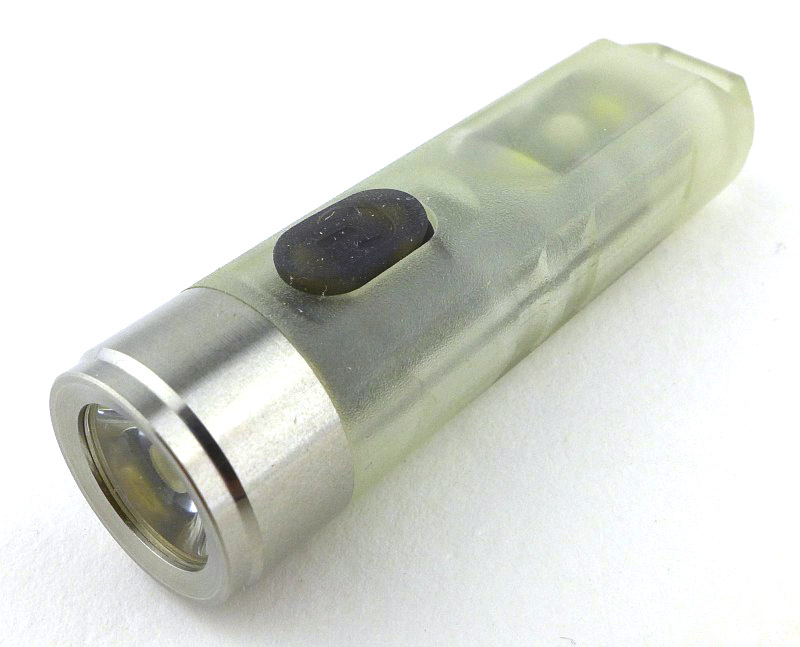


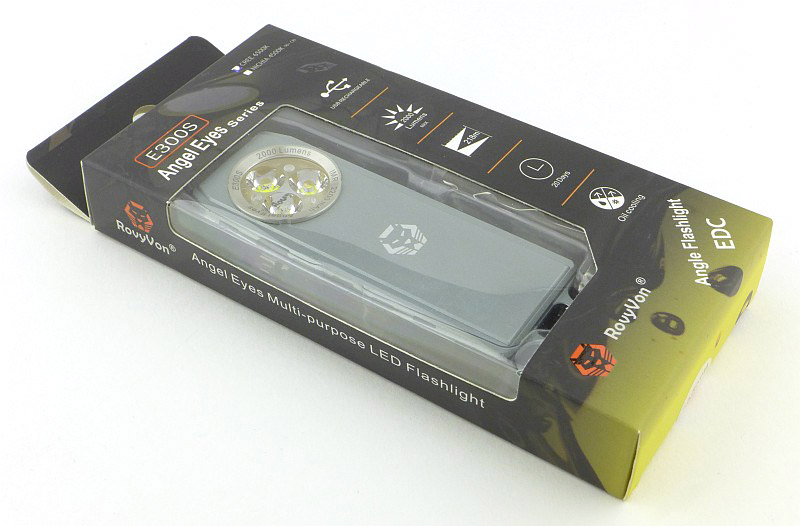


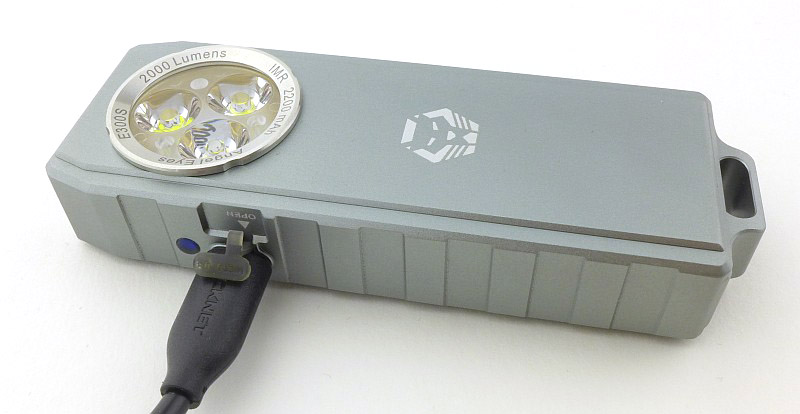

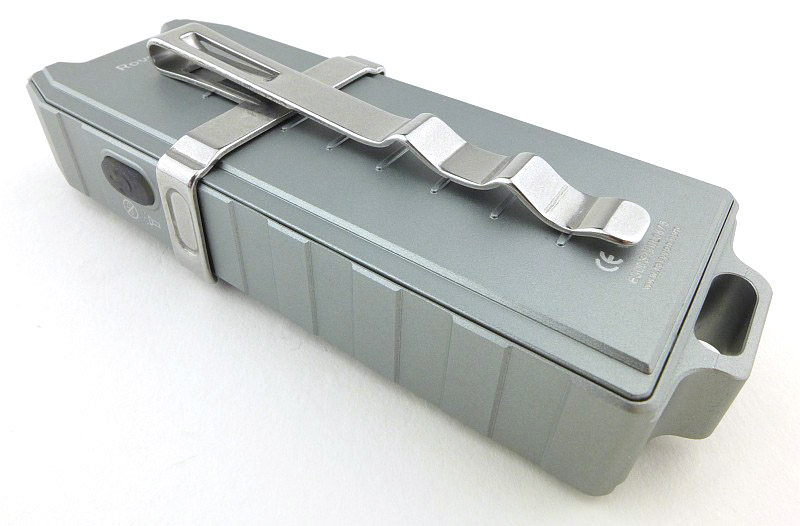
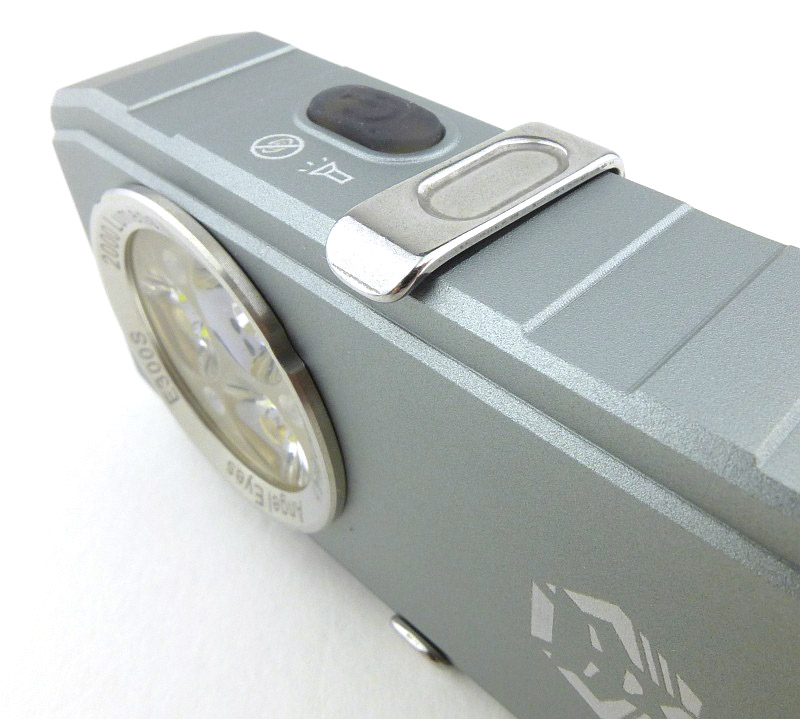

")
")

")


")
")
")
")
")
")
")


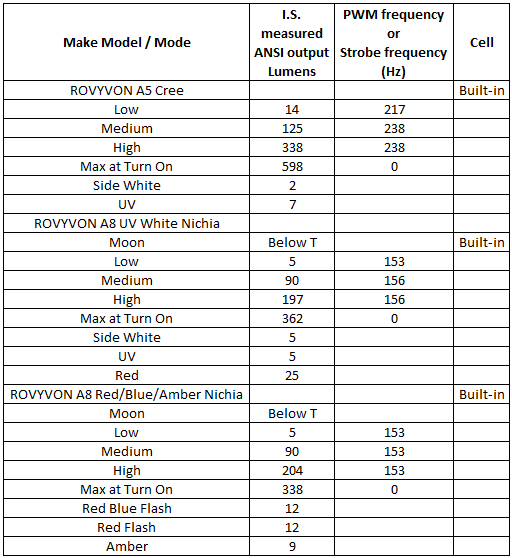
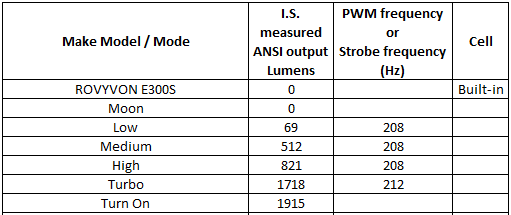


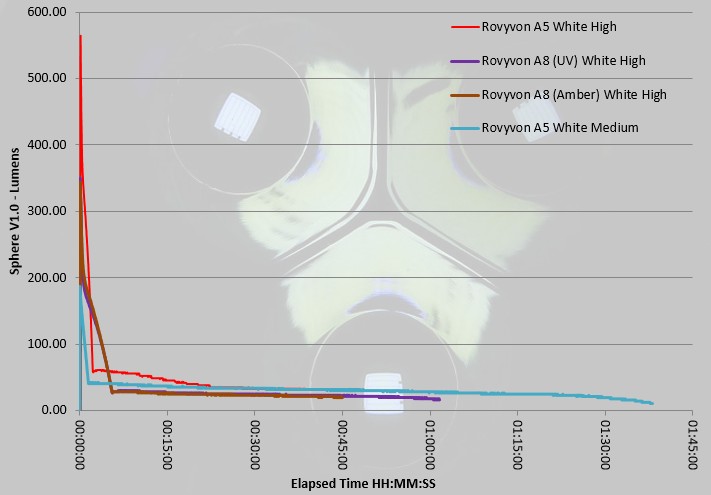

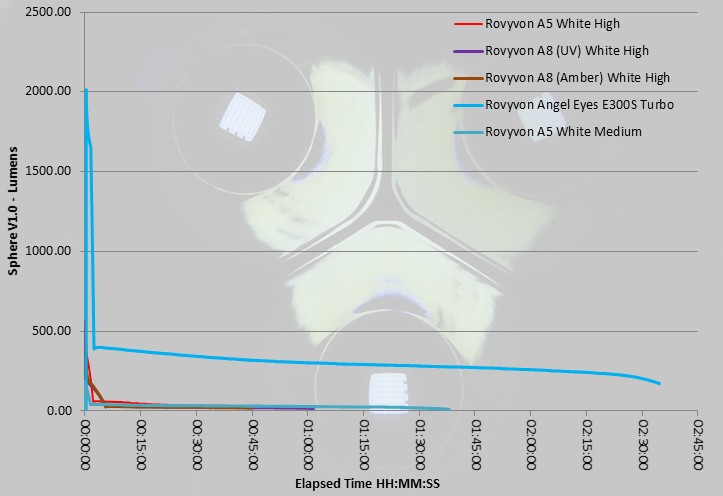


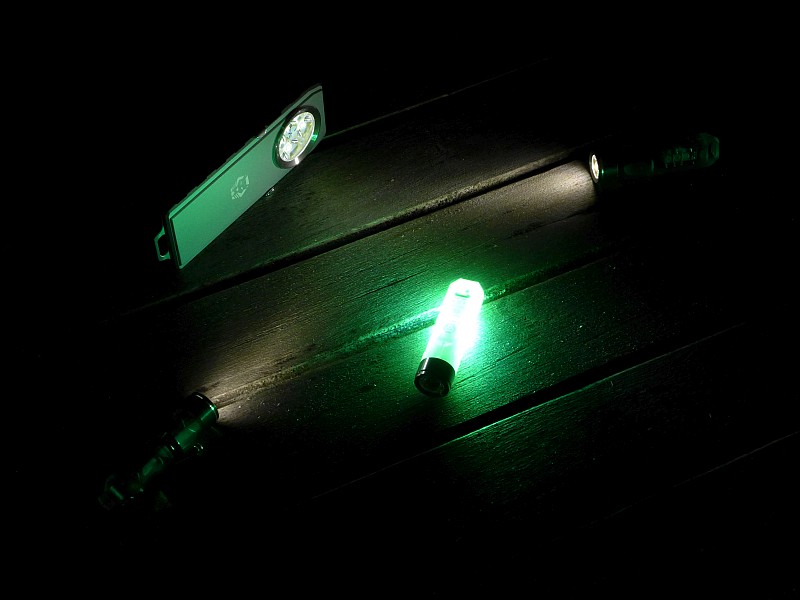

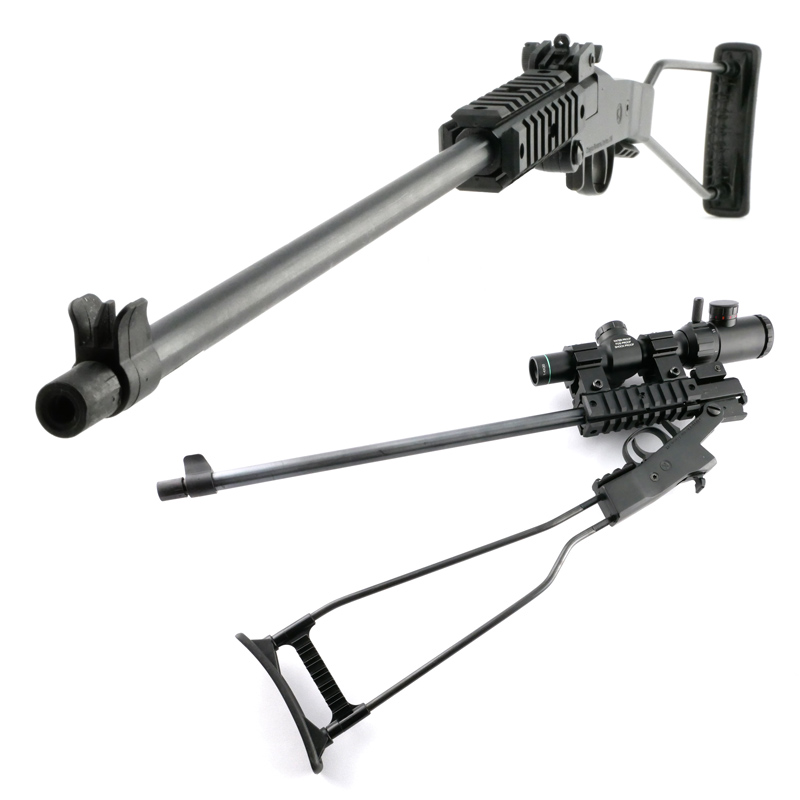
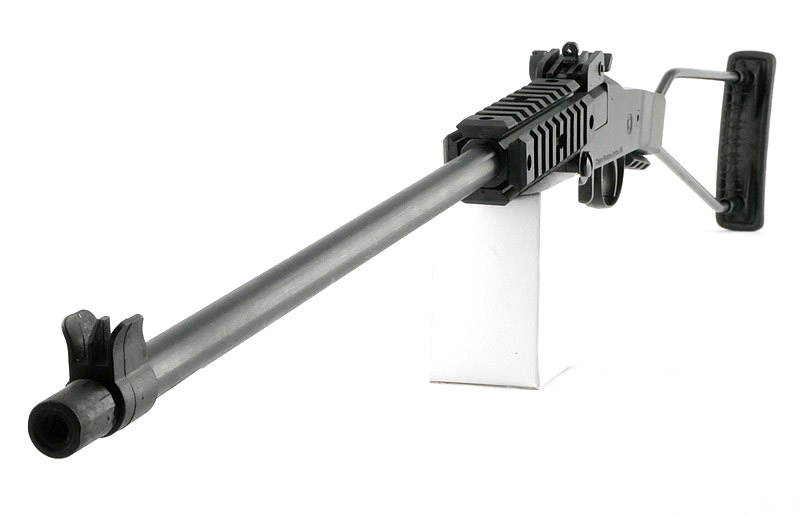


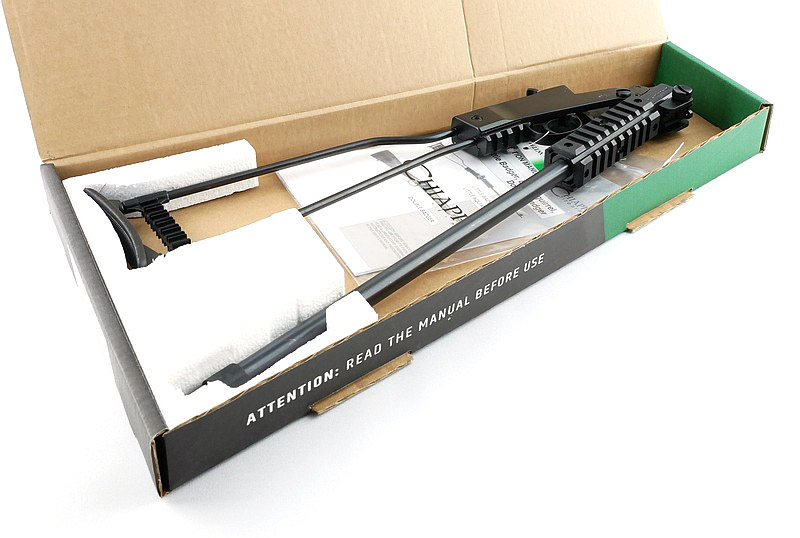
.")


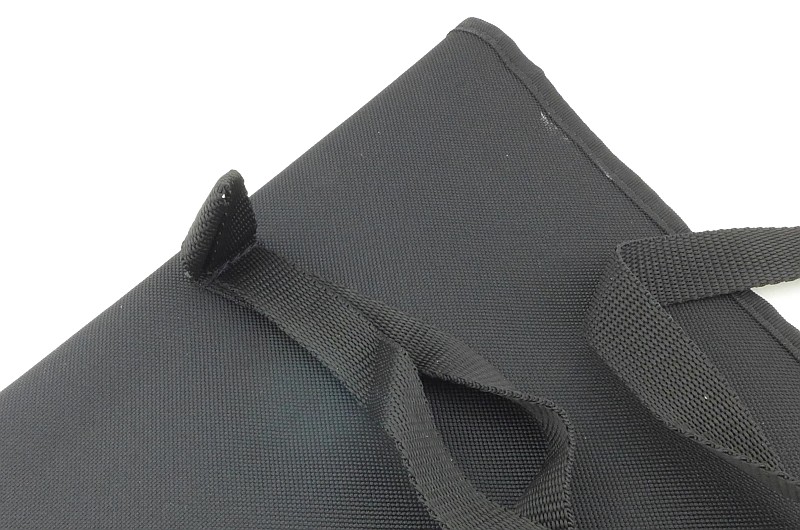


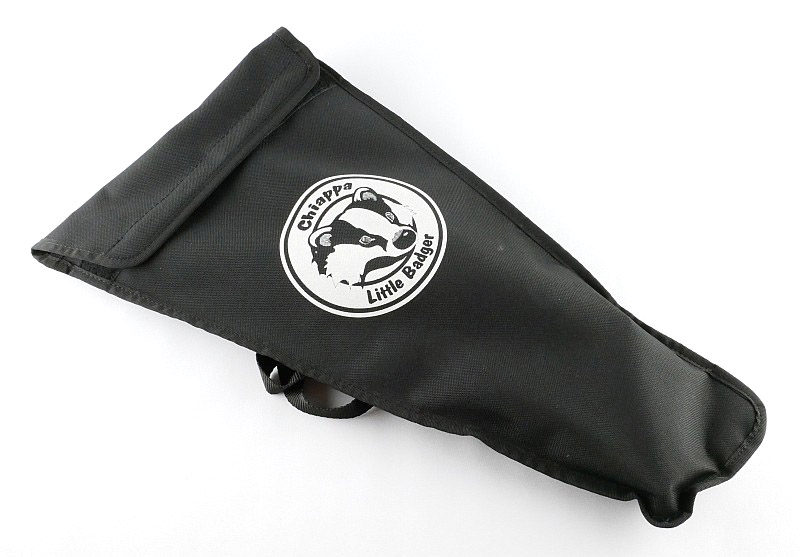
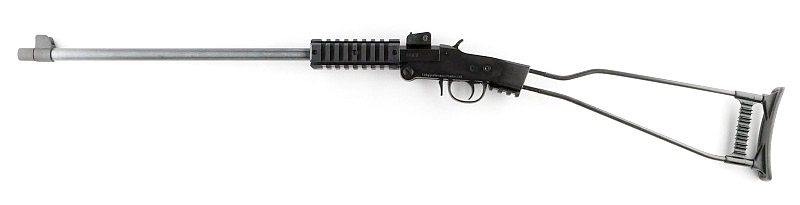


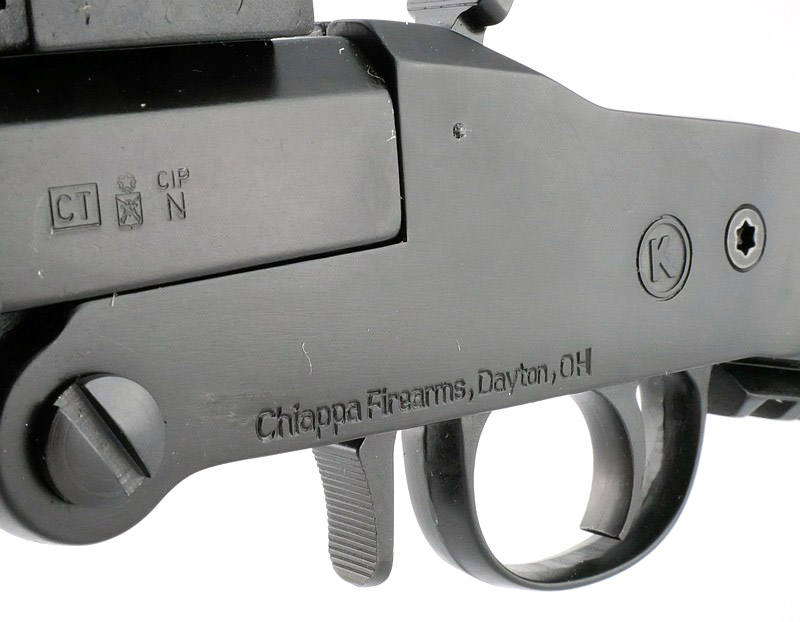


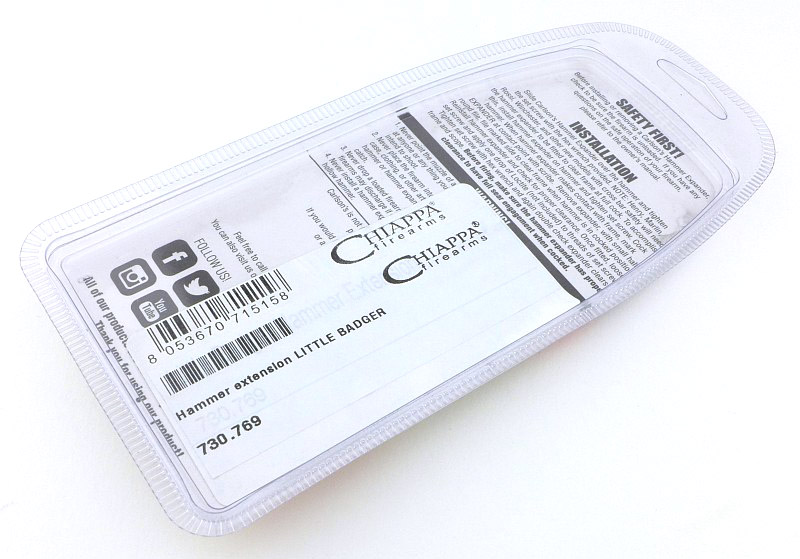


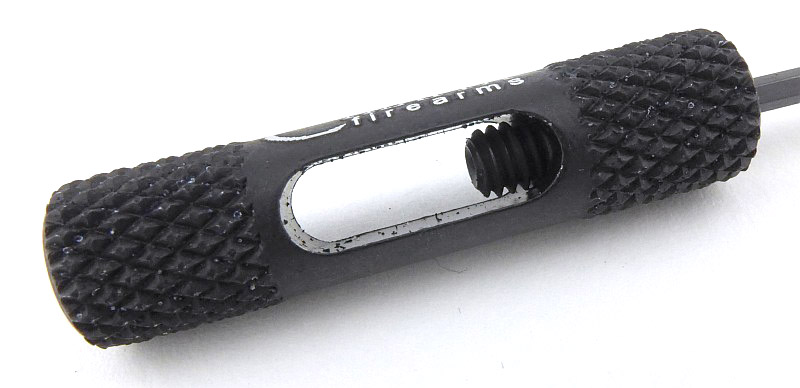

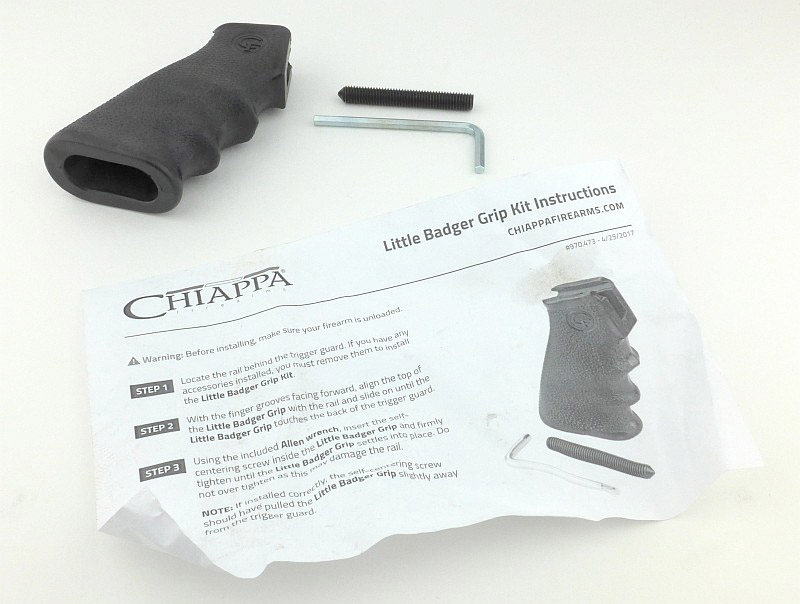
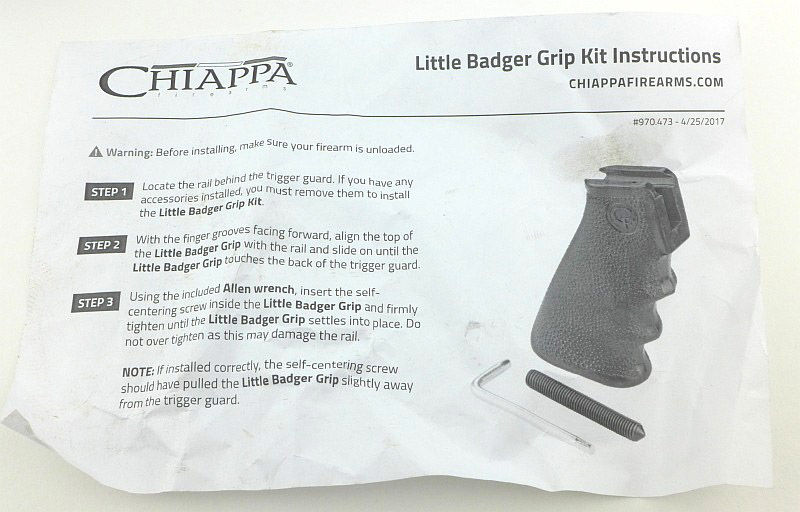

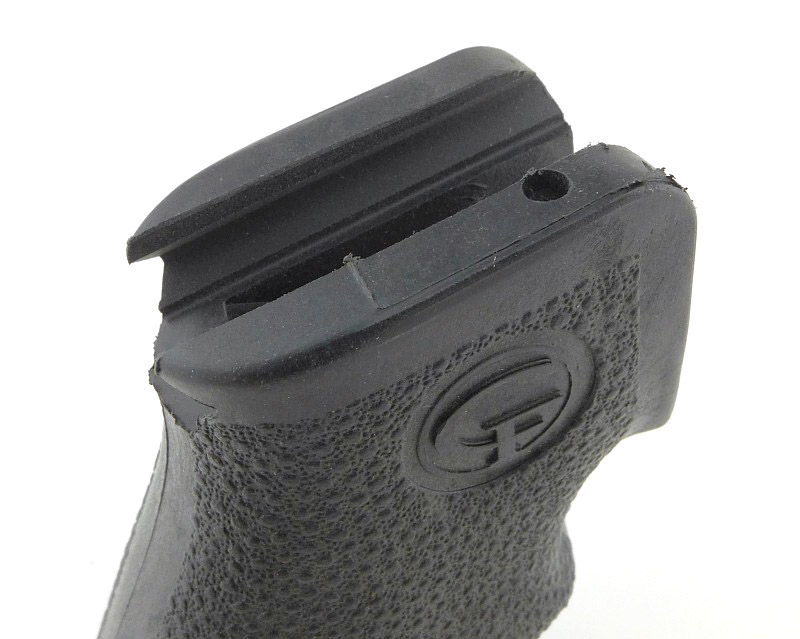


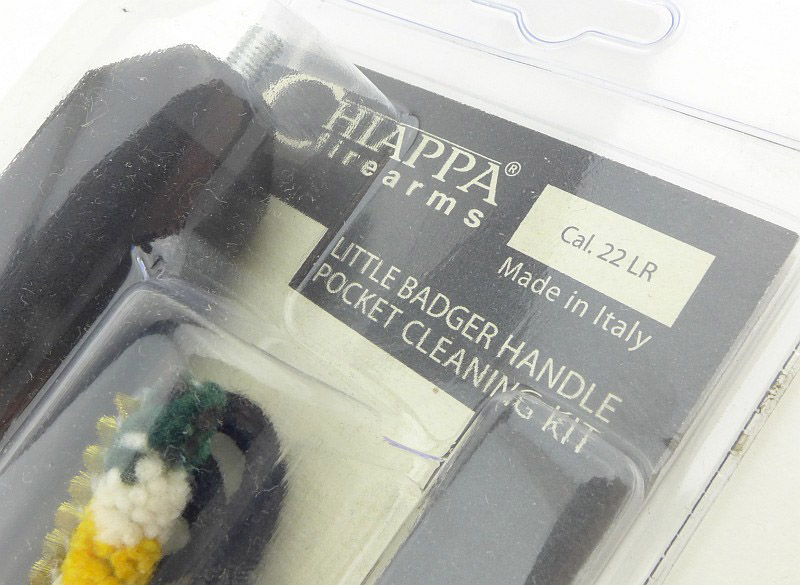


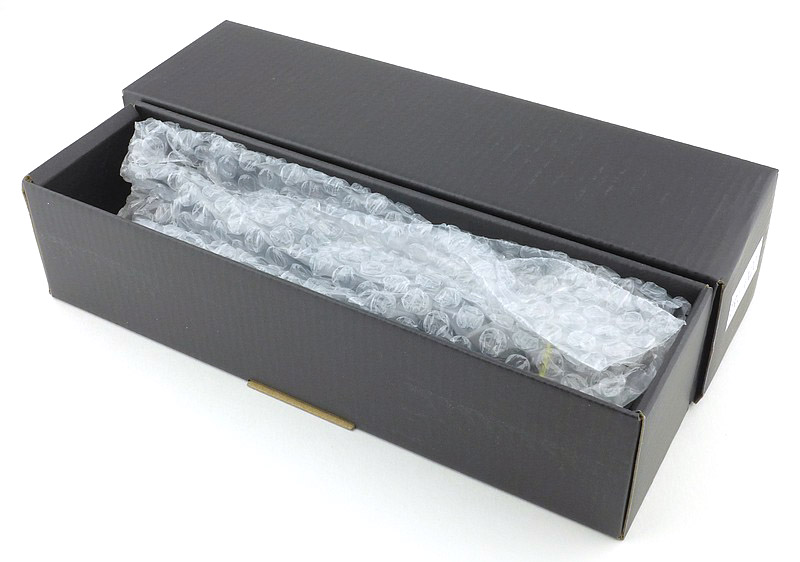
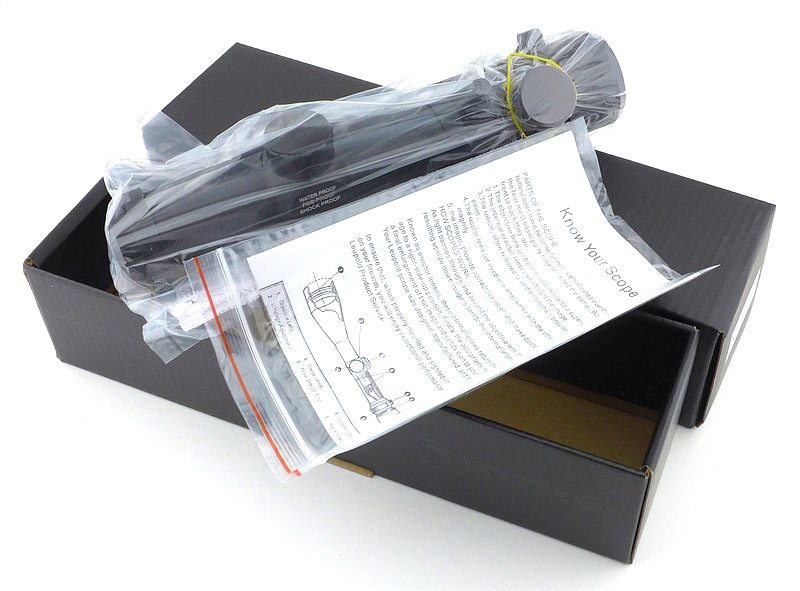


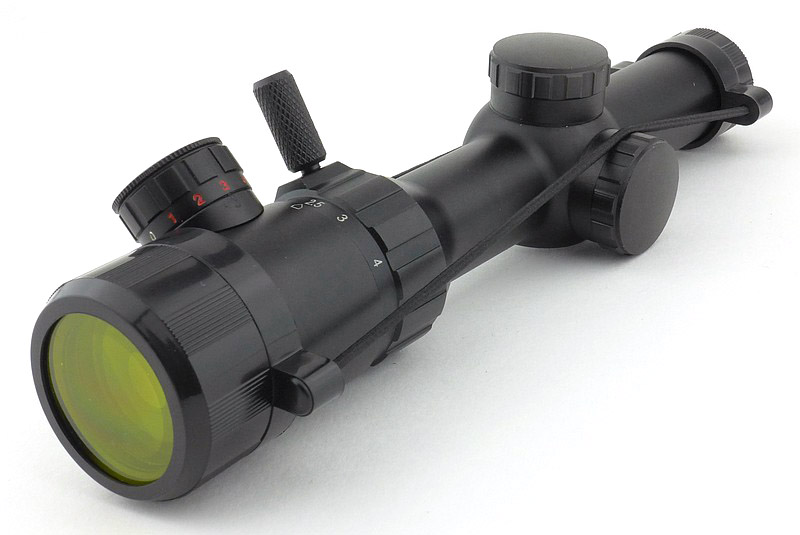


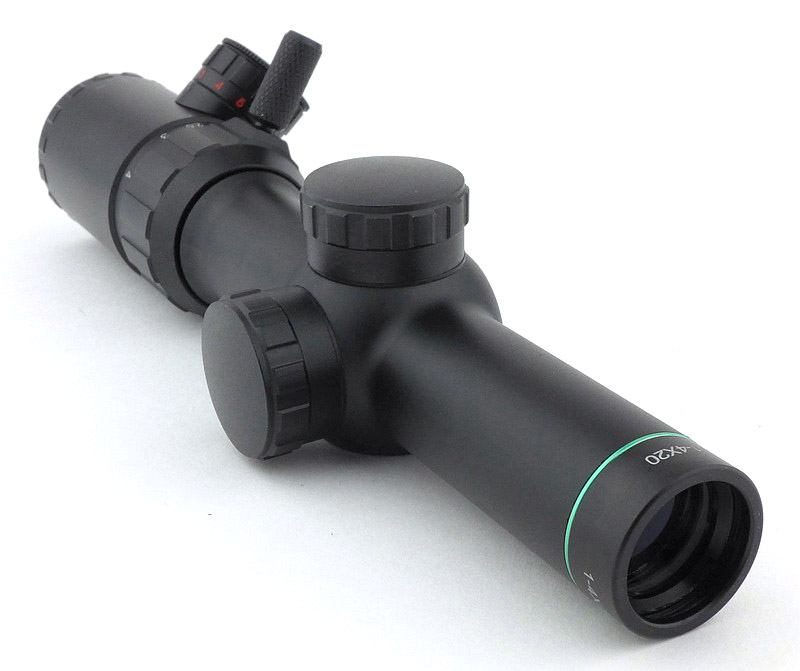
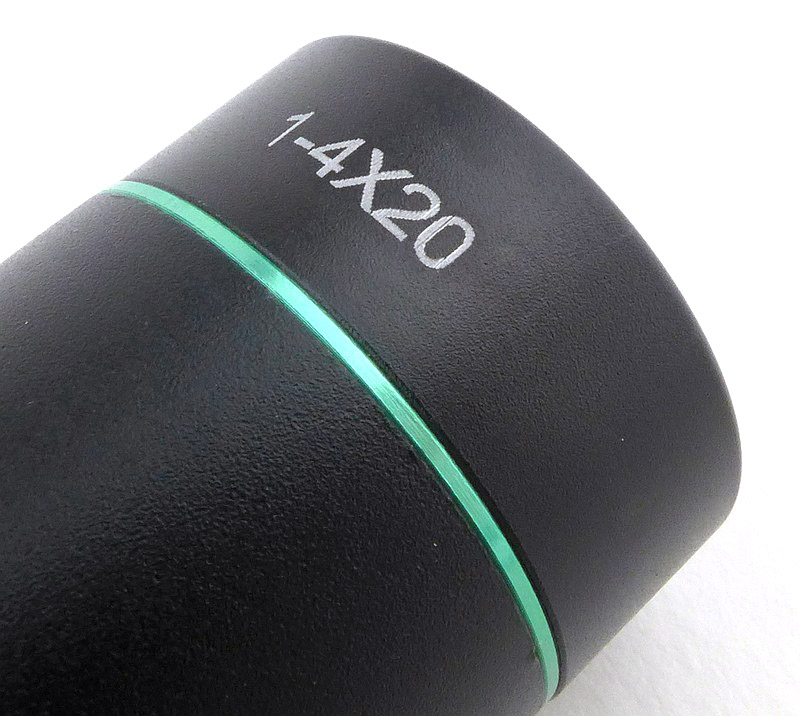


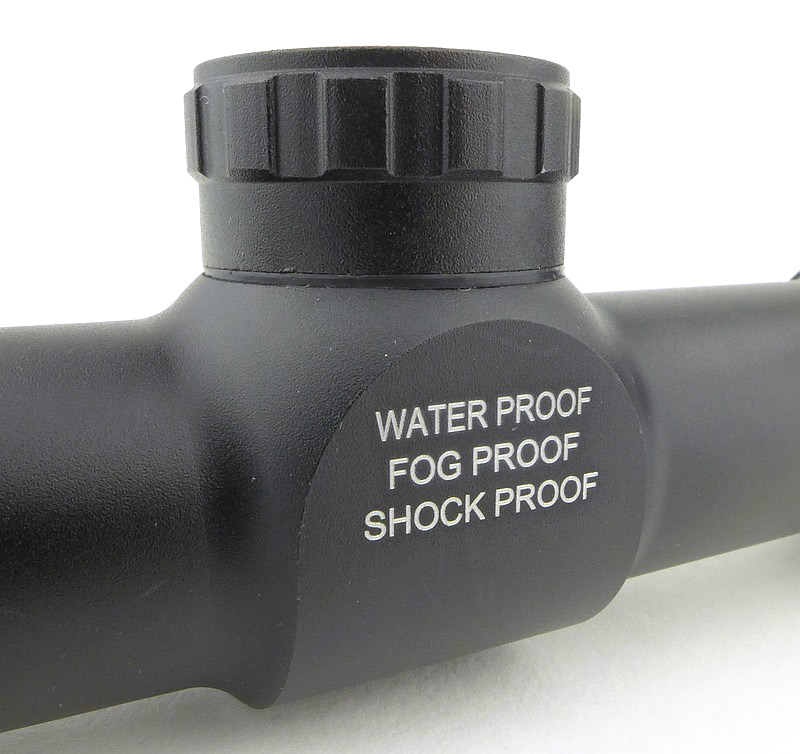


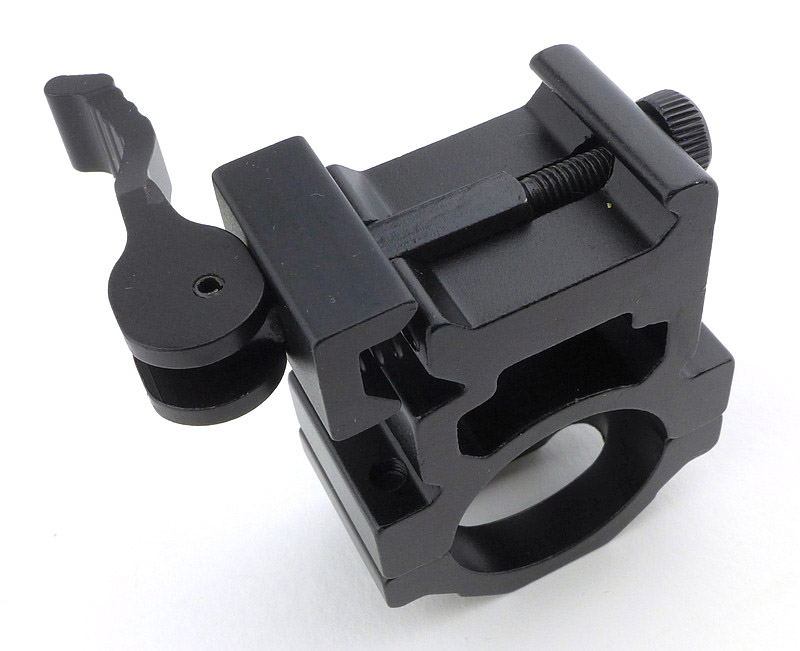


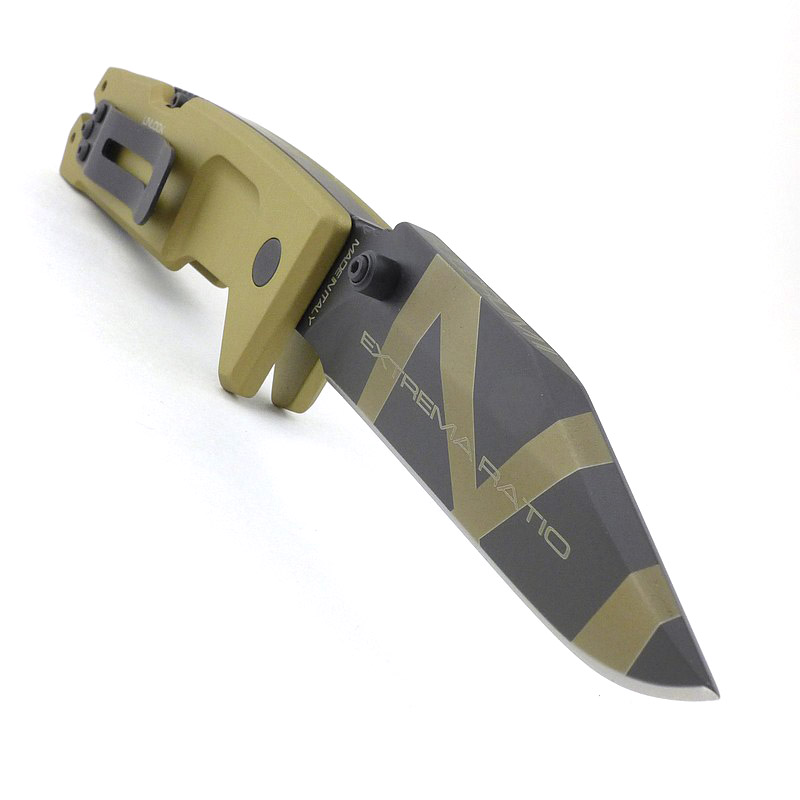
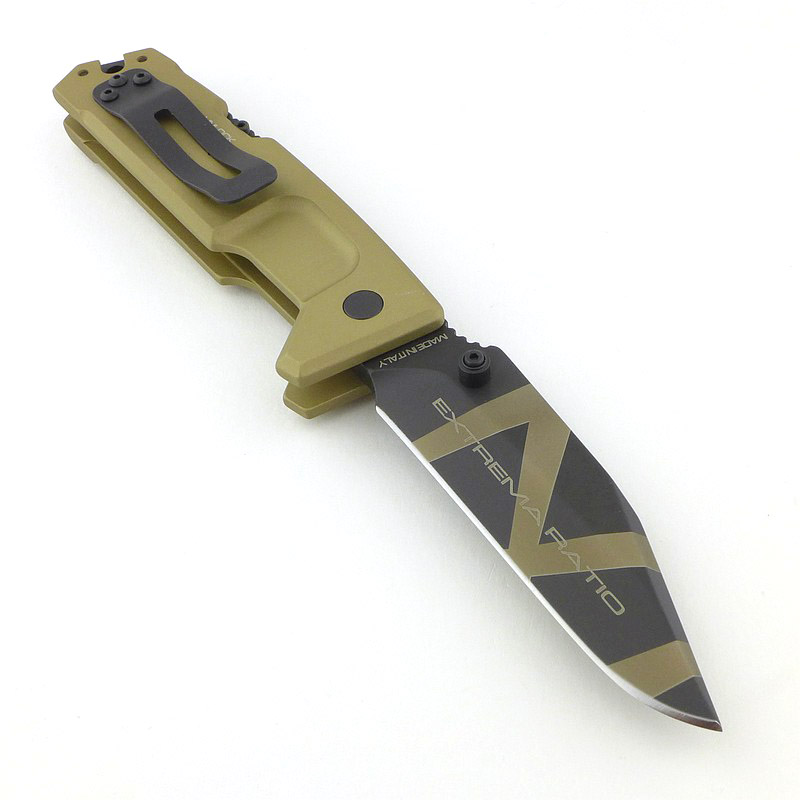


 Allen bolt.")


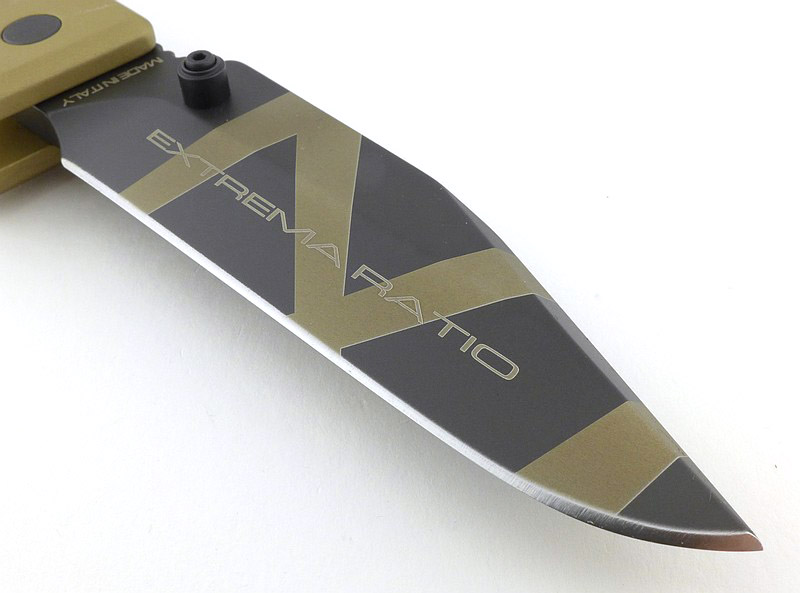


.")


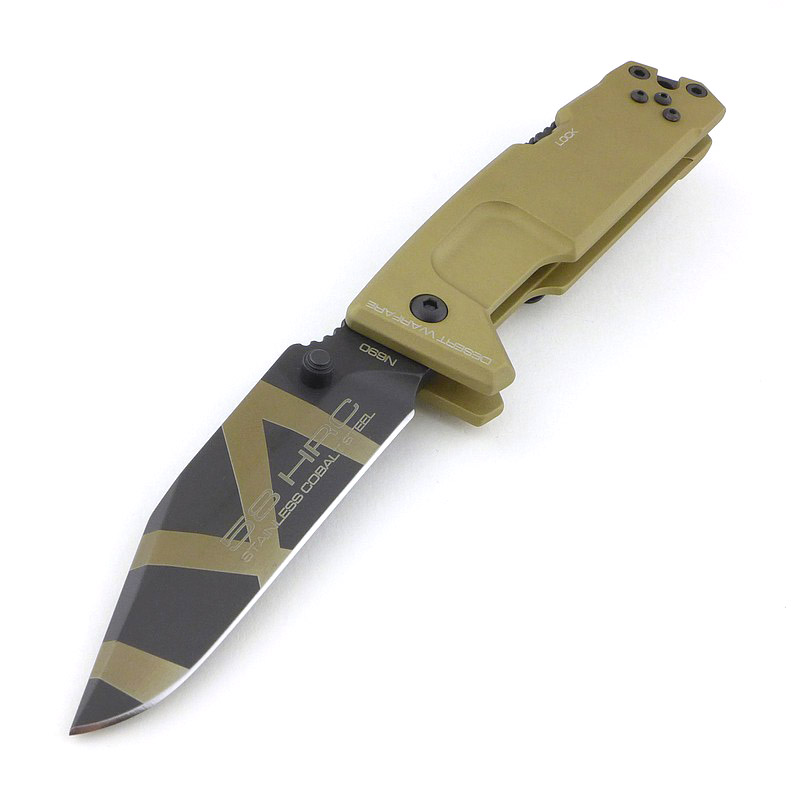


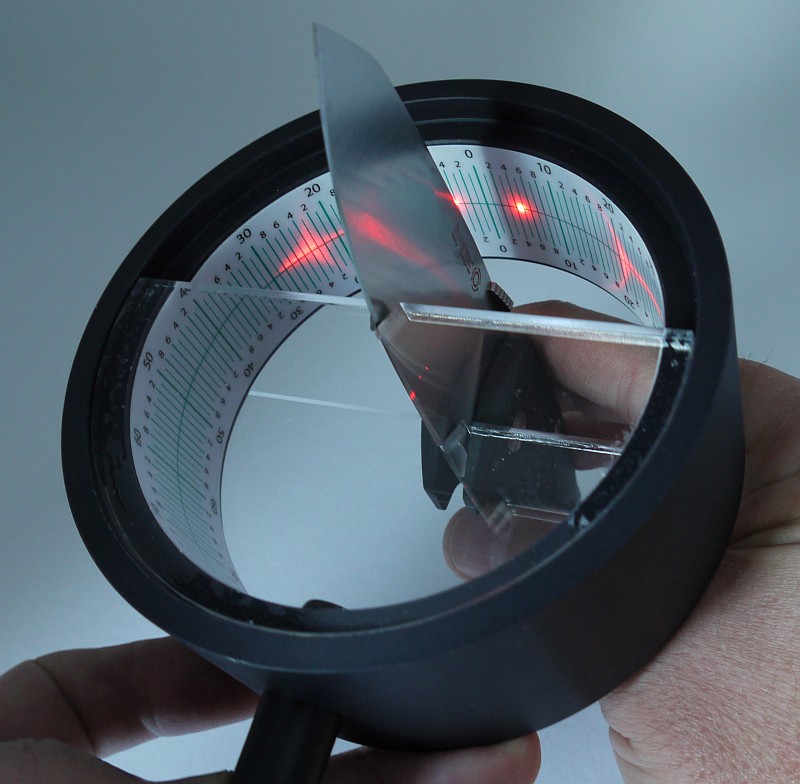

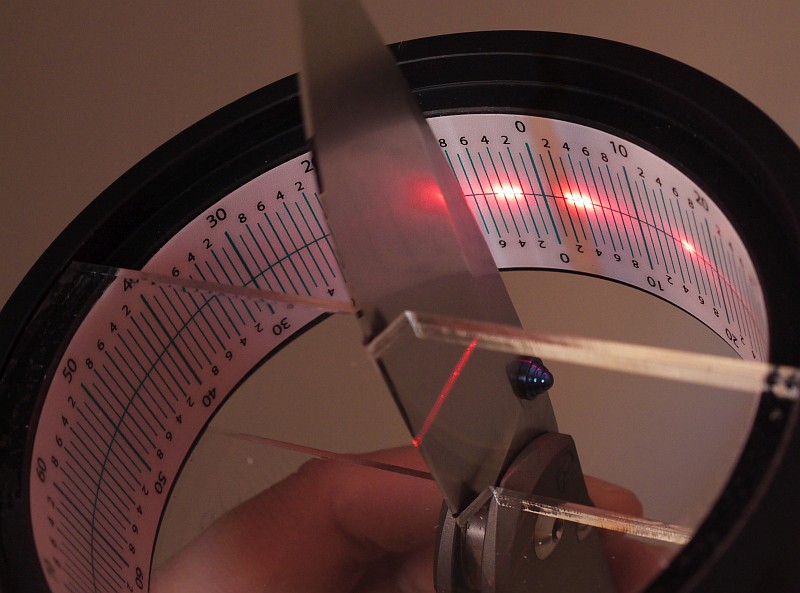


. A precise load (the white tac on the platform is used to adjust the load) applies pressure to an 'impactor'.")


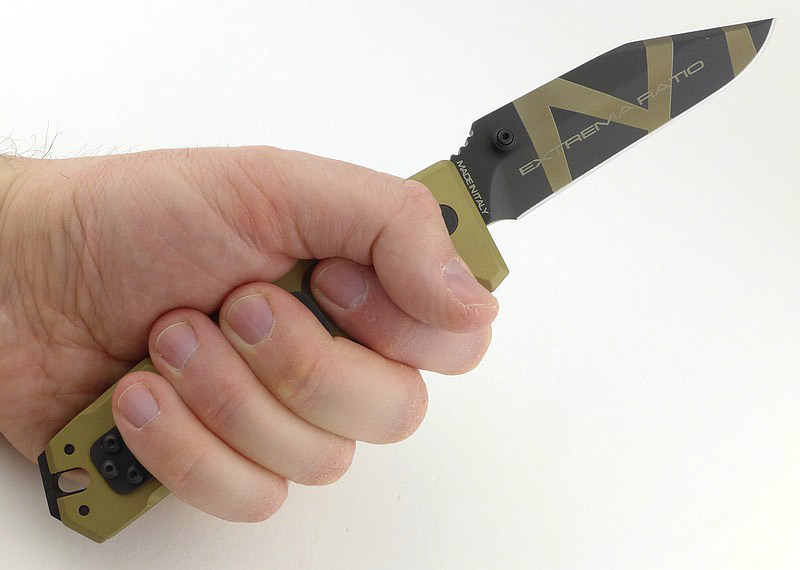
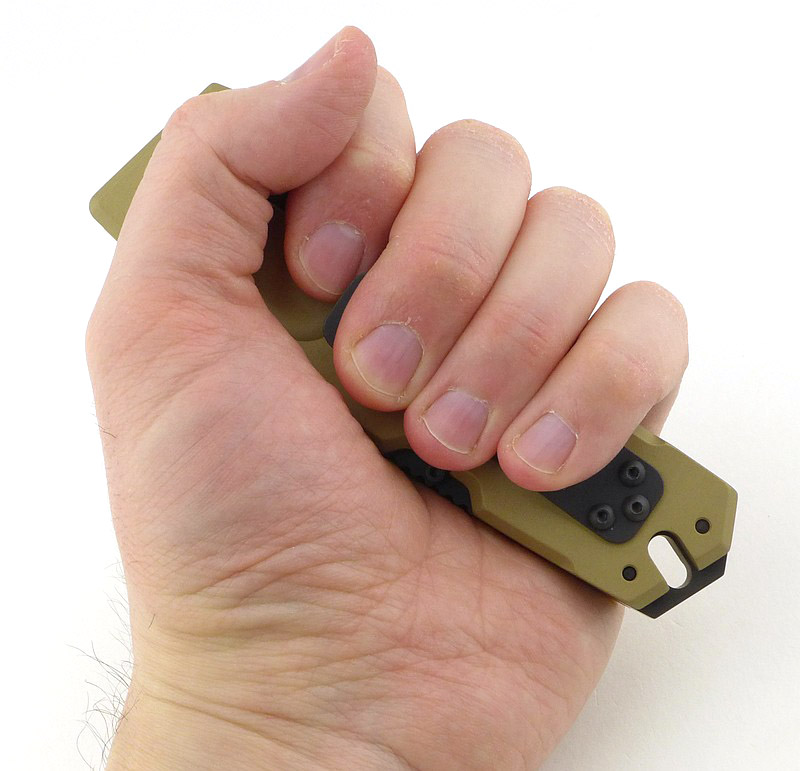


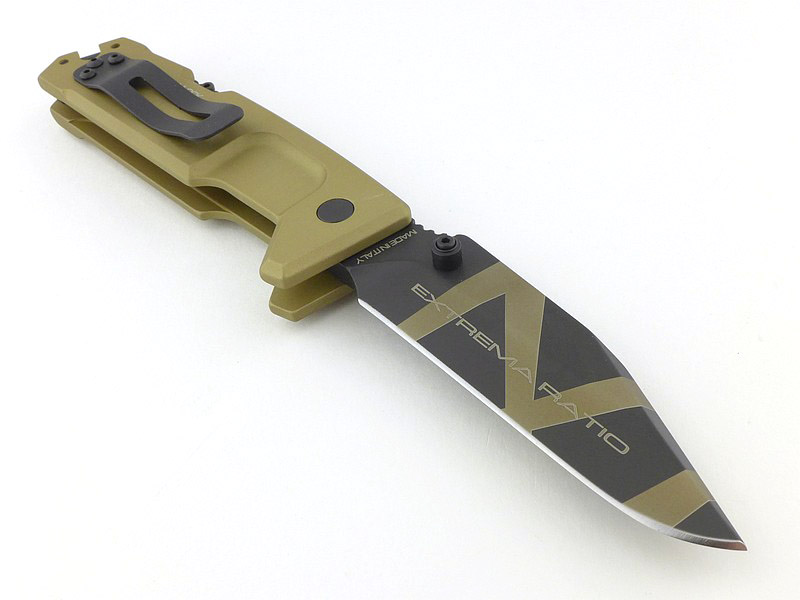
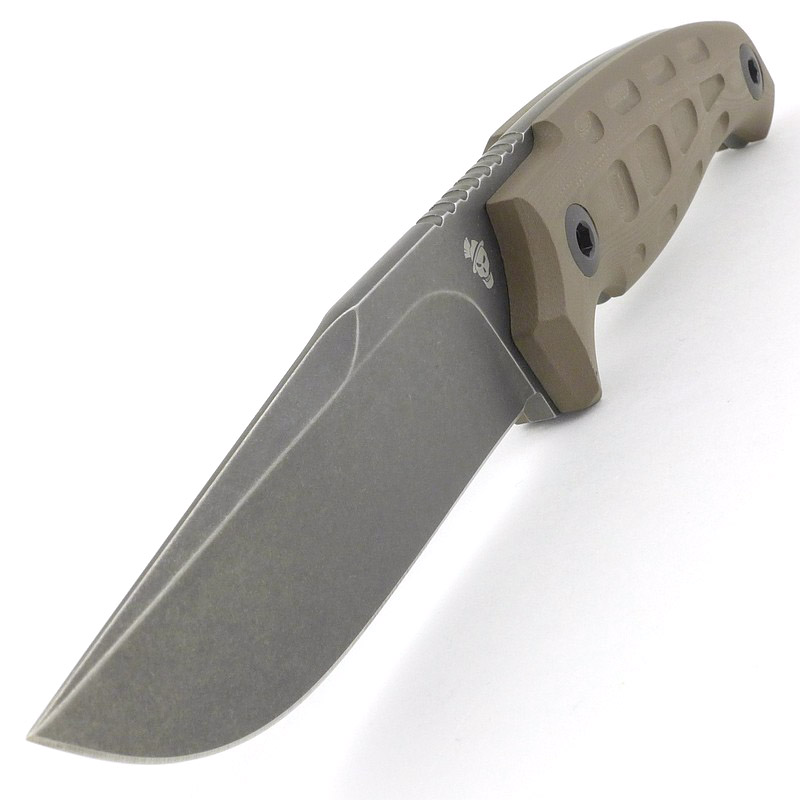
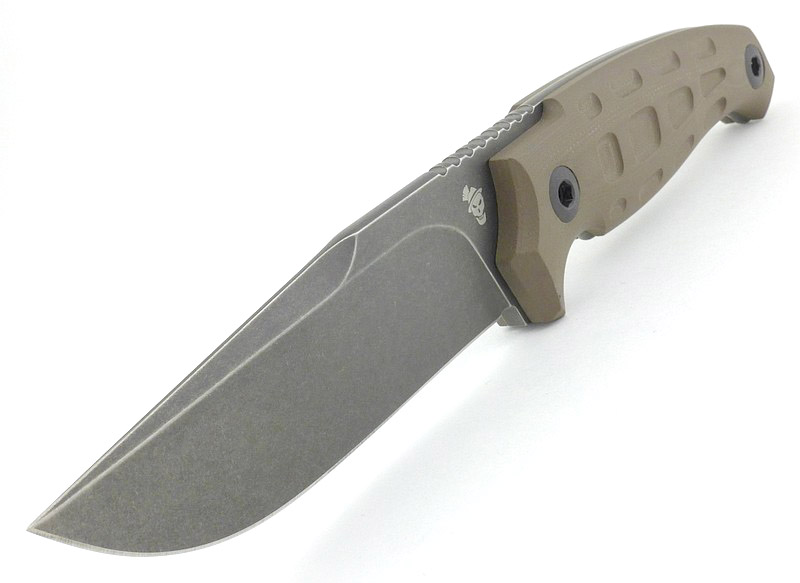
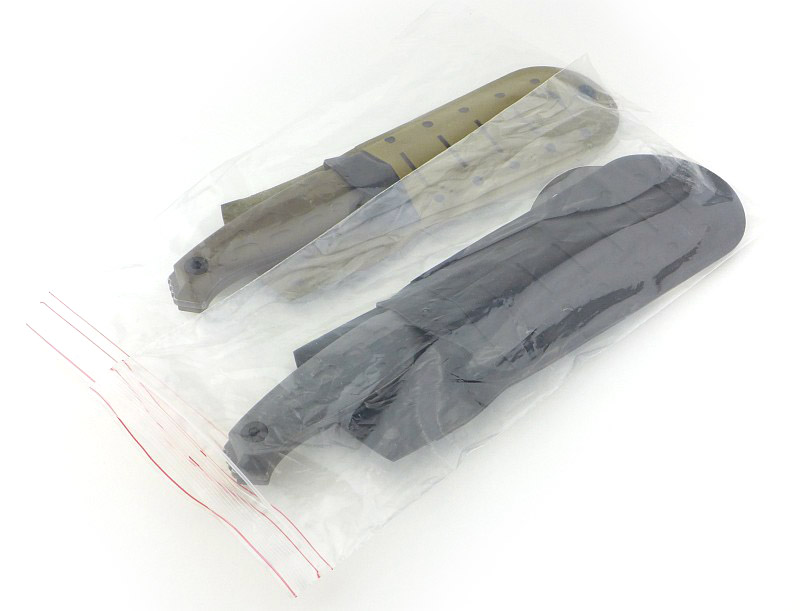
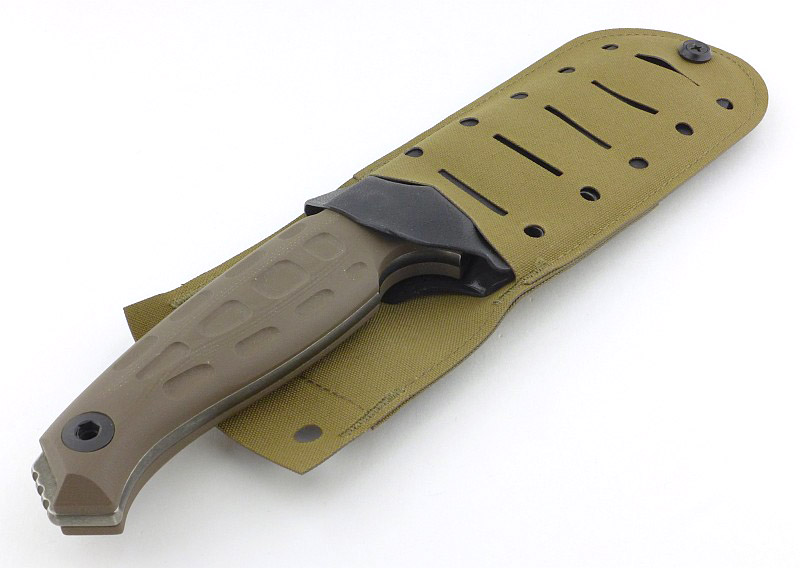


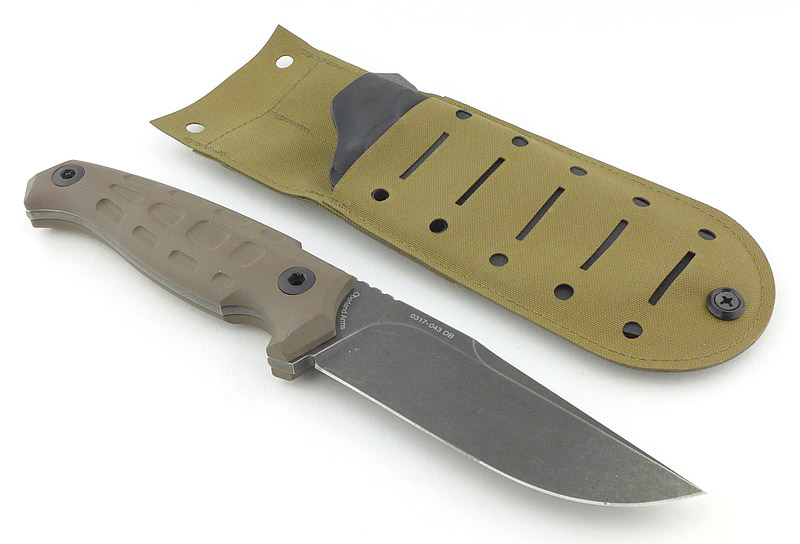


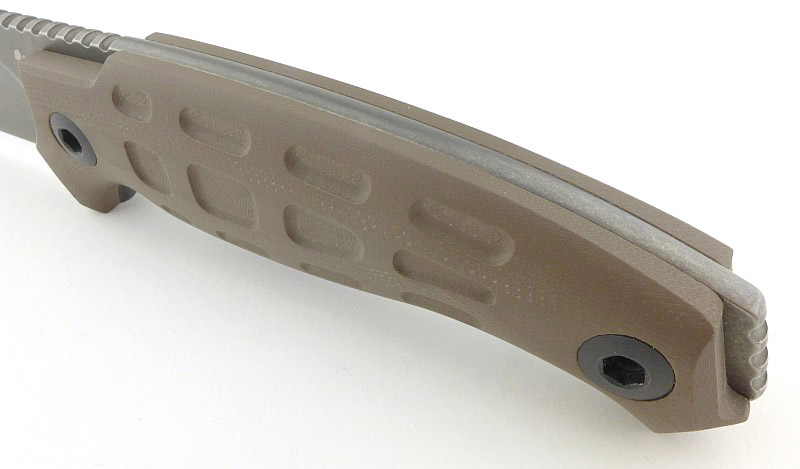


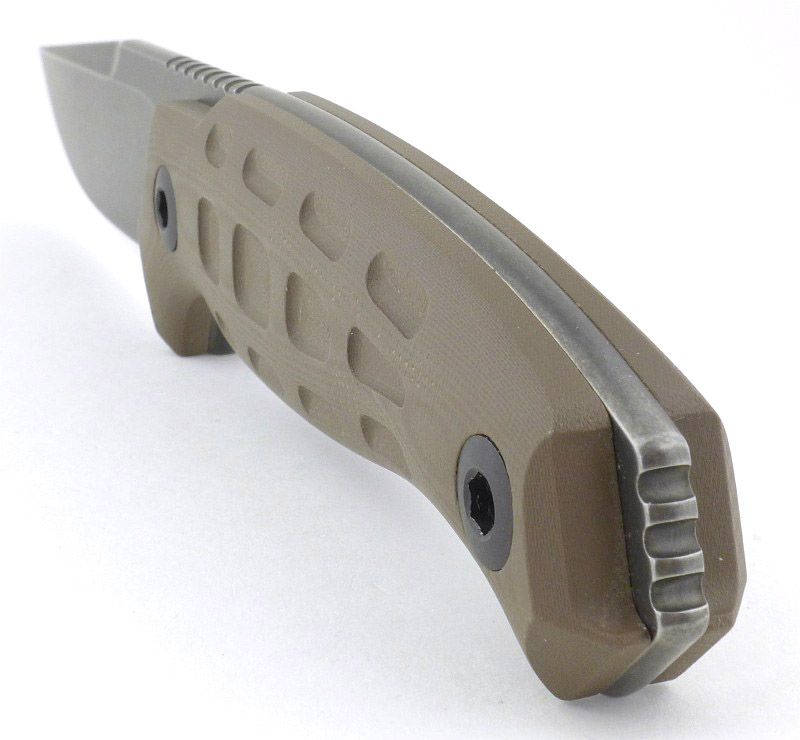
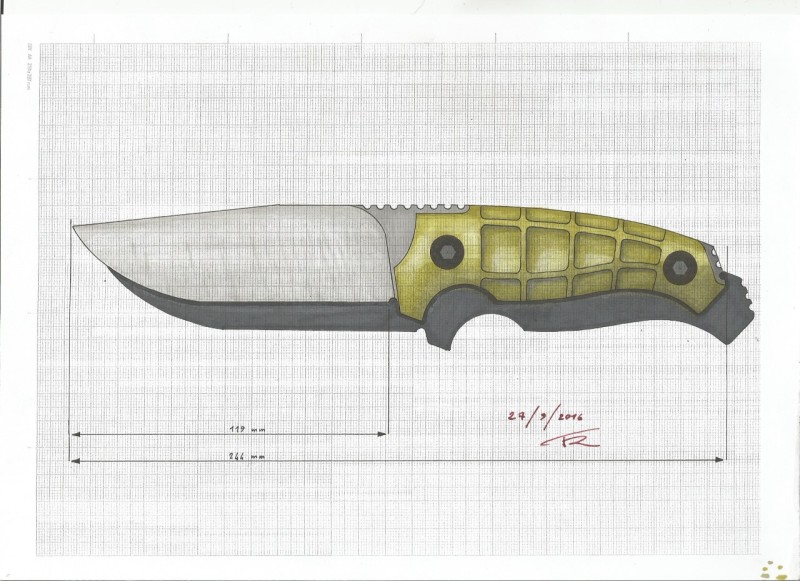

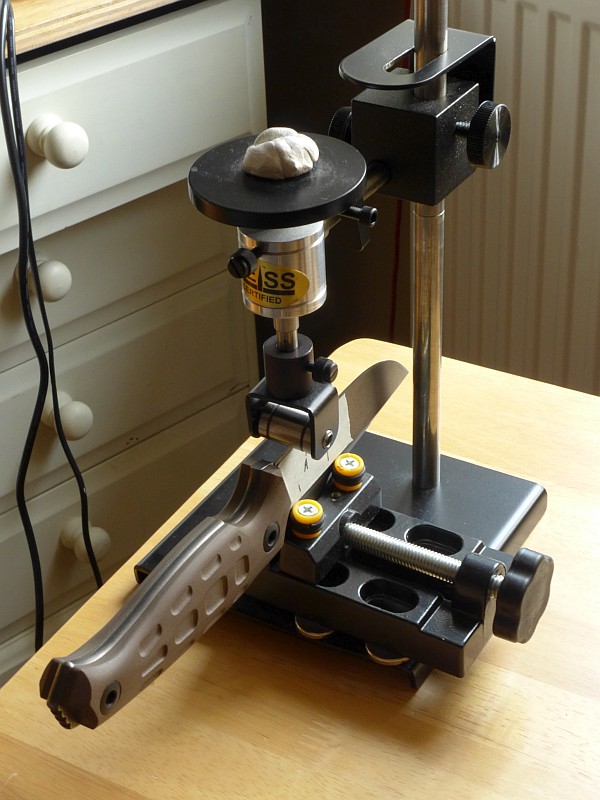
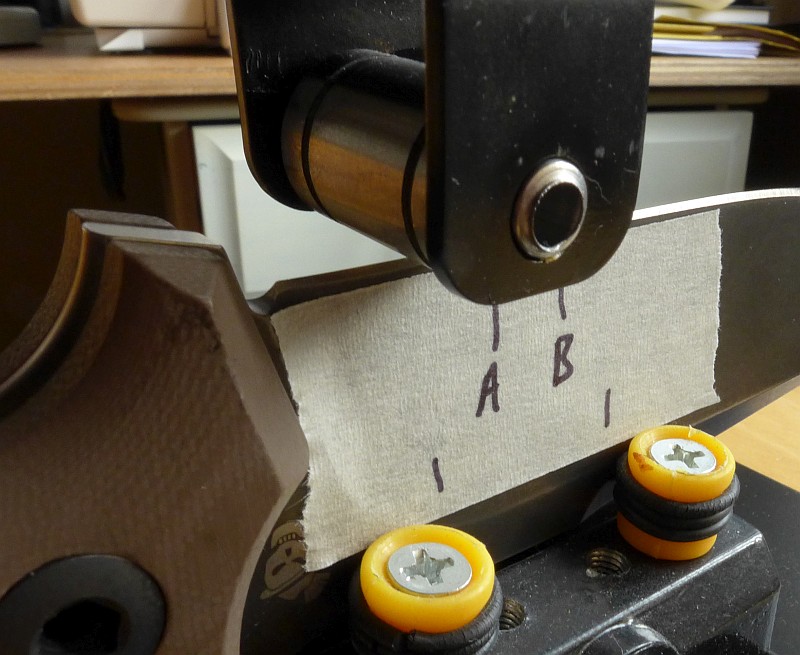
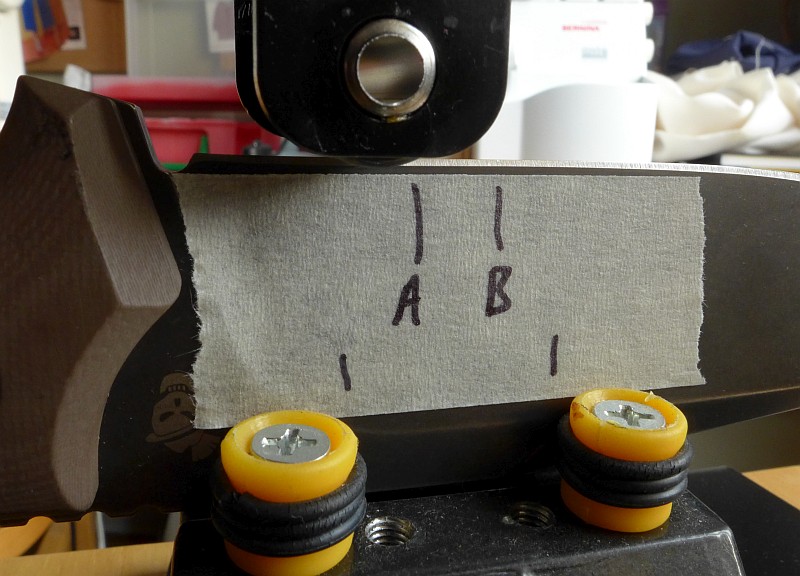


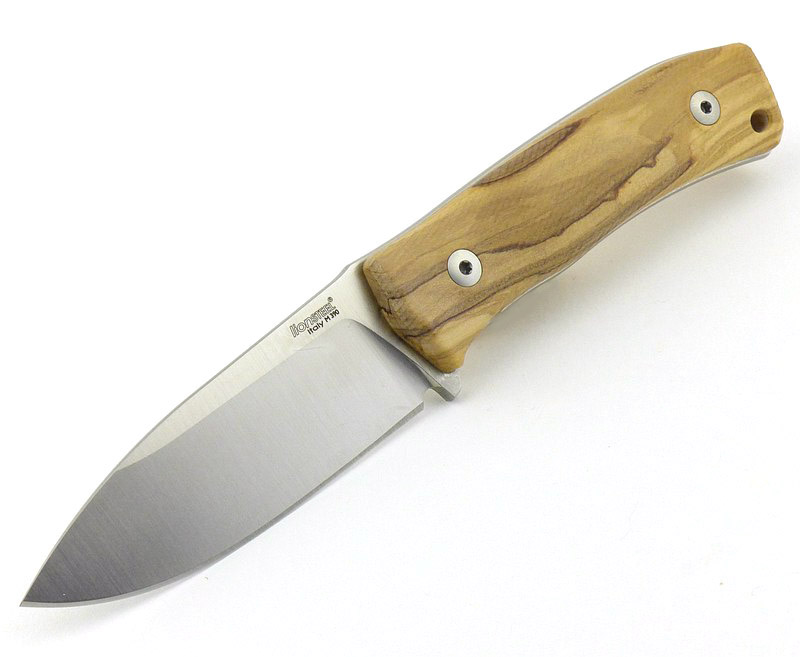
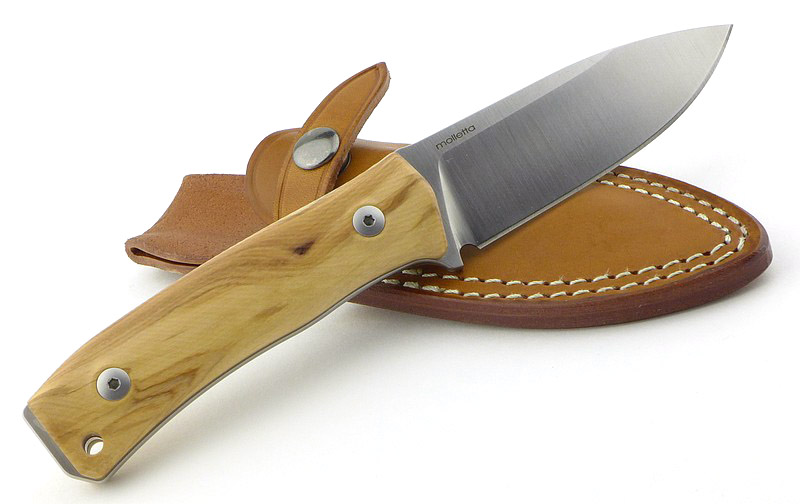

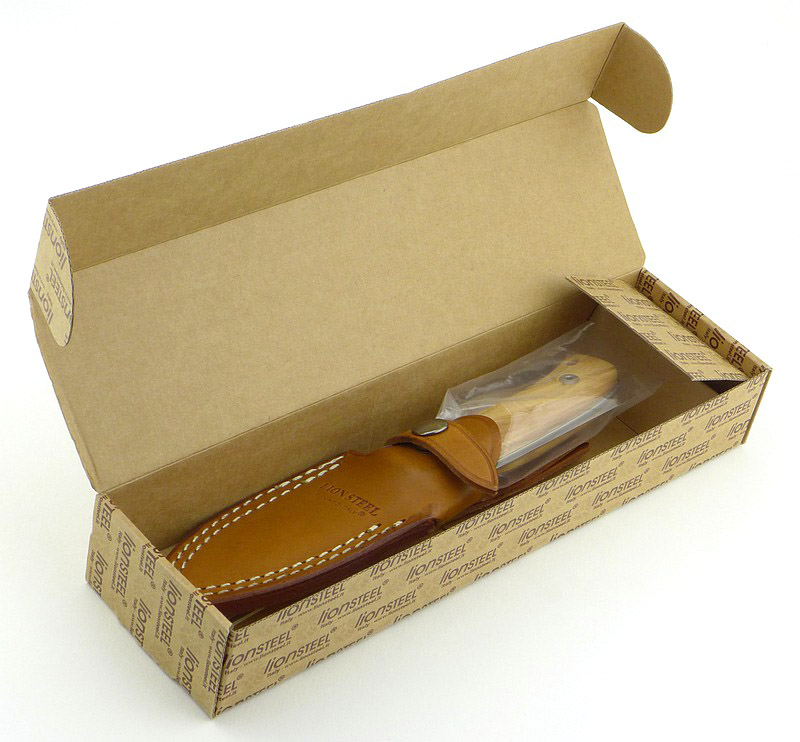


 are all a single piece of leather with a couple of folds.")


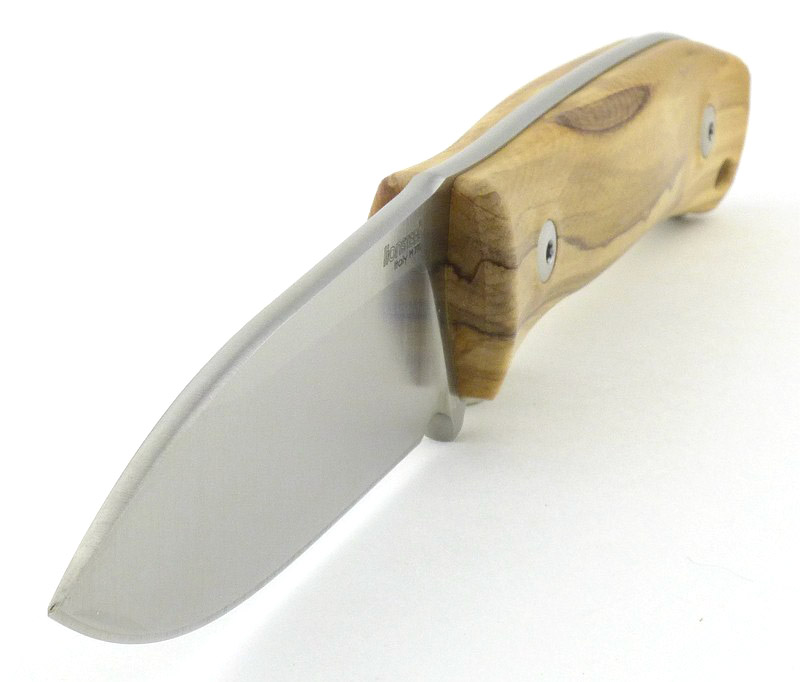

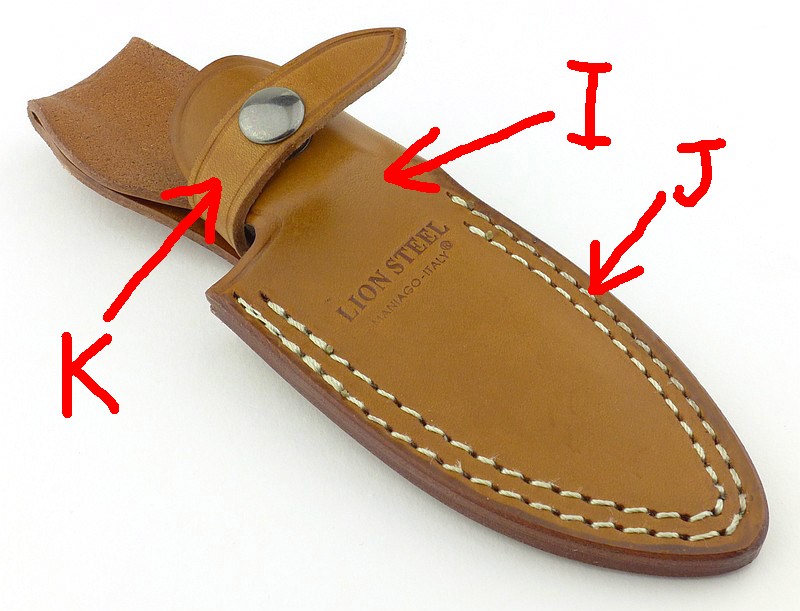
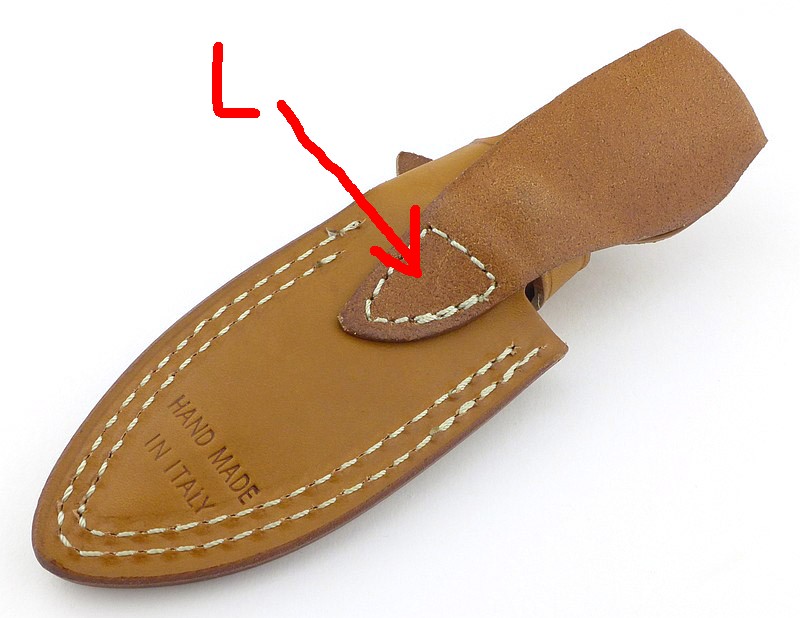
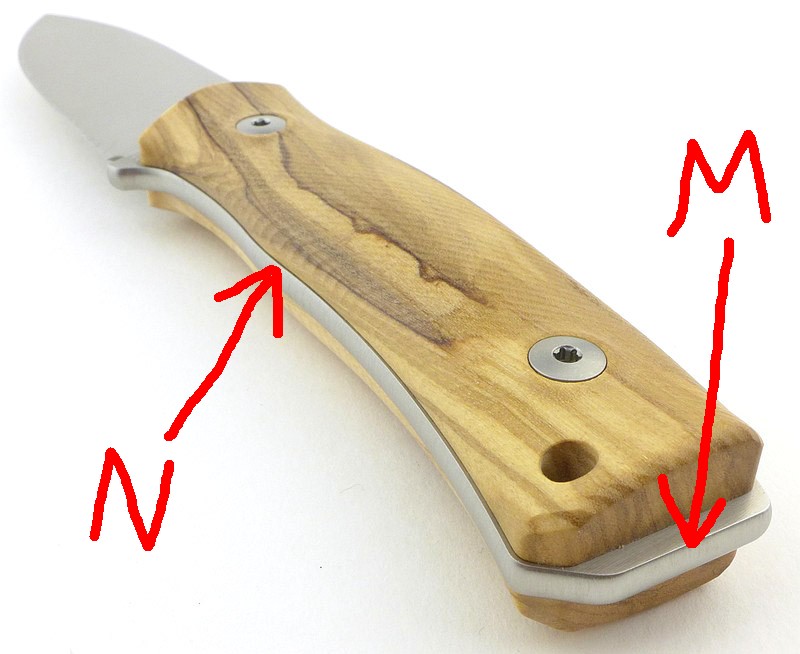


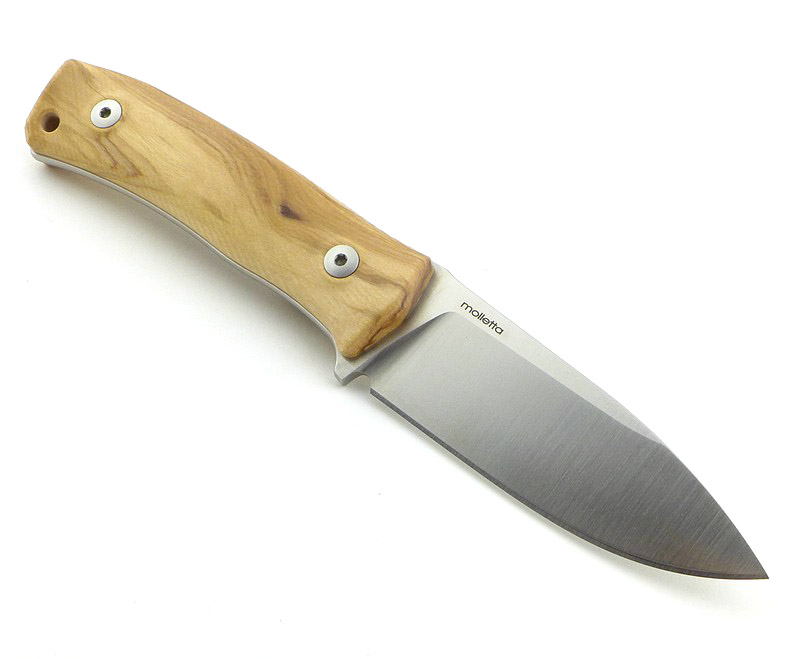


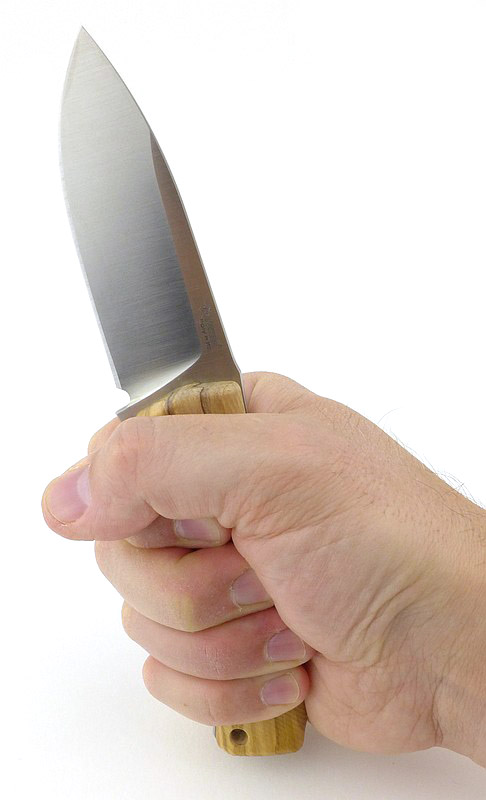

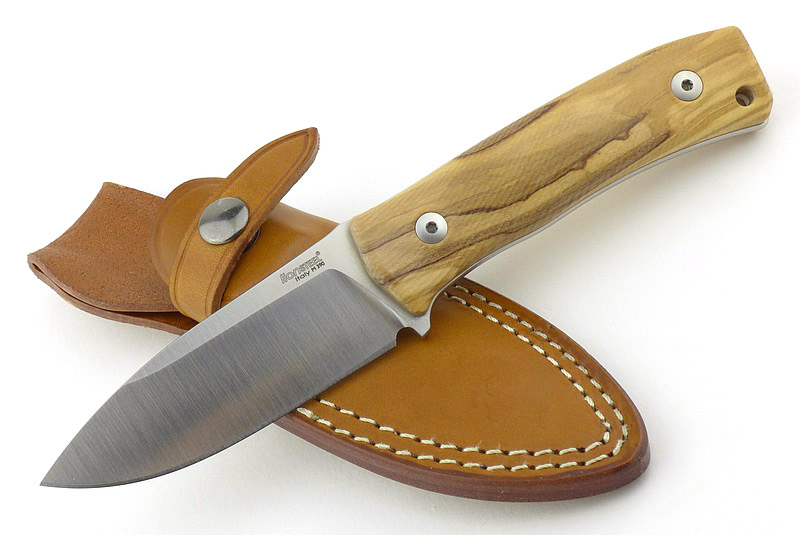

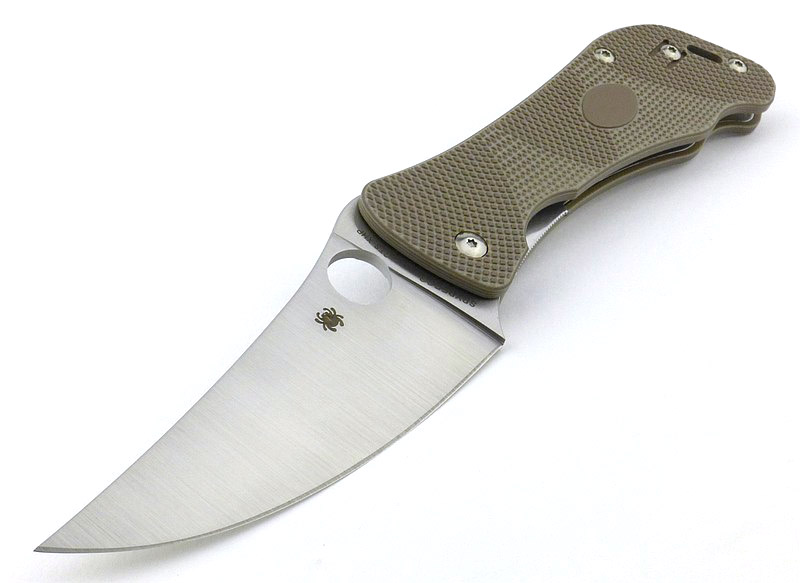
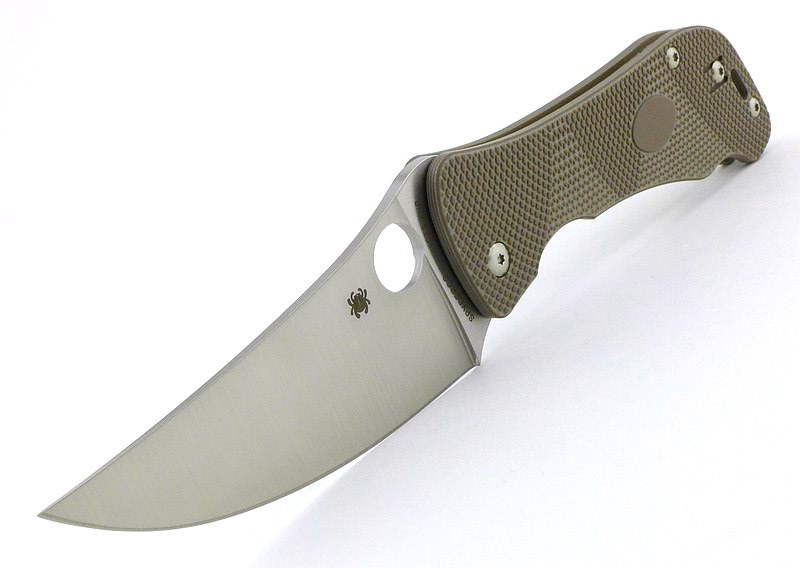

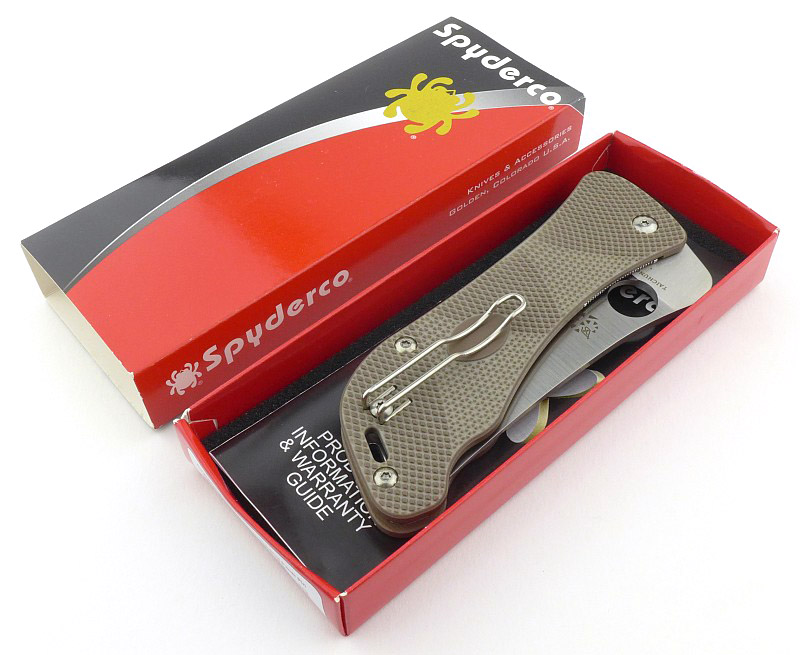


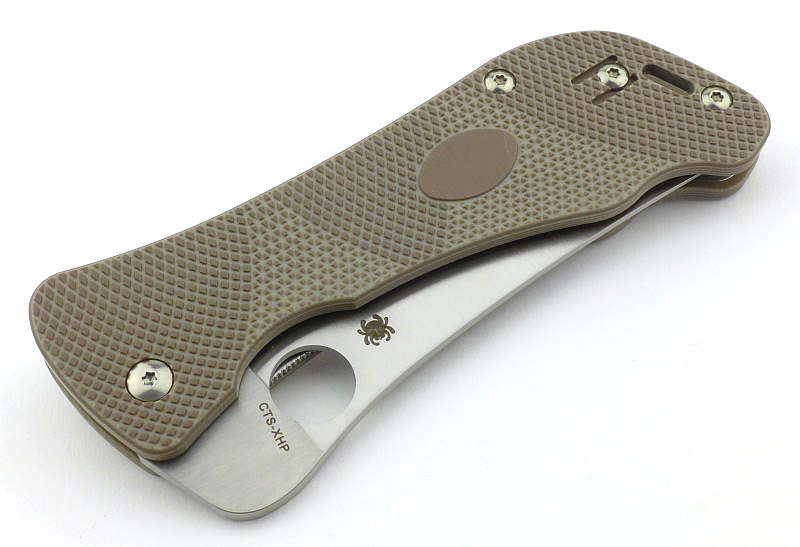


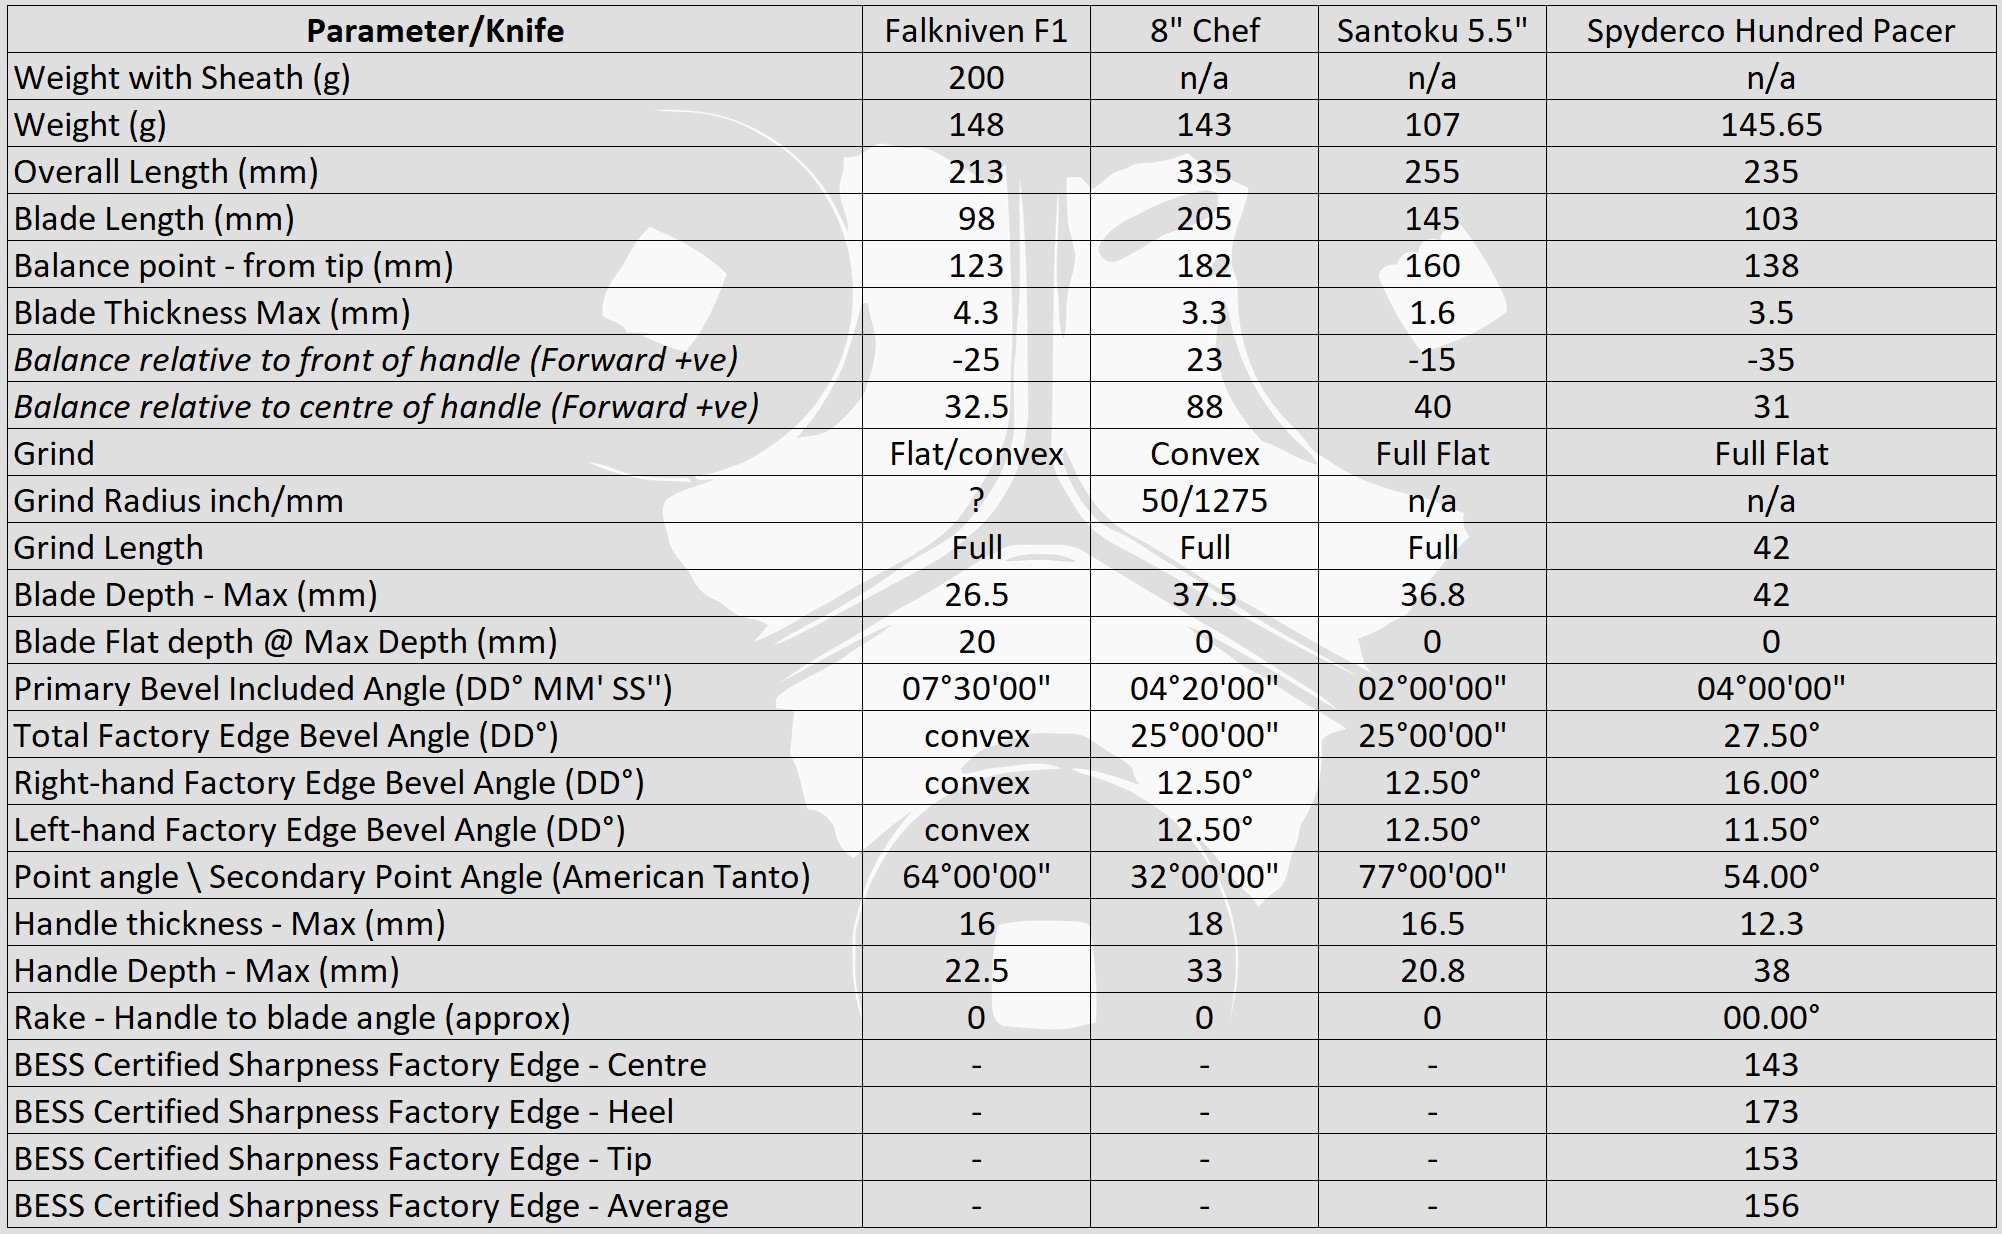


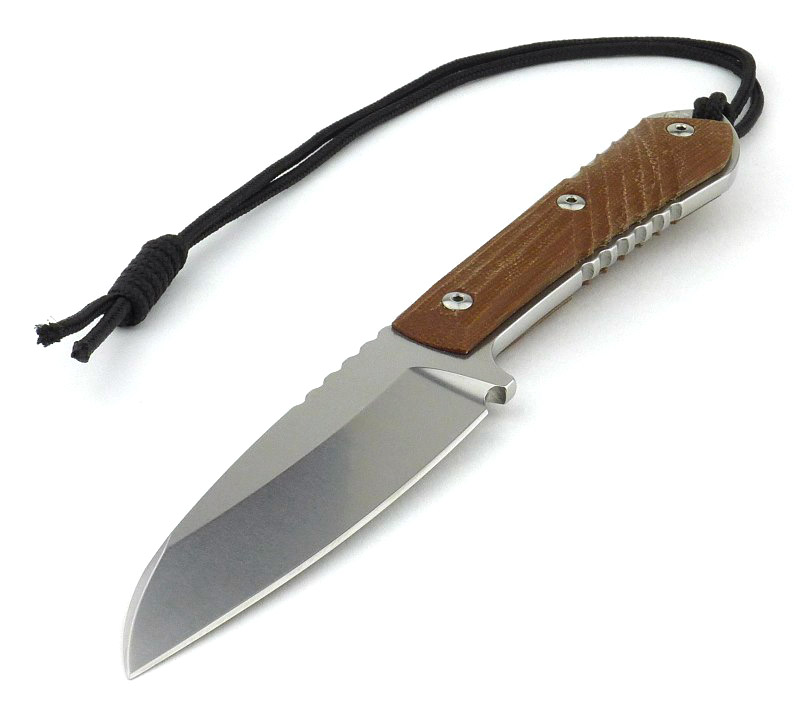
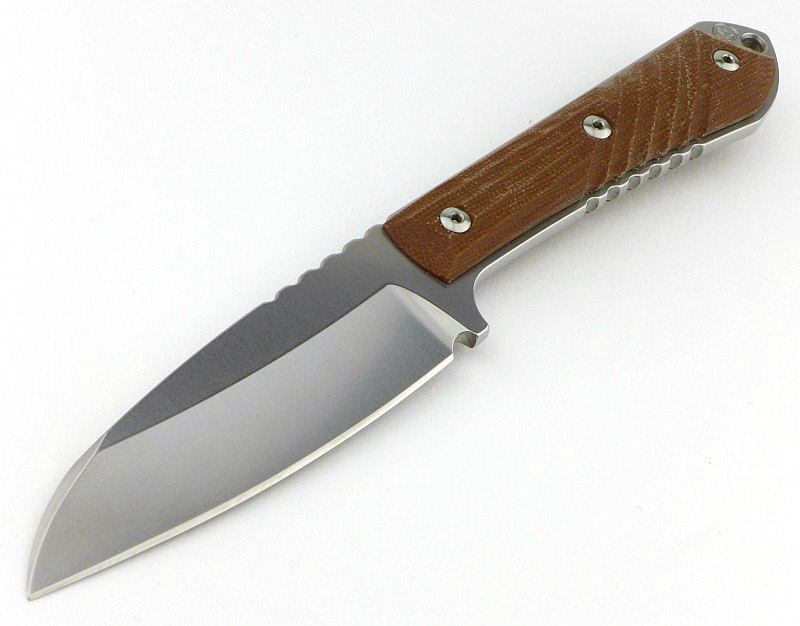


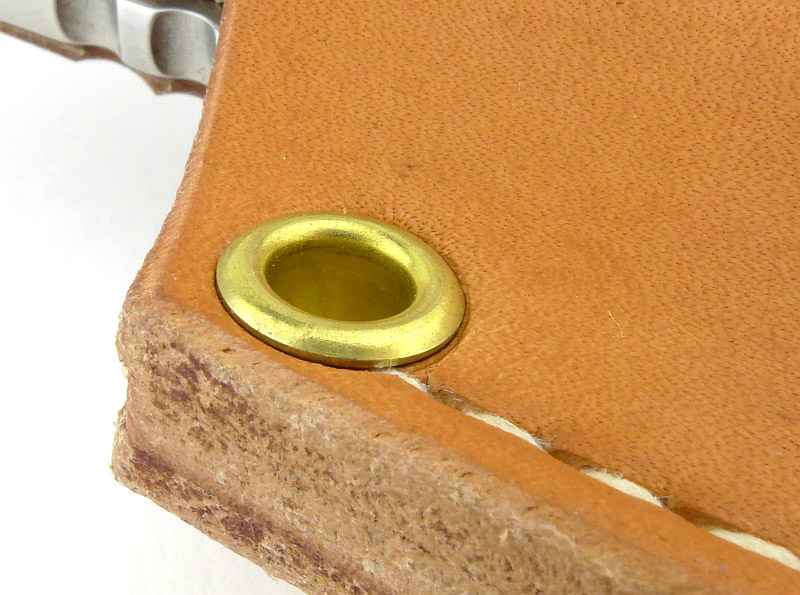


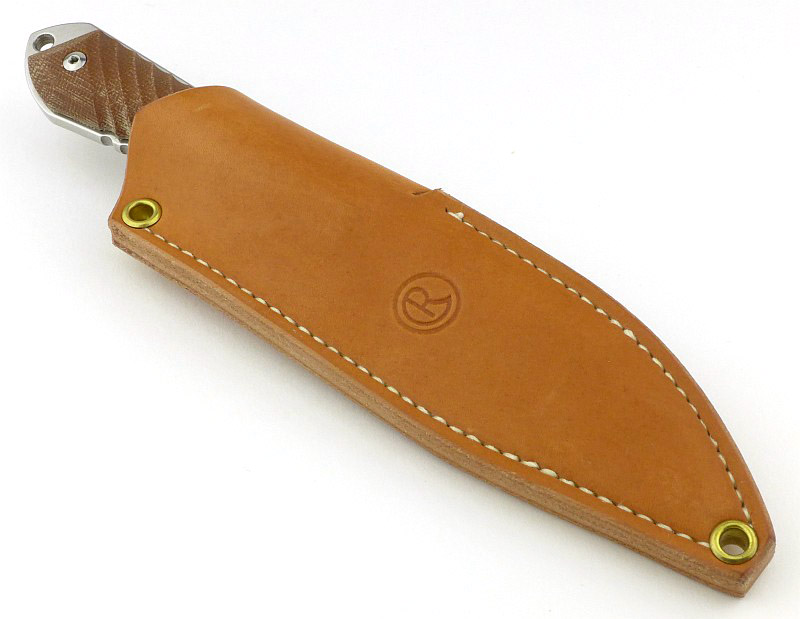


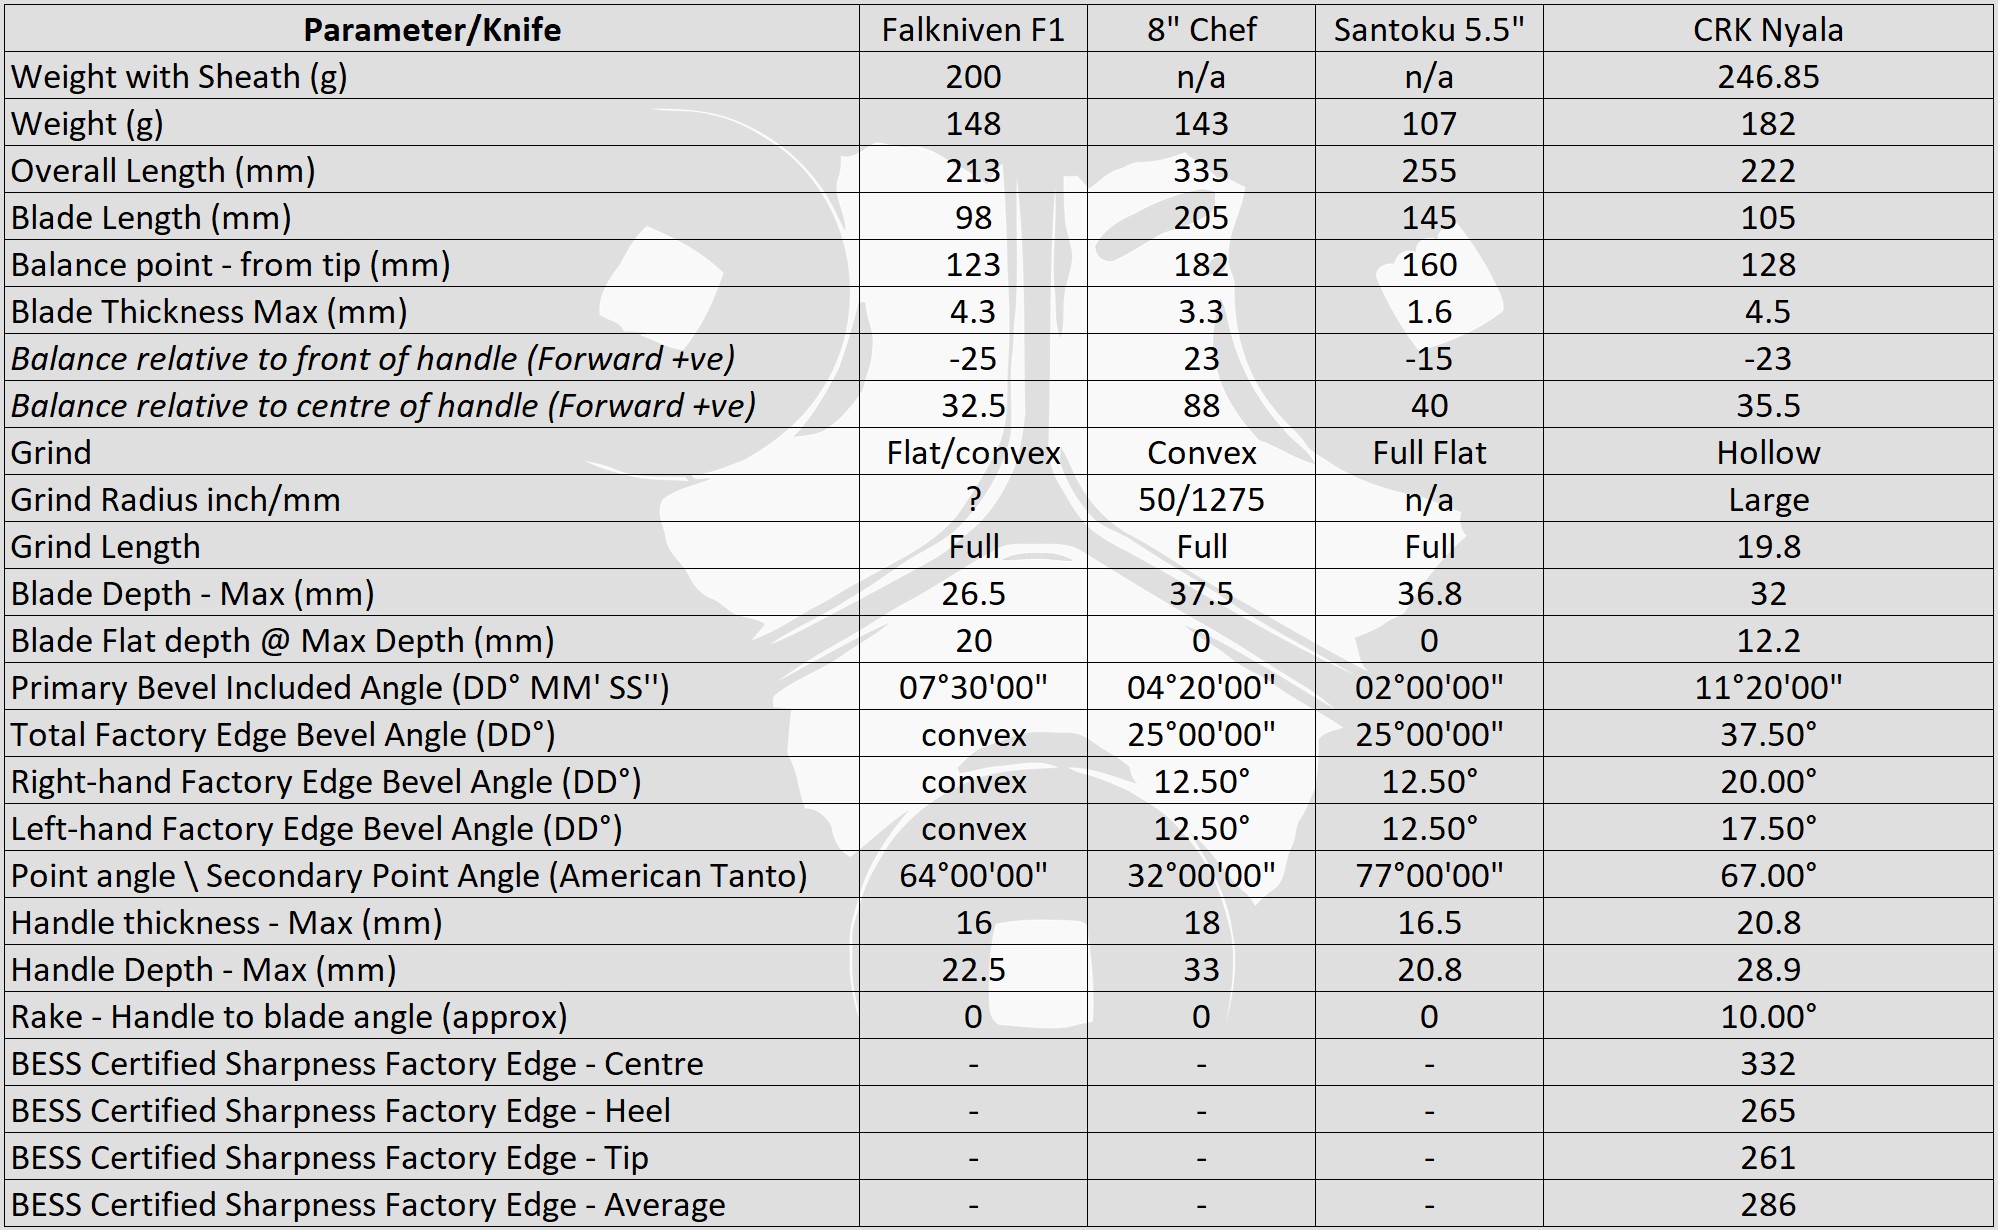


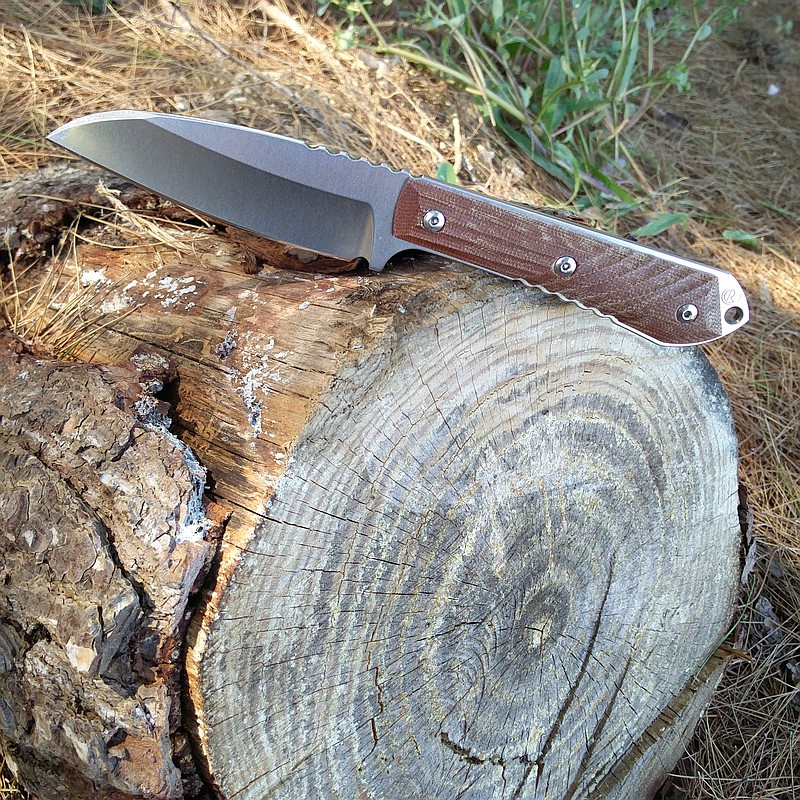
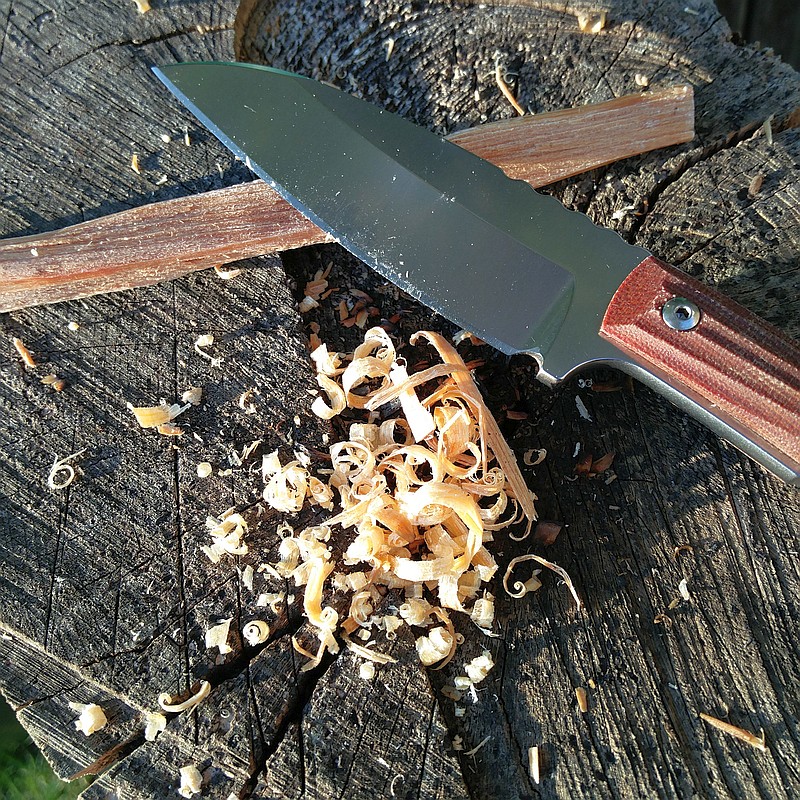

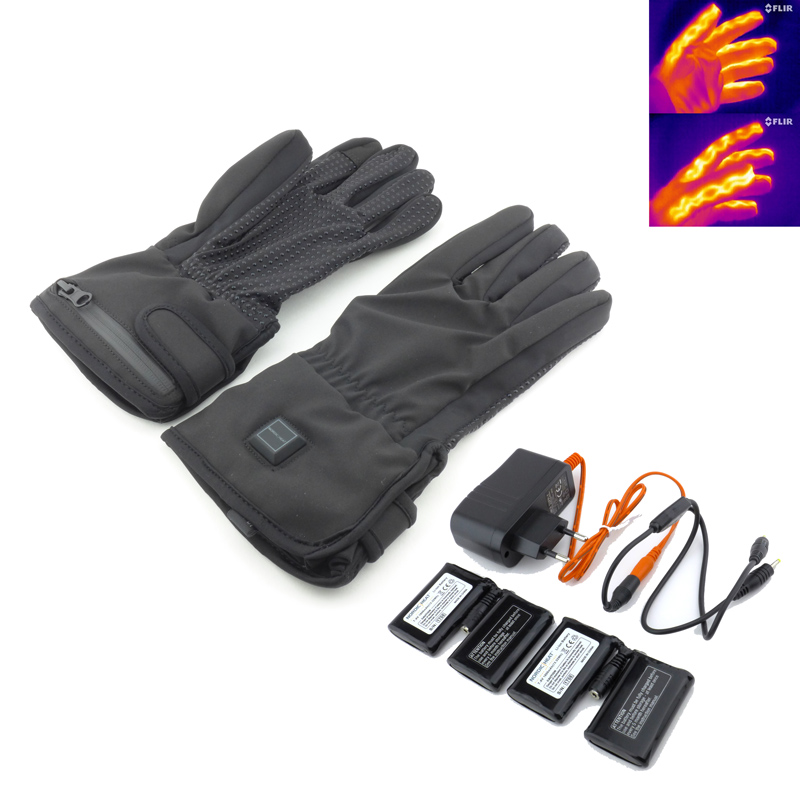
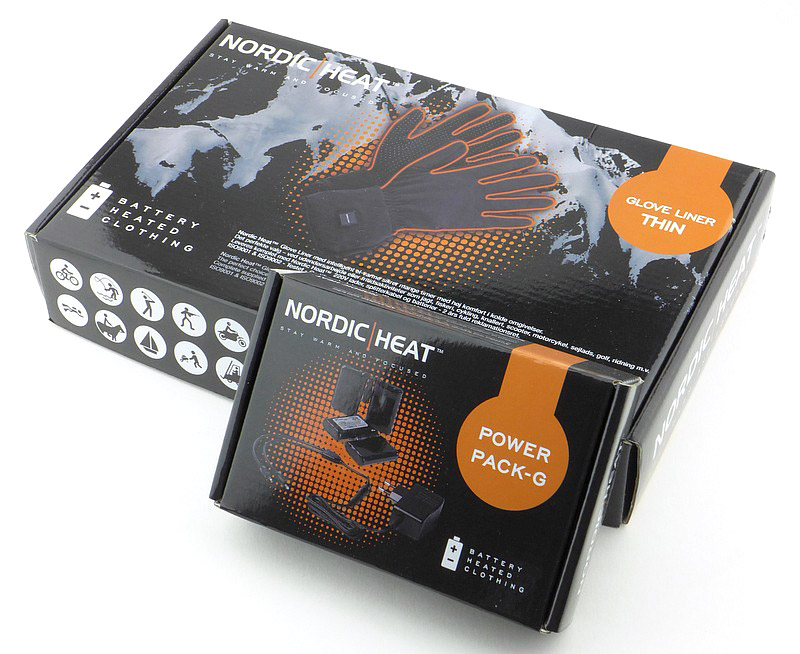


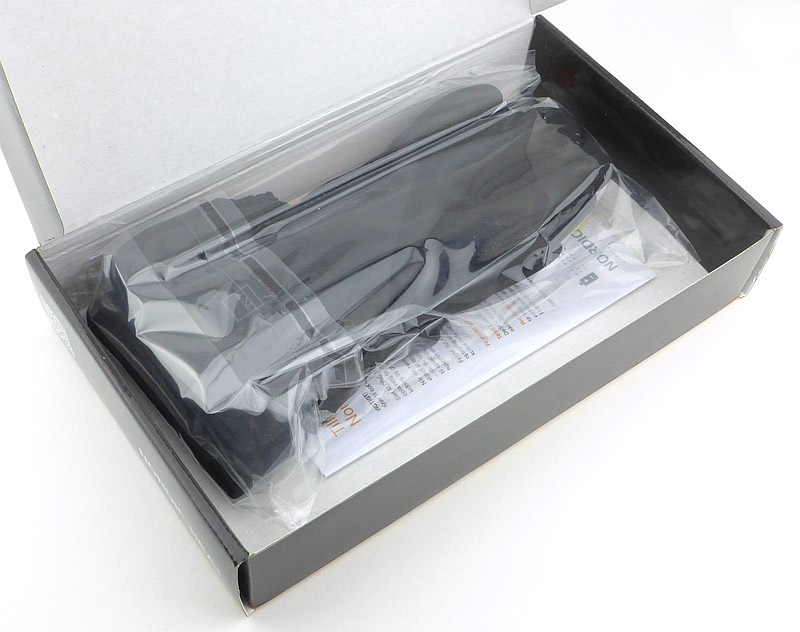


")


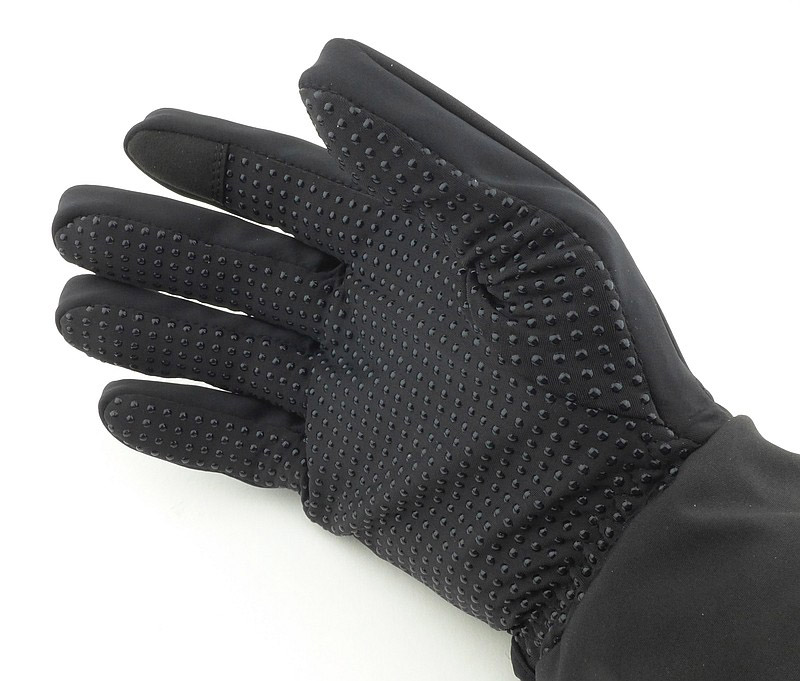
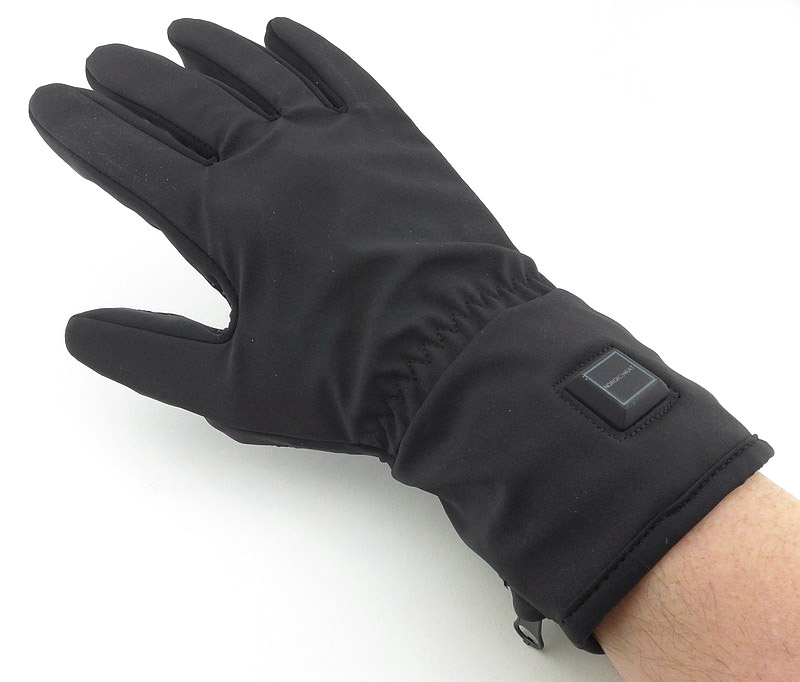


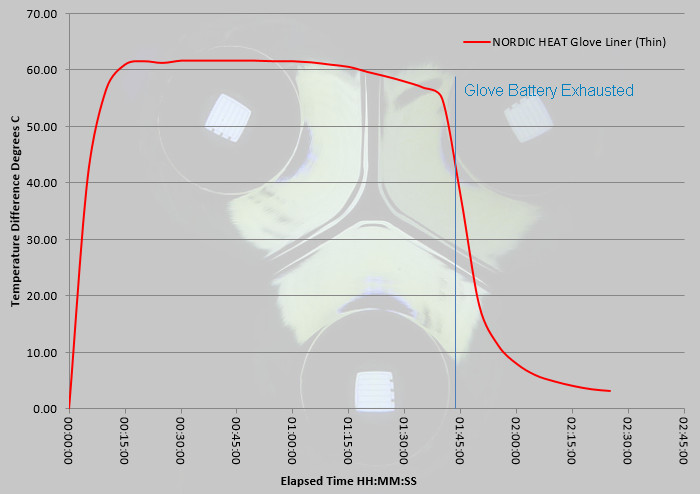


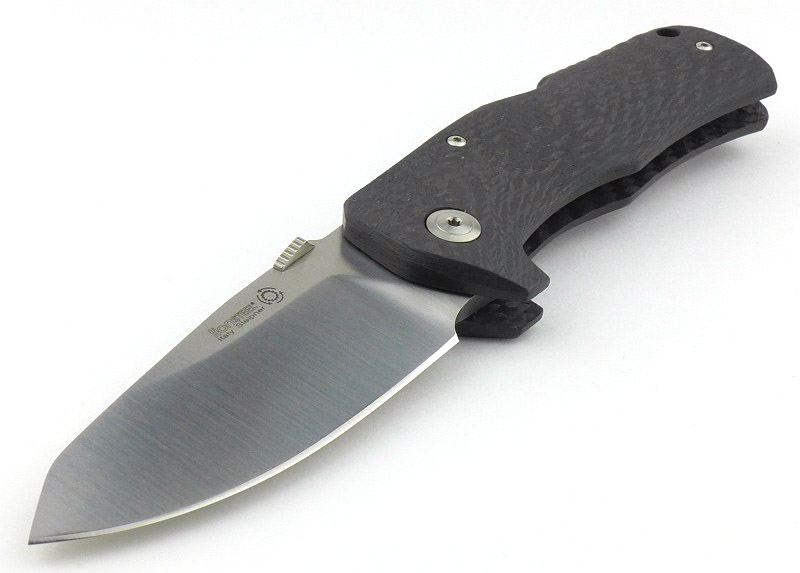
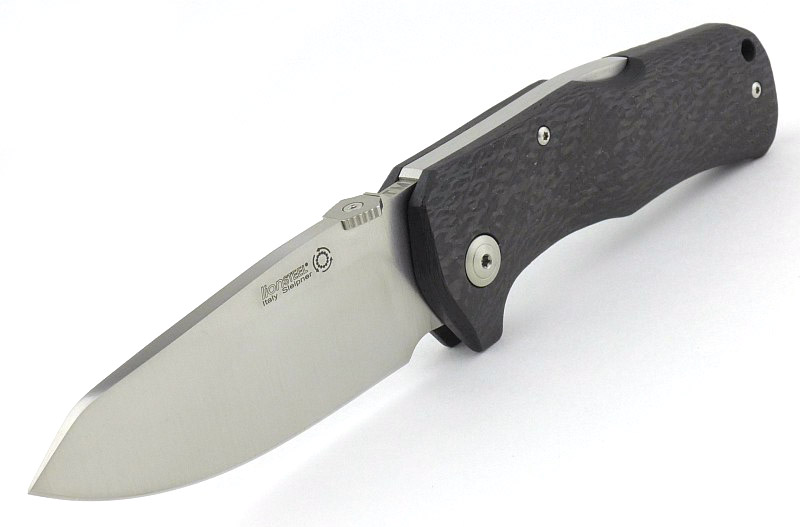
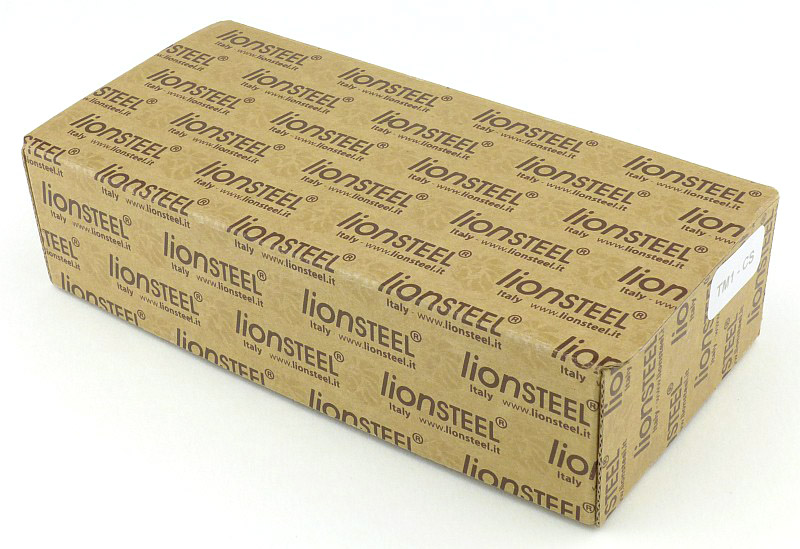


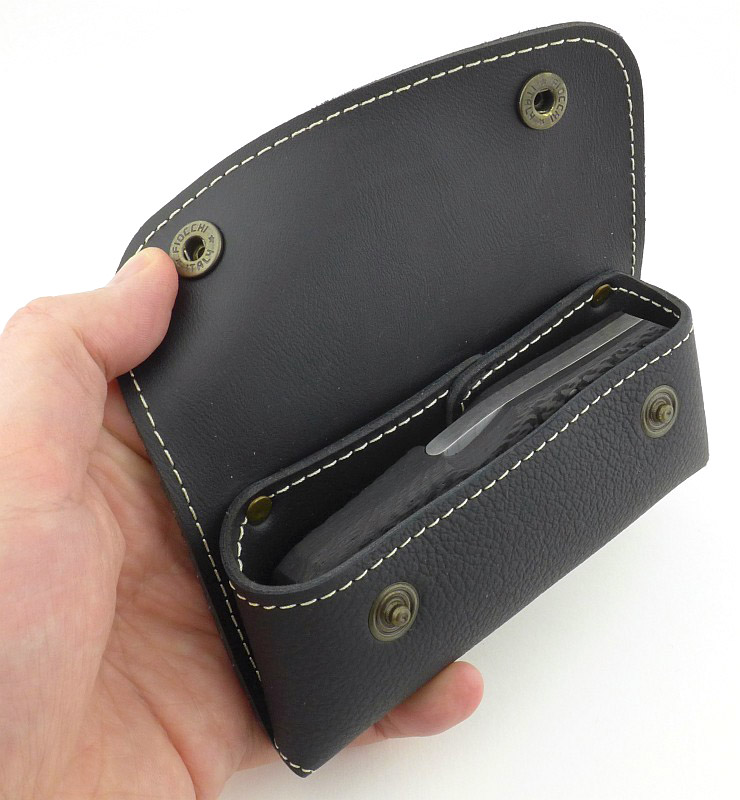
.")