Gear Review: NORDIC HEAT Heated Glove Liner (Thin)

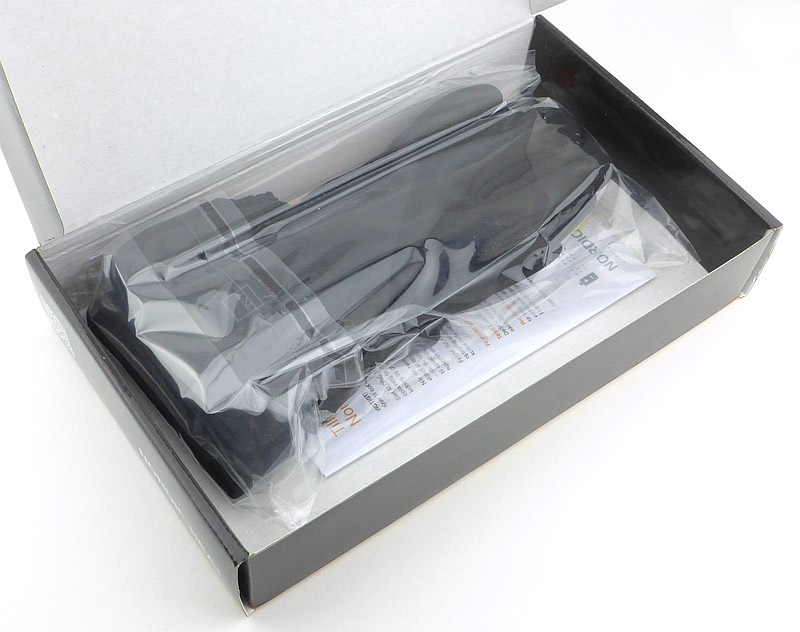
Having been thoroughly impressed by NORDIC HEAT in previous years at IWA, at IWA 2018 I made sure to visit them to be able to talk directly about their thoughtful approach to electrically heated clothing; plus I wanted to take the opportunity try some of their products at the show. I was so impressed, I came away with some NORDIC HEAT gloves to take a more in depth look at.

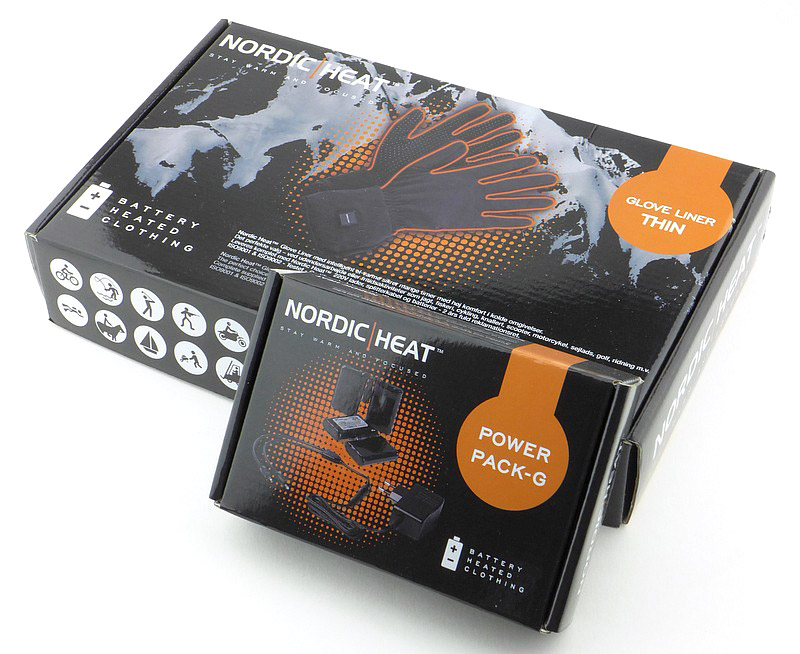
In this case the I’m testing the Glove Liner (Thin) gloves which are the lightest-weight gloves in the NORDIC HEAT range. They give you the option to use them on their own as lightweight heated gloves, or are thin enough to be worn under outer gloves, adding heating to otherwise unheated gloves.

A few more details:

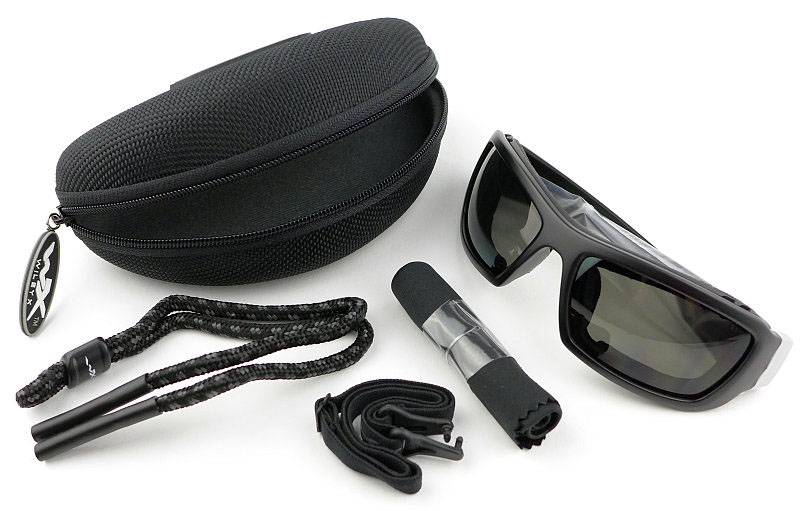
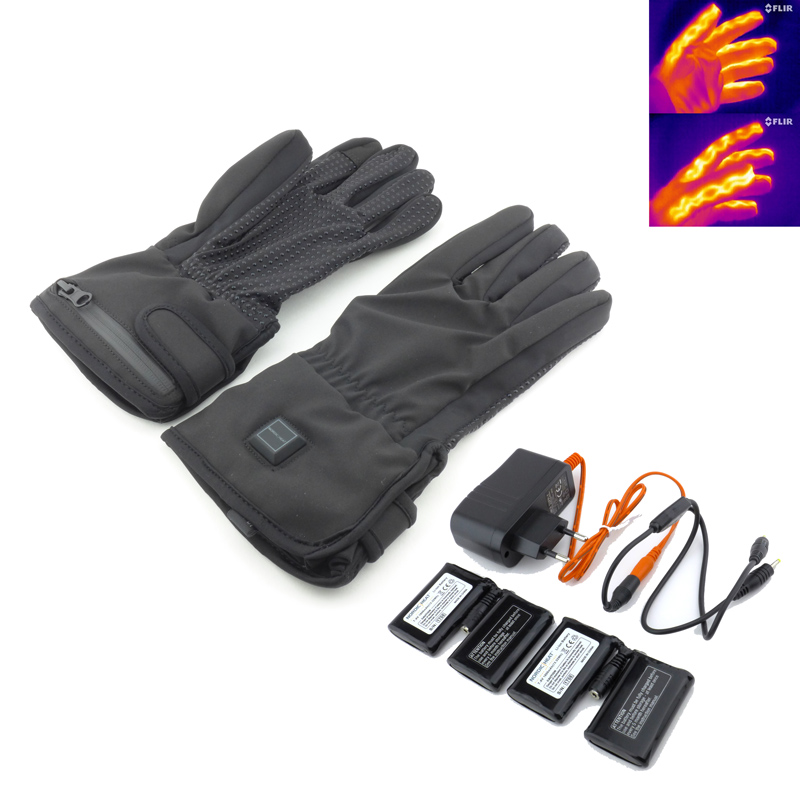
NORDIC HEAT Power Pack-G:

In their logically thought out approach, the whole system is modular and the power packs and charger come as a set to be combined with various items of heated clothing.


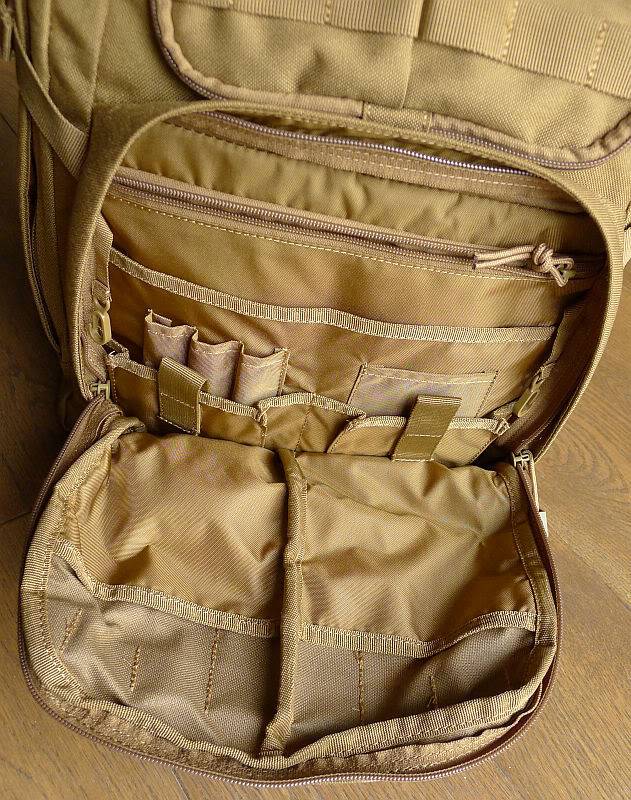
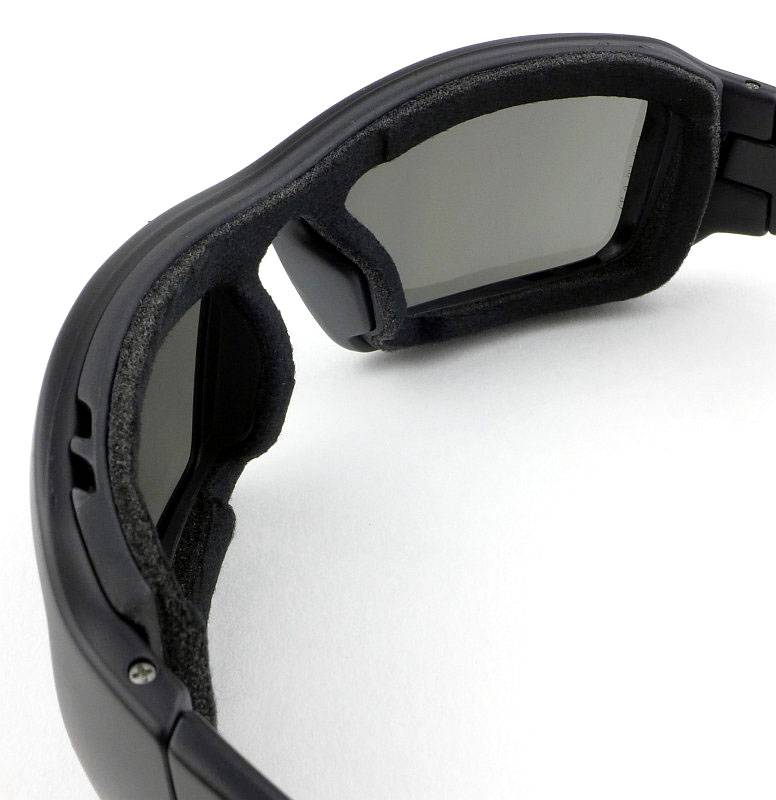
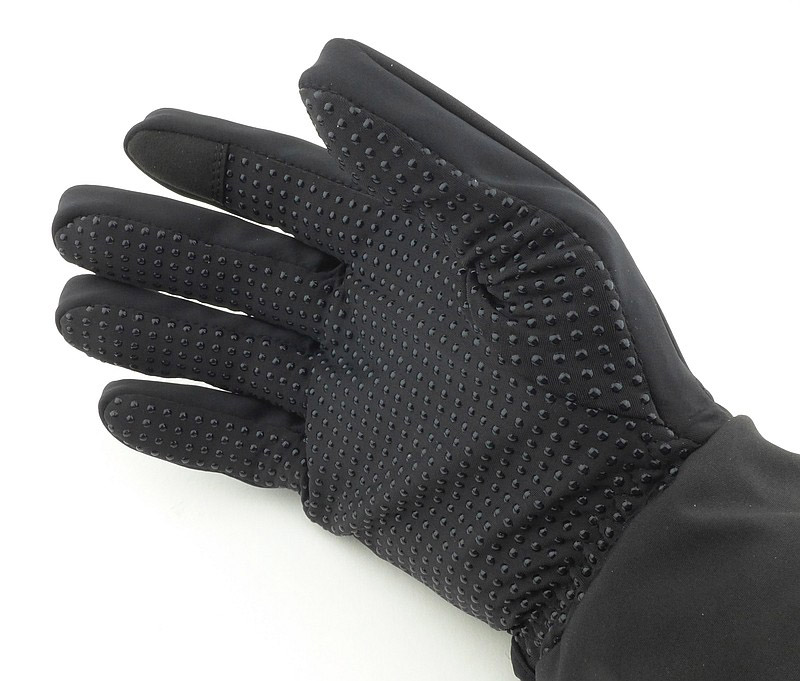
A good look round the NORDIC HEAT Glove Liner – Thin – Things to look out for here are:

Despite being a lightweight glove, the construction is solid and attention to detail in the fit and comfort is excellent. The entire inner surface has rubber dots to really add grip, plus there is a touch screen compatible pad on the index finger.
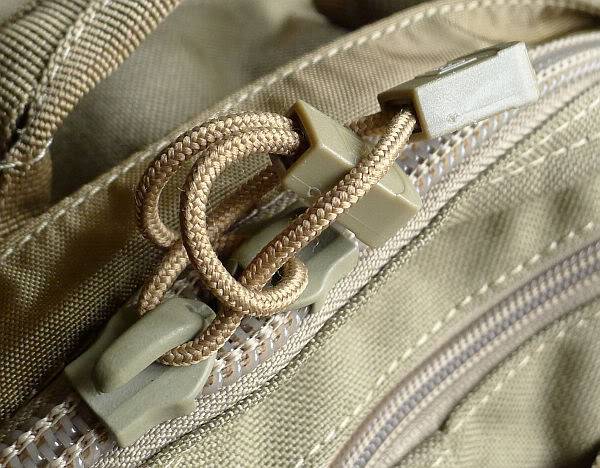
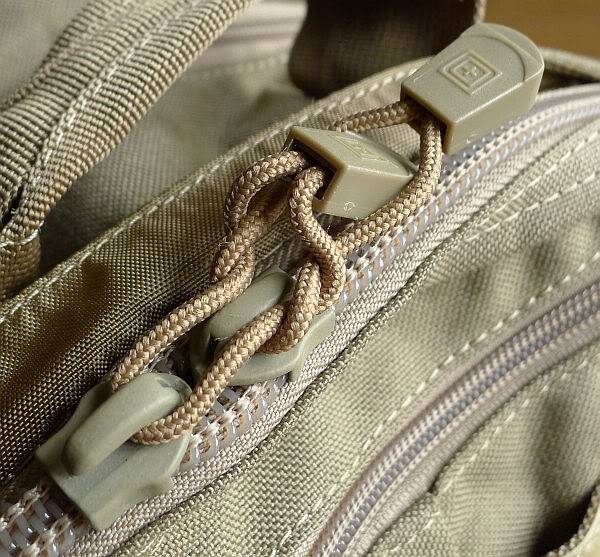
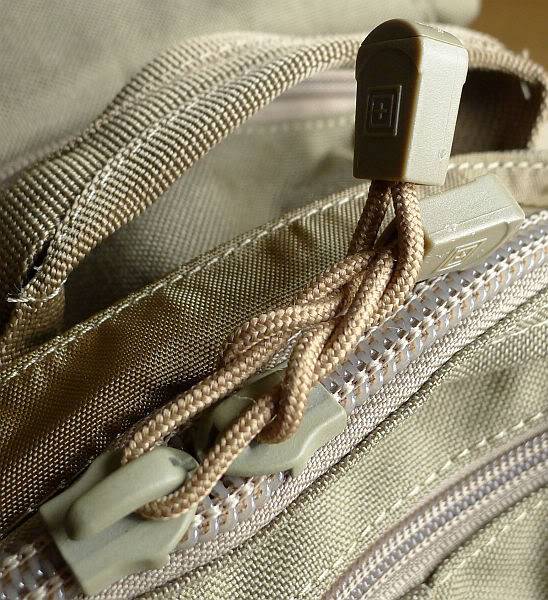
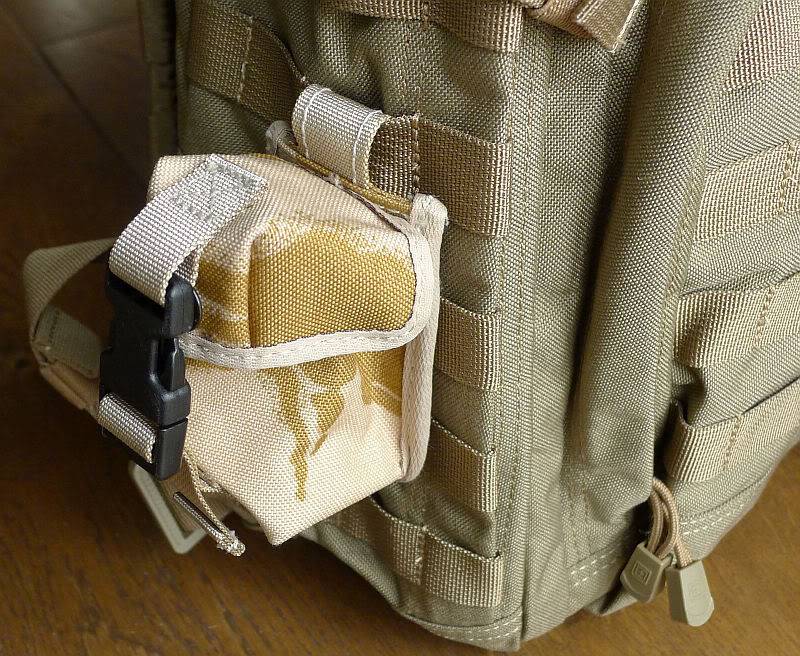
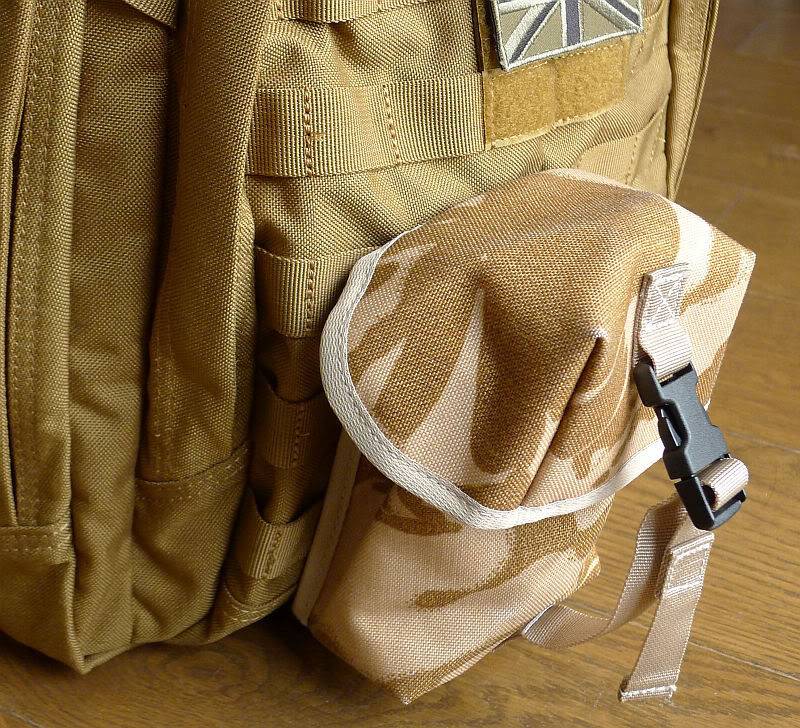
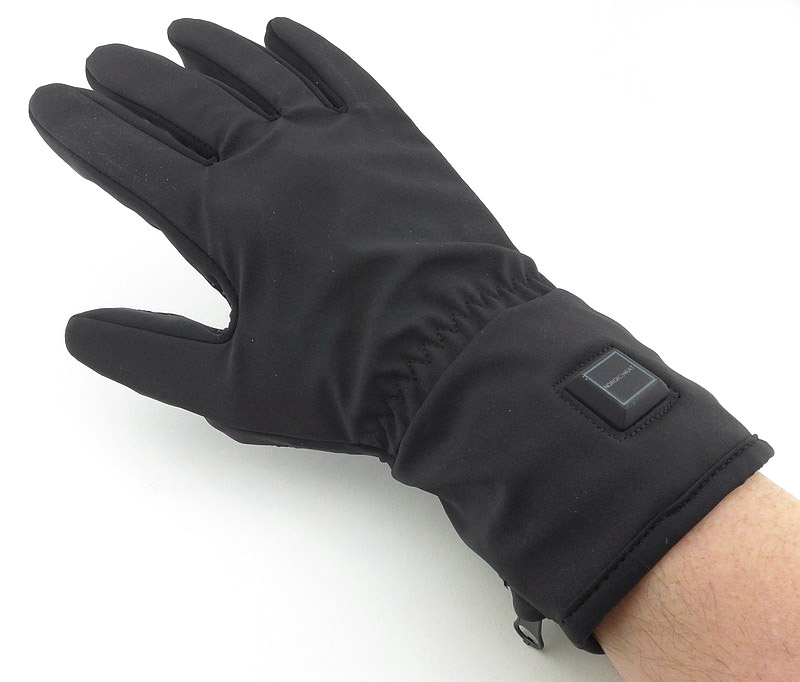
NOTE: (Added at the request of NORDIC HEAT) – NORDIC HEAT recommend fitting the battery pack the other way up to the way shown in the photos. They intend for the power cord to go straight down into the glove rather than being looped round.


What it is like to use?

On this subject of heated clothing, I am reminded of a quote from The Hitchhiker’s Guide to the Galaxy by Douglas Adams:
“one of the lingering questions on NowWhat is how the boghogs manage to stay warm in their skins. It says “if anyone had wanted to learn the language of the boghogs, they would have discovered that they don’t and are just as cold and miserable as everyone else”.”
And this is simply because in the past you had only one choice in the cold, and that was to try and reduce how cold you were with more clothing – ‘try’ being the operative word. Once cold starts to set in, the body reduces blood flow to the extremities and they get even colder. So really you were just a certain level of cold, but didn’t have much choice so got used to the discomfort.
Heated clothing provides us with benefits beyond simply the comfort of feeling warmth; it keeps us functional longer in more extreme conditions.
I use it in a few different ways, all of which are subtly different. These are also based on the fact that there are batteries which will run out, so you can’t simply run them all the time.
The first of these ways of using them involves actively combating the cold to stop it setting in. This is where you start off with the gloves on, and turn them on before even going out into the cold. Keeping the hands warm with heating from the very start means you maintain the best dexterity as long as you have battery power for the heating.
Second, and for me a very important way of using them, is for recovery. There are situations where it is not practical to use the heated gloves initially, and other gloves are used. Inevitably the cold starts to creep in and your hands become colder and colder. Once you reach a certain point you really need to recover. Swapping to the heated gloves and using them to bring back the circulation gets you ready to go again. As these glove liners are not themselves thermally insulated, on their own they do not provide much protection beyond keeping some cold air off the skin, and certainly don’t help with holding very cold tools or touching cold surfaces beyond the active heating provided to the side of the fingers. This is why I frequently use other thicker gloves, most of which are not large enough to allow the use these as glove liners, mainly due to the battery pack bulk, so the ‘recovery’ approach is very helpful.
Third on the list is preparation for the cold environment. We are not always warm to start with and the other gloves you are going to use might be chilled; you can use these heated gloves to give you hands a real boost to start with. The non-heated gloves can then be warmed with body heat from this pre-warming and the circulation boost.
You may find different ways to work with them, but this is what has been good for me.

Though I’m going to move onto observations that are more specific to these gloves, there is one characteristic I need to mention which is the same for all heated gloves that have their own battery packs. Having the battery pack in the cuff gives the gloves a strange balance, bulkiness and heavy feel. In the case of these glove liners, this is even more pronounced as the gloves are lightweight, but it is the same in all heated gloves. The bulk at the cuff tends to interfere with your watch; I frequently go without a wristwatch when using heated gloves. This is something you need to accept if you want the benefits of independently powered heated gloves.

The next comments are supported by the photo gallery coming up next –
Thoughtfully, even though these are called glove liners, a touch screen compatible index finger tip has been included. Though it doesn’t look conductive, it certainly works. Be aware however that, just like every other touch screen compatible glove, the finger contact area is pretty big and imprecise. It is more of a case of being able to answer a call without taking off the gloves than being able to make a call. There is not enough precision to tap on a number or name in a list. Certainly useful if you accept the limitations.
Overall comfort is excellent and the fit is good. In this gallery the first three photos of the glove being worn are without the battery fitted. Skip forward past the photos showing the button illumination to see the bulk added by the battery pack. You get used to this bulk quickly, but it requires some consideration.
It is nice that the power button itself is directly illuminated. When first turned on (using a long press), the first of the three modes is high. To cycle through medium, low and back to high you briefly press the button. A long press is then needed to turn them off again.
Last in the gallery are some thermal camera images of the excellent design of the heating in NORDIC HEAT’s gloves. Each finger is surrounding with heating elements which are clearly visible. Frequently, heated gloves only heat the back of the hand, meaning there is only heating on one side of the fingers. NORDIC HEAT’s method applies heat to two sides of the finger getting more heat in.


Using the FLIR Scout TK thermal camera again to shoot some video, this shows the gloves heating up from cold and those excellent heating elements.

Video Edited with – Cyberlink Director Suite 5 (PowerDirector 16 and AudioDirector 7)
Camera – FLIR Scout TK    

How long do they run?:
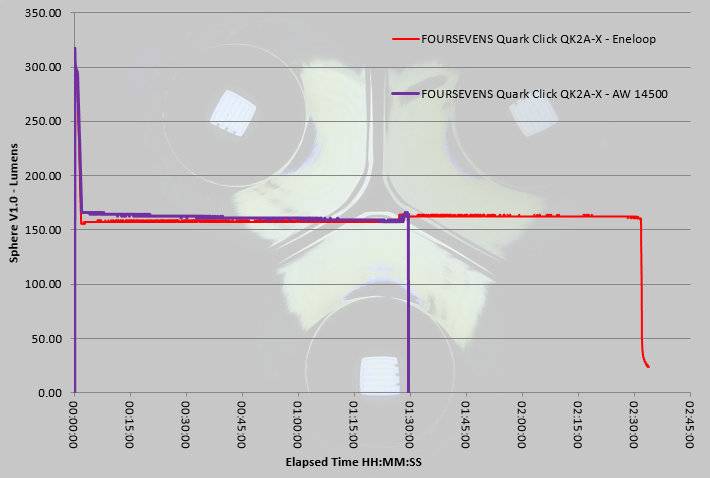
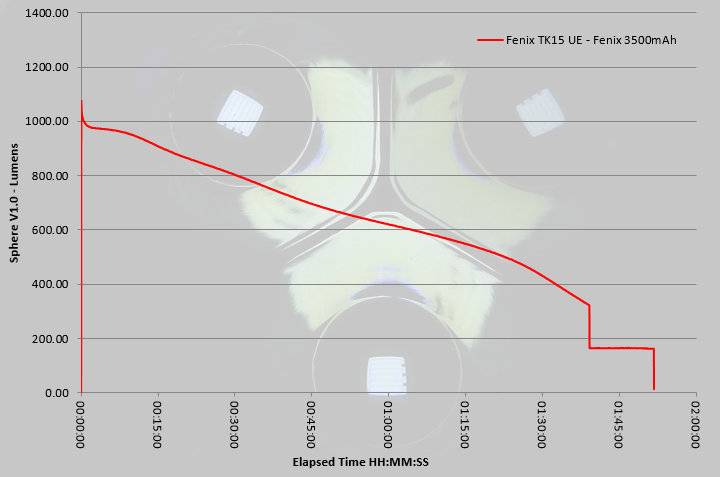
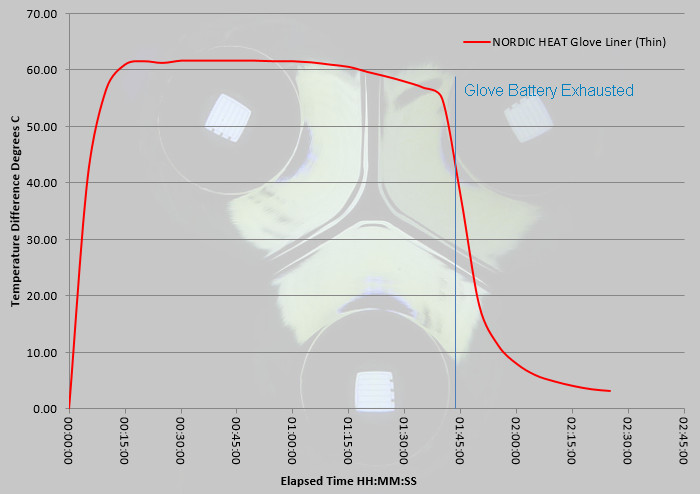
Using a dual thermal probe to measure the ambient temperature and the temperature in the middle finger of one glove, the time/temperature graph was plotted of the difference between these two temperatures. This was carried out in a cool but sheltered area on HIGH mode.
One glove ran out of power at 1h43m and the other at 1h46m.
Recharging the batteries from completely flat takes around three and a half hours (3h33m for one and 4h07m for the other).
The charging indicator on the charger will be solid red if both batteries are connected and charging, and solid green if they are both fully charged. If the indicator light is flashing red, this means that one battery is charged and the charger is “waiting” for the second battery, or only one battery is connected for charging.

In the graph below, the line marking ‘Glove Battery Exhausted’ is the time when the power light went out.

Some Modifications:
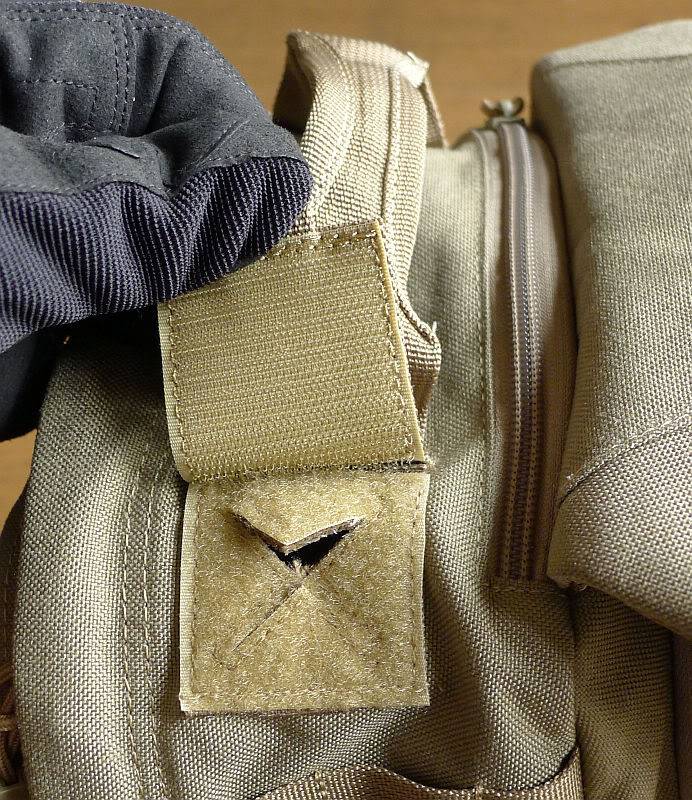
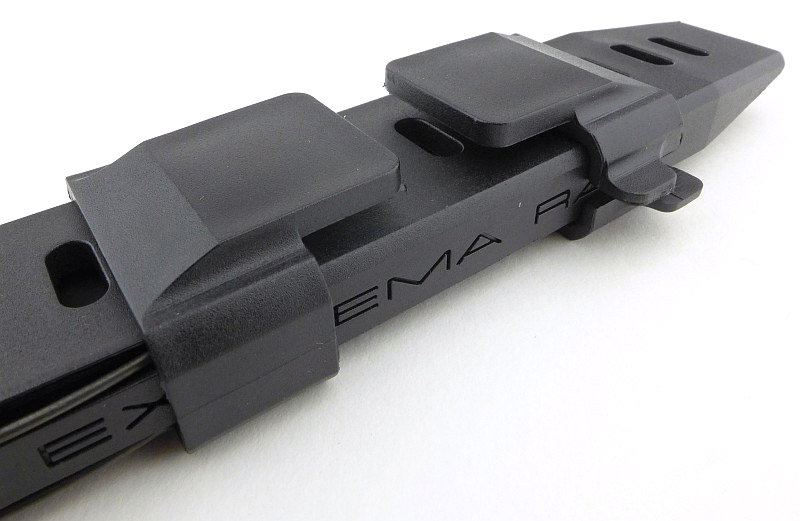
There is only one aspect of these gloves that didn’t work for me, and that was the cuff adjustment tabs. With the batteries adding bulk to the cuff, you really need to open the cuff adjuster to put them on, and then do it up again.
For the first hand this is fine, operating the cuff adjuster with bare hands is no problem, but then we get to the second hand, and now we are using the gloved fingers to grip the tab.
Immediately, as you do up the cuff adjuster, you find the Velcro hook part grabs the fabric of the thumb doing it up. This quickly starts to ‘fluff’ up the thumb fabric and is going to wear it out much faster.
Worse than doing it up, is trying to get hold of the cuff tab to undo it. You really have to press the thumb into the edge of the tab to get hold of it, and so onto the Velcro hooks. This is when the thumb fabric sticks to the hooks and has to be ripped off them.
All it really needs is a little grip tab (which has no Velcro and extends enough to grip with the gloves on) to allow you to get hold of it, so I got out my ‘Velcro control pack’ to make one. As I find the tendency of Velcro hook material to grab things quite annoying I have a selection of hook and loop strips (my ‘Velcro control pack’) that I can cut to size to cover up excessive hook material or in some cases extend it.
The following gallery steps through what I have done for each cuff adjuster. A simple job that took five minutes to do, and has transformed the fitting and removal of these gloves.
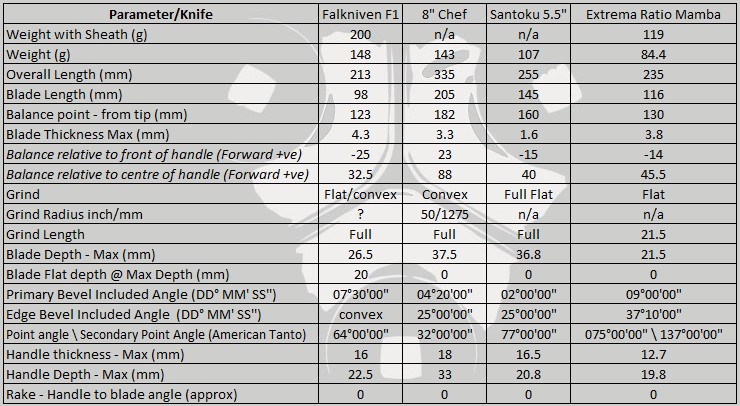

Review Summary

The views expressed in this summary table are from the point of view of the reviewer’s personal use. I am not a member of the armed forces and cannot comment on its use beyond a cutting tool or field/hunting knife.

Something that might be a ‘pro’ for one user can be a ‘con’ for another, so the comments are categorised based on my requirements. You should consider all points and if they could be beneficial to you.

_______________________________________________
Things I like
_______________________________________________

All fingers heated on two sides.
Touch screen compatible index finger.
Turns onto maximum power.
Simple and reliable interface.
Adjustable cuff.
Good grip.
Dual purpose, liner or lightweight glove.
Modular design for use with other NORDIC HEAT products.

_______________________________________________
What doesn’t work so well for me
_______________________________________________

Cuff adjuster tab too short and difficult to get hold of.
Batteries can be fiddly to fit into the pocket.


Discussing the Review:

The ideal place to discuss this reviews is on a forum. If you started reading the shorter forum version of the review, but followed the link this full exclusive review, please return to that forum to discuss the review there.
If you read the review entirely on Tactical Reviews, please consider one of the following to join in, or start, a discussion.

BladeForums – Knife Reviews (US based Forum for Knife Discussion)

CandlePowerForums – Knife Reviews Section (Largest and Friendliest Flashlight Community Forum)

EDC Gear Review: Wiley X Sunglasses – Hayden, Kobe, Wave (EN.166 Safety)

Wiley X continue to innovate, and this Wiley X sunglasses review includes the new ‘Hayden’ which combines the timeless metal framed aviator style with high ratings of eye protection previously not possible with this style. Along with the more conventional ‘Kobe’ this group review shows the ‘Wave’ with its facial cavity seal system providing goggle like protection with sunglasses style.

A little Background:

For those that have not read one of Tactical Reviews articles on sunglasses, I just wanted to add a little explanation as to why the performance of sunglasses is crucial to me, every day, not just in the summer or on sunny days.

Due to having hyper-sensitivity to light, I wear sunglasses 100% of the time during daylight hours when I’m outside or driving, so get a lot of wearing time. I would never consider having only one pair of sunglasses and have many different types and styles. (I’m also a lens quality perfectionist)

Being a shooter, I also only settle for full protection when it comes to my eyes. This requires a good fit, a choice of lenses and of course the appropriate safety standards.

A few more details:

The three models on test here all offer something a bit different. Each has its own gallery to take you around the design and highlight features. The Wave has a further gallery in the next section to show the facial cavity seal in more detail.

Starting with the metal framed Hayden which has Polarized lenses.


Next we have the Kobe which has standard non-polarized lenses.


Last of the three is the Wave. In this gallery we focus on the overall look and details, but as it has the facial cavity seal feature, this has been put into a gallery of its own.

What it is like to use?

I’ll start with a word – Safety. Let’s get this out of the way, but not dismiss it. Wiley X glasses easily surpass the safety standards designed to ensure standard safety glasses will protect you. The exact standard surpassed does depend on the model, and some have higher ratings, but all are at least EN.166 rated, so you know if you have a pair of Wiley X glasses on, you are protected.

A crucial factor for comfort and performance is fit, and with Wiley X there are models to suit all face sizes, so you might find you need to choose a different one to the models shown here to get the sizing right for you.

Here are the Hayden, Kobe and Wave being worn.

 
HAYDEN: Having made the switch to wearing protective glasses at all times, I have been missing my metal frames, so the Hayden is a seriously welcome addition. Being highly light sensitive, I am aware that there is less protection from light coming directly from the side as the thinner arm doesn’t block the light like a thicker plastic arm. A minor point, but might dictate which day I choose to use them.

As delivered I found the Hayden’s nose pads excessively close together, more so than any other glasses I’ve ever tried. Having a couple of specialised pliers I was happy to adjust the nose pieces myself, but most people might want to pop into an opticians and get them to help; even though I’ve done it before, it still worries me having to bend the metal nose pad holders.

The spring arms make for a very comfortable fit. You might notice from the photos the precise fit of the parts of these spring hinges. So tight and precise, they have nipped me a few times (hair and skin) when taking them on and off and flexing them both ways.

However, otherwise, once the nose pads have been set correctly, the Hayden is light, comfortable and the polarized lenses are excellent performers. Very impressed with these.

KOBE: These are the quiet but efficient ones in the group. No ‘special features’, but just doing the job. They are very lightweight and have an efficient ergonomic shape, a bit of a ‘fit and forget’ you are wearing them. The arm width is sufficient to block light from the side along with the fact they have a wrap around shape in the first place.

WAVE: A key feature of the Wave is its Facial Cavity Seal which also appears on several other models. This feature provides a very specific function; when you first put on a model with the Facial Cavity Seal they feel more like goggles than glasses and it can take a little while to get used to. However as you get used to it, the feeling becomes more comforting and the benefits can be very obvious. The Facial Cavity Seal is designed to protect you from wind, fine dust and pollen as well as blocking light that normally leaks in around the edges of sunglasses.

A more detailed look at the Wave’s facial cavity seal.


I’ve found that in situations where I would want to wear a peaked hat, the Facial Cavity Seal provides sufficient protection from light that would normally leak in around the frame and I didn’t need the hat.
Where the Facial Cavity Seal really shines is in wind and dust protection. Though normal sunglasses provide a degree of protection from wind, once it is coming from the side this is far less effective. Add in dust and your normal sunglasses are not much use. The Facial Cavity Seal immediately shields you from this and stops the blinking and squinting. You could use actual goggles, but Wiley X’s Facial Cavity Seal gives you the protection of goggles in a pair of sunglasses, and the included head strap keeps them firmly in place.
You also have the option of removing the seal and using the sunglasses as normal sunglasses. This is crucial as they do come with some of the issues of goggles.
Although the Facial Cavity Seal has some venting built in, yes, just like goggles you do get fogging. I found that this was particularly bad when driving (due to the lack of airflow), and other situations where I was hot and there was little or no airflow.
When it is windy, the small vents seem to cope with preventing fogging very well, but once conditions are calm, you are at the mercy of the temperature of the sunglasses and your immediate humidity (a nice way of describing the body’s output of moisture).
Knowing that when using the Facial Cavity Seal you can get fogging is just something you need to work with. When the situation demands the extra protection, the Wave delivers exactly that.
Remember though, that unlike goggles, you can remove the seal and they become normal sunglasses.

Review Summary

The views expressed in this summary table are from the point of view of the reviewer’s personal use. I am not a member of the armed forces and cannot comment on its use beyond that already described.

Something that might be a ‘pro’ for one user can be a ‘con’ for another, so the comments are categorised based on my requirements. You should consider all points and if they could be beneficial to you.

         Things I like             |        What doesn't work          
                                   |         so well for me            
 __________________________________|___________________________________
 All - EN.166 Safety or above.     |                                   
 All - Comfortable and lightweight |                                   
 All - Case, strap and cloth       |                                   
 included.                         |                                   
 Hayden - Metal Frames.            | Hayden - the hinges can pinch.    
 Kobe - Simple and reliable.       |                                   
 Wave - Removable Facial cavity    | Wave - FCS can cause fogging.     
 seal (FCS).                       |                                   
                                   |                                   


CLASSIC Gear Review: 5.11 Tactical RUSH 12 and 24 Backpack (MOLLE/PALS compatible)

This review of the 5.11 Tactical RUSH 12 and 24 backpacks is a classic from 2013, and is the first in the Classic Series of reviews to be published on Tactical Reviews. The original versions of the Classic Series Reviews used a well known image host who will be cutting off the visiblity of 3rd party hosted images at the end of 2018.

For this review I am testing and comparing two of 5.11’s tactical MOLLE backpacks (well PALS really – but we’ll come back to that), the RUSH 12 and RUSH 24.

These two sizes cover the requirements of the average every-day-user for day trips, commuting, camping, hunting etc. Of course the expandability afforded by the integrated PALS system makes these backpacks all the more versatile.

The model suffix, 12 or 24, of these RUSH backpacks indicates the number of hours you are carrying provisions for, so the RUSH 12 should carry the items you need for a 12 hour outing, and the RUSH 24 covering your needs for a 24 hours out and about. These are reasonable guidelines, especially considering the expandability of the packs and options to add MOLLE/PALS system pouches and tie on other gear.

I have previously looked at a couple of lights from 5.11 Tactical, the ATAC A1 and A2 (1 AA and 2 AA versions) and
ATAC L2 (2xCR123/RCR123), which proved to be great quality and very reliable, and backpacks look like they will live up to the same standards.

Initial Impressions:

‘Quality’, ‘solid build’ and ‘feature packed’ are the over-riding impressions that come to mind when you first get hold of the RUSH 12 and 24. This is certainly reinforced by the weight of the empty bags, roughly double the weight of an average rucksack. However the reasons for this extra weight are the heavy duty materials and construction used to make these along with the designs being packed with useful functional features.

Side by side:

The more I’ve used these two backpacks, the more I appreciate how much thought has gone into their design. Before I delve deeper into the design features of each of them, I wanted to start with a quick look round the RUSH 12 and 24 side-by-side to give an idea of how they compare.

On the left is the RUSH 12 in Sandstone (328) and on the right is the RUSH 24 in Flat Dark Earth (131). For colour comparison, the photo was taken in daylight with the camera set to daylight white balance.

The size difference is clear with the RUSH 12 having a capacity of 21.2 litres and the RUSH24 32.7 litres, so the RUSH 12 is has about 2/3 the capacity of the RUSH 24. The main compartment of the RUSH 12 is 45.7cm tall with the RUSH 24 being 50.8cm tall, and the RUSH 12 is 27.9cm wide compared to the RUSH 24 at 31.8cm wide.

The side view shows extra depth of the RUSH24 which has about 5cm deeper.

The straps are in proportion to the overall backpack dimensions, so the RUSH 12 will suit the smaller framed individual.

Comparing the schematics:

Each of the RUSH backpacks comes with a tag which has a helpful set of schematics which do not appear to be published on 5.11’s website. The schematics also provide an excellent comparison between the two sizes and their main features.

Weighing the empty bags, the RUSH 12 comes in at 1200g and the RUSH 24 at 1670g. This compares to a typical 30 litre rucksack at around 750g.

Looking closer at the RUSH 12’s schematics. The representation of the PALS/MOLLE webbing on these schematics give a good idea of the relative sizes of the RUSH 12 and 24.

With side view

And back view

Then the RUSH 24 and the schematic making it easy to compare layout and size.

Side view.

And back view.

The RUSH 12 in detail:

As each of these RUSH backpacks is packed with so many features, I need to take a closer look at each one separately. The RUSH 24 will be covered in the next section.

Even something as simple as the sternum strap has several special features.

The strap is attached using C-loops which allow it to be easily removed and repositioned higher or lower on the shoulder straps to suit your requirements.

The free end of the length adjustment strap is held neatly by an elasticated keeper, and the strap itself has an elasticated section to provide some give for extra comfort.

Both RUSH backpacks have Dura-flex side release buckles incorporated into the shoulder straps. This simple design feature provides two major benefits most other packs are missing. Firstly, in general use, this makes removing a heavy pack much easier. Simply unclip one strap (or both), and then swing the pack off the other shoulder without having to struggle to get your arm out of the strap. Secondly, as the pack is covered in lashing points and PALS webbing, it has lots of possible points to get hung-up on obstacles. The side-release clips in the straps allow for an instant release from the pack if you ever get caught up on anything.

5.11 mention the Dura-flex hardware in the straps, but don’t seem to highlight this fantastic feature.

Also visible is a plain buckle that allows a hip belt to be attached.

In the base of the pack there are two drainage holes, and this most recent version of the RUSH 12 includes four lashing points on the bottom.

Folding the shoulder straps over the main pack reveals the hydration pocket zip.

A hydration bladder can be fitted and secured using the two toggles or suspension strap. The drinking tube is then fed through the top of this pocket and into the main compartment.

From the main compartment the drinking tube can be fed out of either port (one each side of the grab handle), before being routed under the webbing on the shoulder straps.

Inside the hydration bladder pocket, the back support padding and reinforcement can be accessed and removed if desired.

The padded back of the pack has two textured grip pads to help prevent the pack moving in use and between these is the drainage hole for the hydration pocket.

Just next to the grab handle is a small fleece lined zip pocket perfect for sunglasses or small electronic devices that you want to find quickly.

The pocket is pulled inside out here to show the lining and depth.

Each side of the pack has a compression strap with elastic keeper to tidy the loose end, and a series of PALS webbing provides mounting options. The RUSH 12 is constructed of durable water-resistant 1050-denier nylon.

As well as more PALS webbing the front of the pack has a Velcro panels for a name patch and flag.

These Velcro panels allow you to personalise your pack.

At the top of the front panel there is a simple single compartment.

Below this is the main admin panel which has a further zip compartment and several organiser pockets.

Also incorporated are a couple of key keepers

Unlike most backpacks, the RUSH backpacks feature full clamshell opening of the main compartment. The back of the front panel has two mesh compartments and the main compartment includes a large pocket with bungee clinch top.

Keeping things secure:

Before moving onto the detailed look at the RUSH 24, there is a feature common to both RUSH 12 and 24 worth noting.

All zips are self-repairing YKK zips which have large glove friendly tags. These type of tags allow you to secure the zips together to prevent the pack opening unexpectedly.

Doing this is simple once you are used to it and well worth doing. Hopefully this series of photos will explain.

First feed one tag (A) through the other (B).

Then feed B though A

Pulling B far enough through that you can…

…then pass A back through it

Finally pulling tight.

Using this method of passing one tag through the other again and again allows you to secure the compartments from accidental opening without any other hardware.

The RUSH 24 in detail:

Having already covered the RUSH 12 in detail, may of the same features can be seen on the RUSH 24, plus a few more.

The sternum strap is attached with C-loops and has an elasticated keeper, and the strap itself having an elasticated section to provide extra comfort.

Dura-flex side release buckles are incorporated into the shoulder straps allowing the shoulder straps to be opened for easy removal of the pack, or an instant release from the pack if you ever get caught up on anything.

Also visible is a plain buckle that allows a hip belt to be attached.

In the base of the pack there are two drainage holes, and this most recent version of the RUSH 24 includes four lashing points on the bottom.

Folding the shoulder straps over the main pack provides easy access to the hydration pocket. The padded back of the pack has two textured grip pads to help prevent the pack moving in use and between these is the drainage hole for the hydration pocket.

A hydration bladder can be fitted and secured using the two toggles or suspension strap. The drinking tube is then fed through the top of this pocket and into the main compartment.

From the main compartment the drinking tube can be fed out of either port (one each side of the grab handle), before being routed under the webbing on the shoulder straps.

The grab handle is very strong and stitched firmly to the top of the bag.

Inside the hydration bladder pocket, the back support padding and reinforcement can be accessed and removed if desired.

Just like the RUSH 12, next to the grab handle is a small fleece lined zip pocket perfect for sunglasses or small electronic devices that you want to find quickly. Here the pocket is pulled inside out here to show the lining and depth.

The shoulder straps have a yolk system to spread the load, and densely padded straps to make carrying even heavy loads comfortable.

Each side of the pack has a compression strap with elastic keeper to tidy the loose end, and a series of PALS webbing provides mounting options. The RUSH 24 is constructed of durable water-resistant 1050-denier nylon.

The RUSH 24 also has a side pocket (which the RUSH 12 does not).

As well as more PALS webbing the front of the pack has a Velcro panels for a name patch and flag allowing you to personalise your pack.

Instead of the simple single compartment of the RUSH 12, the RUSH 24 has a double sided compartment (here one side is shown open) where each side has a fleece lined pocket and a zip up mesh pocket. This gives three separated storage areas on each side of this top section.

The large admin panel includes a further zip closed pocket and multiple sections and two key keepers for organising the contents.

Inside the main compartment (with full clamshell opening), the RUSH 24 has two more compartments than the RUSH12. On the back of the front flap there are two mesh compartments and a further zip pouch below these. The main compartment includes a large stuff-pocket with bungee clinch top and above this another mesh zip closed compartment.

MOLLE/PALS and what this means for the user

Already highly featured backpacks, the RUSH 12 and 24 are expandable thanks to the incorporated PALS webbing.

Most people are familiar with the more commonly known MOLLE (pronounced Molly) system used by armed forces around the world.

MOLLE stands for MOdular Lightweight Load-carrying Equipment, and refers to the entire system made up of many components.

Part of the MOLLE system is PALS which stands for Pouch Attachment Ladder System, and takes the form of the 1” webbing you see on ‘MOLLE compatible’ gear. The webbing straps are fitted with 1” spaces between them and stitched on at 1.5” intervals to provide a flexible attachment framework.

Most of the time I’ve been using the RUSH 12 and 24 in their basic form, tending to use the PALS webbing to attach items using karabiners or lashing them on, but have also tried them out with a variety of pouches attached.

Here the RUSH 12 has a small pouch (British Army issue) fitted to the side panel. This has now been replaced by a larger utility pouch.

On the RUSH 24 a small utility pouch has been fitted to the front panel.

The best aspect of this feature is its flexibility. If one pouch configuration isn’t working for you, take them off and rearrange them until you find one that works.

What are they really like to use…

Since prehistoric times, the backpack has been the fundamental load carrier for most activities, and a good one can make all the difference.

Both the RUSH 12 and 24 have been improved on from their first versions, based on real user feedback, so are now a mature design, and this is obvious when you use them.

Of the two, the RUSH 12 is the one I grab for most frequently for general day trips. I’ve moved the small pouch from the side onto the left hand shoulder strap and a larger utility pouch onto the left side. The right hand strap has a polymer karabiner for hooking on a compact camera, and if it’s dark, a torch like the Sidewinder shown here is often added.

All the small touches, like the elastic keepers for tidying up all the strap ends, the well laid out pockets, and compartments, and the fully organised admin panel make it easy to locate all the bits and bobs that always seemed elude me and take ages to find when using standard backpacks. Everything is to hand and organised.

The side-release buckles in the shoulder straps now seem to me an essential feature. Why don’t all backpacks have them? With these, there is no more struggling to take a pack off, and instant release to get unloaded or escape the pack in an emergency is straight forward.

On a recent trip, the RUSH 24 was carefully packed to keep within the airline’s specified dimensions (56x45x25cm). If filled to capacity the 25cm limit could be exceeded, so the contents needed to be arranged neatly. This was made very easy thanks to its clamshell opening, and it then came with me as cabin baggage. In this instance the RUSH 24 was loaded with 10Kg of equipment which almost disappeared once on my back. All the pockets and compartments kept various documents and passes close at hand and perfectly organised.

Even going through security became a breeze as my pockets simply transferred to the various compartments around the RUSH 24. Onto the conveyor for scanning and the clamshell lets me take out the laptop and liquids in a flash, and back in again after the scan.

The only time I noticed the weight of the pack was when I had to use the grab handle or when putting it into the overhead lockers.

Once you’ve tried a RUSH backpack, you won’t want to go back to anything else. If you are in the market for a backpack, the RUSH might seem quite expensive, but just look back over the features crammed into each version. All those pockets, compartments, straps, buckles and PALS webbing don’t come for nothing and in the RUSH 12 and 24 (and presumably the 72 as well) have been put together in a robust package with quality materials. You certainly get what you pay for.

These RUSH backpacks will be trusted companions on many adventures to come, and many more mundane trips as well.

Test samples provided by 5.11 Tactical for review.

Knife Review: Extrema Ratio MAMBA

Extrema Ratio are well known for making knives that are built like a tank; heavy duty fixed blades and folders that will take everything you can throw at them in their stride.
When the new Mamba arrived for testing it was clear this was something quite different; I was struck by how slim this knife is, and by the special sheath with quick release lever locking system – a sheath so slim it is MOLLE compatible because slides directly into the loops of PALS webbing.

The Blade and Handle Geometry:

Most knife specifications have a basic description of the blade geometry, but in this section I will be taking a more detailed look at geometry and balance.

Using a set of gauges and precision measuring equipment including a Vernier protractor, callipers, fixed radius gauges and the unique Arc Master adjustable radius gauge (the one that looks like a crossbow).

These measurements have been tabulated and are presented along with a few reference blades (8″ Chef’s Knife, 5.5″ Santoku and the popular Fällkniven F1).

Key aspects such as the primary bevel angle, grind type, blade depth, blade thickness, length, weight are detailed, along with balance information.

The ‘Balance relative to the front of the handle’ tells you if the knife will feel front heavy, or if the weight is in your hand (a positive value means the weight is forward of the front of the handle). The ‘Balance relative to the centre of the handle’ indicates how close to a ‘neutral balance’ the knife has in the hand.

In the case of full convex grinds the approximate centre of the grind is used for the primary bevel angle estimate.

The blade is made from ACCIAIO BöHLER N690 (58HRC) steel.

A few more details:

The slimmest Extrema Ratio box I’ve come across.

Taking the lid off; this is how the Mamba arrives.

Included is the Mamba and sheath, with a quality control card and a couple of leaflets.

This really is something different from Extrema Ratio. Recognisable in styling, but definitely distinct.

One of the outstanding features of the Mamba is the quick release lever locking system. This is not a new system as it is used in many diving knife sheaths and a few specialist designs, but it is one I’m a real fan of. Easy and quick to use and very secure.

Simply press the lever inwards to release the knife. With the lever pressed in, its wire spring is pushed away from the sheath slightly.

The very unusual sheath has two adjustable plastic clips. They can also be reversed to make the sheath left or right handed. Of course these are used to secure the sheath in place when inserted into PALS webbing.

With the clip removed from the sheath you can see the internal locking lugs. One side is open and has finger tabs to allow you to open it further for adjustment or removal.

All along the sheath are holes for the adjustable clips to lock into. Should you just want a super low profile knife, you can take the clips off and use the sheath like this.

A distinctive design feature of Extrema Ratio knives is the finger grip recess in the Forprene handle.

There is a single bolt holding the Forprene handle in place. The screw is a tight fit, and even when fully loosened does not fall out; you will have to undo it and pry it out to take the handle off the full tang.

The full tang protrudes slightly from the end of the handle giving you a small striking surface.

On the spine, near the handle, the model is printed onto the black MIL-C-13924 burnished blade finish, and next to this is the notch that the locking lever fits into to hold the knife in the sheath.

The spine is flat for its entire length. This is an important detail in the operation of the lever lock.

On the right side of the blade it has ‘Extrema Ratio’ printed onto the black finish.

And on the left “58 HRC” is prominently printed with ” Stainless Cobalt Steel” printed underneath.

As a key design characteristic of the Mamba is that it fits into PALS webbing loops, the sheath is the starting point for this design. With the sheath fitted in PALS webbing, you want quick access to the blade and one-handed operation, both of which make the lever lock an ideal choice.

Taking a close look at the side of the lever that touches the knife, you can see several details. The lever has a pivot pin as well as a second pin to restrict the rotation of the lever. At the left end of the lever is the locking lug that fits into the notch in the blade spine. This lug is showing wear of the black coating where it rubs against the spine. Also showing wear is an area to the right of the lever where it gets pressed into the jimping when releasing the knife. Also note the shaping of the plastic sheath which supports and holds the blade end of the handle closely when the knife is locked in place.

When seen with the deep jimping on the spine, the locking notch doesn’t stand out at all as it is the same size and shape as the rest of the notches in the thumb grip.

Another view of that locking notch.

Though a relatively slim blade, there is a full length fuller cut into the full flat grind.

Having a strong Tanto tip, the edge bevel does widen towards the very tip.

Even in this slim blade there are refinements including a nicely angled plunge line and sharpening choil.

What it is like to use?

For a couple of main reasons, the Mamba has been a bit of a revelation. When I first saw it, I didn’t think all that much of it, but I was wrong, it really works.

The first of those reasons – the quick release lever lock. I’m so pleased to see this in a non-diving knife as it is one of those features I’ve been crying out for in ‘normal’ sheath knives.

A thumb release lever lock is so intuitive and easy to use as you basically free the blade just taking a normal hold on the handle. Your thumb sits onto the lever instead of the jimping and you squeeze to withdraw the blade.

The lever lock does require a slightly different technique when withdrawing or inserting the blade into the sheath. I mentioned this earlier in relation to the full flat spine. You need to keep the spine pressed into the locking lever as you withdraw or insert the blade. If you don’t, the sprung lever pushes the cutting edge into the opposite side of the sheath, both dragging on the blade, and cutting into the plastic. A slight pressure of the blade spine onto the lever and the blade glides in and out easily.

While mentioning ‘gliding’; actually the finish on the blade when new is so matt, it is slightly rough and in certain circumstances, this does actually cause some drag during a cut or when wiping clean. The surface finishing from Extrema Ratio is excellent, and hard wearing, so this ‘feature’ may simply be more noticeable on the finer blade of the Mamba than it is on larger, heavier knives.

There is one major disadvantage with the lever lock design; should you accidentally insert the blade into the sheath the wrong way round, the cutting edge runs directly onto and along the metal locking lever which will seriously damage the cutting edge.

Once in the hand, the Mamba is similar in size to flatware (a table knife) but is clearly something much more serious.

Though it has a slim grip, the finger grip in the handle, combined with the deep jimping under the thumb, give you a really secure hold on the knife.

Of course the main reason for the slim design of the Mamba is so that it, and its sheath, can fit into PALS webbing (so is MOLLE compatible) for ease of integration into your gear. Many people carry a knife in their PALs webbing, but either have a folder clipped onto it, a large knife with MOLLE compatible sheath, or (something that makes me cringe) in some cases an unsheathed knife slipped into the loops.
Here I’ve got it fitted to a MOAB 6 bag, but it works even better on the shoulder strap of a backpack.

Before fitting, take off the clips and try the sheath in the position you are considering, and check your thumb will land on the locking lever. Then refit the clip nearest to the handle and try once more to check it all works. There is a good reason for checking how well it works at this point.

When mounted, the adjustable clips are positioned so that they hold onto one line of webbing. The clips need to be opened on both sides of the sheath to be able to slide, so fitting can be a bit awkward. This is due to the clip near the tip of the sheath having very little room to move as it is pressed against the bag/load carrier on one side. You don’t want to have to do this many times, hence the earlier trial fitting I mentioned.

Although you have to fight with one of the clips to fit the Mamba into PALS webbing, the tapered tip of the sheath slides through the loops very easily.

So, being designed to fit into PALS webbing, compared to the Extrema Ratio ‘standard build’ for a knife, it is quite a bit smaller. To give an idea of this, here it is next to the Extrema Ratio TASK J.

And unsheathed as well.

Initially the Mamba is not a knife I would have been that excited about; a slim knife designed to fit into PALS webbing. Useful maybe, but not that exciting. This is certainly not how I feel about it now after spending time with it.

In many ways, Extrema Ratio got me hooked with this one by using the lever lock. I just hope they introduce this for a few other models, including the larger knives. On top of that is the fact that the more you use knives, the more you realise you don’t need as much knife as you thought you might. So, often people carry around seriously heavy duty tools that are never really put to use. In terms of cutting power, the Mamba is more than capable of most everyday jobs and its slimmer blade (though not weak at 3.8mm thick) makes many cutting jobs easier. It really is a multi-purpose ‘utility blade’, in all the best possible meanings of that term.

If only Extrema Ratio could include a belt loop fitting, perhaps sliding over the sheath like the MOLLE clips do, as I would like to be able to carry the Mamba securely without a load carrier or backpack. Light, slim, easy to work with and an excellent quick release lever lock for sheath retention, I’ll be carrying this whenever I can.

Review Summary

The views expressed in this summary table are from the point of view of the reviewer’s personal use. I am not a member of the armed forces and cannot comment on its use beyond a cutting tool or field/hunting knife.

Something that might be a ‘pro’ for one user can be a ‘con’ for another, so the comments are categorised based on my requirements. You should consider all points and if they could be beneficial to you.

_______________________________________________ _______________________________________________
Things I like What doesn’t work so well for me
_______________________________________________ _______________________________________________
Quick Release Lever Lock used to retain the knife. Can be very difficult to adjust the MOLLE clips when fitted into the PALS webbing.
Slim and Versatile Blade. Handles as easily as flatware. No Belt Loop.
The Sheath fits Directly into PALS webbing loops. Black Blade finish can ‘drag’ when cutting.
Secure Grip provided by the finger groove and heavy jimping. Inserting the blade the wrong way round can blunt the blade.
Ambidextrous.


Discussing the Review:

The ideal place to discuss this reviews is on a forum. If you started reading the shorter forum version of the review, but followed the link this full exclusive review, please return to that forum to discuss the review there.
If you read the review entirely on Tactical Reviews, please consider one of the following to join in any discussion.

EdgeMatters – Sponsored Reviews (UK based Forum for Knife Makers and Collectors)

BladeForums – Knife Reviews (US based Forum for Knife Discussion)

CandlePowerForums – Knife Reviews Section (Largest and Friendliest Flashlight Community Forum)

Knife Review: Zero Tolerance 0630 (Emerson Design)

The ZT (Zero Tolerance) 0630 is a collaboration between ZT and Ernest Emerson, and naturally features the patented Emerson “wave shaped feature” that makes it one of the fastest deploying folding knives in the world.

With a strong upswept S35VN tactical blade the 0630 is powerfully over-built for hard-use.

The Blade and Handle Geometry:

Most knife specifications have a basic description of the blade geometry, but in this section I will be taking a more detailed look at geometry and balance.

Using a set of gauges and precision measuring equipment including a Vernier protractor, callipers, fixed radius gauges and the unique Arc Master adjustable radius gauge (the one that looks like a crossbow).

These measurements have been tabulated and are presented along with a few reference blades (8″ Chef’s Knife, 5.5″ Santoku and the popular Fällkniven F1).

Key aspects such as the primary bevel angle, grind type, blade depth, blade thickness, length, weight are detailed, along with balance information.

The ‘Balance relative to the front of the handle’ tells you if the knife will feel front heavy, or if the weight is in your hand (a positive value means the weight is forward of the front of the handle). The ‘Balance relative to the centre of the handle’ indicates how close to a ‘neutral balance’ the knife has in the hand.

In the case of full convex grinds the approximate centre of the grind is used for the primary bevel angle estimate.

The blade is made from S35VN steel.

Explained by the Maker:

The reasons for certain design choices may not be clear when simply looking at an object, so this section is intended to give an insight into the thinking behind a design by speaking to the designer themselves.

Unfortunately I can’t always get time with the designer so will use this section to include relevant information about the knife and its designer.

I wanted to include a short extract from Emerson Knives about the ‘Wave’ feature.

“The remote pocket opener is the most dynamic and advanced feature ever designed for folding knives. Originally designed by Ernest Emerson as a request from the Navy Seals. They needed him to design a ‘blade catcher’ that would essentially stop a blade from sliding up the back of your knife and cutting your arm when in a one-on-one knife fight. By accident, Ernest Emerson inadvertently created the Emerson Wave Feature when he discovered that the knife would self deploy when being pulled from your pocket, given the right motion.

This device allows you to open the knife literally, as it is removed from the pocket. This makes any Emerson Knife with the remote pocket opening system the fastest deploying knife in the world. Faster than an automatic, your knife is open as it comes up into your hand-ready for use.”

A few more details:

The 0630 comes in a cardboard box.

Along with the knife are two leaflets, one with general information, and one about the Wave feature.

How to use the Wave Feature.

Tucked under the pocket clip is a silica gel packet.

On the other handle is a peeled G-10 scale with milled grip grooves.

Rather than a stud, the 0630 has a thumb-disc for manual opening of the blade.

Matching the heavy no-nonsense design of this knife, there is a substantial pivot nut which can be adjusted with a standard spanner; no special tools required).

By default, the pocket clip is fitted to the framelock side of the knife which suits a right-handed owner. However the 0630 comes drilled and tapped for the pocket clip to be moved to the G-10 side for a left-handed owner.

The titanium framelock has a pleasing stonewashed finish.

At the base of the lock-bar cutout is a rounded corner to reduce stresses.

All round the Titanium slab, the corners are nicely radiused ensuring there are no sharp edges to cut into your hand.

With its wide design, the pocket clip has a strong grip. This is important when used on the Titanium side as the smooth titanium does not grab the pocket fabric as much as the G-10 side.

Key areas of the handle have jimping to help with grip.

The cutout that forms the lock-bar spring is deep and well rounded at the corners.

Though it might look like the clip is pressing on the lock-bar, it actually sits onto the fixed part of the frame.

Where needed, stress reducing features are included, in this case at the end of the lock-bar slot.

Further jimping in the thumb ramp area of the grip. This actually extends up onto the ‘wave’ as we will see.

There is jimping on the top of the ‘wave’ which is a natural extension of the jimping on the frame.

With the blade open, you can now see that flow of the jimping from handle to wave.

The 0630 has an open frame with black spacers.

On this example the lock engagement was about a third out-of-the-box. Note the hardened steel lockbar insert for reliable solid lock-up. You can also see the phosphor-bronze washers making the bearing as simple and strong as it can be.

A close-up look at the blade tip, and edge bevel.

To make unlocking more comfortable the inside of the lock-bar has a bevelled corner.

A well rounded plunge line keeps maximum blade strength.

Love those grind lines.

Let’s put it to work…

What it is like to use?

ZT’s 0630 has pushed me in a direction I normally avoid, as I’m not keen on pocket clips. They work well for a lot of people, but I’ve had knives become unclipped, which makes them very likely to be lost. However, here we have an Emerson, and the Wave, so it means you really do need to go for the pocket clip carry or you just won’t get the experience you should be.

Very often I find pocket clips (or more accurately the handle scale under them) too abrasive, and end up with shredded pockets. With the 0630 having a smooth titanium handle under the strong pocket clip, despite the ‘hold’ the clip has, it has not chewed up my pockets, but has also not come free by itself. If I were left handed, it would be a different story, so for some this won’t work out as well.

What is very apparent when handling the 0630 is its super solid build. There is not one aspect of this knife that feels like a weak point. I’m still looking for one, but haven’t found it yet.

Thanks to getting lots of pocket carry, it has been getting a wide variety of uses.

With ZT featuring a lot models with flippers and wave opening, they have developed a very strong detent, perhaps one of the strongest of any production knife I’ve used. This strong detent means the opening action becomes very positive as a lot of force is built up pressing on the detent before it ‘breaks’ and the blade deploys. The downside to this is one-handed manual opening can be much harder work than on other knives and the thumb opening of the 0630 is certainly an example of this. Out of the box I struggled to open the blade using the thumb disc, and even now don’t consider this a reliable opening method. At the end of a day’s work, that disc can start to create a sore spot on the thumb thanks to the relentless detent. This short video talks a little about this as well as showing the wave opening in slow motion.

Video Edited with – Cyberlink Director Suite 5 (PowerDirector 16 and AudioDirector 7)
Camera – Panasonic HC-V770    Microphone – Tonor TN120308BL

The Wave feature just keeps giving, as it provides an extended thumb ramp for a great grip for pushing the tip forward.

Thanks to its size the length of the handle allows a comfortable grip for general slicing. (I take XL size gloves).

For a right-hander, the peeled G-10 scale falls under the fingers and has a lot of grip even with wet hands. The peeled G-10 is not overly aggressive or abrasive to your hand.

To give an idea of scale, here it is next to the Fällkniven F1 and a Spyderco UK Pen Knife.

Looking like a bit of a brute, I would not have said the 0630 was a particularly attractive knife (to my taste), but as I have found before, there is often a very good reason why the design looks the way it does, and the 0630 has proven without a doubt that it functions incredibly well, and those design aspects that I’m not so keen on the look of make it a really excellent tool.

I like a super slick ball bearing pivot as much as the next knife enthusiast, but when it comes to a hard-use knife I always prefer phosphor-bronze. Again I love a flipper, but for the utmost reliability I don’t want to rely on flipping a blade open, I want to be able to manually open it. The wave opening of the 0630 is a bonus, with the thumb disc giving that ultimate reliability (albeit with a very tough detent).

Based on looks alone I was initially a little underwhelmed by the 0630. As I got to know it, its capabilities just shone through along with a striking strength of build which means I will happily work this knife harder than I would most folders. If I could change one thing, it would be the severity of that detent, hopefully it will wear in more over time.

Review Summary

The views expressed in this summary table are from the point of view of the reviewer’s personal use. I am not a member of the armed forces and cannot comment on its use beyond a cutting tool or field/hunting knife.

Something that might be a ‘pro’ for one user can be a ‘con’ for another, so the comments are categorised based on my requirements. You should consider all points and if they could be beneficial to you.

_______________________________________________ _______________________________________________
Things I like What doesn’t work so well for me
_______________________________________________ _______________________________________________
Super strong build. Overly stiff detent.
Powerful and tough blade.
Emerson Wave Opening.
S35VN Steel.
Steel lock-bar insert in Titanium frame-lock.


Discussing the Review:

The ideal place to discuss this reviews is on a forum. If you started reading the shorter forum version of the review, but followed the link this full exclusive review, please return to that forum to discuss the review there.
If you read the review entirely on Tactical Reviews, please consider one of the following to join in any discussion.

EdgeMatters – Sponsored Reviews (UK based Forum for Knife Makers and Collectors)

BladeForums – Knife Reviews (US based Forum for Knife Discussion)

CandlePowerForums – Knife Reviews Section (Largest and Friendliest Flashlight Community Forum)

Light Review: FOURSEVENS Quark Click QK2A-X (2xAA)

The original Quark models from FOURSEVENS redefined what a light could be, but with redesign forced upon them, FOURSEVENS had to re-imagine the Quark, and the Quark Click was born. This review is of the QK2A-X model (2AA)

 photo 05 Quark Click engraving P1240116.jpg

Taking a more detailed look:

FOURSEVENS packaging presents the Quark Click so you can get an all round view.
 photo 01 Quark Click boxed P1240094.jpg

Supplied with the QK2A-X is a holster, hand-grip, lanyard, spare O-rings and 2x AA Alkaline cells.
 photo 02 Quark Click unboxed P1240099.jpg

If you already know the Quark holsters, this is the same as all the others I have. The front/back are semi rigid with elasticated sides.
 photo 03 Quark Click holstered P1240107.jpg

On the back is a D-loop and fixed webbing loop.
 photo 04 Quark Click holstered P1240110.jpg

The Quark range have removable steel pocket clips.
 photo 06 Quark Click clip P1240122.jpg

As standard, the Quark Click comes with the ‘Tactical’ forward-clicky switch.
 photo 07 Quark Click rear P1240125.jpg

Being a ‘Tactical’ switch the button protrudes for easy access, so no tail-standing for this one.
 photo 08 Quark Click button P1240128.jpg

The FOURSEVENS logo is laser engraved on the head.
 photo 09 Quark Click engraving logo P1240129.jpg

At the base of the compact textured reflector is a XM-L2 LED.
 photo 10 Quark Click reflector P1240138.jpg

Thanks to the design including a location guide surrounding the LED, the LED is very well aligned with the reflector.
 photo 12 Quark Click LED P1240135.jpg

Taking the head off, and you can see the contacts inside it. These include physical reverse polarity protection.
 photo 11 Quark Click contacts P1240141.jpg

The threads are square and bare metal. They arrive well lubricated.
 photo 13 Quark Click threads P1240146.jpg

Inside the tailcap is a strong spring contact for the negative connection. Due to the use of bare metal threads, the Quark Click cannot be locked-out by unscrewing the tail-cap slightly – instead you must unscrew the head of the Quark Click half a turn.
 photo 14 Quark Click tail contacts P1240150.jpg

And here we have one of the Quarks’ historical features, its lego-ability (change the head, or battery tube, or switch). In this case, simply use a 1xAA long battery tube and this Quark can now use 1xAA or 1×14500 as well as the original 2xAA.
 photo 15 Quark Click 1AA P1240154.jpg

So this is the Quark Click QK2A-X next to 2xAA cells for size reference.
 photo 16 Quark Click size 2AA P1240161.jpg

The same head and switch now on a 1xAA battery tube next to1xAA for size reference.
 photo 17 Quark Click size 1AA P1240162.jpg

Another feature of FOURSEVENS lights is the inclusion of the hand-grip. Not frequently talked about, this is a very useful accessory. Here it is fitted to the QK2A-X.
 photo 18 Quark Click strap P1240168.jpg

Slipping the hand-grip over your fingers positions the Quark like this.
 photo 19 Quark Click strap in hand P1240176.jpg

You position the hand-grip to wherever it is most comfortable for you. This is where I like it, not quite onto my knuckles.
 photo 20 Quark Click strap in hand P1240174.jpg

No need to hold onto the light as the hand-grip does this for you. You hand is free for other tasks (as long as they fit in with keeping the light where you need it).
 photo 21 Quark Click strap in hand P1240171.jpg

The beam

Please be careful not to judge tint based on images you see on a computer screen. Unless properly calibrated, the screen itself will change the perceived tint.

The indoor beamshot is intended to give an idea of the beam shape/quality rather than tint. All beamshots are taken using daylight white balance. The woodwork (stairs and skirting) are painted Farrow & Ball “Off-White”, and the walls are a light sandy colour called ‘String’ again by Farrow & Ball. I don’t actually have a ‘white wall’ in the house to use for this, and the wife won’t have one!

I’ve always like the Quark beam profile, and the latest Quark Click doesn’t disappoint. Good wide spill, and a hotspot giving good reach make this a great all rounder. If you study the beam close-up on a white wall, it can seem a bit unrefined, but step back and the beam is well diffused and very nice to use.
 photo 22 Quark Click indoor P1240746.jpg

Outdoors and the ultimate brightness of the Quark starts to show its limitations, but that hotspot does give you a reasonable range and the broad spill gives you a wide field of view, even if not the brightest. This is a 2xAA after all.
 photo 23 Quark Click outdoor P1240699.jpg

Modes and User Interface:

In its default configuration the Quark Click has two output modes Low and Max, but the model on test has been reprogrammed to include Moon, Low, Mid and Max/Burst (this customisation was requested as it is offered by FOURSEVENS as standard customisation).

For the default configuration (according to the manual):
To turn ON, either half-press the switch, or fully press it so it clicks.
To toggle between output modes turn the light ON, OFF, then ON again.
The last used mode is memorised if the Quark remains OFF for at least 5 seconds and is used next time you turn it ON.
To turn OFF, release the switch (if half-pressing it), or press it so it clicks and release.

For the customised Quark Click with Moon, Low, Mid, and Max:
To turn on, either half-press the switch, or fully press it so it clicks.
To toggle between output modes turn the light ON, OFF, then ON again – However, you have to cycle through Max, Low three to four times to access the additional modes, so Max, Low, Max, Low, Max, Low, Max, Moon, Low, Mid, Max, Moon……
Now we have another deviation from the standard interface when it comes to memory.
When using the Quark Click in the Max, Low mode selection (before reaching the additional modes) it does not memorise Low, it always starts on Max.
Only if you have selected a mode from the additional mode selection (Moon, Low, Mid, Max) is it memorised. Also it is only memorised if the Quark has been ON that mode for 5s and remains OFF for at least 5 seconds. Then once memorised, as long as there is not a full ON/OFF/ON cycle within 5s, it will remain on that mode.
If you memorise Max mode, the Quark Click returns to the Low/Max mode, and always gives you Max until you carry out the memorisation steps described above.
To turn OFF, release the switch (if half-pressing it), or press it so it clicks and release.

Batteries and output:

The Quark Click QK2A-X in its default configuration runs on 2x AA (Lithium, Alkaline or NiMh). With the additional 1xAA battery tube it will run on 1xAA (Lithium, Alkaline or NiMh) or 1x 14500.

To measure actual output, I built an integrating sphere. See here for more detail. The sensor registers visible light only (so Infra-Red and Ultra-Violet will not be measured).

Please note, all quoted lumen figures are from a DIY integrating sphere, and according to ANSI standards. Although every effort is made to give as accurate a result as possible, they should be taken as an estimate only. The results can be used to compare outputs in this review and others I have published.

___________________________________________ ________________________________ ________________________________
Quark Click QK2A-X using specified cell I.S. measured ANSI output Lumens PWM frequency or Strobe frequency (Hz)
___________________________________________ ________________________________ ________________________________
Max/Burst – 2x AA Eneloop 296 0
Medium – 2x AA Eneloop 26 0
Low – 2x AA Eneloop 3 0
Moon – 2x AA Eneloop Below Threshold 0

* Beacon and Strobe output measurements are only estimates as the brief flashes make it difficult to capture the actual output value.

Peak Beam intensity measured 2500 lx @1m giving a beam range of 100 m.

There is no parasitic drain.

In this runtime graph are the output traces from using 2xAA Eneloop, and an AW protected 14500. Running the QK2A-X head on 3V or 4.2V doesn’t increase the maximum output. Both traces show the Burst mode where the first 30s of output are maximum, before dropping to approximately 50% of this. The output is then very well regulated right up to the point the cells become fully depleted.
With the 14500, there is an absolute cut-off when the protection kicks in (it goes OFF), but the 2xAA trace drops sharply, but doesn’t fully cut out.
 photo FOURSEVENS QK2A-X runtime.jpg

Troubleshooting

This section is included to mention any minor niggles I come across during testing, in case the information helps anyone else.

No issues were encountered during testing.

As per the description of this section, this information is provided in case anyone else finds a similar ‘issue’ that might be fixed in the same way.

The Quark Click QK2A-X in use

Anyone following my reviews will know that I consider the 2xAA form-factor one of the best. The QK2A-X has a slim battery tube with slightly larger head and tail-cap. making it very secure in the hand.

Even if you don’t really use pocket clips, it provides a very useful anti-roll function, so I’d rather leave it in place. As pocket clips go, it also has a generous capacity so is easy to use on thicker pocket edges like on some heavy cargo-pants.

With this one being a customised version, I was scratching my head a little when it wouldn’t memorise the low mode, but as explained in the UI section, you need to get to the additional modes before the memory function kicks in. It can seem a little fiddly as to memorise Moon mode you need to turn the Quark Click on and off 5 or 6 times watching the output to catch the Moon mode (miss it and you have to turn it on and off a further 4 times to get back to Moon). It works, but is not the slickest interface.

In most lights, lock-out is provided by undoing the tail-cap half a turn. It is slightly counter intuitive that the Quark uses the head to lock-out the Quark Click, but then again, this also means you can leave the tail-cap clicked on and then use the head to give you a twisty interface. Great for silent use, and twisting the head is very intuitive. Suddenly I’m liking that design feature much more.

With the interface being an ON/OFF/ON to switch modes, you can’t really use the momentary action for signaling. I’ve always preferred the immediacy of the forward-clicky tail-cap switch, so definitely prefer this to a reverse-clicky.

A little comment about the available levels and the Burst mode – Effectively, you have a combined Burst/High output as a single mode. After the initial 30s of Burst, the output drops to a very useful 150lm which is then maintained. Unfortunately it is not possible to directly enter the 150lm mode as it is always proceeded by the 300lm burst mode. When you look at the ANSI output levels this leaves a ‘hole’ in the available output levels as you have 296lm, then down to 26lm, then 3lm then Moon. Really that 150lm level is needed to fill the hole, and it is there, but you have to get through burst mode first.

Having Moon mode memorised, you will notice the FOURSEVENS pre-flash is present for this mode. This is a very quick flash of a level slightly brighter than Moon mode before it settles into the constant output. It has never caused me a problem and is more a characteristic than anything wrong. With the Moon mode being a true Current Controlled output it is far preferable to some PWM control of this level.

PWM – well I might have just mentioned it, but I’m happy to say there is none present in the Quark Click. None of the modes available in this sample exhibited PWM at any frequency.

A classic, game-changing, lego-able design, rebooted with a simple interface and one that can be operated as a clicky or a twisty.

Review Summary

_______________________________________________ _______________________________________________
Things I like What doesn’t work so well for me
_______________________________________________ _______________________________________________
Excellent All-Rounder beam. Mode memorisation a little laborious in this customised Quark.
Current Controlled output (no PWM). Tail-standing not possible with standard tail-cap.
Lego-able design compatible with all previous Quark models. 150lm output only available after 30s by first using the Burst Mode.
Optional AA and CR123 battery tubes.
Spacious/removable pocket clip provides anti-roll.
Wide input voltage range 0.9-4.2v.
Can be used as a Twisty or Clicky.

 photo 00 Quark Click feature P1240113.jpg


Discussing the Review:

Please feel free to add comments to the review, but the ideal place to freely discuss these reviews is on a forum. If you started reading the shorter forum version of the review, but followed the link this full exclusive review, please return to that forum to discuss the review there.
If you read the review entirely on Tactical Reviews, please consider one of the following to join in any discussion.

CandlePowerForums – Flashlight Reviews Section (Largest and Friendliest Flashlight Community Forum)

EdgeMatters – Sponsored Reviews (UK based Forum for Knife Makers and Collectors)

Light Review: Fenix TK15UE (Ultimate Edition)

Fenix have been taking classic lights from their range and creating ‘Ultimate Edition’ versions, pushing their performance to the maximum. The TK15 has now been ‘UE’ed to make the TK15UE with uprated output, throw and a new stainless steel bezel.

 photo 16 TK15UE trailer P1230848.jpg

Taking a more detailed look:

The TK15UE comes in Fenix’s standard packaging.
 photo 01 TK15UE Boxed P1230641.jpg

Included with the TK15UE are the instructions, a holster, a lanyard, a couple of O-rings and a spare switch boot.
 photo 02 TK15UE Box contents P1230650.jpg

Before we move on, the holster is worth lingering on a little longer.
 photo 03 TK15UE holster P1230657.jpg

On the back there is a choice of a D-ring, fixed loop, and Velcro closing loop.
 photo 04 TK15UE holster loops P1230656.jpg

There is something a little different here. The holster flap has a retaining strap over it and inside the holster it is fixed with Velcro.
 photo 05 TK15UE holster flap P1230667.jpg

You can just see inside that the flap extends most of the way down the inside of the holster.
 photo 07 TK15UE holster flap adjust inside P1230678.jpg

The entire flap can be undone and either removed or adjusted to loosen or tighten the fit, or even accommodate a different length light.
 photo 06 TK15UE holster flap adjust P1230675.jpg

As supplied, the holster is correctly configured for the TK15UE.
 photo 08 TK15UE in holster P1230680.jpg

The most obvious sign that this is something a bit different to the previous TK15s is the Stainless Steel bezel.
 photo 09 TK15UE angle P1230689.jpg

Let’s have a look at how the TK15UE and an older TK15 compare. This is the TK15C. So the holster is more than the basic one the TK15C comes with.
 photo 10 TK15UE compare P1230827.jpg

Dimensions are all very similar. The TK15C I’m comparing with here has had the clip removed as well as the tactical grip ring because it has been used gun-mounted.
 photo 12 TK15UE compare P1230832.jpg

Going in close to the engraving of the model, the knurling and mode switch.
 photo 13 TK15UE switch detail P1230837.jpg

All the edges of the clip are nicely rounded, and there are no sharp corners to eat away at your pockets (just the knurling under the clip).
 photo 14 TK15UE clip detail P1230839.jpg

The switch button does protrude, so no tail-standing, and it has two raised areas to provide the switch with some protection from accidental activation.
 photo 15 TK15UE tail detail P1230844.jpg

As with the stainless bezels on other Fenix lights, the edges have been bevelled to make them kind to the holster and your pockets.
 photo 17 TK15UE bezel P1230849.jpg

The inner edges of the bezel are crisp without being sharp.
 photo 18 TK15UE bezel P1230852.jpg

Fenix’s preferred trapezoid threads are used.
 photo 19 TK15UE threads P1230857.jpg

The end of the battery tube is the electrical contact that connects to the tail-cap contact.
 photo 20 TK15UE tube P1230863.jpg

Inside the tail-cap are the battery tube contact and the negative terminal sprung contact.
 photo 21 TK15UE tailcap contacts P1230866.jpg

With the TK15UE, the head will unscrew.
 photo 22 TK15UE head off P1230884.jpg

As the battery tube can be removed we can get a good look at those contacts in the head.
 photo 23 TK15UE head contacts P1230885.jpg

Just like previous TK15 models, the TK15UE has a smooth reflector.
 photo 24 TK15UE reflector P1230888.jpg

In the centre of that reflector is the CREE XP-L HI V3 LED.
 photo 25 TK15UE LED P1230897.jpg

Looking straight into the TK15UE’s reflector.
 photo 26 TK15UE LED P1230901.jpg

The TK15UE is one of the more compact single 18650 lights. Not as compact as the small-head types such as the PD32, but it does have a big enough reflector to give it some punch.
 photo 27 TK15UE with cell P1230904.jpg

You can take off the tactical grip ring by unscrewing it.
 photo 28 TK15UE ring off P1230910.jpg

Unless you buy the optional thread protector you will see the grip ring threads.
 photo 29 TK15UE ring threads P1230914.jpg

The beam

Please be careful not to judge tint based on images you see on a computer screen. Unless properly calibrated, the screen itself will change the perceived tint.

The indoor beamshot is intended to give an idea of the beam shape/quality rather than tint. All beamshots are taken using daylight white balance. The woodwork (stairs and skirting) are painted Farrow & Ball “Off-White”, and the walls are a light sandy colour called ‘String’ again by Farrow & Ball. I don’t actually have a ‘white wall’ in the house to use for this, and the wife won’t have one!

Indoors the TK15UE is not at its best, as it is quite a throw orientated beam. The hotspot is bright and well formed. Spill is relatively dim and narrow but usable. There is enough balance in the beam to make it OK indoors.
 photo 32 TK15UE indoor P1240716.jpg

But it is when you get a bit more range that the TK15UE really starts to shows what it is made of. The throw belies its compact size, and with the ‘UE’ upgrade it is a really punchy little light.
 photo 31 TK15UE outdoor P1240668.jpg

Modes and User Interface:

To control the TK15 UE there is the forward-clicky tail switch, and the mode selection switch just behind the head.

Click ON (or half press for momentary action) the tail switch to access the last used constant mode. With the tail switch on, press the mode button to cycle though the modes.

The standard modes are Low, Medium, High and Turbo.

There is a hidden Strobe mode accessed by holding the modes selection switch in for 1s. Strobe is not memorised as a last used mode.

Batteries and output:

The TK15UE runs on 18650 or 2xCR123.

To measure actual output, I built an integrating sphere. See here for more detail. The sensor registers visible light only (so Infra-Red and Ultra-Violet will not be measured).

Please note, all quoted lumen figures are from a DIY integrating sphere, and according to ANSI standards. Although every effort is made to give as accurate a result as possible, they should be taken as an estimate only. The results can be used to compare outputs in this review and others I have published.

___________________________________________ ________________________________ ________________________________
Fenix TK15UE using specified cell I.S. measured ANSI output Lumens PWM frequency or Strobe frequency (Hz)
___________________________________________ ________________________________ ________________________________
Turbo – Fenix ARB-L18-3500 776 0
High – Fenix ARB-L18-3500 377 0
Medium – Fenix ARB-L18-3500 164 0
Low – Fenix ARB-L18-3500 14 0

* Beacon and Strobe output measurements are only estimates as the brief flashes make it difficult to capture the actual output value.

Peak Beam intensity measured 31100 lx @1m giving a beam range of 353m.

There is no parasitic drain.

I was slightly surprised by the Turbo output runtime trace as unlike most Fenix lights the TK15UE does not appear to run with a regulated output. The trace was recorded using cooling, so it is unlikely that this is due to overheat protection, instead the TK15UE seems to run at maximum output with that output sagging as the cell becomes depleted. However saying that, you do get a full hour of runtime at more than 600lm, so overall the performance is still good. (This was run using Fenix’s latest ARB-L18 3500mAh cell.)
 photo Fenix TK15 UE runtime.jpg

Troubleshooting

This section is included to mention any minor niggles I come across during testing, in case the information helps anyone else.

No issues were encountered during testing.

As per the description of this section, this information is provided in case anyone else finds a similar ‘issue’ that might be fixed in the same way.

The TK15UE in use

By separating the mode selection to a side-switch Fenix have allowed proper momentary use of that forward-clicky tail switch. This makes for a really easy and intuitive interface and keeps things simple for any user.
Fortunately the strobe mode is reasonably well hidden and is not memorised; I’m surprised anyone still includes strobe. As those that follow me will know, I’m certainly no fan of strobe and most true tactical users I know are aware that if you strobe another person, you strobe yourself as well, so your are better off not using it at all. Thankfully with the TK15UE you need never come across strobe and can use the four constant output modes without tripping over strobe.
The TK15UE manages a balance between hotspot and spill that, although it is more oriented towards throw, is still usable at indoor distances.
When using the holster with the TK15UE inserted bezel-down, the bezel does catch in the holster before getting all the way in. Used bezel-up, this does not happen. It seems to be due to the adjustable flap taking up more space inside so the bezel catches on the inside of the holster. To get it all the way into the holster bezel-down you need to twist the TK15UE as you insert it.
There are smaller single 18650 lights, but the TK15UE is still compact enough to make it easy to carry, yet that slightly larger head is enough to give it a nice strong beam. Even with the upgrades to the head and LED, Fenix have kept the character of the TK15 but made it significantly brighter.
I’ve always felt the TK15 was an unsung hero in the Fenix line-up, quietly getting on with the job while others took the glory. In the Ultimate Edition, the TK15UE can now take some of the limelight and hopefully get a bit more recognition.

Review Summary

_______________________________________________ _______________________________________________
Things I like What doesn’t work so well for me
_______________________________________________ _______________________________________________
Significantly boosted output compared to previous TK15 models. Turbo output not regulated.
Excellent throw from a compact head. Bezel catches in holster when used bezel down.
Simple user interface. Can accidentally hit the mode switch especially if wearing gloves.
Stainless Steel Bezel.

 photo 30 TK15UE angle on P1230918.jpg


Discussing the Review:

Please feel free to add comments to the review, but the ideal place to freely discuss these reviews is on a forum. If you started reading the shorter forum version of the review, but followed the link this full exclusive review, please return to that forum to discuss the review there.
If you read the review entirely on Tactical Reviews, please consider one of the following to join in any discussion.

CandlePowerForums – Flashlight Reviews Section (Largest and Friendliest Flashlight Community Forum)

EdgeMatters – Sponsored Reviews (UK based Forum for Knife Makers and Collectors)

Sunglasses Review: Wiley X MEGA Test – Saber, Twisted and Knife

I first came across Wiley X due to the fact they manufacture 5.11 Tactical’s range of sunglasses. It is a real compliment that 5.11 chose Wiley X, and when you see more of what Wiley X make you will understand why they are a brand you can trust if you want protection as well as style.

In this group review I’m looking at three very different pairs of glasses showing some of the key benefits Wiley X offer. On test we have the Sabre – wrap around ultra-protective shooting glasses, Twisted – the simplest glasses but in a special Stealth Grey frame, and Knife – using Wiley X’s Facial Cavity Seal making them as close fitting as goggles.
All three are in a non-polarized grey lens aimed at tactical use. For tactical use you want to avoid polarized lenses due to their tendency to cause issues with various device displays – it is just not worth the risk.
There is a lot to show as each of these models have features specific to Wiley X. Many of these features are repeated across the Wiley X range. The models in this MEGA review will help you understand what options you have.

Taking a more detailed look at the Saber:

There are several options for the Saber, from individual lenses to a full set, and this is the full triple lens set.

Everything is supplied in a Wiley X multi-lens case.

The case has two Velcro loops on the back for mounting to a belt/strap/etc.

Each component arrives wrapped in a protective plastic bag so it is in perfect condition when you first unpack it. After that, well, it is up to you.

In the case is the Saber with grey lens, a clear lens, orange lens, strap, cleaning cloth and instructions.

The set of lenses fresh out of its wrapping.

Each lens is a compound curve to fully wrap the eyes.

Taking a closer look round the Saber here it is from the front with arms folded.

And arms unfolded.

From the side.

Then from the inside.

The nose piece has fully adjustable rubber covered pads. You simply bend them to fit.

On the inside of the arm, the model name is printed on the ‘active’ section of the arm.

The first ‘active’ feature of the arm is that you can remove the rigid arm and replace it with a goggle style strap. First pull out the arm.

Plug in the first end of the strap.

Repeat with the other arm and strap end.

Instead of just pulling the arm out entirely, each arm has length adjustment to enable the best possible fit for each person.

The arm has four ‘stops’.

Being a frameless interchangeable lens system, you need to remove the arms and nose part and transfer these over to the lens you want to use. The fit of these parts is really quite firm.

Here we are 2/3 transferred over to the orange lens, just the second arm to move.

I found the easiest process was to pull the arm outward and then lift the hinge upward ensuring you don’t try to lever with the whole arm, instead applying pressure as close to the lens as possible. The arm then pops up.

Fitting the arm was easiest doing this the other way round, first seating the hinge side of the mount, pressing the arm inwards and then pushing down on the mount.

The clear lens almost disappears in the photo despite one of the Saber’s special features. The Sabre has the thickest lens, at 3mm thick, I’ve ever come across. This gives it probably the highest protection rating for any glasses of this type. With the bare lens you can see this thickness at the nose cut out.

Looking closer to where the brow foam padding is attached you can see the machining marks in the lens edge.

And next to a ruler with mm graduations.

Taking a more detailed look at the Twisted Stealth Grey:

The Twisted model originally came in a black frame, but with more demand for grey, Wiley X have released a special ‘Stealth Grey’ version.

With no additional lenses to carry, the case for the Twisted is the Wiley X standard case. You also get a sticker in the box.

Inside the case are the plastic wrapped glasses, a cleaning cloth, information leaflet and a neck strap.

Getting rid of some of the plastic wrap for a better look.

Taking a closer look round the Twisted here it is from the front with arms folded.

And arms unfolded.

From the side.

Then from the inside.

The arm is wide at the hinge which helps shade the wearer from light and debris coming from the side.

A detail of the hinge.

On the Twisted, the nose bridge is a fixed, moulded design. The surfaces are all rounded with no corners to dig in.

Taking a more detailed look at the Knife:

The last in this set is the Knife which features Wiley X’s facial cavity seal.

As well as the cased glasses and sticker, the Knife comes with an instruction leaflet for the facial cavity seal.

With the Knife you get a cleaning cloth, neck strap, and T-bar ‘goggle’ strap (more on that later).

Everything unwrapped.

Taking a closer look round the Knife here it is from the front with arms folded.

And arms unfolded.

From the side.

Then an inside view to show the facial cavity seal insert.

The Knife’s hinge.

Each arm has a mounting hole for the T-bar strap system. This is a strap to hold the glasses firmly onto the face. With the facial cavity seal, these glasses become almost goggles, so this system makes perfect sense as it keeps the seal good.

The T-bar strap fits in pointing downwards.

Then rotates back to lock in place. You can only release the strap by rotating the mount back down to the previous position.

Inside the arm you can see the T-bar in the locked position.

Here the knife has the goggle strap fully fitted.

It is possible to remove the facial cavity seal for cleaning or to use the glasses without the seal. There are times when the extra ventilation is needed.

The seal is specific to the model and is labelled for the Knife.

Here is the Knife without the seal.

The facial cavity seal has a soft foam edge to fit closely to the face.

Comparing the three:

We’ve spent some time looking at each one in detail, now a first quick comparison series.

And now with each one on a display head:

Troubleshooting

This section is included to mention any minor niggles I come across during testing, in case the information helps anyone else.

The standard neck straps that were supplied with the Twisted and Knife both failed with the rubber tubing splitting.
From the moment they were fitted there appeared to be stress lines in the rubber.

This line turned into a split.

Altogether I’ve had three of these straps, and all three have split.
As per the description of this section, this information is provided in case anyone else finds a similar ‘issue’ that might be fixed in the same way.

In use

Each of these Wiley X models was chosen to represent a different use or requirement, and provide an excellent representation of what Wiley X offer.
For the utmost in protection you need to choose a wrap-around lens as this does not reply on the frame, or how well individual lenses fit in the frame, for protection. You have a one-piece protector positioned over your eyes.
The Saber is exceptional in its lens thickness at 3mm and exceeds all the safety standards, military and civilian, for protective eyewear. It does this without any distortion to your vision. I am very sensitive to poor lens design and have used compound curvature lenses that distort the wearer’s view. The Saber has not caused any visual distortions or strange sensations at all.
The full wrap gives excellent all round vision well around your peripheral vision giving uninterrupted views, just like your uncovered eyes, but protected from bright conditions and flying objects. What this does mean is that you are not protected from glaring light such as low sun to your side which the arms of certain glasses would shade you from.
For use as shooting glasses or to guard against flying objects (not dust) the Saber will give you exceptional protection.
Adjustable arms allow the maximum comfort for most users. You also have a great deal of fit adjustment with the nose piece which can be bent to raise or lower the Saber and bring it closer or further from the face. Do not neglect this, you can get a fantastic fit and comfort by taking the time to adjust the nose piece, and don’t be afraid to experiment to find the optimum fit.

Of the three, the Twisted is the most conventional ‘fit’ with no actual adjustment. On this point, of course, unlike the Saber, the Twisted will not fit everyone, but Wiley X give you excellent size information for every model so you can look for those suitable for small, medium and large heads and also at the detailed specifications of lens width, arm length and bridge width to find your best fitting model.
The arms of the Twisted curve inwards to wrap around the head and provide a good level of grip to keep them in place. The entire frame flexes as you put them on, and acts like a spring to prevent sliding. Coupled with their light weight, this makes them some of the most securely fitting glasses I’ve used without creating hotspots and discomfort when wearing for extended periods.
With the lenses curving round, there is minimal frame visible in my peripheral vision, yet the wide arms protect from low-angle light coming in from the side. An excellent compromise, and one reason the Twisted has become my most worn of the three and great for driving as well as outdoor activities.
The Stealth Grey frame is also a bit different and it is good to have a break from the normal black.

Last up in this group is the Knife. Its key feature to look at is the FACIAL CAVITY SEAL which also appears on several other models, but provides a very specific function.
When you first put on a model with the FACIAL CAVITY SEAL they feel more like goggles than glasses and it can take a little while to get used to. However as you get used to it, the feeling becomes more comforting and the benefits can be very obvious.
The FACIAL CAVITY SEAL is designed to protect you from wind, fine dust and pollen as well as blocking light that normally leaks in around the edges of sunglasses.
I’ve found that in situations where I would want to wear a peaked hat, the FACIAL CAVITY SEAL provides sufficient protection from the light that would normally leak in around the frame that I didn’t need the hat.
Where the FACIAL CAVITY SEAL really shines is in wind and dust protection. Though normal sunglasses provide a degree of protection from wind, once it is coming from the side this is far less effective. Add in dust and your normal sunglasses are not much use. The FACIAL CAVITY SEAL immediately shields you from this and stops the blinking and squinting. You could use actual goggles, but Wiley X’s FACIAL CAVITY SEAL gives you the protection of goggles in a pair of sunglasses.
You also have the option of removing the seal and using the sunglasses as normal sunglasses. This is crucial as they do also come with some of the issues of goggles.
Although the FACIAL CAVITY SEAL has some venting built in, yes, just like goggles you do get fogging. I found that this was particularly bad when driving (due to the lack of airflow), and other situations where I was hot and there was little or no airflow.
When it is windy, the small vents seem to cope with preventing fogging very well, but once conditions are calm, you are at the mercy of the temperature of the sunglasses and your immediate humidity (a nice way of describing the body’s output of moisture).
Knowing that when using the FACIAL CAVITY SEAL you can get fogging is just something you need to work with. When the situation demands the extra protection, the Knife delivers exactly that.
Remember though, that unlike goggles, you can remove the seal and they become normal sunglasses.
Due to hyper sensitivity to light, I wear sunglasses 100% of the time during daylight hours when I’m outside, so get a lot of wearing time. I would never consider having only one pair of sunglasses and have many different types and styles. Just as most people have many shoes and jackets to suit different situations, I consider sunglasses the same in that you benefit from a choice of different features. (I’m also a lens quality perfectionist)

The reason for explaining that is that now I’ve experienced it, Wiley X’s FACIAL CAVITY SEAL has become an essential part of my eyewear options.

Sunglasses are not just sunglasses and are not just eye protection. These three different models give three very different experiences and features while ensuring your eyes are protected to standards above and beyond most requirements

Review Summary

_______________________________________________ _______________________________________________
Things I like What doesn’t work so well for me
_______________________________________________ _______________________________________________
Saber – 3mm thick super tough wrap-around lens
Saber – interchangeable lenses
Saber – adjustable nose bridge and arms
Twisted – Lightweight, comfortable and secure Twisted – supplied neck strap failed
Twisted – Stealth Grey frame option
Knife – FACIAL CAVITY SEAL technology Knife – fogging in still conditions
Knife – T-bar retention system Knife – supplied neck strap failed