Inspired by their excellent S1 Baton pocket light (previously reviewed), Olight wanted to bring the same concept of an ultra compact body with high performance output to a headlamp. As will become clear throughout this review they have managed to do just that with the H1 Nova which is a headlamp and pocket light all in one.
Taking a more detailed look:
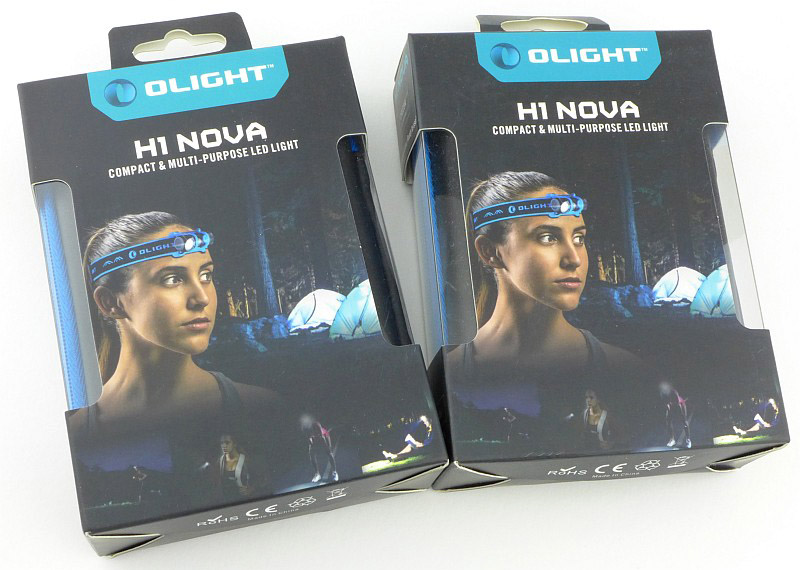
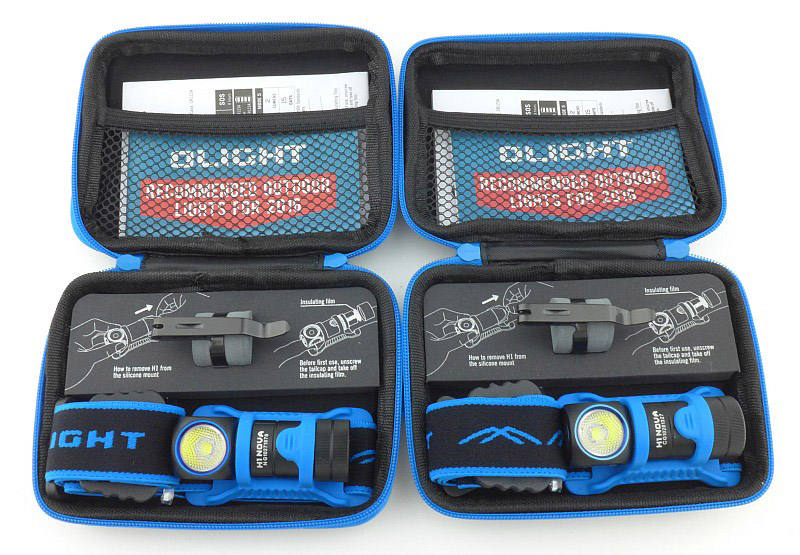
The reason there are two boxes here is that this review is looking at the CW – Cool White, and NW – Neutral White versions of the H1.
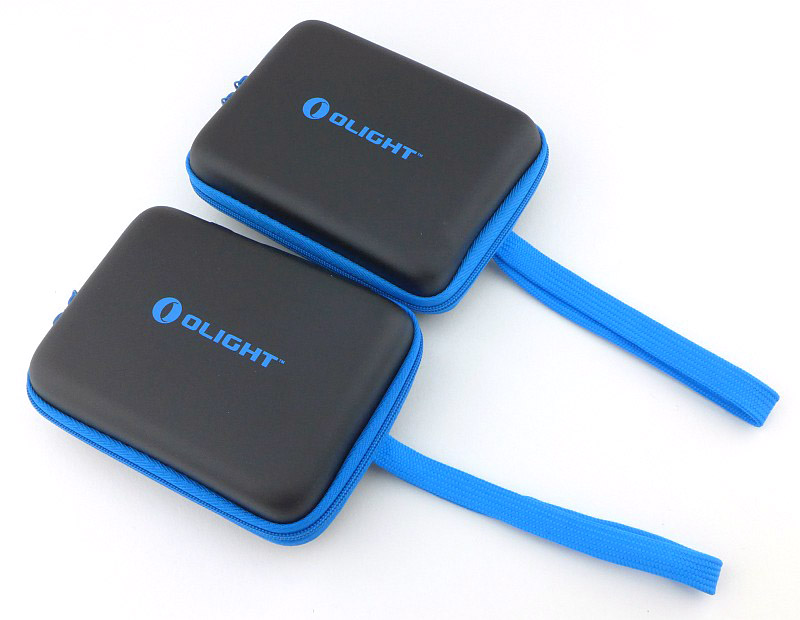
Inside the outer box is a zip-up carry case.
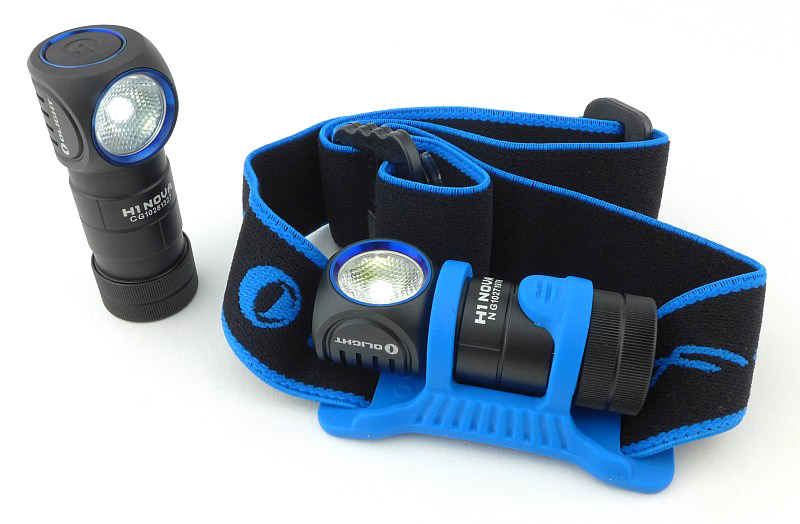
In each of the cases is the H1 in its headband mount, a pocket clip stored on a foam holder, and the instructions held in a mesh pocket.
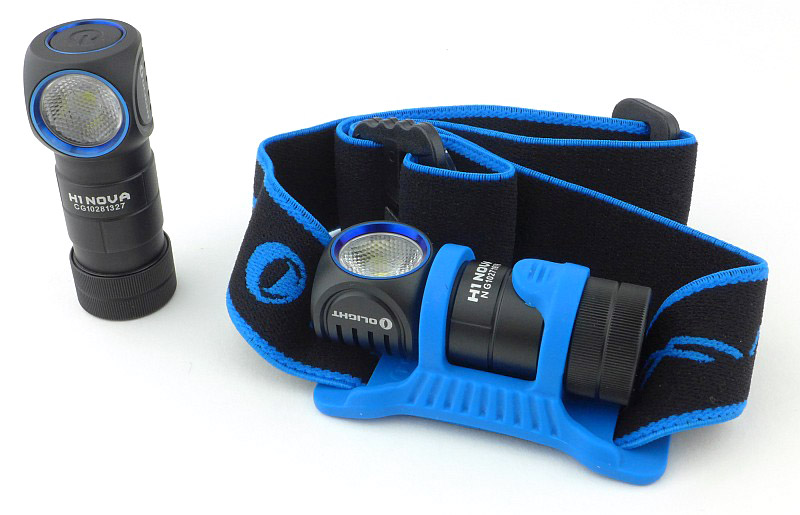
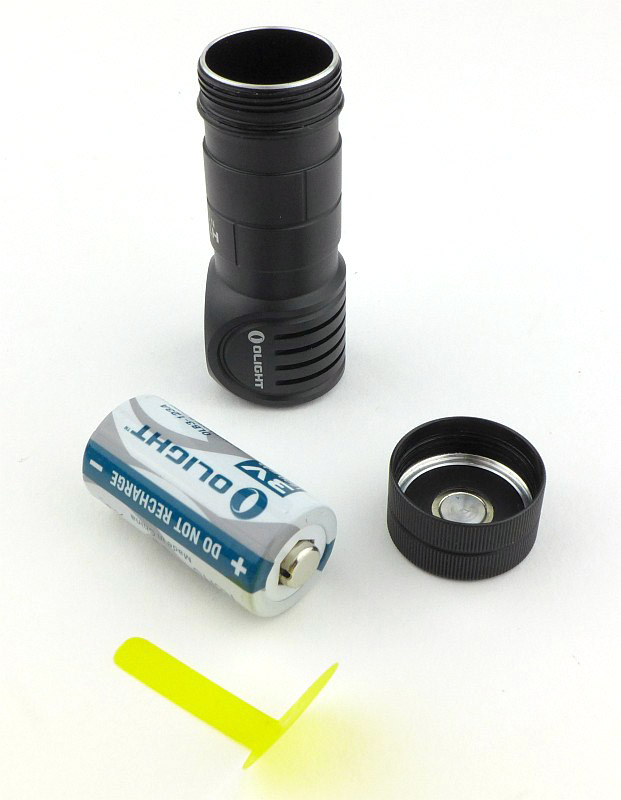
Laying out the contents of the case.
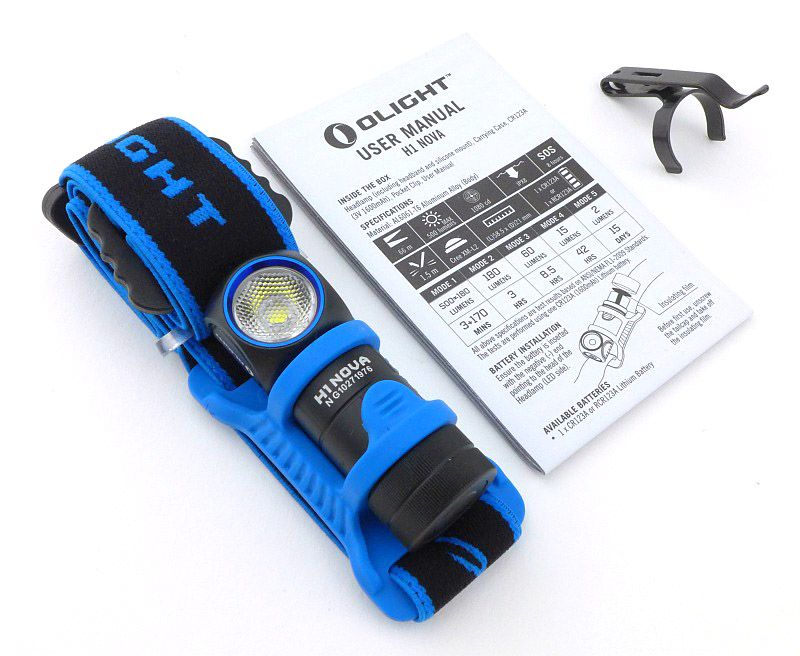
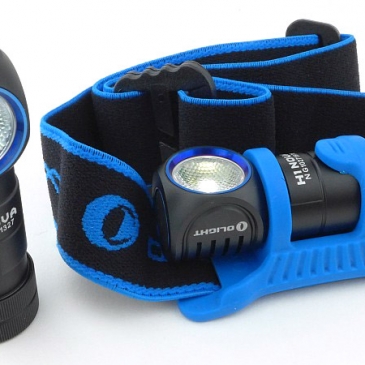
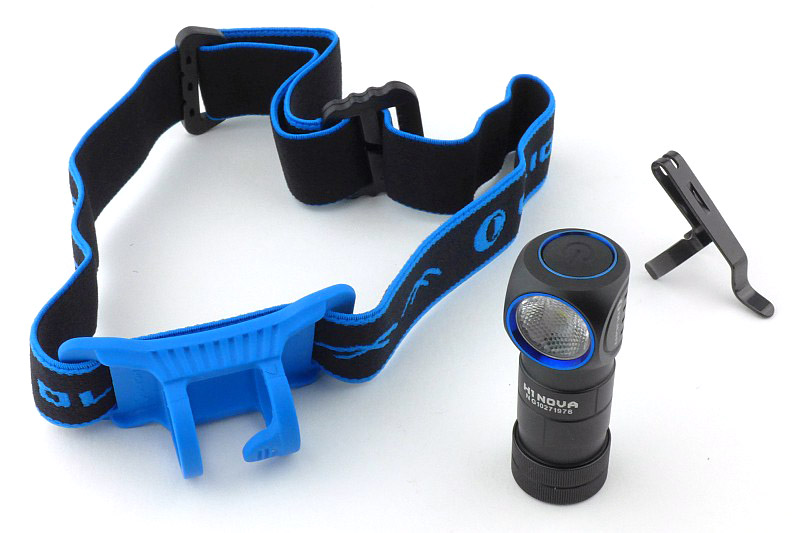
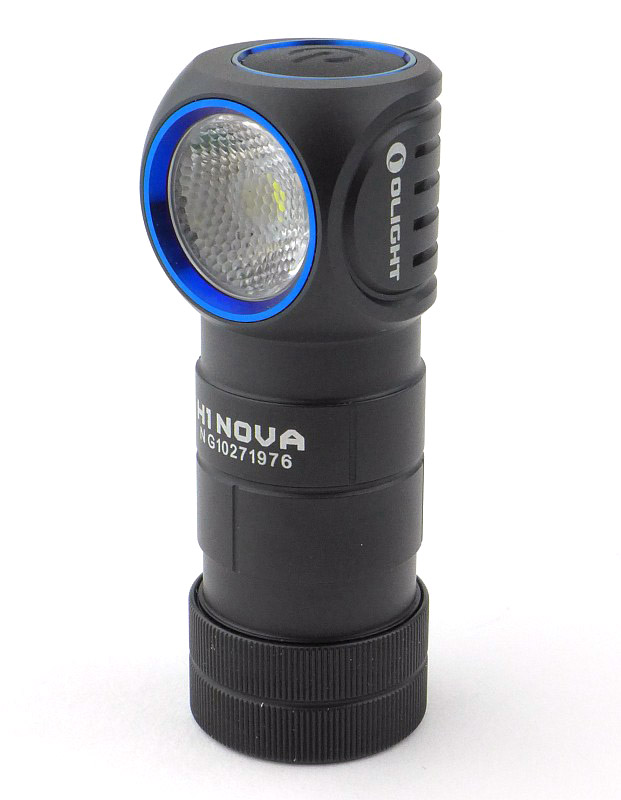
The main parts are the headband with rubber mount, the H1 Nova light, and a steel pocket clip.
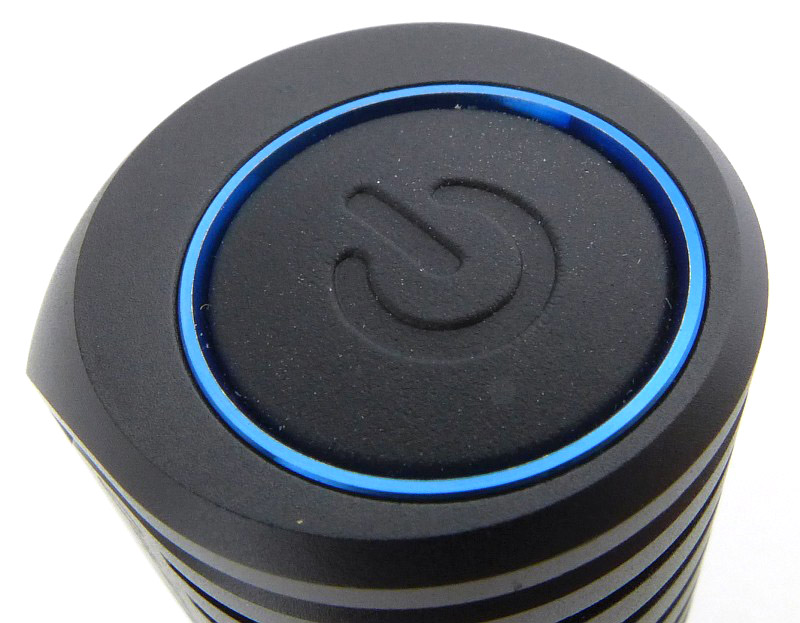
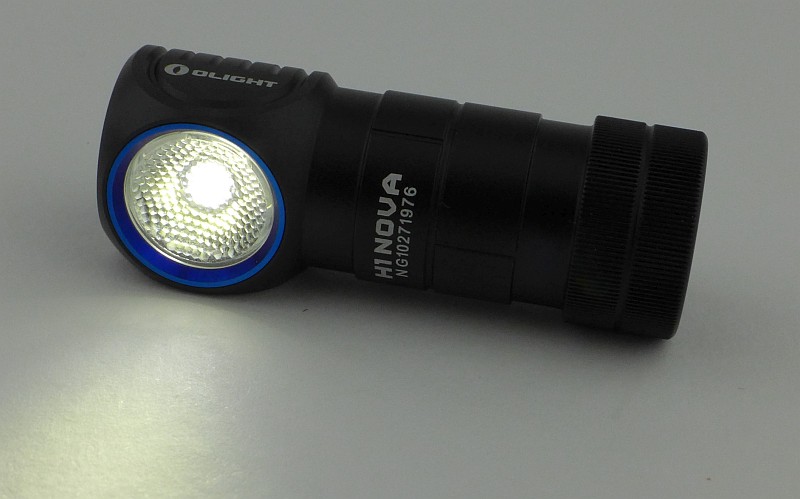
Just like the S1, the H1 has the blue highlights surrounding the lens and switch.
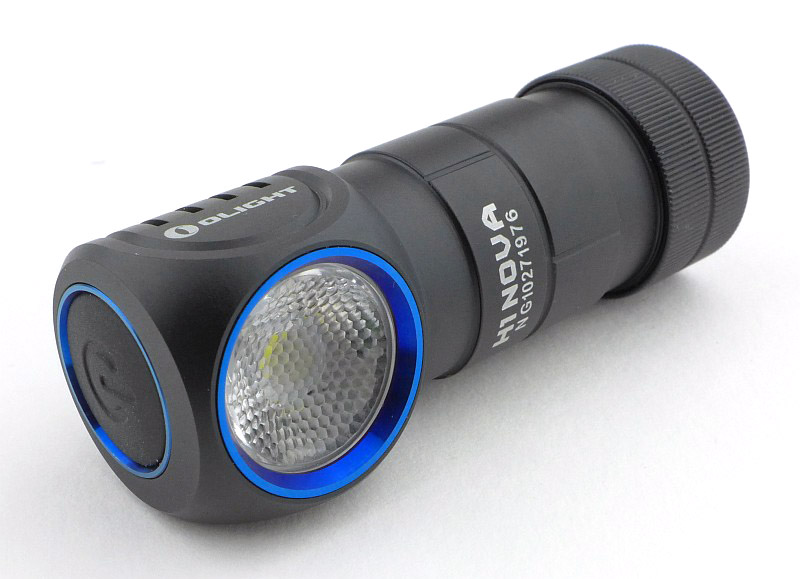
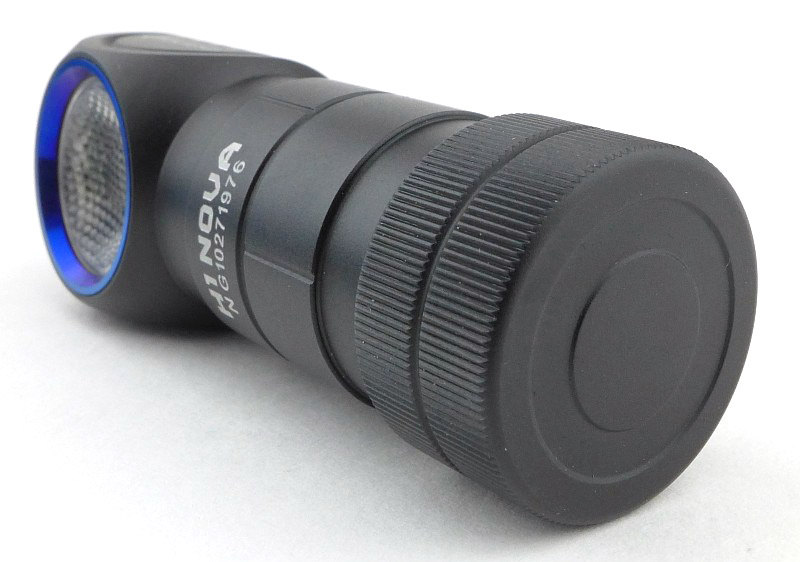
A TIR optic is used, but this also has a hexagonal diffuser pattern to give a flood beam to the XM-L2 LED.

On the top of the H1 is its rubber power switch. This is an electronic click switch.
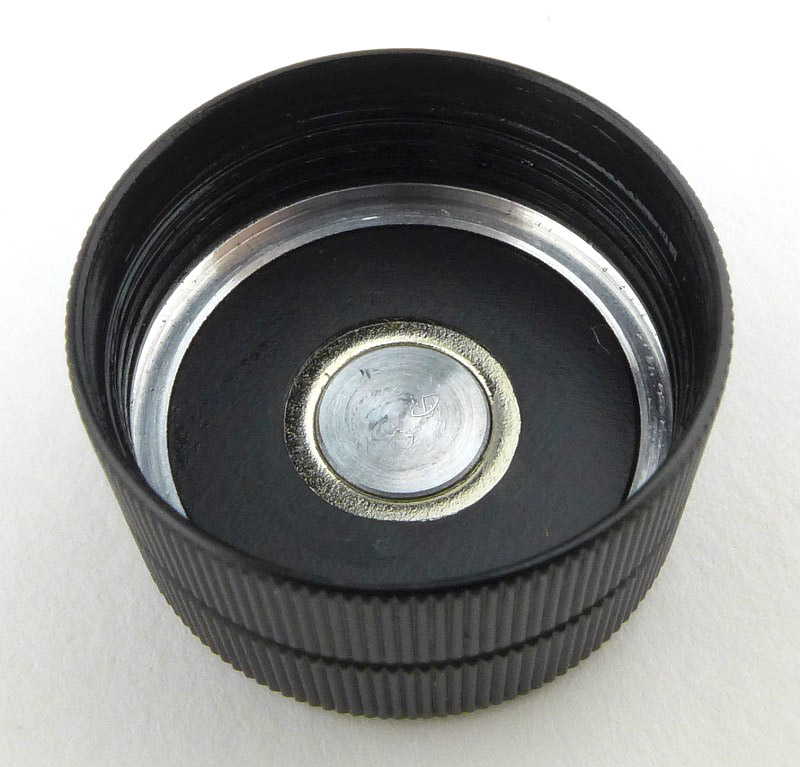
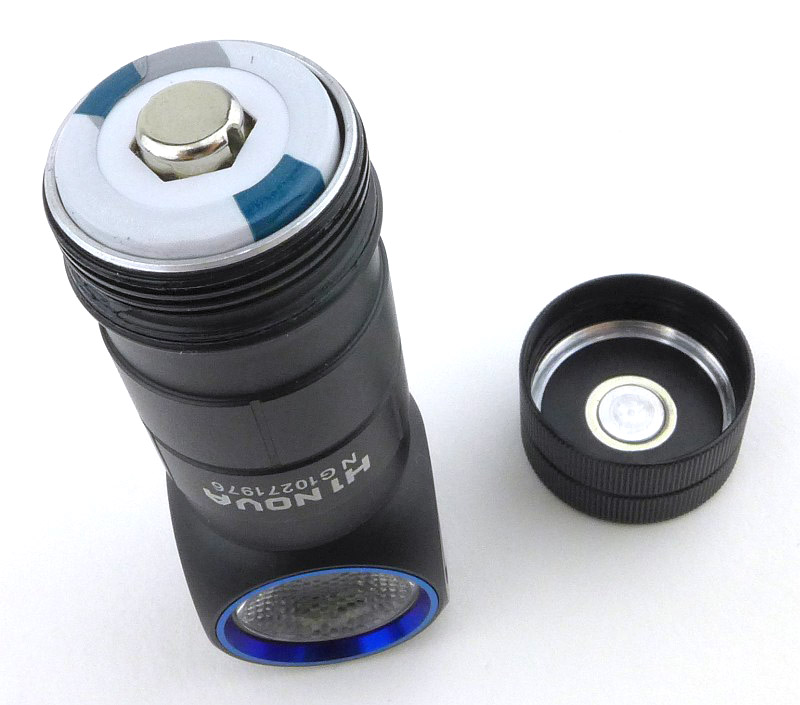
A plain tail-cap has a hidden magnet.
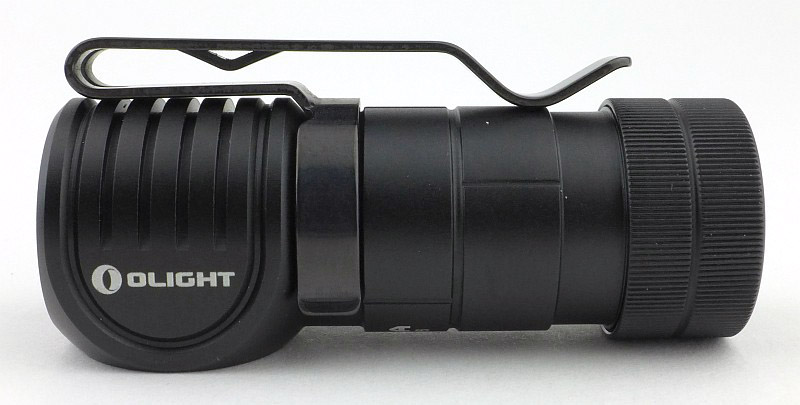
Though designed as a headlamp, the H1 also has a pocket clip that can be fitted either way up into one of the two grooves in the body.
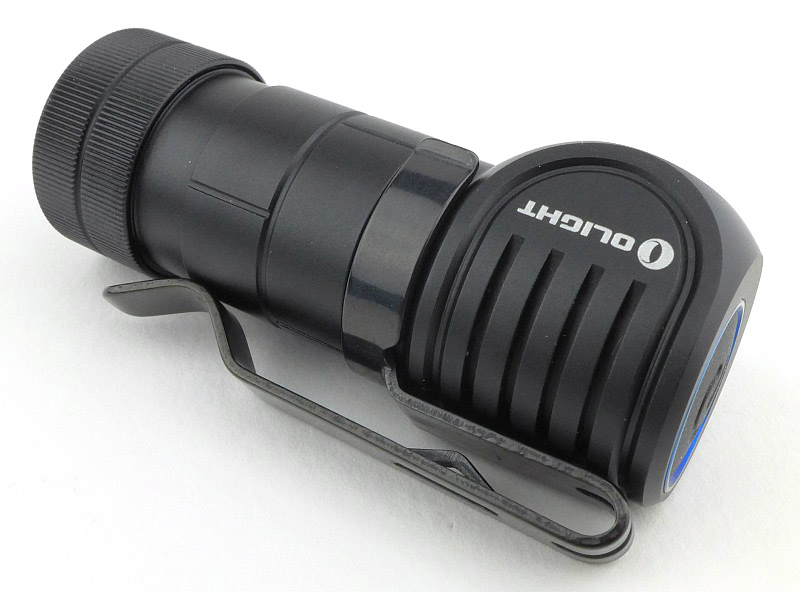
It is a deep carry type of clip with a secondary ‘catch’ to help it hold onto a pocket edge.
When it arrives, the H1 has a CR123 fitted inside it, but there is also a plastic insulator to stop the H1 from coming on, or having any parasitic drain.
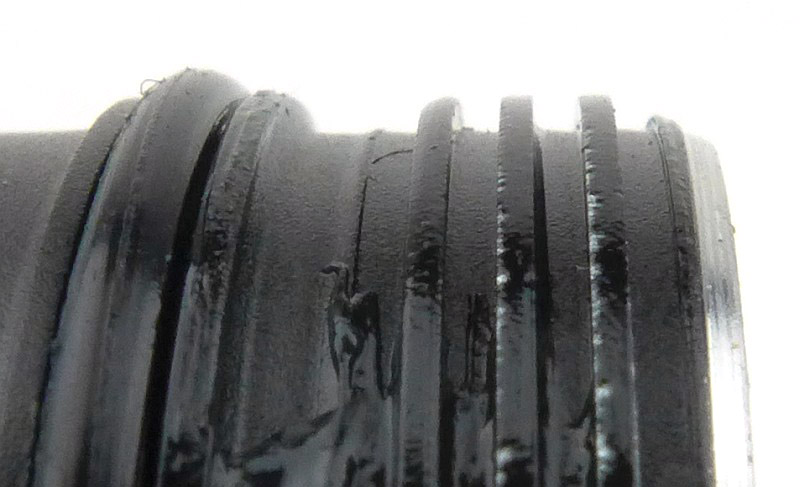
The threads are square cut. In this case there is some chipping to the anodised finish on one side of the thread.
Inside, the tail-cap looks very simple. This is actually the positive contact so doesn’t have a spring. Surrounding the aluminium terminal, there is a ring of the tail-cap magnet visible.
With the less conventional “negative into the tube” contact arrangement, there is a negative terminal spring contact inside the battery tube.
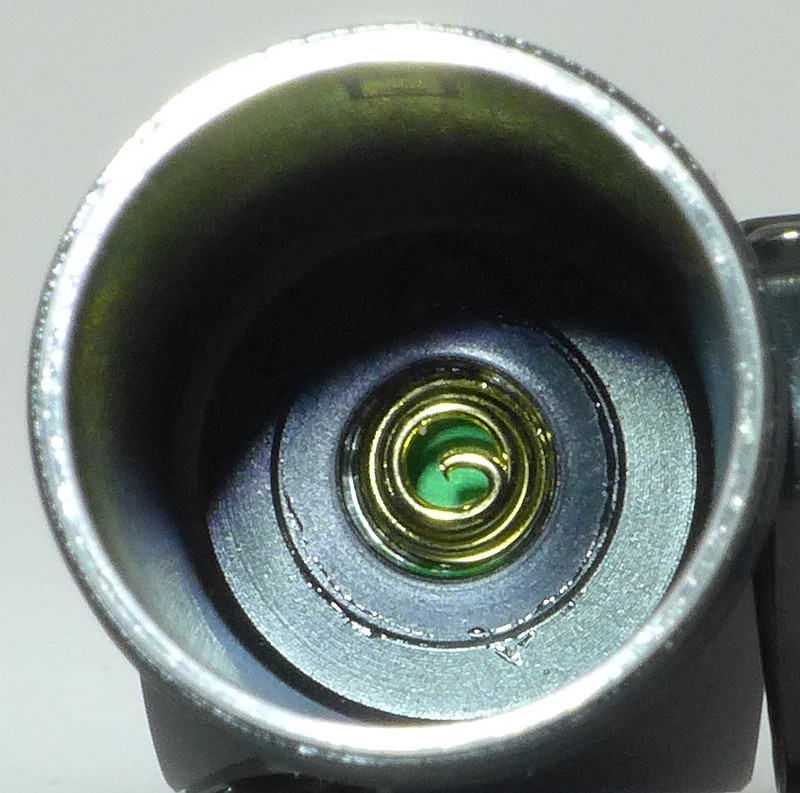
To remind you which way the battery goes in there is a guide marker inside the battery tube.

Refitting the cell after removing the transit insulator, the unconventional cell orientation has the positive terminal of the cell visible.
And we are ready to go.
With the NW and CW versions on test we can compare the beam tint in the next section.
The beam
Please be careful not to judge tint based on images you see on a computer screen. Unless properly calibrated, the screen itself will change the perceived tint.
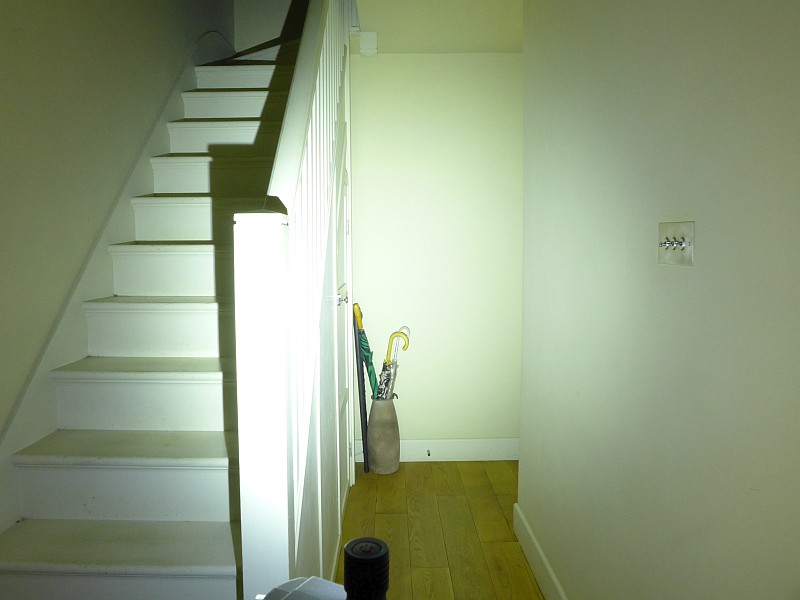
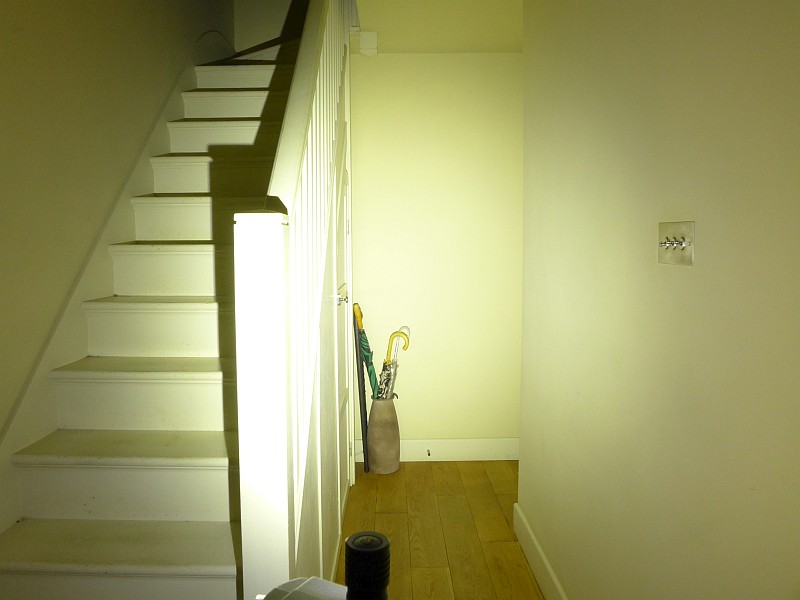
The indoor beamshot is intended to give an idea of the beam shape/quality rather than tint. All beamshots are taken using daylight white balance. The woodwork (stairs and skirting) are painted Farrow & Ball “Off-White”, and the walls are a light sandy colour called ‘String’ again by Farrow & Ball. I don’t actually have a ‘white wall’ in the house to use for this, and the wife won’t have one!
In this first beamshot we have the CW version. All beamshot photos are taken with daylight white balance set. Of particular note is how wide the beam is, an excellent flood beam which, although it has a hotspot, this hotspot is large and surrounded by a super wide spill.
Now the NW version and the tint is significantly warmer than the CW and gentler on the eye.
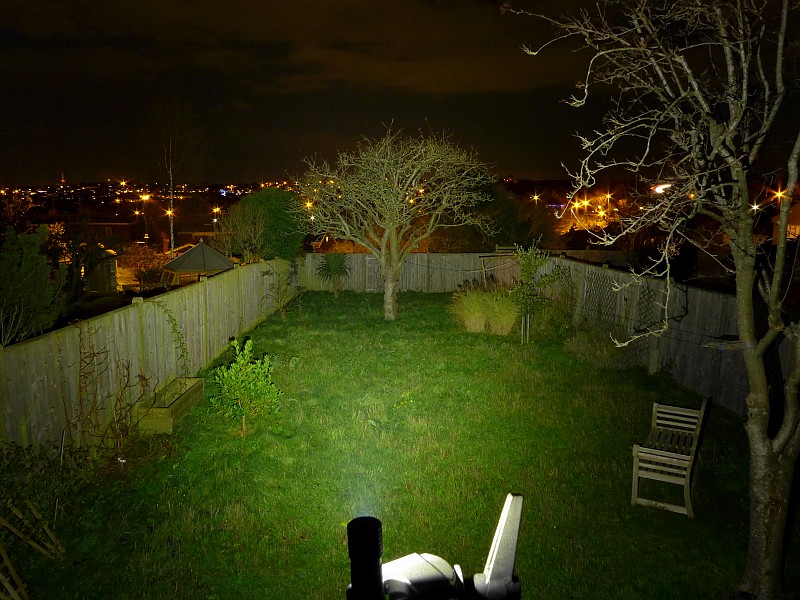
Taking them outdoors, and back to the CW.

I didn’t quite get the beam alignment the same for these comparison photos, but the NW version appears to have a better reach.
Modes and User Interface:
There are five constant modes, Moon, Low, Medium, High and Turbo, plus an SOS mode. Access to these is controlled via the single electronic click switch.
To turn the H1 ON to the last used output level, click the switch once. Click again to turn OFF.
Note: Turbo is only memorised for 10 minutes after which is changes to Medium, and SOS is not memorised.
To change the output level, when ON, press and hold the switch to cycle through Moon (or Turbo), Low, Medium, High, Low etc.
Note: ‘normal’ brightness levels are Low, Medium and High.
For Moon mode, from OFF, press and hold the switch for 1s and the H1 will turn ON to Moon mode. This level is memorised.
For Turbo, from ON or OFF, rapidly double tap the switch. Double tap the switch again to change to the memorised output level.
For SOS, from ON or OFF, rapidly triple tap the switch. To exit SOS carry out any action with the side switch.
The H1 also has an electronic lockout to protect against accidental activation. To LOCK the H1, from OFF, press and hold the switch for 2s. After 1s the H1 will enter Moon mode, but continuing to hold the switch and the moon mode goes off again. The H1 is now Locked Out.
While locked, pressing and holding the switch for less than 1s will activate Moon mode momentarily, going off as soon as the switch is released. Holding it for 2s or more will unlock the H1.
To UNLOCK the H1, press and hold the switch for 2s or more. The Moon mode output will blink briefly to indicate it is unlocked and the H1 will be on in Moon mode.
With the anodised tail-cap threads there is also the option of a mechanical lockout by unscrewing the tail-cap 1/4 to 1/2 turn.
Batteries and output:
The H1 Nova runs on CR123 or RCR123.
To measure actual output, I built an integrating sphere. See here for more detail. The sensor registers visible light only (so Infra-Red and Ultra-Violet will not be measured).
Please note, all quoted lumen figures are from a DIY integrating sphere, and according to ANSI standards. Although every effort is made to give as accurate a result as possible, they should be taken as an estimate only. The results can be used to compare outputs in this review and others I have published.
| ___________________________________________ | ________________________________ | ________________________________ |
| Olight H1 Nova Version using specified cell. | I.S. measured ANSI output Lumens | PWM frequency or Strobe frequency (Hz) |
| ___________________________________________ | ________________________________ | ________________________________ |
| Cool White Turbo – AW RCR123 | 575 | 0 |
| Cool White Turbo – CR123 | 308 | 0 |
| Cool White High – AW RCR123 | 193 | 0 |
| Cool White Medium – AW RCR123 | 70 | 0 |
| Cool White Low – AW RCR123 | 14 | 0 |
| Cool White Moon – AW RCR123 | 2 | 0 |
| Neutral White Turbo – AW RCR123 | 560 | 0 |
| Neutral White High – AW RCR123 | 190 | 0 |
| Neutral White Medium – AW RCR123 | 70 | 0 |
| Neutral White Low – AW RCR123 | 14 | 0 |
| Neutral White Moon – AW RCR123 | 2 | 0 |
There is parasitic drain but it is low. When using CR123, the drain was 19.6uA (8.15 years to drain the cell) and when using RCR123, the drain was 23.6uA (3.63 years to drain the cell).
Initially looking at just the first part of the three runtime traces shown in the graph, and the first observation is that the H1 does not achieve full output on CR123 instead requiring a RCR123 for the full 500+ lm. Also note that for the maximum Turbo output the H1 is quite sensitive to the cell condition with the CW run only managing about 45s on Turbo before dropping to High, but the NW taking this to the full 3 minutes of Turbo before ramping down to High. There is more to discuss on this in the full length runtime graph.
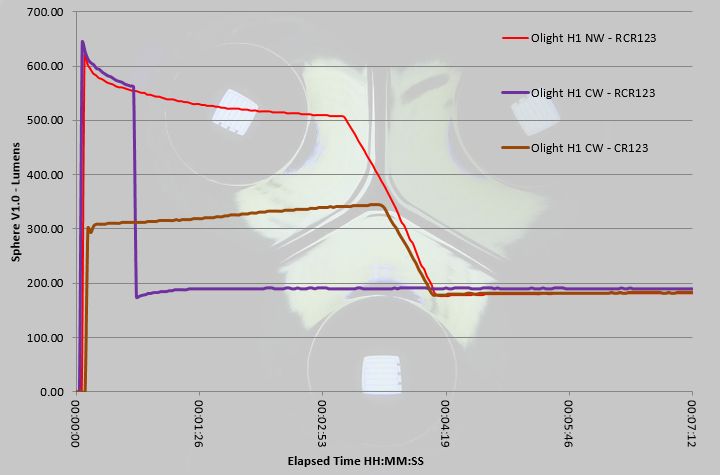
Picking up from the previous comment, where the CW only ran at Turbo for 45s (possibly indicating a cell that was not fully charged) it actually managed a slightly longer runtime than the NW (which had the full 3 minutes of Turbo), so in reality the cell had the same level of charge, but the CW terminated Turbo earlier.
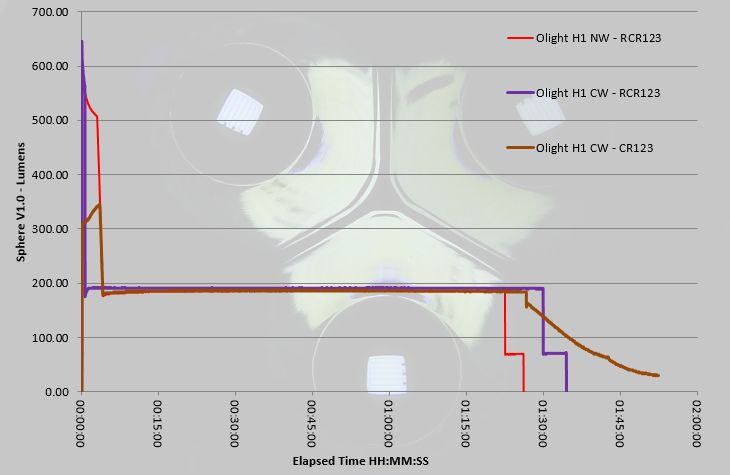
Also note that the supplied CR123 has managed approximately the same overall output (though it does tail off and gives a longer total runtime). What is important to note is that when using the RCR123, it’s protection kicks in and the output of the H1 does cut out completely around 5 minutes after dropping down to Medium. If used on Medium for long periods, you won’t have any warning a RCR123 is running low, it will just cut out.
Troubleshooting
This section is included to mention any minor niggles I come across during testing, in case the information helps anyone else.
No issues were encountered during testing.
As per the description of this section, this information is provided in case anyone else finds a similar ‘issue’ that might be fixed in the same way.
The H1 Nova in use
Honestly, before trying out the H1 Nova, I was never a fan of 1xCR123 headlamps. The reasons for this were that many would only work with primary cells (I definitely want the option of rechargeable), and the interface/beam/runtime never seemed a good fit to my needs.
Personally, the critical aspects in a headlamp are no PWM, a flood beam, direct access to moon mode, plus a comfortable headband. Add to this easy conversion to a pocket lamp, and the ability to use rechargeable cells, and you have a winning formula.
Though I prefer rechargeable cells, you often have the issue that output can shut off completely if the protection circuit kicks in. Unfortunately the H1 does have this slight issue, and it can be very disorienting to suddenly lose all light. As the H1 will drop from High to Medium when a RCR123 is getting low, if you are already on Medium, then you don’t get that warning and it will just go off. Using a primary cell completely removes this problem, so depending on your type of use you can pick the cell to suit.
With the switch being very low profile, which helps avoid accidental activation, I have found it difficult to operate reliably. When you don’t hit the middle of the button, but are more to the side, the click is not clean, or might not click at all. As soon as you find the middle of the button, it has a very precise action and works perfectly. Mounted on your head, finding that sweet spot on the button is not always easy, and if wearing gloves, forget it, so the compact design can work against the H1 in this way.
The beamshots really do speak for themselves, and the H1 has a beam that is so easy to get on with. A headlamp is predominately a task light, and when you are carrying out a task you don’t want to have to ‘point’ the beam with your head. When using the H1 as a headlamp you can just focus on the task in hand, and the fact the H1 pretty much disappears from your awareness is the signal it is working really well.
It is great that the H1 is capable of the Turbo output, however, I find that this is rarely used, it is just too bright for anything within arms reach. Moon mode is an essential, and the Low and Medium levels are just right for the vast majority of my needs. If out walking with it, I will use High sometimes when I want that bit more range, but even then Medium is my go-to level.
There is one feature I hadn’t really noticed that much, the gradual brightness changes: When turned on/off on medium, high, and turbo modes, it will turn on or off gradually. This mimics the characteristics of incan bulbs that have to heat up and cool down, making it much kinder to the eyes; Thank you Olight. The reason I hadn’t noticed this much was due to mainly using Low and Medium where the effect is less noticeable. It is more significant with the High and Turbo modes, and does make a difference.
I wouldn’t normally bother to mention the magnetic tail-cap except in passing, but I would like to make a point with the H1, to say that the strength of the magnet is one of the best I’ve come across. Often a magnetic tail-cap can be too aggressive and end up sticking to everything, yet with the H1 it is sufficient to hold the light where you put it, without ‘grabbing’ everything incessantly.
Considering this is based on the excellent S1 Baton, my one slight disappointment is that the parasitic drain is much higher. OK, it is only 20uA, but the S1 is 1uA. Parasitic drain is pure waste, especially with primary cells, so I’d have hoped to see this at the same level as the S1 instead of 20x more.
This does lead me to prefer using the mechanical lockout as this does kill the drain completely, but also the electronic lockout is not ideal to prevent accidental activation as this is too easy to unlock, and if squashed in a bag or pocket, it is very likely the button will be pressed for 2s or more.
Converting the H1 between headlamp and pocket light is very easy, and getting the light out of the rubber mount is no struggle at all. Regular fitting and removal of the pocket clip will mar the anodised finish, but there is not much that could be done about that, so you decide if you want to convert it to and from. I find it most useful as a headlamp, and a bit on the small and lose-able size when taken out of the mount.
So, overall I’ve been won round by this CR123 headlamp, which has been helped by how easy it is to carry (living in my coat pocket), by its very usable interface, the excellent beam, and comfort. There have been far fewer battery changes than I expected, so its practicality has been proven.
Review Summary
| _______________________________________________ | _______________________________________________ |
| Things I like | What doesn’t work so well for me |
| _______________________________________________ | _______________________________________________ |
| Compact and easy to carry. | Though low, the parasitic drain is much higher than the S1 Baton. |
| Excellent flood beam. | Electronic lockout too easy to unlock. |
| Runs on CR123 and RCR123. | When used on RCR123 the cell protection is ultimately triggered, cutting the output completely. |
| Direct access to Moon mode (and Turbo). | Sometimes difficult to press the switch in the right spot. |
| Very functional UI. | |
| Useful level selection. | |
| Soft ON/OFF is easy on the eyes. |
Discussing the Review:
The ideal place to discuss this reviews is on a forum. If you started reading the shorter forum version of the review, but followed the link this full exclusive review, please return to that forum to discuss the review there.
If you read the review entirely on Tactical Reviews, please consider one of the following to join in any discussion.
CandlePowerForums – Flashlight Reviews Section (Largest and Friendliest Flashlight Community Forum)
EdgeMatters – Sponsored Reviews (UK based Forum for Knife Makers and Collectors)
